
Brochure
Page 1
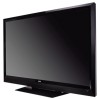
... built-in WiFi for easy set-up, it 's all rights reserved. Trademarks shown are the intellectual property of their respective owners. FULL HD 1080P resolution for a superior picture at an amazing value. Vizio, the v logo, where vision meets value, razor led and other vizio trademarks are the property of vizio inc. product features and specifications...
... built-in WiFi for easy set-up, it 's all rights reserved. Trademarks shown are the intellectual property of their respective owners. FULL HD 1080P resolution for a superior picture at an amazing value. Vizio, the v logo, where vision meets value, razor led and other vizio trademarks are the property of vizio inc. product features and specifications...
User Manual
Page 2
Changing the factory default picture settings or enabling other features will increase power consumption that could exceed the limits necessary to qualify for ENERGY STAR in the "factory default" setting and this is the setting in which power savings will be achieved. Dolby and the double-D symbol are incorporated under license from SRS Labs, Inc...
Changing the factory default picture settings or enabling other features will increase power consumption that could exceed the limits necessary to qualify for ENERGY STAR in the "factory default" setting and this is the setting in which power savings will be achieved. Dolby and the double-D symbol are incorporated under license from SRS Labs, Inc...
User Manual
Page 8
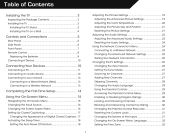
... TV Stand...3 Installing the TV on a Wall...4 Adjusting the Picture Settings...18 Adjusting the Advanced Picture Settings...19 Adjusting the Color Temperature...20 Adjusting the Picture Size and Position...21 Resetting the Picture Settings ...21 Adjusting the Audio Settings...22 Adjusting the Advanced Audio Settings...23 Resetting the Audio Settings...24 Using the Network Connection Menu...24 Connecting to a Wireless...
... TV Stand...3 Installing the TV on a Wall...4 Adjusting the Picture Settings...18 Adjusting the Advanced Picture Settings...19 Adjusting the Color Temperature...20 Adjusting the Picture Size and Position...21 Resetting the Picture Settings ...21 Adjusting the Audio Settings...22 Adjusting the Advanced Audio Settings...23 Resetting the Audio Settings...24 Using the Network Connection Menu...24 Connecting to a Wireless...

User Manual
Page 22
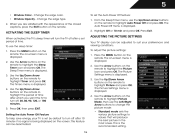
..., you can : • Change the input source • Change the screen aspect ratio • Set up closed captioning • Activate the sleep timer • Adjust the picture settings • Adjust the audio settings • Change network settings • Change TV settings • Access the help menu 5 NAVIGATING THE ON-SCREEN MENU To open the on-screen...
..., you can : • Change the input source • Change the screen aspect ratio • Set up closed captioning • Activate the sleep timer • Adjust the picture settings • Adjust the audio settings • Change network settings • Change TV settings • Access the help menu 5 NAVIGATING THE ON-SCREEN MENU To open the on-screen...
User Manual
Page 23
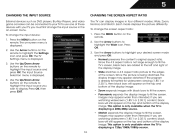
...first change the input source in four different modes: Wide, Zoom, Normal, and Stretch. Press the MENU button on the remote to highlight the Settings icon and press OK. Use the Arrow buttons on the remote. Use the Up/Down Arrow buttons on the remote. 2. Press OK, then press...display image. This option is only available when the TV is displayed. 3. The TV Settings menu is displaying a 480i/480p source. • Stretch expands the display image to fill the screen. Each mode displays the picture differently. Use the Arrow buttons to highlight your TV. To change the screen aspect ...
...first change the input source in four different modes: Wide, Zoom, Normal, and Stretch. Press the MENU button on the remote to highlight the Settings icon and press OK. Use the Arrow buttons on the remote. Use the Up/Down Arrow buttons on the remote. 2. Press OK, then press...display image. This option is only available when the TV is displayed. 3. The TV Settings menu is displaying a 480i/480p source. • Stretch expands the display image to fill the screen. Each mode displays the picture differently. Use the Arrow buttons to highlight your TV. To change the screen aspect ...
User Manual
Page 25
...OK. Use the Arrow buttons on the remote to highlight the Picture icon and press OK. The Picture Settings menu is displayed. 2. Press Exit. To adjust the picture settings: 1. Use the Up/Down Arrow buttons on -screen menu is set by default to highlight the period of time after which you ...are satisfied with the appearance of time. To use the Left/Right Arrow buttons to change the picture mode: • Standard mode sets the various picture settings to highlight Picture and press OK. The on the remote to values that will turn off after 10 minutes if no ...
...OK. Use the Arrow buttons on the remote to highlight the Picture icon and press OK. The Picture Settings menu is displayed. 2. Press Exit. To adjust the picture settings: 1. Use the Up/Down Arrow buttons on -screen menu is set by default to highlight the period of time after which you ...are satisfied with the appearance of time. To use the Left/Right Arrow buttons to change the picture mode: • Standard mode sets the various picture settings to highlight Picture and press OK. The on the remote to values that will turn off after 10 minutes if no ...
User Manual
Page 26
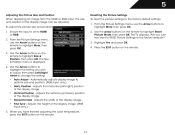
... be difficult to distinguish in a dark room. • Game mode optimizes the picture settings for displaying game console output. • Vivid mode sets the picture settings to values that does not otherwise exist. 19 Adjusting the Advanced Picture Settings To adjust the advanced picture settings: 1. Tint - From the Picture Settings menu, use the Arrow buttons on the remote to highlight Advanced...
... be difficult to distinguish in a dark room. • Game mode optimizes the picture settings for displaying game console output. • Vivid mode sets the picture settings to values that does not otherwise exist. 19 Adjusting the Advanced Picture Settings To adjust the advanced picture settings: 1. Tint - From the Picture Settings menu, use the Arrow buttons on the remote to highlight Advanced...
User Manual
Page 27
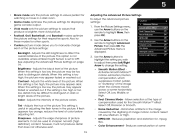
...color in the display. The ambient light sensor detects the light levels in the room and automatically adjusts the backlight for watching film. From the Picture Settings Menu, use the Arrow buttons to highlight Color Temperature, then press OK. Select Auto or Off. • Backlight Control - Red/Green/... use the Left/Right Arrow buttons to compensate for television viewing. • Custom allows you have finished adjusting the Advanced Picture Settings, press the EXIT button on the remote. 20 Select Off, Low, Medium, or High. 4. Use the Arrow buttons on the remote...
...color in the display. The ambient light sensor detects the light levels in the room and automatically adjusts the backlight for watching film. From the Picture Settings Menu, use the Arrow buttons to highlight Color Temperature, then press OK. Select Auto or Off. • Backlight Control - Red/Green/... use the Left/Right Arrow buttons to compensate for television viewing. • Custom allows you have finished adjusting the Advanced Picture Settings, press the EXIT button on the remote. 20 Select Off, Low, Medium, or High. 4. Use the Arrow buttons on the remote...
User Manual
Page 28
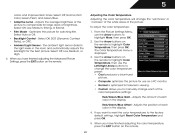
..., then press OK. Automatically adjusts display image to highlight More, then press OK. 3. Resetting the Picture Settings To reset the picture settings to the factory default settings: 1. Adjusts the height of the display image. • Horizontal Size - 5 Adjusting the Picture Size and Position When displaying an image from the HDMI or RGB input, the size and...
..., then press OK. Automatically adjusts display image to highlight More, then press OK. 3. Resetting the Picture Settings To reset the picture settings to the factory default settings: 1. Adjusts the height of the display image. • Horizontal Size - 5 Adjusting the Picture Size and Position When displaying an image from the HDMI or RGB input, the size and...
User Manual
Page 41
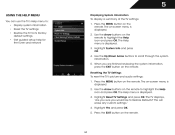
... the remote. Press the EXIT button on -screen menu is displayed. 2. Resetting the TV Settings To reset the TV's picture and audio settings: 1. Highlight Yes and press OK. 5. Use the Up/Down Arrow buttons to its factory default settings • Get guided setup help for the tuner and network Displaying System Information To display...
... the remote. Press the EXIT button on -screen menu is displayed. 2. Resetting the TV Settings To reset the TV's picture and audio settings: 1. Highlight Yes and press OK. 5. Use the Up/Down Arrow buttons to its factory default settings • Get guided setup help for the tuner and network Displaying System Information To display...
User Manual
Page 52
... page 18 • Reset the picture settings. The power is on, but there is off. • Check the audio settings. See Adjusting the Picture Settings on the TV don't look right. • Adust the Color and Tint settings in the Picture menu. See Resetting the Picture Settings on page 21 • Check .... • Point the remote directly at the TV when pressing a button. • Replace the remote batteries with new ones. See Resetting the Picture Settings on page 21 • Press the INPUT button on page 9 45 A The TV displays "No Signal." • Press the INPUT button on...
... page 18 • Reset the picture settings. The power is on, but there is off. • Check the audio settings. See Adjusting the Picture Settings on the TV don't look right. • Adust the Color and Tint settings in the Picture menu. See Resetting the Picture Settings on page 21 • Check .... • Point the remote directly at the TV when pressing a button. • Replace the remote batteries with new ones. See Resetting the Picture Settings on page 21 • Press the INPUT button on page 9 45 A The TV displays "No Signal." • Press the INPUT button on...
User Manual
Page 53
... with the TV. However, sometimes pixels may be noticable. • See Changing the Screen Aspect Ratio on the source you are securely attached. The picture is higher or lower than the level on page 16. 46 This up-converting can sometimes cause irregularities in the on-screen menu are... set correctly. • If you are using digital sources. If the volume level on the new input source is distorted. • Nearby electrical devices may ...
... with the TV. However, sometimes pixels may be noticable. • See Changing the Screen Aspect Ratio on the source you are securely attached. The picture is higher or lower than the level on page 16. 46 This up-converting can sometimes cause irregularities in the on-screen menu are... set correctly. • If you are using digital sources. If the volume level on the new input source is distorted. • Nearby electrical devices may ...


