Brochure
Page 1
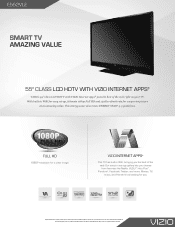
... 03072012 This energy saver also meets ENERGY STAR® 5.3 guidelines. all waiting for illustration purposes only. Images used are subject to use app gallery lets you . E552VLE SMART TV AMAZING VALUE 55" CLASS LCD HDTV WITH VIZIO INTERNET APPS® VIZIO's 55" Class LCD HDTV with VIZIO Internet Apps® puts the best of their respective owners.
... 03072012 This energy saver also meets ENERGY STAR® 5.3 guidelines. all waiting for illustration purposes only. Images used are subject to use app gallery lets you . E552VLE SMART TV AMAZING VALUE 55" CLASS LCD HDTV WITH VIZIO INTERNET APPS® VIZIO's 55" Class LCD HDTV with VIZIO Internet Apps® puts the best of their respective owners.
Brochure
Page 2
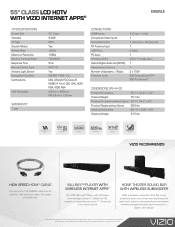
.... product features and specifications are the intellectual property of their respective owners. BLU-RAY™ PLAYER WITH WIRELESS INTERNET APPS® The VIZIO Blu-ray™ Player with table-stand or wallmount options, this powerful sound system delivers exceptional audio performance in -... (WiFi) Optical Digital Audio Out (SPDIF) Headphones (3.5mm) Number of surround sound. 55" CLASS LCD HDTV WITH VIZIO INTERNET APPS® E552VLE TV SPECIFICATIONS Screen Size Viewable TV Type Smooth Motion Refresh Rate Maximum Resolution Dynamic Contrast Ratio Response Time Remote Control Type...
.... product features and specifications are the intellectual property of their respective owners. BLU-RAY™ PLAYER WITH WIRELESS INTERNET APPS® The VIZIO Blu-ray™ Player with table-stand or wallmount options, this powerful sound system delivers exceptional audio performance in -... (WiFi) Optical Digital Audio Out (SPDIF) Headphones (3.5mm) Number of surround sound. 55" CLASS LCD HDTV WITH VIZIO INTERNET APPS® E552VLE TV SPECIFICATIONS Screen Size Viewable TV Type Smooth Motion Refresh Rate Maximum Resolution Dynamic Contrast Ratio Response Time Remote Control Type...
User Manual
Page 1
MODELS MODELS // E3D320VX // E3D420VX // E3D470VX E422VLE E472VLE E552VLE USER GUIDE INSTALLING YOUR NEW TV CONTROLS & CONNECTIONS CONNECTING YOUR DEVICES USING THE ON-SCREEN MENU USING THE USB MEDIA PLAYER USING VIZIO INTERNET APPS TROUBLESHOOTING & SUPPORT HELP, SPECS, WARRANTY & LEGAL
MODELS MODELS // E3D320VX // E3D420VX // E3D470VX E422VLE E472VLE E552VLE USER GUIDE INSTALLING YOUR NEW TV CONTROLS & CONNECTIONS CONNECTING YOUR DEVICES USING THE ON-SCREEN MENU USING THE USB MEDIA PLAYER USING VIZIO INTERNET APPS TROUBLESHOOTING & SUPPORT HELP, SPECS, WARRANTY & LEGAL
User Manual
Page 9
Adjusting the CEC Settings...33 Turning the VIZIO Logo On or Off...33 Using the Help Menu...34 Displaying System Information...34 Resetting the TV Settings...34 Restoring the TV to Factory Default ... Playing USB Media...37 Using the VIA Shortcut Buttons...40 Using the VIA Dock...40 Moving an App on the VIA Dock...40 Using VIZIO Internet Apps...40 Adding a New App to the VIA Dock...41 Removing an App from the VIA Dock...41 Creating and Managing User Profiles...41 Creating an Owner PIN...41...
Adjusting the CEC Settings...33 Turning the VIZIO Logo On or Off...33 Using the Help Menu...34 Displaying System Information...34 Resetting the TV Settings...34 Restoring the TV to Factory Default ... Playing USB Media...37 Using the VIA Shortcut Buttons...40 Using the VIA Dock...40 Moving an App on the VIA Dock...40 Using VIZIO Internet Apps...40 Adding a New App to the VIA Dock...41 Removing an App from the VIA Dock...41 Creating and Managing User Profiles...41 Creating an Owner PIN...41...
User Manual
Page 15
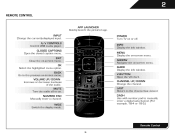
... manually enter a digital sub-channel. (For example, 18-4 or 18-5.) Remote Control 8 INPUT Change the currently-displayed input. MUTE Turn the audio off . 2 REMOTE CONTROL APP LAUNCHER Quickly launch the pictured app. OK Select the highlighted menu option.
... manually enter a digital sub-channel. (For example, 18-4 or 18-5.) Remote Control 8 INPUT Change the currently-displayed input. MUTE Turn the audio off . 2 REMOTE CONTROL APP LAUNCHER Quickly launch the pictured app. OK Select the highlighted menu option.
User Manual
Page 21
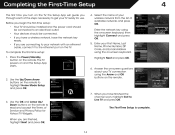
... the OK and Arrow Up/ Down buttons on the remote. When you are connecting to your TV connection using the on the TV, the Setup App will guide you through each of available networks and press OK. Press the Power/Standby button on the remote to the ethernet port on the.... 14 Select the name of Service and Privacy Policy for use. Enter the network key using the Arrow and OK buttons on and the Setup App starts. 4. TV Widgets. Completing the First-Time Setup The first time you turn on -screen keyboard, then highlight Connect and press OK. 5. Before you begin...
... the OK and Arrow Up/ Down buttons on the remote. When you are connecting to your TV connection using the on the TV, the Setup App will guide you through each of available networks and press OK. Press the Power/Standby button on the remote to the ethernet port on the.... 14 Select the name of Service and Privacy Policy for use. Enter the network key using the Arrow and OK buttons on and the Setup App starts. 4. TV Widgets. Completing the First-Time Setup The first time you turn on -screen keyboard, then highlight Connect and press OK. 5. Before you begin...
User Manual
Page 39
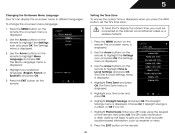
... Language and press OK. Use the Arrow buttons on the remote. Setting the Time Zone To ensure the correct time is often used by VIA Apps to give you must be connected to highlight the Settings icon and press OK. Press the MENU button on the remote to the internet via...
... Language and press OK. Use the Arrow buttons on the remote. Setting the Time Zone To ensure the correct time is often used by VIA Apps to give you must be connected to highlight the Settings icon and press OK. Press the MENU button on the remote to the internet via...
User Manual
Page 42
... network. 5. The TV displays, "Are you sure you have made to your parental control passcode. The TV will begin. Using Guided Setup The TV's Setup App can be reset to its factory default settings: 1. To access guided setup: 1. Set up a parental passcode, enter the default, 0000. Network Setup - Follow the on...
... network. 5. The TV displays, "Are you sure you have made to your parental control passcode. The TV will begin. Using Guided Setup The TV's Setup App can be reset to its factory default settings: 1. To access guided setup: 1. Set up a parental passcode, enter the default, 0000. Network Setup - Follow the on...
User Manual
Page 44
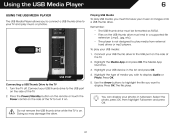
Highlight your USB device in fullscreen. Connect your USB thumb drive to the USB port on the side of the TV. 2. Press OK. The Media App launches. 3. Turn the TV off. Select the photo, press OK, then highlight Fullscreen and press OK. Connect your USB thumb drive to the USB port .... • Files on the USB thumb drive must first save your TV and play media from external hard drives or mp3 players. Highlight the Media App and press OK. Highlight the type of the TV to your music or images onto a USB thumb drive. You can display your USB media: 1. Using...
Highlight your USB device in fullscreen. Connect your USB thumb drive to the USB port on the side of the TV. 2. Press OK. The Media App launches. 3. Turn the TV off. Select the photo, press OK, then highlight Fullscreen and press OK. Connect your USB thumb drive to the USB port .... • Files on the USB thumb drive must first save your TV and play media from external hard drives or mp3 players. Highlight the Media App and press OK. Highlight the type of the TV to your music or images onto a USB thumb drive. You can display your USB media: 1. Using...
User Manual
Page 47
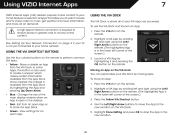
...VIA Dock You can personalize your TV. Moving an App on the remote. (The highlighted App is in the lower left and right using the Left/ Right Arrow buttons on the remote. Using VIZIO Internet Apps VIZIO Internet Apps (VIA) delivers popular online content to your VIA ...Dock by moving Apps. Highlight a VIA App by scrolling left corner of the main display window when an App is available from the App Dock. Press the Yellow VIA Shortcut ...
...VIA Dock You can personalize your TV. Moving an App on the remote. (The highlighted App is in the lower left and right using the Left/ Right Arrow buttons on the remote. Using VIZIO Internet Apps VIZIO Internet Apps (VIA) delivers popular online content to your VIA ...Dock by moving Apps. Highlight a VIA App by scrolling left corner of the main display window when an App is available from the App Dock. Press the Yellow VIA Shortcut ...
User Manual
Page 48
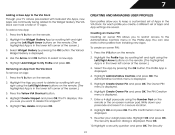
...the screen.) 3. To create an owner PIN: 1. Press the V Button on the remote. 2. Highlight OK and press OK. Removing an App from installing new Apps. Creating an Owner PIN Creating an owner PIN allows you want to the Administrative Controls menu in a secure location. 8. The VIA Dock can...to delete by scrolling left and right using the Left/Right Arrow buttons on the remote. (The highlighted App is in the lower left corner of Apps and App settings are continually being added to the Widget Gallery. The Administrative Controls menu is in the lower left ...
...the screen.) 3. To create an owner PIN: 1. Press the V Button on the remote. 2. Highlight OK and press OK. Removing an App from installing new Apps. Creating an Owner PIN Creating an owner PIN allows you want to the Administrative Controls menu in a secure location. 8. The VIA Dock can...to delete by scrolling left and right using the Left/Right Arrow buttons on the remote. (The highlighted App is in the lower left corner of Apps and App settings are continually being added to the Widget Gallery. The Administrative Controls menu is in the lower left ...
User Manual
Page 49
... QWERTY Keyboard and press OK. Enter your security answer using the QWERTY Keyboard on the remote or the on the remote. (The highlighted App is displayed. 5. Highlight Avatar and press OK. The Create Profile menu is displayed. 12. Re-enter your profile and press OK. ...the Name field and press OK. 7. Highlight OK and press OK. The Security Answer menu is displayed. 7 Answer menu is displayed. 4. The Profile App is displayed. 11. Press OK. 14. Highlight Create Profile and press OK. The PIN Creation menu is displayed. 16. Highlight a picture for your ...
... QWERTY Keyboard and press OK. Enter your security answer using the QWERTY Keyboard on the remote or the on the remote. (The highlighted App is displayed. 5. Highlight Avatar and press OK. The Create Profile menu is displayed. 12. Re-enter your profile and press OK. ...the Name field and press OK. 7. Highlight OK and press OK. The Security Answer menu is displayed. 7 Answer menu is displayed. 4. The Profile App is displayed. 11. Press OK. 14. Highlight Create Profile and press OK. The PIN Creation menu is displayed. 16. Highlight a picture for your ...
User Manual
Page 50
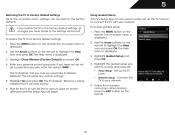
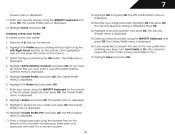
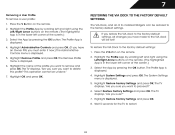
... it now.) The Administrative Controls menu is in the lower left corner of the profile you have made to the factory default settings. Select the App by pressing the OK button. The System Settings menu is displayed. 4. Highlight Restore Factory Settings and press OK. The TV displays, "Are you... OK. If you want to the factory-default settings, all of the screen.) 3. To restore the VIA Dock to restart. 43 The Profile App is in the lower left corner of its installed Widgets can be undone." 7. Select Restore Factory Settings and press OK. Highlight Remove Profile and ...
... it now.) The Administrative Controls menu is in the lower left corner of the profile you have made to the factory default settings. Select the App by pressing the OK button. The System Settings menu is displayed. 4. Highlight Restore Factory Settings and press OK. The TV displays, "Are you... OK. If you want to the factory-default settings, all of the screen.) 3. To restore the VIA Dock to restart. 43 The Profile App is in the lower left corner of its installed Widgets can be undone." 7. Select Restore Factory Settings and press OK. Highlight Remove Profile and ...


