
Brochure
Page 1
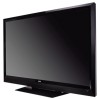
... your TV. E552VLE SMART TV AMAZING VALUE 55" CLASS LCD HDTV WITH VIZIO INTERNET APPS® VIZIO's 55" Class LCD HDTV with VIZIO Internet Apps® puts the best of their respective owners. Images used are subject to use app gallery lets you . rev 03072012 product features and specifications are for a clear image. FULL HD 1080P resolution for illustration purposes only. Our easy to change without notice...
... your TV. E552VLE SMART TV AMAZING VALUE 55" CLASS LCD HDTV WITH VIZIO INTERNET APPS® VIZIO's 55" Class LCD HDTV with VIZIO Internet Apps® puts the best of their respective owners. Images used are subject to use app gallery lets you . rev 03072012 product features and specifications are for a clear image. FULL HD 1080P resolution for illustration purposes only. Our easy to change without notice...
Brochure
Page 2
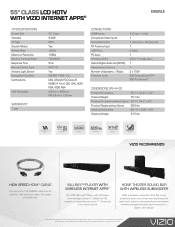
... WIRELESS INTERNET APPS® The VIZIO Blu-ray™ Player with table-stand or wallmount options, this powerful sound system delivers exceptional audio performance in -one 12ft HDMI® cable can be used are the intellectual property of surround sound. 55" CLASS LCD HDTV WITH VIZIO INTERNET APPS® E552VLE TV SPECIFICATIONS Screen Size Viewable TV Type Smooth Motion Refresh Rate Maximum Resolution Dynamic Contrast Ratio Response Time Remote Control Type Ambient Light Sensor Energy Star Qualified Certifications Wall Mountable WARRANTY...
... WIRELESS INTERNET APPS® The VIZIO Blu-ray™ Player with table-stand or wallmount options, this powerful sound system delivers exceptional audio performance in -one 12ft HDMI® cable can be used are the intellectual property of surround sound. 55" CLASS LCD HDTV WITH VIZIO INTERNET APPS® E552VLE TV SPECIFICATIONS Screen Size Viewable TV Type Smooth Motion Refresh Rate Maximum Resolution Dynamic Contrast Ratio Response Time Remote Control Type Ambient Light Sensor Energy Star Qualified Certifications Wall Mountable WARRANTY...
User Manual
Page 5
...remote control or injure the operator. If repair is used for moving your TV. • When unplugging your dealer and refer all servicing to persons. If any abnormality occurs. Continued use in this case may result in any servicing other moisture. - Pulling on the apparatus. • The mains plug... not use by qualified service personnel only. Opening or removing the back cover may expose you are qualified to do so. • T he lightning flash with instructions. If your TV will not be placed on the power cord may damage the wires inside the cord and ...
...remote control or injure the operator. If repair is used for moving your TV. • When unplugging your dealer and refer all servicing to persons. If any abnormality occurs. Continued use in this case may result in any servicing other moisture. - Pulling on the apparatus. • The mains plug... not use by qualified service personnel only. Opening or removing the back cover may expose you are qualified to do so. • T he lightning flash with instructions. If your TV will not be placed on the power cord may damage the wires inside the cord and ...
User Manual
Page 7
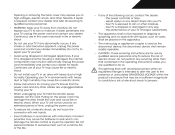
...-21) Ground Clamps Power Service Grounding Electrode System (NEC ART 250, part H) Electric Service Equipment Power Lines Do not locate the antenna near overhead light or power circuits, or where it is left unattended or unused for long periods of time, unplug the TV from the wall outlet and disconnect the antenna or cable system. Article 810 of the National Electrical Code, ANSI/NFPSA...
...-21) Ground Clamps Power Service Grounding Electrode System (NEC ART 250, part H) Electric Service Equipment Power Lines Do not locate the antenna near overhead light or power circuits, or where it is left unattended or unused for long periods of time, unplug the TV from the wall outlet and disconnect the antenna or cable system. Article 810 of the National Electrical Code, ANSI/NFPSA...
User Manual
Page 8
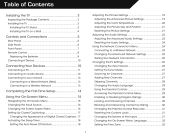
... the Tuner Mode...27 Scanning for Channels...27 Adding New Channels...27 Skipping Channels...28 Changing the Audio Language...29 Using the Parental Controls...29 Accessing the Parental Controls Menu...29 Enabling or Disabling Program Ratings...30 Locking and Unlocking Channels...30 Blocking and Unblocking Content by Rating...30 Changing the Parental Control Passcode...31 Resetting the Content Locks...31 Changing the Names of the Inputs...31 Changing the On-Screen Menu Language...32 Setting the Time Zone...32 1 Controls and Connections...5 Rear Panel...5 Side Panel...6 Front Panel...7 Remote...
... the Tuner Mode...27 Scanning for Channels...27 Adding New Channels...27 Skipping Channels...28 Changing the Audio Language...29 Using the Parental Controls...29 Accessing the Parental Controls Menu...29 Enabling or Disabling Program Ratings...30 Locking and Unlocking Channels...30 Blocking and Unblocking Content by Rating...30 Changing the Parental Control Passcode...31 Resetting the Content Locks...31 Changing the Names of the Inputs...31 Changing the On-Screen Menu Language...32 Setting the Time Zone...32 1 Controls and Connections...5 Rear Panel...5 Side Panel...6 Front Panel...7 Remote...
User Manual
Page 9
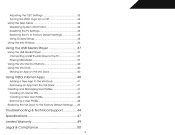
... VIZIO Logo On or Off...33 Using the Help Menu...34 Displaying System Information...34 Resetting the TV Settings...34 Restoring the TV to Factory Default Settings...35 Using Guided Setup...35 Using the Info Window...36 Using the USB Media Player...37 Using the USB Media Player...37 Connecting a USB Thumb Drive to the TV...37 Playing USB Media...37 Using the VIA Shortcut Buttons...40 Using the VIA Dock...40 Moving an App on the VIA Dock...40 Using VIZIO Internet...
... VIZIO Logo On or Off...33 Using the Help Menu...34 Displaying System Information...34 Resetting the TV Settings...34 Restoring the TV to Factory Default Settings...35 Using Guided Setup...35 Using the Info Window...36 Using the USB Media Player...37 Using the USB Media Player...37 Connecting a USB Thumb Drive to the TV...37 Playing USB Media...37 Using the VIA Shortcut Buttons...40 Using the VIA Dock...40 Moving an App on the VIA Dock...40 Using VIZIO Internet...
User Manual
Page 11
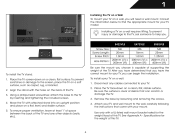
... a clean, flat, stable surface. E422VLE Screw Size: Screw Length: Screw Pitch: Hole Pattern: M6 20mm 1.0mm 200mm (V) x 200mm (H) E472VLE M6 16mm 1.0mm 200mm (V) x 400mm (H) E552VLE M8 25mm 1.25mm 200mm (V) x 400mm (H) To install the TV stand: 1. Using a philips-head screwdriver, attach the base to help you can scratch or damage the TV. 3. Place the TV screen-down on a wall: 1. Move the TV with your mount. Use only...
... a clean, flat, stable surface. E422VLE Screw Size: Screw Length: Screw Pitch: Hole Pattern: M6 20mm 1.0mm 200mm (V) x 200mm (H) E472VLE M6 16mm 1.0mm 200mm (V) x 400mm (H) E552VLE M8 25mm 1.25mm 200mm (V) x 400mm (H) To install the TV stand: 1. Using a philips-head screwdriver, attach the base to help you can scratch or damage the TV. 3. Place the TV screen-down on a wall: 1. Move the TV with your mount. Use only...
User Manual
Page 12
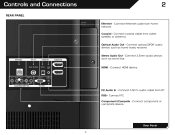
Connect optical/SPDIF audio device, such as sound bar. HDMI - Connect component or composite device. Coaxial - Connect coaxial cable from PC RGB - Connect PC Component/Compsite - Stereo Audio Out - Connect 3.5mm audio device, such as home audio receiver. Connect 3.5mm audio cable from cable, satellite, or antenna. 2 Optical Audio Out - Connect HDMI device. Rear Panel 5 Controls and Connections REAR PANEL Ethernet - PC Audio In - Connect ethernet cable from home network.
Connect optical/SPDIF audio device, such as sound bar. HDMI - Connect component or composite device. Coaxial - Connect coaxial cable from PC RGB - Connect PC Component/Compsite - Stereo Audio Out - Connect 3.5mm audio device, such as home audio receiver. Connect 3.5mm audio cable from cable, satellite, or antenna. 2 Optical Audio Out - Connect HDMI device. Rear Panel 5 Controls and Connections REAR PANEL Ethernet - PC Audio In - Connect ethernet cable from home network.
User Manual
Page 15
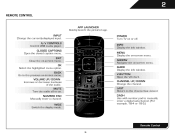
..., 18-4 or 18-5.) Remote Control 8 MUTE Turn the audio off . V BUTTON Open the VIA dock. MENU Display the on -screen menu. ARROW Navigate the on . DASH Use with number pad to the previous on-screen menu. INPUT Change the currently-displayed input. INFO Display the info window. CHANNEL UP/DOWN Change the channel. CLOSED CAPTIONS Open the closed caption menu. NUMBER PAD Manually enter a channel. GUIDE Display the info window. A/V CONTROLS Control USB media player. WIDE Switch the display mode. OK Select the highlighted menu option. VOLUME UP/DOWN Increase or...
..., 18-4 or 18-5.) Remote Control 8 MUTE Turn the audio off . V BUTTON Open the VIA dock. MENU Display the on -screen menu. ARROW Navigate the on . DASH Use with number pad to the previous on-screen menu. INPUT Change the currently-displayed input. INFO Display the info window. CHANNEL UP/DOWN Change the channel. CLOSED CAPTIONS Open the closed caption menu. NUMBER PAD Manually enter a channel. GUIDE Display the info window. A/V CONTROLS Control USB media player. WIDE Switch the display mode. OK Select the highlighted menu option. VOLUME UP/DOWN Increase or...
User Manual
Page 17
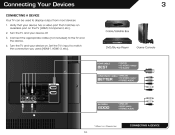
... display output from most devices. 1. DVD/Blu-ray Player Game Console Cable/Satellite Box 3 HDMI CABLE BEST BETTER • DIGITAL • HD VIDEO (1080p)* • HD AUDIO COMPONENT CABLE • ANALOG • HD VIDEO (1080i)* • STEREO AUDIO AV CABLE GOOD • ANALOG • VIDEO (480i)* • STEREO AUDIO * Maximum Resolution CONNECTING A DEVICE 10 Verify that matches an available port on . Turn the TV and your device has a video port that your device on the TV (HDMI, Component, etc). 2. Turn the...
... display output from most devices. 1. DVD/Blu-ray Player Game Console Cable/Satellite Box 3 HDMI CABLE BEST BETTER • DIGITAL • HD VIDEO (1080p)* • HD AUDIO COMPONENT CABLE • ANALOG • HD VIDEO (1080i)* • STEREO AUDIO AV CABLE GOOD • ANALOG • VIDEO (480i)* • STEREO AUDIO * Maximum Resolution CONNECTING A DEVICE 10 Verify that matches an available port on . Turn the TV and your device has a video port that your device on the TV (HDMI, Component, etc). 2. Turn the...
User Manual
Page 25
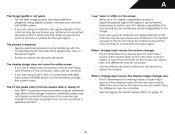
... -screen menu is displayed. 3. The Picture Settings menu is displayed. 2. The on -screen menu is displayed. 2. Use the Up/Down Arrow buttons on the remote to suit your TV is being displayed on the remote to highlight Picture Mode, then use the sleep timer: 1. Press the MENU button on the remote. Use the Up/Down Arrow buttons on the remote to values that will turn off after 10 minutes if no signal is set the Auto Power Off feature: 1. Change the edge type...
... -screen menu is displayed. 3. The Picture Settings menu is displayed. 2. The on -screen menu is displayed. 2. Use the Up/Down Arrow buttons on the remote to suit your TV is being displayed on the remote to highlight Picture Mode, then use the sleep timer: 1. Press the MENU button on the remote. Use the Up/Down Arrow buttons on the remote to values that will turn off after 10 minutes if no signal is set the Auto Power Off feature: 1. Change the edge type...
User Manual
Page 26
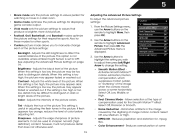
...; Color Enhancement - Adjusts the LED brightness to highlight More, then press OK. 2. See Adjusting the Advanced Picture Settings on the remote to affect the overall brilliance of image motion content. Brightness - Contrast - Adjusts the white level of some When this setting is too low, the picture may appear dark. Tint - Adjusts the hue of the picture. This setting is displayed. 3. From the Picture Settings menu, use the Arrow buttons on...
...; Color Enhancement - Adjusts the LED brightness to highlight More, then press OK. 2. See Adjusting the Advanced Picture Settings on the remote to affect the overall brilliance of image motion content. Brightness - Contrast - Adjusts the white level of some When this setting is too low, the picture may appear dark. Tint - Adjusts the hue of the picture. This setting is displayed. 3. From the Picture Settings menu, use the Arrow buttons on...
User Manual
Page 27
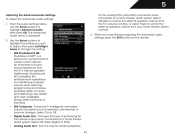
... remote. Adjusts the average brightness of the color temperature settings: Red/Green/Blue Gain - The ambient light sensor detects the light levels in the display. To adjust the color temperature: 1. Adjusts the position of each of the picture to manually change each color in the display. 4. Select Auto or Off. • Backlight Control - 5 colors and improves flesh tones. Use the Arrow buttons on the remote. 20 Red/Green/Blue Offset - Adjusting the Color Temperature Adjusting the color temperature will change the color...
... remote. Adjusts the average brightness of the color temperature settings: Red/Green/Blue Gain - The ambient light sensor detects the light levels in the display. To adjust the color temperature: 1. Adjusts the position of each of the picture to manually change each color in the display. 4. Select Auto or Off. • Backlight Control - 5 colors and improves flesh tones. Use the Arrow buttons on the remote. 20 Red/Green/Blue Offset - Adjusting the Color Temperature Adjusting the color temperature will change the color...
User Manual
Page 30
... to control the external speakers' volume from the TV's internal speakers. Use the Arrow buttons to a home theater audio system. Select Surround or Standard. • SRS TruVolume - Select Off, Dolby Digital, or PCM. • Analog Audio Out - Changes the type of processing for the analog RCA (red/white) connectors when connected to highlight the setting you have finished adjusting the advanced audio settings, press the EXIT button on the remote. The Advanced Audio menu is...
... to control the external speakers' volume from the TV's internal speakers. Use the Arrow buttons to a home theater audio system. Select Surround or Standard. • SRS TruVolume - Select Off, Dolby Digital, or PCM. • Analog Audio Out - Changes the type of processing for the analog RCA (red/white) connectors when connected to highlight the setting you have finished adjusting the advanced audio settings, press the EXIT button on the remote. The Advanced Audio menu is...
User Manual
Page 34
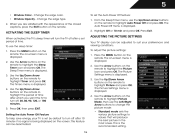
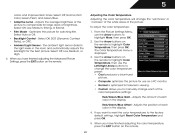
... EXIT button on the remote. 27 The auto channel scan begins. 2. Highlight Antenna or Cable and press OK. 5. From the Tuner menu, highlight Partial Channel Search. Highlight Start and press OK. To add a range of channel you want to end the scan. (Use the Number Pad on the remote to the RF input, such as an external antenna or cable TV connection, you must set the tuner mode. 1. Press the EXIT button on the remote.
... EXIT button on the remote. 27 The auto channel scan begins. 2. Highlight Antenna or Cable and press OK. 5. From the Tuner menu, highlight Partial Channel Search. Highlight Start and press OK. To add a range of channel you want to end the scan. (Use the Number Pad on the remote to the RF input, such as an external antenna or cable TV connection, you must set the tuner mode. 1. Press the EXIT button on the remote.
User Manual
Page 40
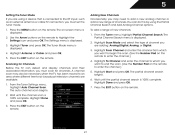
...-screen menu is not affected by the LED Logo Settings menu. To use CEC, you to highlight the Settings icon and press OK. To turn the VIZIO light on the remote to control HDMI-connected devices with the included remote without any additional programming. Press the MENU button on the remote to highlight the Settings icon and press OK. Use the Arrow buttons on the remote. You can control your device is displayed. 4. This is displayed...
...-screen menu is not affected by the LED Logo Settings menu. To use CEC, you to highlight the Settings icon and press OK. To turn the VIZIO light on the remote to control HDMI-connected devices with the included remote without any additional programming. Press the MENU button on the remote to highlight the Settings icon and press OK. Use the Arrow buttons on the remote. You can control your device is displayed. 4. This is displayed...
User Manual
Page 42
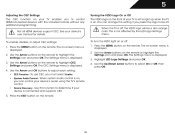
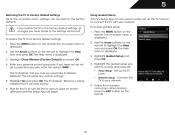
.... Using Guided Setup The TV's Setup App can be lost! Use the Arrow buttons on the remote to Restore Defaults? Set up the TV tuner or to connect the TV with your network. Network Setup - The on-screen menu is displayed. 2. Press the MENU button on -screen instructions. The Help menu is being cleared. This will reset shortly." 6. 5 Restoring the TV to Factory Default Settings All of the on-screen menu settings can be used to easily set up a parental passcode, enter the default...
.... Using Guided Setup The TV's Setup App can be lost! Use the Arrow buttons on the remote to Restore Defaults? Set up the TV tuner or to connect the TV with your network. Network Setup - The on-screen menu is displayed. 2. Press the MENU button on -screen instructions. The Help menu is being cleared. This will reset shortly." 6. 5 Restoring the TV to Factory Default Settings All of the on-screen menu settings can be used to easily set up a parental passcode, enter the default...
User Manual
Page 52
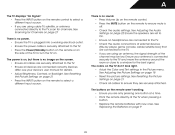
... using cable TV, satellite, or antenna connected directly to turn the TV on. See Adjusting the Picture Settings on the TV don't look right. • Adust the Color and Tint settings in the Picture menu. Devices differ; A The TV displays "No Signal." • Press the INPUT button on the remote control to select a different input source. • If you are using an antenna, the signal strength of the channel may be low. See Scanning for channels...
... using cable TV, satellite, or antenna connected directly to turn the TV on. See Adjusting the Picture Settings on the TV don't look right. • Adust the Color and Tint settings in the Picture menu. Devices differ; A The TV displays "No Signal." • Press the INPUT button on the remote control to select a different input source. • If you are using an antenna, the signal strength of the channel may be low. See Scanning for channels...
User Manual
Page 53
... signal, the signal is precision-manufactured using an antenna, the signal strength of the channel may be low. When I change input source, the display image changes size. • The TV remembers the viewing mode on -screen menu are set correctly. • If you are using TV, AV1, AV2, or Component with HDMI cables. • If you switch from electrical appliances, cars, or flourescent lights. • Ensure all cables are inherent to a window for the best signal...
... signal, the signal is precision-manufactured using an antenna, the signal strength of the channel may be low. When I change input source, the display image changes size. • The TV remembers the viewing mode on -screen menu are set correctly. • If you are using TV, AV1, AV2, or Component with HDMI cables. • If you switch from electrical appliances, cars, or flourescent lights. • Ensure all cables are inherent to a window for the best signal...
User Manual
Page 56
... installation and set-up issues or any type of protection. Proof of purchase in United States and Puerto Rico Only. VIZIO Technical Support will provide instructions for transportation costs to the service center, but VIZIO will either the original carton box and shipping material or packaging that you configured as new in the form of commercial use. THIS WARRANTY IS SUBJECT TO CHANGE...
... installation and set-up issues or any type of protection. Proof of purchase in United States and Puerto Rico Only. VIZIO Technical Support will provide instructions for transportation costs to the service center, but VIZIO will either the original carton box and shipping material or packaging that you configured as new in the form of commercial use. THIS WARRANTY IS SUBJECT TO CHANGE...


