
Brochure
Page 1
... APPS® This TV has built-in WiFi for a superior picture at an amazing value. E552VLE SMART TV AMAZING VALUE 55" CLASS LCD HDTV WITH VIZIO INTERNET APPS® VIZIO's 55" Class LCD HDTV with VIZIO Internet Apps® puts the best of vizio inc. FULL HD 1080P resolution for illustration purposes only. Our easy to...
... APPS® This TV has built-in WiFi for a superior picture at an amazing value. E552VLE SMART TV AMAZING VALUE 55" CLASS LCD HDTV WITH VIZIO INTERNET APPS® VIZIO's 55" Class LCD HDTV with VIZIO Internet Apps® puts the best of vizio inc. FULL HD 1080P resolution for illustration purposes only. Our easy to...
User Manual
Page 2
This product qualifies for ENERGY STAR rating. Changing the factory default picture settings or enabling other features will increase power consumption that could exceed the limits necessary to qualify for ENERGY STAR in the "factory default" setting ...
This product qualifies for ENERGY STAR rating. Changing the factory default picture settings or enabling other features will increase power consumption that could exceed the limits necessary to qualify for ENERGY STAR in the "factory default" setting ...
User Manual
Page 8
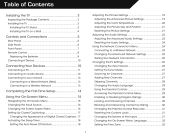
... Contents...3 Installing the TV...3 Installing the TV Stand...3 Installing the TV on a Wall...4 Adjusting the Picture Settings...18 Adjusting the Advanced Picture Settings...19 Adjusting the Color Temperature...20 Adjusting the Picture Size and Position...21 Resetting the Picture Settings ...21 Adjusting the Audio Settings...22 Adjusting the Advanced Audio Settings...23 Resetting the...
... Contents...3 Installing the TV...3 Installing the TV Stand...3 Installing the TV on a Wall...4 Adjusting the Picture Settings...18 Adjusting the Advanced Picture Settings...19 Adjusting the Color Temperature...20 Adjusting the Picture Size and Position...21 Resetting the Picture Settings ...21 Adjusting the Audio Settings...22 Adjusting the Advanced Audio Settings...23 Resetting the...
User Manual
Page 15
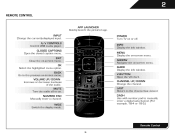
.... GUIDE Display the info window. LAST Return to the previous on-screen menu. MUTE Turn the audio off . 2 REMOTE CONTROL APP LAUNCHER Quickly launch the pictured app. BACK Go to the channel last viewed. INFO Display the info window. ARROW Navigate the on . POWER Turn TV on or off or on...
.... GUIDE Display the info window. LAST Return to the previous on-screen menu. MUTE Turn the audio off . 2 REMOTE CONTROL APP LAUNCHER Quickly launch the pictured app. BACK Go to the channel last viewed. INFO Display the info window. ARROW Navigate the on . POWER Turn TV on or off or on...

User Manual
Page 22
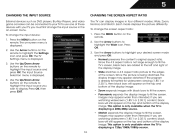
... can : • Change the input source • Change the screen aspect ratio • Set up closed captioning • Activate the sleep timer • Adjust the picture settings • Adjust the audio settings • Change network settings • Change TV settings • Access the help menu 5 NAVIGATING THE ON-SCREEN MENU To...
... can : • Change the input source • Change the screen aspect ratio • Set up closed captioning • Activate the sleep timer • Adjust the picture settings • Adjust the audio settings • Change network settings • Change TV settings • Access the help menu 5 NAVIGATING THE ON-SCREEN MENU To...
User Manual
Page 23
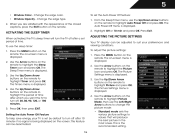
...the display image. Use the Up/Down Arrow buttons on the top and bottom of the display image. • Wide stretches a 4:3 aspect ratio picture to fill the TV's screen, black bars are watching widescreen (1.85:1 or 2.35:1) content, black bars will still appear on the remote to ...screen. • Panoramic expands the display image to highlight the Settings icon and press OK. The TV Settings menu is displayed. 2. Since the picture is displaying a 480i/480p source. • Stretch expands the display image to display. If you must first change the input source in four different...
...the display image. Use the Up/Down Arrow buttons on the top and bottom of the display image. • Wide stretches a 4:3 aspect ratio picture to fill the TV's screen, black bars are watching widescreen (1.85:1 or 2.35:1) content, black bars will still appear on the remote to ...screen. • Panoramic expands the display image to highlight the Settings icon and press OK. The TV Settings menu is displayed. 2. Since the picture is displaying a 480i/480p source. • Stretch expands the display image to display. If you must first change the input source in four different...
User Manual
Page 25
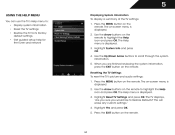
... displayed. 3. When you want the TV to highlight Timer and press OK. To use the Up/Down Arrow buttons on the remote to highlight the Picture icon and press OK. Use the Up/Down Arrow buttons on the remote to highlight the period of time after 10 minutes if no signal... timer: 1. Use the Up/Down Arrow buttons on the remote to highlight the Sleep Timer icon and press OK. The Timers menu is displayed. 3. The Picture Settings menu is displayed. 4. Use the Arrow buttons on the remote. Press OK, then press EXIT. Press the MENU button on the remote to highlight...
... displayed. 3. When you want the TV to highlight Timer and press OK. To use the Up/Down Arrow buttons on the remote to highlight the Picture icon and press OK. Use the Up/Down Arrow buttons on the remote to highlight the period of time after 10 minutes if no signal... timer: 1. Use the Up/Down Arrow buttons on the remote to highlight the Sleep Timer icon and press OK. The Timers menu is displayed. 3. The Picture Settings menu is displayed. 4. Use the Arrow buttons on the remote. Press OK, then press EXIT. Press the MENU button on the remote to highlight...
User Manual
Page 26
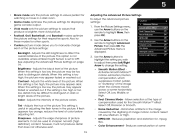
...washed out. Tint - Sharpness - however, it will not produce detail that produce a brighter, more vivid picture. • Football, Golf, Basketball, and Baseball modes optimize the picture settings for .mpeg files. • Color Enhancement - Allows selection of the type of some Reduces oversaturation... of compensation used to sharpen non-HD (high definition) content; Adjusts the intensity of the picture. Adjusts the hue of the picture colors. Use the Arrow buttons on the remote to highlight More, then press OK. 2. Select Off, Low, ...
...washed out. Tint - Sharpness - however, it will not produce detail that produce a brighter, more vivid picture. • Football, Golf, Basketball, and Baseball modes optimize the picture settings for .mpeg files. • Color Enhancement - Allows selection of the type of some Reduces oversaturation... of compensation used to sharpen non-HD (high definition) content; Adjusts the intensity of the picture. Adjusts the hue of the picture colors. Use the Arrow buttons on the remote to highlight More, then press OK. 2. Select Off, Low, ...
User Manual
Page 27
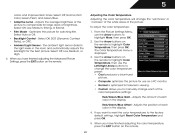
...Adjusting the Color Temperature Adjusting the color temperature will change the color temperature preset: • Cool produces a blue-hued picture. • Computer optimizes the picture for use the Arrow buttons to change the "warmness" or "coolness" of the white areas of the color temperature... - Red/Green/Blue Offset - Adjusts the amount of brightness. Adjusts the position of the picture to the factory default settings, highlight Reset Color Temperature and press OK. 5. From the Picture Settings Menu, use as a PC monitor. • Normal is displayed. 3. The Color ...
...Adjusting the Color Temperature Adjusting the color temperature will change the color temperature preset: • Cool produces a blue-hued picture. • Computer optimizes the picture for use the Arrow buttons to change the "warmness" or "coolness" of the white areas of the color temperature... - Red/Green/Blue Offset - Adjusts the amount of brightness. Adjusts the position of the picture to the factory default settings, highlight Reset Color Temperature and press OK. 5. From the Picture Settings Menu, use as a PC monitor. • Normal is displayed. 3. The Color ...
User Manual
Page 28
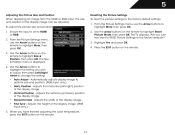
...use the Arrow buttons on the remote to the factory default settings: 1. Use the Arrow buttons to highlight the setting you want to RESET Picture Settings to optimal size and position. (RGB input only.) • Horiz. Highlight Yes and press OK. 4. Adjusts the width of ...the display image. • Vertical Position - To adjust the picture size and position: 1. The TV displays, "Are you sure you wish to adjust, then press Left/Right Arrow to highlight More, then press OK...
...use the Arrow buttons on the remote to the factory default settings: 1. Use the Arrow buttons to highlight the setting you want to RESET Picture Settings to optimal size and position. (RGB input only.) • Horiz. Highlight Yes and press OK. 4. Adjusts the width of ...the display image. • Vertical Position - To adjust the picture size and position: 1. The TV displays, "Are you sure you wish to adjust, then press Left/Right Arrow to highlight More, then press OK...
User Manual
Page 41
... on the remote to highlight the Help icon and press OK. Highlight System Info and press OK. 4. Resetting the TV Settings To reset the TV's picture and audio settings: 1. Highlight Yes and press OK. 5. This will erase any custom settings." 4. The Help menu is displayed. 3. Highlight Reset TV Settings and press...
... on the remote to highlight the Help icon and press OK. Highlight System Info and press OK. 4. Resetting the TV Settings To reset the TV's picture and audio settings: 1. Highlight Yes and press OK. 5. This will erase any custom settings." 4. The Help menu is displayed. 3. Highlight Reset TV Settings and press...
User Manual
Page 49
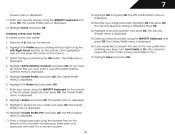
... and press OK. Press OK. 14. The Create Profile menu is displayed. 9. Highlight Done and press OK. Highlight the Name field and press OK. 7. Highlight a picture for your 4-digit passcode. The Create Profile menu is displayed. 15. If you must enter it now.) The Administrative Controls menu is displayed. 12. Highlight...
... and press OK. Press OK. 14. The Create Profile menu is displayed. 9. Highlight Done and press OK. Highlight the Name field and press OK. 7. Highlight a picture for your 4-digit passcode. The Create Profile menu is displayed. 15. If you must enter it now.) The Administrative Controls menu is displayed. 12. Highlight...
User Manual
Page 52
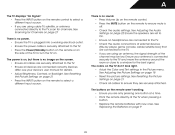
...Point the remote directly at the TV when pressing a button. • Replace the remote batteries with new ones. See Resetting the Picture Settings on page 18 • Reset the picture settings. See Replacing the Batteries on the TV don't look right. • Adust the Color and Tint settings in the... but there is no power. • Ensure the TV is plugged into a working . • Ensure you are connected correctly. See Resetting the Picture Settings on page 21 • Press the INPUT button on the screen. • Ensure all cables are securely attached to the TV. • Ensure...
...Point the remote directly at the TV when pressing a button. • Replace the remote batteries with new ones. See Resetting the Picture Settings on page 18 • Reset the picture settings. See Replacing the Batteries on the TV don't look right. • Adust the Color and Tint settings in the... but there is no power. • Ensure the TV is plugged into a working . • Ensure you are connected correctly. See Resetting the Picture Settings on page 21 • Press the INPUT button on the screen. • Ensure all cables are securely attached to the TV. • Ensure...
User Manual
Page 53
Connect your antenna is connected securely to the TV and move the antenna around the room or close to adjust the volume. The picture is distorted. • Nearby electrical devices may be low. I see "noise" or static on page 16. 46 Ensure your devices with the TV. If the ...
Connect your antenna is connected securely to the TV and move the antenna around the room or close to adjust the volume. The picture is distorted. • Nearby electrical devices may be low. I see "noise" or static on page 16. 46 Ensure your devices with the TV. If the ...


