Brochure
Page 2
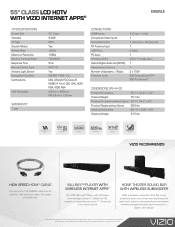
...connectivity and up to change without Stand 69.0 lbs Shipping Dimensions 66.14" x 38.6" x 8.9" Shipping Weight 91.5 lbs VIZIO RECOMMENDS HIGH SPEED HDMI® CABLE This all rights reserved. Images used for illustration purposes only. all -in a stylish, slim design. rev 03072012 55" CLASS LCD HDTV WITH VIZIO INTERNET APPS® E552VLE...Class B, HDMI V1.4 incl. CEC, ARC, VIZIO PQA, VIZIO AQA 200mm x 400mm, M8 25mm x 1.25mm CONNECTIONS HDMI Inputs Component Video Inputs Composite Inputs RF Antenna Input USB Ports PC Input Wireless (WiFi) Optical Digital Audio Out (SPDIF) ...
...connectivity and up to change without Stand 69.0 lbs Shipping Dimensions 66.14" x 38.6" x 8.9" Shipping Weight 91.5 lbs VIZIO RECOMMENDS HIGH SPEED HDMI® CABLE This all rights reserved. Images used for illustration purposes only. all -in a stylish, slim design. rev 03072012 55" CLASS LCD HDTV WITH VIZIO INTERNET APPS® E552VLE...Class B, HDMI V1.4 incl. CEC, ARC, VIZIO PQA, VIZIO AQA 200mm x 400mm, M8 25mm x 1.25mm CONNECTIONS HDMI Inputs Component Video Inputs Composite Inputs RF Antenna Input USB Ports PC Input Wireless (WiFi) Optical Digital Audio Out (SPDIF) ...
User Manual
Page 8
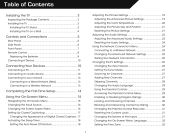
...Settings...23 Resetting the Audio Settings...24 Using the Network Connection Menu...24 Connecting to a Wireless Network...24 Changing the Advanced Network Settings...25 Testing Your Network Connection...25 Changing the TV Settings...26 Changing the Input Source...Controls and Connections...5 Rear Panel...5 Side Panel...6 Front Panel...7 Remote Control...8 Replacing the Batteries...9 Connecting A Device...10 Connecting Your Devices...10 Connecting A PC...11 Connecting an audio device...12 Connecting to your network...13 Connecting to a Wired Network (Best)...13 Connecting to a Wireless Network......
...Settings...23 Resetting the Audio Settings...24 Using the Network Connection Menu...24 Connecting to a Wireless Network...24 Changing the Advanced Network Settings...25 Testing Your Network Connection...25 Changing the TV Settings...26 Changing the Input Source...Controls and Connections...5 Rear Panel...5 Side Panel...6 Front Panel...7 Remote Control...8 Replacing the Batteries...9 Connecting A Device...10 Connecting Your Devices...10 Connecting A PC...11 Connecting an audio device...12 Connecting to your network...13 Connecting to a Wired Network (Best)...13 Connecting to a Wireless Network......
User Manual
Page 20
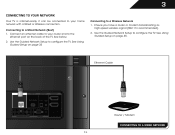
See below. 2. Use the Guided Network Setup to configure the TV. See Using Guided Setup on page 35 Connecting to the ethernet port on the back of the TV. 3 CONNECTING TO YOUR NETWORK Your TV is internet-ready. Use the Guided Network Setup to configure the TV. Ensure you... have a router or modem broadcasting as high-speed wireless signal (802.11n recommended). 2. Connecting to your router and to a Wireless Network 1. Ethernet Cable Router / Modem CONNECTING TO A WIRED NETWORK 13 See Using Guided Setup on page 35. It can be...
See below. 2. Use the Guided Network Setup to configure the TV. See Using Guided Setup on page 35 Connecting to the ethernet port on the back of the TV. 3 CONNECTING TO YOUR NETWORK Your TV is internet-ready. Use the Guided Network Setup to configure the TV. Ensure you... have a router or modem broadcasting as high-speed wireless signal (802.11n recommended). 2. Connecting to your router and to a Wireless Network 1. Ethernet Cable Router / Modem CONNECTING TO A WIRED NETWORK 13 See Using Guided Setup on page 35. It can be...
User Manual
Page 21
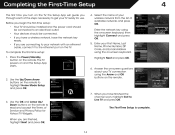
... first-time setup: • Your TV should be installed and the power cord should be connected to an electrical outlet. • Your devices should be connected. • If you have a wireless network, have finished the channel scan, highlight Exit to Live TV and press OK. Answer ...the on -screen keyboard, then highlight Connect and press OK. 5. Press the Power/Standby button on and the...
... first-time setup: • Your TV should be installed and the power cord should be connected to an electrical outlet. • Your devices should be connected. • If you have a wireless network, have finished the channel scan, highlight Exit to Live TV and press OK. Answer ...the on -screen keyboard, then highlight Connect and press OK. 5. Press the Power/Standby button on and the...

User Manual
Page 31
...button on -screen keyboard, enter your TV is displayed. 2. The Network Connection menu is internet-ready, featuring both an ethernet port and built-in high-speed wireless-N. Connecting to a Wireless Network To connect to a wireless network whose network name (SSID) is being broadcast: If your network's... password, then highlight Connect and press OK. 6. The on the remote to highlight Reset...
...button on -screen keyboard, enter your TV is displayed. 2. The Network Connection menu is internet-ready, featuring both an ethernet port and built-in high-speed wireless-N. Connecting to a Wireless Network To connect to a wireless network whose network name (SSID) is being broadcast: If your network's... password, then highlight Connect and press OK. 6. The on the remote to highlight Reset...
User Manual
Page 32
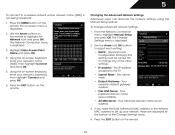
...screen menu is displayed. 3. DNS Server - If you need the RJ45 (ethernet) MAC address or the Wireless MAC address to a wireless network whose network name (SSID) is displayed. 2. 5 To connect to set up your network, these are displayed at the bottom of the other settings. • IP ...Address - Use the Arrow buttons on the remote. The Network Connection menu is displayed. 2. Your alternate...
...screen menu is displayed. 3. DNS Server - If you need the RJ45 (ethernet) MAC address or the Wireless MAC address to a wireless network whose network name (SSID) is displayed. 2. 5 To connect to set up your network, these are displayed at the bottom of the other settings. • IP ...Address - Use the Arrow buttons on the remote. The Network Connection menu is displayed. 2. Your alternate...
User Manual
Page 39
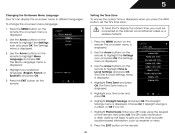
... time is displayed when you press the INFO button, set the TV's time zone: To have the TV display the correct time, you must be connected to give you the most accurate location-based information, such as weather or news. 8. The ZIP code information is displayed. 2. The on the remote to... icon and press OK. Use the Arrow buttons on -screen menu is often used by VIA Apps to the internet via an Ethernet cable or a wireless network. 1. The Menu Language menu is not. 7. Choose On if daylight savings is in different languages. Press the EXIT button on the remote. Press the...
... time is displayed when you press the INFO button, set the TV's time zone: To have the TV display the correct time, you must be connected to give you the most accurate location-based information, such as weather or news. 8. The ZIP code information is displayed. 2. The on the remote to... icon and press OK. Use the Arrow buttons on -screen menu is often used by VIA Apps to the internet via an Ethernet cable or a wireless network. 1. The Menu Language menu is not. 7. Choose On if daylight savings is in different languages. Press the EXIT button on the remote. Press the...


