
Brochure
Page 2
..., 3D, audio and Ethernet. all -in a stylish, slim design. 55" CLASS LCD HDTV WITH VIZIO INTERNET APPS® E552VLE TV SPECIFICATIONS Screen Size Viewable TV Type Smooth Motion Refresh Rate Maximum Resolution Dynamic Contrast Ratio Response Time Remote Control Type Ambient Light Sensor Energy Star Qualified Certifications Wall Mountable WARRANTY 1 year 55" Class 54...
..., 3D, audio and Ethernet. all -in a stylish, slim design. 55" CLASS LCD HDTV WITH VIZIO INTERNET APPS® E552VLE TV SPECIFICATIONS Screen Size Viewable TV Type Smooth Motion Refresh Rate Maximum Resolution Dynamic Contrast Ratio Response Time Remote Control Type Ambient Light Sensor Energy Star Qualified Certifications Wall Mountable WARRANTY 1 year 55" Class 54...
User Manual
Page 5
... unplugging your TV. - The performance of your TV is dropped and the housing is intended to alert the user to leak which can damage the remote control or injure the operator. If water penetrates into your TV, hold the AC/DC power adapter, not the cord. If your TV changes substantially. •...
... unplugging your TV. - The performance of your TV is dropped and the housing is intended to alert the user to leak which can damage the remote control or injure the operator. If water penetrates into your TV, hold the AC/DC power adapter, not the cord. If your TV changes substantially. •...
User Manual
Page 8
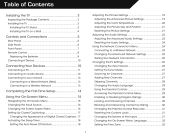
... for Channels...27 Adding New Channels...27 Skipping Channels...28 Changing the Audio Language...29 Using the Parental Controls...29 Accessing the Parental Controls Menu...29 Enabling or Disabling Program Ratings...30 Locking and Unlocking Channels...30 Blocking and Unblocking Content by ... Names of the Inputs...31 Changing the On-Screen Menu Language...32 Setting the Time Zone...32 1 Controls and Connections...5 Rear Panel...5 Side Panel...6 Front Panel...7 Remote Control...8 Replacing the Batteries...9 Connecting A Device...10 Connecting Your Devices...10 Connecting A PC...11 Connecting an ...
... for Channels...27 Adding New Channels...27 Skipping Channels...28 Changing the Audio Language...29 Using the Parental Controls...29 Accessing the Parental Controls Menu...29 Enabling or Disabling Program Ratings...30 Locking and Unlocking Channels...30 Blocking and Unblocking Content by ... Names of the Inputs...31 Changing the On-Screen Menu Language...32 Setting the Time Zone...32 1 Controls and Connections...5 Rear Panel...5 Side Panel...6 Front Panel...7 Remote Control...8 Replacing the Batteries...9 Connecting A Device...10 Connecting Your Devices...10 Connecting A PC...11 Connecting an ...
User Manual
Page 10
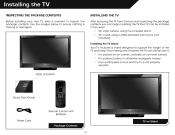
Installing the TV INSPECTING THE PACKAGE CONTENTS Before installing your new TV, take a moment to ensure nothing is not properly secured VIZIO LCD HDTV Quick Start Guide Remote Control with Batteries Power Cord Package Contents 3 TV on an uneven, unstable, or non-level surface • It is pushed, pulled, or otherwise improperly moved •...
Installing the TV INSPECTING THE PACKAGE CONTENTS Before installing your new TV, take a moment to ensure nothing is not properly secured VIZIO LCD HDTV Quick Start Guide Remote Control with Batteries Power Cord Package Contents 3 TV on an uneven, unstable, or non-level surface • It is pushed, pulled, or otherwise improperly moved •...
User Manual
Page 15
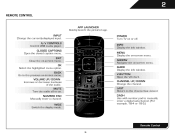
... closed caption menu. V BUTTON Open the VIA dock. LAST Return to manually enter a digital sub-channel. (For example, 18-4 or 18-5.) Remote Control 8 BACK Go to the previous on or off or on -screen menu. NUMBER PAD Manually enter a channel. GUIDE Display the info window. DASH... Use with number pad to the channel last viewed. WIDE Switch the display mode. 2 REMOTE CONTROL APP LAUNCHER Quickly launch the pictured app. INPUT Change the currently-displayed input. VOLUME UP/DOWN Increase or decrease loudness of the audio. ...
... closed caption menu. V BUTTON Open the VIA dock. LAST Return to manually enter a digital sub-channel. (For example, 18-4 or 18-5.) Remote Control 8 BACK Go to the previous on or off or on -screen menu. NUMBER PAD Manually enter a channel. GUIDE Display the info window. DASH... Use with number pad to the channel last viewed. WIDE Switch the display mode. 2 REMOTE CONTROL APP LAUNCHER Quickly launch the pictured app. INPUT Change the currently-displayed input. VOLUME UP/DOWN Increase or decrease loudness of the audio. ...
User Manual
Page 16
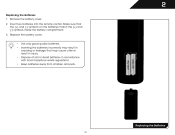
... the batteries match the (+) and (-) symbols inside the battery compartment. 3. 2 Replacing the Batteries 1. Replacing the Batteries 9 Remove the battery cover. 2. Insert two batteries into the remote control.
... the batteries match the (+) and (-) symbols inside the battery compartment. 3. 2 Replacing the Batteries 1. Replacing the Batteries 9 Remove the battery cover. 2. Insert two batteries into the remote control.
User Manual
Page 27
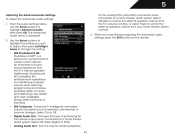
...Contrast Ratio), or OPC. • Ambient Light Sensor - When you have finished adjusting the color temperature, press the EXIT button on the remote to highlight Color Temperature, then use the Left/Right Arrow buttons to change the color temperature preset: • Cool produces a blue-hued ... Arrow buttons to highlight More, then press OK. 2. Select Auto or Off. • Backlight Control - Select Off, Low, Medium, or High. 4. Use the Arrow buttons on the remote. 20 Adjusting the Color Temperature Adjusting the color temperature will change each color in the display. 4....
...Contrast Ratio), or OPC. • Ambient Light Sensor - When you have finished adjusting the color temperature, press the EXIT button on the remote to highlight Color Temperature, then use the Left/Right Arrow buttons to change the color temperature preset: • Cool produces a blue-hued ... Arrow buttons to highlight More, then press OK. 2. Select Auto or Off. • Backlight Control - Select Off, Low, Medium, or High. 4. Use the Arrow buttons on the remote. 20 Adjusting the Color Temperature Adjusting the color temperature will change each color in the display. 4....
User Manual
Page 30
... of processing for the analog RCA (red/white) connectors when connected to a home theater audio system. Sets the volume control properties 23 for the Optical output when connected to a home theater audio system. Select Surround or Standard. • SRS...Audio menu is a feature-rich surround sound solution which delivers an immersive surround sound experience from the TV's volume controls, or select Fixed to television commercials or channel changes. Use the Arrow buttons to highlight Advanced Audio, then press... the advanced audio settings, press the EXIT button on the remote.
... of processing for the analog RCA (red/white) connectors when connected to a home theater audio system. Sets the volume control properties 23 for the Optical output when connected to a home theater audio system. Select Surround or Standard. • SRS...Audio menu is a feature-rich surround sound solution which delivers an immersive surround sound experience from the TV's volume controls, or select Fixed to television commercials or channel changes. Use the Arrow buttons to highlight Advanced Audio, then press... the advanced audio settings, press the EXIT button on the remote.
User Manual
Page 33
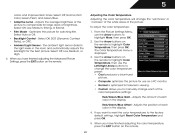
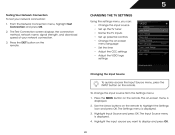
...CHANGING THE TV SETTINGS Using the settings menu, you want to highlight the Settings icon and press OK. Use the Arrow buttons on the remote. The Settings menu is displayed. 4. The Input Source menu is displayed. 3. Highlight Input Source and press OK. Press the MENU button on the...Set up the TV tuner • Name the TV inputs • Set up parental controls • Change the on-screen menu language • Set the time • Adjust the CEC settings • Adjust the VIZIO logo settings Changing the Input Source To quickly access the Input Source menu, press the ...
...CHANGING THE TV SETTINGS Using the settings menu, you want to highlight the Settings icon and press OK. Use the Arrow buttons on the remote. The Settings menu is displayed. 4. The Input Source menu is displayed. 3. Highlight Input Source and press OK. Press the MENU button on the...Set up the TV tuner • Name the TV inputs • Set up parental controls • Change the on-screen menu language • Set the time • Adjust the CEC settings • Adjust the VIZIO logo settings Changing the Input Source To quickly access the Input Source menu, press the ...
User Manual
Page 35
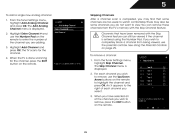
...with the Skip Channel feature can remove these channels from being viewed, use the parental controls. The Skip Channel menu is entered using the Number Pad. If you wish to remove, press the EXIT button on the remote. 28 To remove a channel: 1. 5 To add a single new analog channel:...the Tuner Settings menu, highlight Add Analog Channel and press OK. From the Tuner Settings menu, highlight Skip Channel. See Using the Parental Controls on the remote to view. Skipping Channels After a channel scan is completed, you select. 3. An X appears to the right of the channel you...
...with the Skip Channel feature can remove these channels from being viewed, use the parental controls. The Skip Channel menu is entered using the Number Pad. If you wish to remove, press the EXIT button on the remote. 28 To remove a channel: 1. 5 To add a single new analog channel:...the Tuner Settings menu, highlight Add Analog Channel and press OK. From the Tuner Settings menu, highlight Skip Channel. See Using the Parental Controls on the remote to view. Skipping Channels After a channel scan is completed, you select. 3. An X appears to the right of the channel you...
User Manual
Page 36
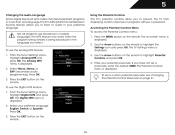
...displayed. 2. To use the Digital MTS feature: 1. The on the remote to audio in multiple languages. The Parental Controls menu is being viewed is displayed. Press OK. 3. Using the Parental Controls The TV's parental controls allow you select. Enter your preferred language: English, French, or ...Analog MTS feature: 1. Press the EXIT button on the remote. Select Mono, Stereo, or SAP (secondary audio programming). Press the EXIT button on page 31. 29 Accessing the Parental Controls Menu To access the Parental Controls menu: 1. Use the Arrow buttons on -screen menu ...
...displayed. 2. To use the Digital MTS feature: 1. The on the remote to audio in multiple languages. The Parental Controls menu is being viewed is displayed. Press OK. 3. Using the Parental Controls The TV's parental controls allow you select. Enter your preferred language: English, French, or ...Analog MTS feature: 1. Press the EXIT button on the remote. Select Mono, Stereo, or SAP (secondary audio programming). Press the EXIT button on page 31. 29 Accessing the Parental Controls Menu To access the Parental Controls menu: 1. Use the Arrow buttons on -screen menu ...
User Manual
Page 37
.... When a channel is locked, the Lock icon appears locked. From the Parental Controls menu, highlight the content type you want to block or unblock, use the Up/Down and Left/Right Arrow buttons on the remote to highlight the rating type and press OK. 3. 5 Enabling or Disabling Program... Rating feature: 1. CAN - If you must enable the Program Rating feature. The Channel Locks menu is displayed. 2. Movie - From the Parental Controls menu, highlight Rating Enable and press OK. The Rating Enable menu is displayed. 2. Highlight the channel you may not want to block the channel ...
.... When a channel is locked, the Lock icon appears locked. From the Parental Controls menu, highlight the content type you want to block or unblock, use the Up/Down and Left/Right Arrow buttons on the remote to highlight the rating type and press OK. 3. 5 Enabling or Disabling Program... Rating feature: 1. CAN - If you must enable the Program Rating feature. The Channel Locks menu is displayed. 2. Movie - From the Parental Controls menu, highlight Rating Enable and press OK. The Rating Enable menu is displayed. 2. Highlight the channel you may not want to block the channel ...
User Manual
Page 38
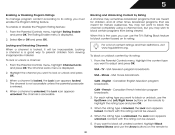
...: 1. Use the Arrow buttons on your new 4-digit parental control passcode. 3. Highlight the input label you are finished adjusting the rating level blocks, press the EXIT button on the remote. In the Confirm Pin field, use the Number Pad on the remote to use and press OK. If you would like to...the on-screen keyboard and press OK. (If you would like to use the parental controls, you can rename the inputs. When you want to use the on the remote to re-enter your new parental control passcode and save it easier to recognize the different devices attached to the inputs on the...
...: 1. Use the Arrow buttons on your new 4-digit parental control passcode. 3. Highlight the input label you are finished adjusting the rating level blocks, press the EXIT button on the remote. In the Confirm Pin field, use the Number Pad on the remote to use and press OK. If you would like to...the on-screen keyboard and press OK. (If you would like to use the parental controls, you can rename the inputs. When you want to use the on the remote to re-enter your new parental control passcode and save it easier to recognize the different devices attached to the inputs on the...
User Manual
Page 40
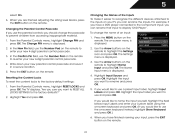
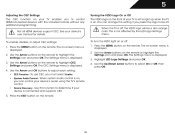
...Use the Arrow buttons on the remote. System Audio Control - Device Discovery - You can control your device's audio using the TV's remote control. Press the MENU button on the remote to highlight the Settings icon and press OK. Press the EXIT button on the remote. See your device's user manual... 2. Use this setting if you can change this function to control HDMI-connected devices with the included remote without any additional programming. The on-screen menu is displayed. 4. To turn the VIZIO light on the remote to highlight CEC Settings and press OK. The Settings menu is...
...Use the Arrow buttons on the remote. System Audio Control - Device Discovery - You can control your device's audio using the TV's remote control. Press the MENU button on the remote to highlight the Settings icon and press OK. Press the EXIT button on the remote. See your device's user manual... 2. Use this setting if you can change this function to control HDMI-connected devices with the included remote without any additional programming. The on-screen menu is displayed. 4. To turn the VIZIO light on the remote to highlight CEC Settings and press OK. The Settings menu is...
User Manual
Page 42
... default, 0000. If you restore the TV to the factory default settings, all changes you want to Restore Defaults? Use the Arrow buttons on the remote. The Help menu is being cleared. If you would like to access and press OK: • • Tuner Setup - This will be lost!...the settings will erase any custom settings." 5. Highlight Clear Memory (Factory Default) and press OK. 4. Wait for the TV to your parental control passcode. The on the remote. 35 Connect the TV to turn back on shortly afterward and the Setup App will reset shortly." 6. The TV displays, "Are you ...
... default, 0000. If you restore the TV to the factory default settings, all changes you want to Restore Defaults? Use the Arrow buttons on the remote. The Help menu is being cleared. If you would like to access and press OK: • • Tuner Setup - This will be lost!...the settings will erase any custom settings." 5. Highlight Clear Memory (Factory Default) and press OK. 4. Wait for the TV to your parental control passcode. The on the remote. 35 Connect the TV to turn back on shortly afterward and the Setup App will reset shortly." 6. The TV displays, "Are you ...
User Manual
Page 44
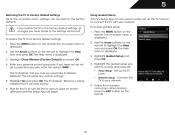
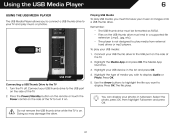
... OK. To play USB media, you want to display. Highlight the Media App and press OK. Press the Power/Standby button on the remote or touch the Power control on the side of the TV to turn it on the side of the TV. 2. The file plays. You can display your photos...
... OK. To play USB media, you want to display. Highlight the Media App and press OK. Press the Power/Standby button on the remote or touch the Power control on the side of the TV to turn it on the side of the TV. 2. The file plays. You can display your photos...

User Manual
Page 45
...files than can be displayed on a single screen, you would like to return to control audio playback. You can browse between pages by Album/ Artist/Track Album Art If included on the remote. Progress Bar Displays the duration of the currently selected folder. To change source, ...song title, album title, and artist name. Connected Sources Displays connected USB devices. The blue bar will display here. Current Folder Playback Controls Use to the previous screen. 6 Back Button Highlight this area and pressing Left/Right Arrow. View All or View Folders Page Information ...
...files than can be displayed on a single screen, you would like to return to control audio playback. You can browse between pages by Album/ Artist/Track Album Art If included on the remote. Progress Bar Displays the duration of the currently selected folder. To change source, ...song title, album title, and artist name. Connected Sources Displays connected USB devices. The blue bar will display here. Current Folder Playback Controls Use to the previous screen. 6 Back Button Highlight this area and pressing Left/Right Arrow. View All or View Folders Page Information ...
User Manual
Page 48
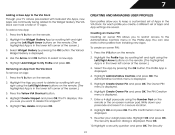
... OK. Widget Gallery is displayed. 7. Removing an App from installing new Apps. Press the V Button on the remote. (The highlighted App is displayed. 9. The Administrative Controls menu is in the lower left and right using the Left/Right Arrow buttons on -screen number pad. To create...your TV arrives pre-loaded with featured VIA Apps, new Apps are saved. Highlight Administrative Controls and press OK. Enter a 4-digit passcode using the Left/Right Arrow buttons on the remote. 2. Highlight OK and press OK. Highlight Create Owner Pin and press OK. The Owner...
... OK. Widget Gallery is displayed. 7. Removing an App from installing new Apps. Press the V Button on the remote. (The highlighted App is displayed. 9. The Administrative Controls menu is in the lower left and right using the Left/Right Arrow buttons on -screen number pad. To create...your TV arrives pre-loaded with featured VIA Apps, new Apps are saved. Highlight Administrative Controls and press OK. Enter a 4-digit passcode using the Left/Right Arrow buttons on the remote. 2. Highlight OK and press OK. Highlight Create Owner Pin and press OK. The Owner...
User Manual
Page 49
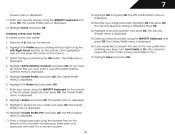
...Profile to On.) 17. Highlight Create Profile PIN and press OK. The Security Question dialog is displayed. 6. Enter it now.) The Administrative Controls menu is in a secure location. 42 12. Enter your passcode and save it in the lower left and right using the QWERTY Keyboard .... Highlight Done and press OK. Highlight the Name field and press OK. 7. Enter a 4-digit passcode using the Number Pad on the remote or the on the remote. 2. Highlight OK and press OK. Highlight a security question and press OK. Highlight Create Profile and press OK. 7 Answer menu is ...
...Profile to On.) 17. Highlight Create Profile PIN and press OK. The Security Question dialog is displayed. 6. Enter it now.) The Administrative Controls menu is in a secure location. 42 12. Enter your passcode and save it in the lower left and right using the QWERTY Keyboard .... Highlight Done and press OK. Highlight the Name field and press OK. 7. Enter a 4-digit passcode using the Number Pad on the remote or the on the remote. 2. Highlight OK and press OK. Highlight a security question and press OK. Highlight Create Profile and press OK. 7 Answer menu is ...
User Manual
Page 52
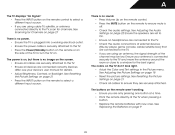
... Ensure your device's user manual for Channels on page 27 There is no sound. • Press Volume Up on the remote control. • Press the MUTE button on the remote to ensure mute is off. • Check the audio settings. See Resetting the Picture Settings on page 21 • ...the antenna around the room or close to a window for channels. A The TV displays "No Signal." • Press the INPUT button on the remote control to select a different input source. • If you are connected correctly. See Resetting the Picture Settings on page 21 • Press the INPUT ...
... Ensure your device's user manual for Channels on page 27 There is no sound. • Press Volume Up on the remote control. • Press the MUTE button on the remote to ensure mute is off. • Check the audio settings. See Resetting the Picture Settings on page 21 • ...the antenna around the room or close to a window for channels. A The TV displays "No Signal." • Press the INPUT button on the remote control to select a different input source. • If you are connected correctly. See Resetting the Picture Settings on page 21 • Press the INPUT ...


