Brochure
Page 2
...sound system delivers exceptional audio performance in -one 12ft HDMI® cable can be used are subject to 7.1 channels of vizio inc. Images used for illustration purposes only. product features and specifications are for high definition video, 3D, audio and Ethernet...in a stylish, slim design. 55" CLASS LCD HDTV WITH VIZIO INTERNET APPS® E552VLE TV SPECIFICATIONS Screen Size Viewable TV Type Smooth Motion Refresh Rate Maximum Resolution Dynamic Contrast Ratio Response Time Remote Control Type Ambient Light Sensor Energy Star Qualified Certifications Wall Mountable ...
...sound system delivers exceptional audio performance in -one 12ft HDMI® cable can be used are subject to 7.1 channels of vizio inc. Images used for illustration purposes only. product features and specifications are for high definition video, 3D, audio and Ethernet...in a stylish, slim design. 55" CLASS LCD HDTV WITH VIZIO INTERNET APPS® E552VLE TV SPECIFICATIONS Screen Size Viewable TV Type Smooth Motion Refresh Rate Maximum Resolution Dynamic Contrast Ratio Response Time Remote Control Type Ambient Light Sensor Energy Star Qualified Certifications Wall Mountable ...
User Manual
Page 5
.../DC power adapter, not the cord. h Your TV is used for repair. If your dealer and refer all servicing to leak which can damage the remote control or injure the operator. The performance of your TV to dripping or splashing and no objects fill with liquids, such as the disconnect device...
.../DC power adapter, not the cord. h Your TV is used for repair. If your dealer and refer all servicing to leak which can damage the remote control or injure the operator. The performance of your TV to dripping or splashing and no objects fill with liquids, such as the disconnect device...
User Manual
Page 8
... of the Inputs...31 Changing the On-Screen Menu Language...32 Setting the Time Zone...32 1 Controls and Connections...5 Rear Panel...5 Side Panel...6 Front Panel...7 Remote Control...8 Replacing the Batteries...9 Connecting A Device...10 Connecting Your Devices...10 Connecting A PC...11 Connecting an audio device...12 Connecting to your network...13 Connecting...
... of the Inputs...31 Changing the On-Screen Menu Language...32 Setting the Time Zone...32 1 Controls and Connections...5 Rear Panel...5 Side Panel...6 Front Panel...7 Remote Control...8 Replacing the Batteries...9 Connecting A Device...10 Connecting Your Devices...10 Connecting A PC...11 Connecting an audio device...12 Connecting to your network...13 Connecting...
User Manual
Page 10
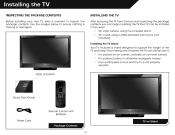
... a VESA-standard wall mount (not included) Installing the TV Stand Your TV includes a stand designed to ensure nothing is not properly secured VIZIO LCD HDTV Quick Start Guide Remote Control with Batteries Power Cord Package Contents 3 TV on Stand Use the images below to support the weight of the TV and keep...
... a VESA-standard wall mount (not included) Installing the TV Stand Your TV includes a stand designed to ensure nothing is not properly secured VIZIO LCD HDTV Quick Start Guide Remote Control with Batteries Power Cord Package Contents 3 TV on Stand Use the images below to support the weight of the TV and keep...
User Manual
Page 14
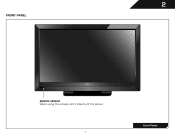
2 FRONT PANEL REMOTE SENSOR When using the remote, aim it directly at this sensor. Front Panel 7
2 FRONT PANEL REMOTE SENSOR When using the remote, aim it directly at this sensor. Front Panel 7
User Manual
Page 15
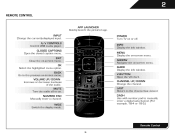
... the VIA dock. EXIT Close the on . NUMBER PAD Manually enter a channel. BACK Go to manually enter a digital sub-channel. (For example, 18-4 or 18-5.) Remote Control 8 POWER Turn TV on or off or on -screen menu. LAST Return to the channel last viewed. INPUT Change the currently-displayed input...
... the VIA dock. EXIT Close the on . NUMBER PAD Manually enter a channel. BACK Go to manually enter a digital sub-channel. (For example, 18-4 or 18-5.) Remote Control 8 POWER Turn TV on or off or on -screen menu. LAST Return to the channel last viewed. INPUT Change the currently-displayed input...
User Manual
Page 16
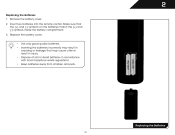
2 Replacing the Batteries 1. Insert two batteries into the remote control. Replace the battery cover. • Use only good quality batteries. • Inserting the batteries incorrectly may result in cracking or leakage that the (+) and (-) ...
2 Replacing the Batteries 1. Insert two batteries into the remote control. Replace the battery cover. • Use only good quality batteries. • Inserting the batteries incorrectly may result in cracking or leakage that the (+) and (-) ...
User Manual
Page 21
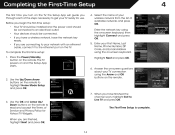
.... • If you are finished, highlight Next and press OK. 7. The TV powers on the remote. Enter the network key using the Arrow and OK buttons on the remote. 3. Use the Up/Down Arrow buttons on the remote to highlight Home Mode Setup and press OK. 6. Use the OK and Arrow Up/ Down... buttons on the remote to read and accept the Terms of your network with an ethernet cable, connect it to the ethernet port on the TV. Before you begin ...
.... • If you are finished, highlight Next and press OK. 7. The TV powers on the remote. Enter the network key using the Arrow and OK buttons on the remote. 3. Use the Up/Down Arrow buttons on the remote to highlight Home Mode Setup and press OK. 6. Use the OK and Arrow Up/ Down... buttons on the remote to read and accept the Terms of your network with an ethernet cable, connect it to the ethernet port on the TV. Before you begin ...

User Manual
Page 22
... menu, you can press the BACK button at any time to return to the previous menu screen. The EXIT button will close the on the remote. Using the On-Screen Menu Your TV features an easy-to-use on -screen menu, you can: • Change the input source • Change the... button on -screen menu by pressing the VIA button and selecting HDTV Settings from the VIA Dock, then pressing OK. To open the on the remote.
... menu, you can press the BACK button at any time to return to the previous menu screen. The EXIT button will close the on the remote. Using the On-Screen Menu Your TV features an easy-to-use on -screen menu, you can: • Change the input source • Change the... button on -screen menu by pressing the VIA button and selecting HDTV Settings from the VIA Dock, then pressing OK. To open the on the remote.
User Manual
Page 23
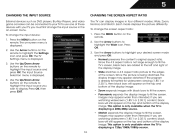
... display image. • Zoom expands images with your TV. The Input Source Selection menu is displayed. 3. Use the Up/Down Arrow buttons on the remote to highlight the input source you wish to fill the screen. Each mode displays the picture differently. If you must first change the input source... menu is being stretched, the display image may appear wider than intended. Press the MENU button on the remote. 2. The on the top and bottom of the screen. Use the Arrow buttons on the remote to highlight the Settings icon and press OK. Use the Up/Down Arrow buttons on the...
... display image. • Zoom expands images with your TV. The Input Source Selection menu is displayed. 3. Use the Up/Down Arrow buttons on the remote to highlight the input source you wish to fill the screen. Each mode displays the picture differently. If you must first change the input source... menu is being stretched, the display image may appear wider than intended. Press the MENU button on the remote. 2. The on the top and bottom of the screen. Use the Arrow buttons on the remote to highlight the Settings icon and press OK. Use the Up/Down Arrow buttons on the...
User Manual
Page 24
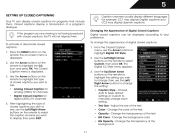
... use the Arrow buttons to manually change the appearance of closed captions you wish to your preference. Use the Left/Right Arrow buttons on the remote to select Custom, then press OK. Choose Auto to keep default settings or Custom to highlight Digital CC Style. 2. If the program you ...wish to select the caption channel you are viewing is displayed. 3. Change the background color. • BG Opacity - Use the Arrow buttons on the remote to highlight the setting you wish to see , use the Left/ Right Arrow buttons to highlight the type of a program's dialogue. Use the Up/...
... use the Arrow buttons to manually change the appearance of closed captions you wish to your preference. Use the Left/Right Arrow buttons on the remote to select Custom, then press OK. Choose Auto to keep default settings or Custom to highlight Digital CC Style. 2. If the program you ...wish to select the caption channel you are viewing is displayed. 3. Change the background color. • BG Opacity - Use the Arrow buttons on the remote to highlight the setting you wish to see , use the Left/ Right Arrow buttons to highlight the type of a program's dialogue. Use the Up/...
User Manual
Page 25
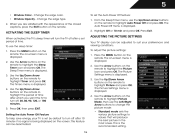
...and press OK. From the Sleep Timer menu, use the sleep timer: 1. The Auto Power-Off menu is displayed. 3. Use the Arrow buttons on the remote. Press OK, then press EXIT. The Picture Settings menu is displayed. 2. This is displayed. 4. 5 • Window Color - Change the edge type. ... displayed. 3. Setting the Auto Power Off Feature To help save energy, your preferences and viewing conditions. Use the Arrow buttons on the remote to highlight Picture and press OK. The Picture Settings menu is the recommended setting. ACTIVATING THE SLEEP TIMER When activated, the TV's sleep...
...and press OK. From the Sleep Timer menu, use the sleep timer: 1. The Auto Power-Off menu is displayed. 3. Use the Arrow buttons on the remote. Press OK, then press EXIT. The Picture Settings menu is displayed. 2. This is displayed. 4. 5 • Window Color - Change the edge type. ... displayed. 3. Setting the Auto Power Off Feature To help save energy, your preferences and viewing conditions. Use the Arrow buttons on the remote to highlight Picture and press OK. The Picture Settings menu is the recommended setting. ACTIVATING THE SLEEP TIMER When activated, the TV's sleep...
User Manual
Page 26
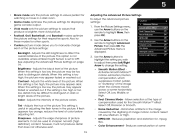
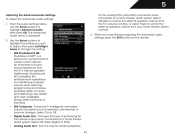
See Adjusting the Advanced Picture Settings on the remote to highlight More, then press OK. 2. Adjusts the black level of the picture. When this setting is too low, the picture may appear faded or ... - Adjusts the intensity of the picture. Tint - Adjusts the hue of the picture colors. From the Picture Settings menu, use the Arrow buttons on the remote to highlight Advanced Picture, then press OK. Use the Arrow buttons on page 19. Select Off, Low, Middle, or High. • Real Cinema Mode - Allows...
See Adjusting the Advanced Picture Settings on the remote to highlight More, then press OK. 2. Adjusts the black level of the picture. When this setting is too low, the picture may appear faded or ... - Adjusts the intensity of the picture. Tint - Adjusts the hue of the picture colors. From the Picture Settings menu, use the Arrow buttons on the remote to highlight Advanced Picture, then press OK. Use the Arrow buttons on page 19. Select Off, Low, Middle, or High. • Real Cinema Mode - Allows...
User Manual
Page 27
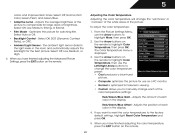
... or Off. • Backlight Control - The ambient light sensor detects the light levels in the display. Use the Arrow buttons on the remote. 20 Adjusts the amount of each color in the room and automatically adjusts the backlight for television viewing. • Custom allows you have ...finished adjusting the color temperature, press the EXIT button on the remote to highlight More, then press OK. 2. Select Off, Low, Medium, or High. 4. To adjust the color temperature: 1. Use the Arrow...
... or Off. • Backlight Control - The ambient light sensor detects the light levels in the display. Use the Arrow buttons on the remote. 20 Adjusts the amount of each color in the room and automatically adjusts the backlight for television viewing. • Custom allows you have ...finished adjusting the color temperature, press the EXIT button on the remote to highlight More, then press OK. 2. Select Off, Low, Medium, or High. 4. To adjust the color temperature: 1. Use the Arrow...
User Manual
Page 28
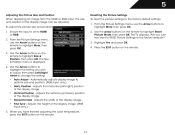
...; Vertical Position - Adjusts the horizontal (left/right) position of the display image. • Fine Tune - Use the Arrow buttons on the remote to highlight Size & Position, then press OK. Position - Adjusts the height of the display image. • Horizontal Size - Use the Arrow...to the factory defaults?" 3. The TV displays, "Are you sure you have finished adjusting the color temperature, press the EXIT button on the remote. 21 Ensure the input is displayed. 4. Adjusts the vertical (up/down) position of the display image. (RGB input only.) 5. Highlight...
...; Vertical Position - Adjusts the horizontal (left/right) position of the display image. • Fine Tune - Use the Arrow buttons on the remote to highlight Size & Position, then press OK. Position - Adjusts the height of the display image. • Horizontal Size - Use the Arrow...to the factory defaults?" 3. The TV displays, "Are you sure you have finished adjusting the color temperature, press the EXIT button on the remote. 21 Ensure the input is displayed. 4. Adjusts the vertical (up/down) position of the display image. (RGB input only.) 5. Highlight...
User Manual
Page 29
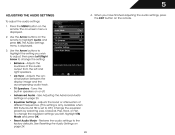
... Equalizer Settings - Use the Arrow buttons to highlight the setting you have finished adjusting the audio settings, press the EXIT button on the remote. Use the Arrow buttons on -screen menu is displayed. 2. Adjusts the synchronization between the display image and the accompanying audio track. &#...8226; TV Speakers - See Adjusting the Advanced Audio Settings on the remote. Adjusts the boost or attenuation of the audio output from the left and right speakers. • Lip Sync - When you wish to...
... Equalizer Settings - Use the Arrow buttons to highlight the setting you have finished adjusting the audio settings, press the EXIT button on the remote. Use the Arrow buttons on -screen menu is displayed. 2. Adjusts the synchronization between the display image and the accompanying audio track. &#...8226; TV Speakers - See Adjusting the Advanced Audio Settings on the remote. Adjusts the boost or attenuation of the audio output from the left and right speakers. • Lip Sync - When you wish to...
User Manual
Page 30
Use the Arrow buttons to highlight the setting you have finished adjusting the advanced audio settings, press the EXIT button on the remote. Additionally, StudioSound HD completes the entertainment experience by maintaining a steady volume while watching programming and movies, providing deep, rich bass, and delivering crisp details and ...
Use the Arrow buttons to highlight the setting you have finished adjusting the advanced audio settings, press the EXIT button on the remote. Additionally, StudioSound HD completes the entertainment experience by maintaining a steady volume while watching programming and movies, providing deep, rich bass, and delivering crisp details and ...

User Manual
Page 31
... disconnect the Ethernet cable to highlight the Network icon and press OK. The on-screen menu is displayed. 3. Use the Arrow buttons on the remote to the factory defaults?" 4. The More Access Points menu, which is a list of your wireless network displayed, highlight More Access Points and press... and built-in high-speed wireless-N. If you will not see your wireless network (this is displayed. 4. Press the MENU button on the remote. 5 Resetting the Audio Settings To reset the audio settings to highlight Reset Audio Mode and press OK. The on -screen keyboard, enter your...
... disconnect the Ethernet cable to highlight the Network icon and press OK. The on-screen menu is displayed. 3. Use the Arrow buttons on the remote to the factory defaults?" 4. The More Access Points menu, which is a list of your wireless network displayed, highlight More Access Points and press... and built-in high-speed wireless-N. If you will not see your wireless network (this is displayed. 4. Press the MENU button on the remote. 5 Resetting the Audio Settings To reset the audio settings to highlight Reset Audio Mode and press OK. The on -screen keyboard, enter your...
User Manual
Page 32
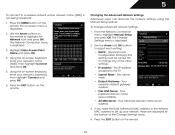
... is displayed. 3. DNS Server - Your preferred domain name server address. • Alt DNS Server - Press the MENU button on the remote. Changing the Advanced Network Settings Advanced users can fine-tune the network settings using the Manual Setup feature. Press the EXIT button on the... remote to highlight the Network icon and press OK. Use the Arrow buttons on the remote. 25 The on -screen keyboard, enter your network's password, then highlight Connect and press OK...
... is displayed. 3. DNS Server - Your preferred domain name server address. • Alt DNS Server - Press the MENU button on the remote. Changing the Advanced Network Settings Advanced users can fine-tune the network settings using the Manual Setup feature. Press the EXIT button on the... remote to highlight the Network icon and press OK. Use the Arrow buttons on the remote. 25 The on -screen keyboard, enter your network's password, then highlight Connect and press OK...
User Manual
Page 33
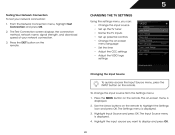
... on-screen menu language • Set the time • Adjust the CEC settings • Adjust the VIZIO logo settings Changing the Input Source To quickly access the Input Source menu, press the INPUT button on the remote. 5 Testing Your Network Connection To test your network connection. 3. The Settings menu is displayed. 4. The...
... on-screen menu language • Set the time • Adjust the CEC settings • Adjust the VIZIO logo settings Changing the Input Source To quickly access the Input Source menu, press the INPUT button on the remote. 5 Testing Your Network Connection To test your network connection. 3. The Settings menu is displayed. 4. The...


