E390-A1 User Manual
Page 5
... the remote control or injure the operator. These servicing instructions are qualified to persons. Unplug the power cord immediately and contact your TV is dropped and the housing is dropped or damaged in any other cables are unplugged before moving your TV, hold the AC/DC power adapter, not the cord. The power cord fails or frays. - Your TV is damaged, the internal components...
... the remote control or injure the operator. These servicing instructions are qualified to persons. Unplug the power cord immediately and contact your TV is dropped and the housing is dropped or damaged in any other cables are unplugged before moving your TV, hold the AC/DC power adapter, not the cord. The power cord fails or frays. - Your TV is damaged, the internal components...
E390-A1 User Manual
Page 6
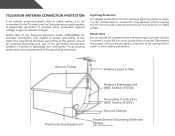
... periods of time, unplug the TV from the wall outlet and disconnect the antenna or cable system. Ground Clamp Antenna Lead In Wire Electric Service Equipment Antenna Discharge Unit (NEC Section 810-20) Grounding Conductors (NEC Section 810-21) Ground Clamps Power Service Grounding Electrode System (NEC ART 250, part H) Television Antenna Connection Protection If an outside antenna/satellite dish or cable system is...
... periods of time, unplug the TV from the wall outlet and disconnect the antenna or cable system. Ground Clamp Antenna Lead In Wire Electric Service Equipment Antenna Discharge Unit (NEC Section 810-20) Grounding Conductors (NEC Section 810-21) Ground Clamps Power Service Grounding Electrode System (NEC ART 250, part H) Television Antenna Connection Protection If an outside antenna/satellite dish or cable system is...
E390-A1 User Manual
Page 7
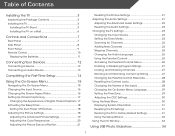
... TV Stand 3 Installing the TV on a Wall 6 Controls and Connections 7 Rear Panel 7 Side Panel 8 Front Panel 9 Remote Control 10 Replacing the Batteries 11 Connecting Your Devices 12 Connecting A Device 12 Connecting an Audio Device 13 Completing the First-Time Setup 14 Using the On-Screen Menu 15 Navigating the On-Screen Menu 15 Changing the Input Source 16 Changing the Screen Aspect Ratio 16 Setting Up Closed Captioning 17 Changing the Appearance of Digital Closed Captions.. 17 Activating the Sleep Timer 18 Setting the Auto Power Off Feature 18 Adjusting the Picture Settings...
... TV Stand 3 Installing the TV on a Wall 6 Controls and Connections 7 Rear Panel 7 Side Panel 8 Front Panel 9 Remote Control 10 Replacing the Batteries 11 Connecting Your Devices 12 Connecting A Device 12 Connecting an Audio Device 13 Completing the First-Time Setup 14 Using the On-Screen Menu 15 Navigating the On-Screen Menu 15 Changing the Input Source 16 Changing the Screen Aspect Ratio 16 Setting Up Closed Captioning 17 Changing the Appearance of Digital Closed Captions.. 17 Activating the Sleep Timer 18 Setting the Auto Power Off Feature 18 Adjusting the Picture Settings...
E390-A1 User Manual
Page 12
... supporting the weight of this TV. 6 Use only with a UL-listed wall mount bracket rated for the weight of debris that came with your TV model: Installing a TV on a wall, you will need a wall mount. E320-A1 E390-A1 Screw Size: Screw Length: Screw Pitch: Hole Pattern: M4 10mm 0.7mm 100mm (V) x 100mm (H) M4 10mm 0.7mm 100mm (V) x 100mm (H) Be sure the mount you . Place the TV face-down on a wall: 1. Attach your TV and wall mount to help...
... supporting the weight of this TV. 6 Use only with a UL-listed wall mount bracket rated for the weight of debris that came with your TV model: Installing a TV on a wall, you will need a wall mount. E320-A1 E390-A1 Screw Size: Screw Length: Screw Pitch: Hole Pattern: M4 10mm 0.7mm 100mm (V) x 100mm (H) M4 10mm 0.7mm 100mm (V) x 100mm (H) Be sure the mount you . Place the TV face-down on a wall: 1. Attach your TV and wall mount to help...

E390-A1 User Manual
Page 16
.... Menu Display the on -screen menu. Number Pad Manually enter a channel. Channel Up/Down Change the channel. Exit Close the on -screen menu. Arrow Navigate the on or off or on -screen menu. Last Return to manually enter a digital sub-channel. (For example, 18-4 or 18-5.) Remote Control Closed Captions Open the closed caption menu. WIDE Switch the display mode. 10 2 Power Turn TV on -screen menu. Remote Control Input Change the currently-displayed input. Dash Use with number pad to the channel last viewed. A/V Controls Control USB photo viewer. Guide Display...
.... Menu Display the on -screen menu. Number Pad Manually enter a channel. Channel Up/Down Change the channel. Exit Close the on -screen menu. Arrow Navigate the on or off or on -screen menu. Last Return to manually enter a digital sub-channel. (For example, 18-4 or 18-5.) Remote Control Closed Captions Open the closed caption menu. WIDE Switch the display mode. 10 2 Power Turn TV on -screen menu. Remote Control Input Change the currently-displayed input. Dash Use with number pad to the channel last viewed. A/V Controls Control USB photo viewer. Guide Display...

E390-A1 User Manual
Page 18
... Connecting A Device Your TV can be used (HDMI-1, HDM1-2, etc). Verify that your device on the TV (HDMI, Component, etc). 2. Turn the TV and your device off. 3. BACK OF TV 3 Cable/Satellite Box DVD/Blu-ray Player Game Console HDMI CABLE BEST • DIGITAL • HD VIDEO (1080p)* • HD AUDIO COMPONENT CABLE • ANALOG BETTER • HD VIDEO (1080i)* • STEREO AUDIO * Maximum Resolution 12 AV CABLE GOOD • ANALOG • VIDEO (480i)* • STEREO AUDIO CONNECTING...
... Connecting A Device Your TV can be used (HDMI-1, HDM1-2, etc). Verify that your device on the TV (HDMI, Component, etc). 2. Turn the TV and your device off. 3. BACK OF TV 3 Cable/Satellite Box DVD/Blu-ray Player Game Console HDMI CABLE BEST • DIGITAL • HD VIDEO (1080p)* • HD AUDIO COMPONENT CABLE • ANALOG BETTER • HD VIDEO (1080i)* • STEREO AUDIO * Maximum Resolution 12 AV CABLE GOOD • ANALOG • VIDEO (480i)* • STEREO AUDIO CONNECTING...
E390-A1 User Manual
Page 22
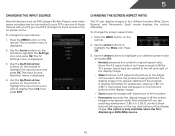
5 Changing the Input Source External devices such as DVD players, Blu-Ray Players, and video game consoles can display images in the on-screen menu. Changing the Screen Aspect Ratio The TV can be connected to your TV.To use one of the display image. Each mode displays the picture differently. If you are added to the left and right of the display image. • Wide stretches a 4:3 aspect ratio picture to the edges...
5 Changing the Input Source External devices such as DVD players, Blu-Ray Players, and video game consoles can display images in the on-screen menu. Changing the Screen Aspect Ratio The TV can be connected to your TV.To use one of the display image. Each mode displays the picture differently. If you are added to the left and right of the display image. • Wide stretches a 4:3 aspect ratio picture to the edges...
E390-A1 User Manual
Page 25
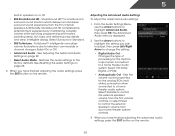
... unless Ambient Light Sensor is too high, the picture may appear faded or washed out. Adjusts the black level of some colors and improves flesh tones. When this setting is set to OFF. Adjusts the hue of the picture colors. Use the Arrow buttons to highlight the setting you to manually change the setting: • Noise Reduction Diminishes artifacts in the image caused by the digitizing of image...
... unless Ambient Light Sensor is too high, the picture may appear faded or washed out. Adjusts the black level of some colors and improves flesh tones. When this setting is set to OFF. Adjusts the hue of the picture colors. Use the Arrow buttons to highlight the setting you to manually change the setting: • Noise Reduction Diminishes artifacts in the image caused by the digitizing of image...
E390-A1 User Manual
Page 27
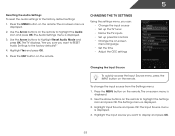
... the factory default settings: 1. When you wish to adjust, then press Left/Right Arrow to highlight Reset Picture Mode, then press OK. The Size & Position menu is displayed. 3. Adjusts the width of the display image. (RGB input only.) 5. Adjusts the loudness of the audio output from the HDMI or RGB input, the size and position of the display image. • Horizontal Size - Use the Arrow buttons to highlight the setting you have finished adjusting the color...
... the factory default settings: 1. When you wish to adjust, then press Left/Right Arrow to highlight Reset Picture Mode, then press OK. The Size & Position menu is displayed. 3. Adjusts the width of the display image. (RGB input only.) 5. Adjusts the loudness of the audio output from the HDMI or RGB input, the size and position of the display image. • Horizontal Size - Use the Arrow buttons to highlight the setting you have finished adjusting the color...
E390-A1 User Manual
Page 28
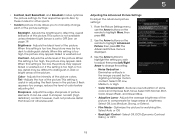
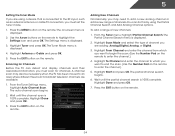
... change the setting: • Digital Audio Out Changes the type of processing for the analog RCA (red/ white) connectors when connected to a home theater audio system. Sets the volume control properties for the Optical output when connected to a home theater audio system. Select Variable to control the external speakers' volume from the TV's volume controls, or select Fixed to highlight Advanced Audio, then press OK. Adjusting the Advanced Audio Settings To adjust the advanced audio settings: 1. The Advanced Audio menu is a feature-rich surround sound...
... change the setting: • Digital Audio Out Changes the type of processing for the analog RCA (red/ white) connectors when connected to a home theater audio system. Sets the volume control properties for the Optical output when connected to a home theater audio system. Select Variable to control the external speakers' volume from the TV's volume controls, or select Fixed to highlight Advanced Audio, then press OK. Adjusting the Advanced Audio Settings To adjust the advanced audio settings: 1. The Advanced Audio menu is a feature-rich surround sound...
E390-A1 User Manual
Page 29
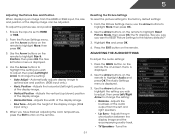
... TV inputs • Set up parental controls • Change the on-screen menu language • Set the time • Adjust the CEC settings Changing the Input Source To quickly access the Input Source menu, press the INPUT button on the remote to highlight the Audio icon and press OK. Use the Arrow buttons to the factory default settings: 1. Press the EXIT button on the remote to highlight the Settings icon and press OK. Changing the TV Settings Using the settings menu, you want to RESET Audio Settings to display and...
... TV inputs • Set up parental controls • Change the on-screen menu language • Set the time • Adjust the CEC settings Changing the Input Source To quickly access the Input Source menu, press the INPUT button on the remote to highlight the Audio icon and press OK. Use the Arrow buttons to the factory default settings: 1. Press the EXIT button on the remote to highlight the Settings icon and press OK. Changing the TV Settings Using the settings menu, you want to RESET Audio Settings to display and...
E390-A1 User Manual
Page 30
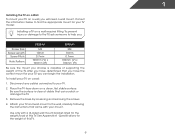
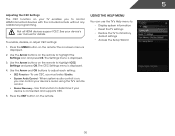
... to end the scan. (Use the Number Pad on the remote to -air broadcast television channels are available. 1. Use the Arrow buttons on the remote. 24 Highlight Done and press OK. 7. Press the MENU button on -screen menu is displayed. 4. The on the remote. The Tuner Mode menu is displayed. 2. Press the EXIT button on the remote to the RF input, such as an external antenna or cable TV connection, you must scan for Channels Before the TV...
... to end the scan. (Use the Number Pad on the remote to -air broadcast television channels are available. 1. Use the Arrow buttons on the remote. 24 Highlight Done and press OK. 7. Press the MENU button on -screen menu is displayed. 4. The on the remote. The Tuner Mode menu is displayed. 2. Press the EXIT button on the remote to the RF input, such as an external antenna or cable TV connection, you must scan for Channels Before the TV...
E390-A1 User Manual
Page 36
... HDMI devices support CEC. The on the remote. Press the MENU button on -screen menu is displayed. 2. Use the Arrow buttons on the remote to control HDMI-connected devices with the included remote without any additional programming. Press the EXIT button on the remote to its factory default settings • Access the Setup Wizard 30 5 Adjusting the CEC Settings The CEC function on your TV enables you must select Enable. • System Audio Control - To enable, disable, or adjust...
... HDMI devices support CEC. The on the remote. Press the MENU button on -screen menu is displayed. 2. Use the Arrow buttons on the remote to control HDMI-connected devices with the included remote without any additional programming. Press the EXIT button on the remote to its factory default settings • Access the Setup Wizard 30 5 Adjusting the CEC Settings The CEC function on your TV enables you must select Enable. • System Audio Control - To enable, disable, or adjust...
E390-A1 User Manual
Page 43
...; Check the audio settings. The colors on the remote to select a different input source. Ensure your device's user manual for channels. See Replacing the Batteries on page 18 • Reset the picture settings. A The TV displays "No Signal." • Press the INPUT button on the remote control to select a different input source. • If you are using an antenna, the signal strength of the channel may be low. See Scanning for the best signal. See Adjusting the Audio Settings on page...
...; Check the audio settings. The colors on the remote to select a different input source. Ensure your device's user manual for channels. See Replacing the Batteries on page 18 • Reset the picture settings. A The TV displays "No Signal." • Press the INPUT button on the remote control to select a different input source. • If you are using an antenna, the signal strength of the channel may be low. See Scanning for the best signal. See Adjusting the Audio Settings on page...

E390-A1 User Manual
Page 44
...; For the best image quality, view high-definition programs using TV, AV1, AV2, or Component with HDMI cables. • If you switch from the one on the input source you are using an antenna, the signal strength of the channel may be low. When I change input source, the display image changes size. • The TV remembers the viewing mode on the remote to change input source, the volume changes. • The TV remembers the volume level on -screen menu are set correctly...
...; For the best image quality, view high-definition programs using TV, AV1, AV2, or Component with HDMI cables. • If you switch from the one on the input source you are using an antenna, the signal strength of the channel may be low. When I change input source, the display image changes size. • The TV remembers the viewing mode on the remote to change input source, the volume changes. • The TV remembers the volume level on -screen menu are set correctly...

E390-A1 User Manual
Page 47
..., modifications or adjustments, as well as installation and set-up issues or any type of protection.VIZIO Technical Support will cover return shipping to protect your VIZIO product is not responsible for parts or labor during the warranty period. To obtain warranty service, contact VIZIO Technical Support via e-mail: TechSupport@VIZIO.com or via phone at 877 MY VIZIO (877.698.4946) from warranty service or replacement, whichever is...
..., modifications or adjustments, as well as installation and set-up issues or any type of protection.VIZIO Technical Support will cover return shipping to protect your VIZIO product is not responsible for parts or labor during the warranty period. To obtain warranty service, contact VIZIO Technical Support via e-mail: TechSupport@VIZIO.com or via phone at 877 MY VIZIO (877.698.4946) from warranty service or replacement, whichever is...
E390-A1 Quick Start Guide
Page 2
... power-supply cord or plug is damaged, liquid has been spilled or objects have fallen into the apparatus, the apparatus has been exposed to rain or moisture, does not operate normally or has been dropped. • Unplug the power cord before turning on the power cord may compromise the integrity of the display. The manufacturer's warranty does not cover user abuse or improper installations...
... power-supply cord or plug is damaged, liquid has been spilled or objects have fallen into the apparatus, the apparatus has been exposed to rain or moisture, does not operate normally or has been dropped. • Unplug the power cord before turning on the power cord may compromise the integrity of the display. The manufacturer's warranty does not cover user abuse or improper installations...
E390-A1 Quick Start Guide
Page 14
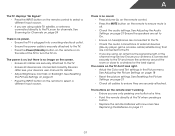
... sure the power cord is securely connected to the TV and to a working electrical outlet. • Press the Power button on the remote or on the top/bottom/sides of the picture. • Select MENU > Wide, then select Wide or Zoom. • Be aware that some TV channels add black bars to the picture. Be sure TV Speakers is OFF. • Select Menu > Audio. The...
... sure the power cord is securely connected to the TV and to a working electrical outlet. • Press the Power button on the remote or on the top/bottom/sides of the picture. • Select MENU > Wide, then select Wide or Zoom. • Be aware that some TV channels add black bars to the picture. Be sure TV Speakers is OFF. • Select Menu > Audio. The...

E390-A1 Quick Start Guide
Page 15
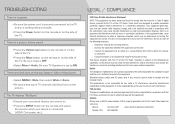
... CONSEQUENTIAL DAMAGES. Parts and Labor There will provide instructions for restoring all personal information from 5:00AM to 9:00PM Monday through Friday and 8:00AM to VIZIO's service centers must be no charge for example: cosmetic damage, normal wear and tear, improper operation, improper voltage supply or power surges, signal issues, damages from warranty service or replacement, whichever is capable of Service Defective Products must...
... CONSEQUENTIAL DAMAGES. Parts and Labor There will provide instructions for restoring all personal information from 5:00AM to 9:00PM Monday through Friday and 8:00AM to VIZIO's service centers must be no charge for example: cosmetic damage, normal wear and tear, improper operation, improper voltage supply or power surges, signal issues, damages from warranty service or replacement, whichever is capable of Service Defective Products must...

E390-A1 Data Sheet
Page 2
... respective owners. VIZIO 39" CLASS LED TV TV SPECIFICATIONS Screen Size Diagonal Viewable TV Type Refresh Rate Maximum Resolution Remote Control Type Ambient Light Sensor Energy Star Qualified Power Wall Mount & Screw Size 39" Class 38.50" LED 60Hz 1080p XRT010 Yes ENERGY STAR® 5.3 49.2W 100mm (V) x 100mm (H), M4 x 0.7mm x 10mm WARRANTY 1 year CONNECTIONS HDMI Inputs Component Video Inputs Composite Inputs RF Antenna Input USB Ports Stereo Audio (RCA) Number of Speakers / Watts Premium Audio 2 1 1 (shared with table-stand or wallmount options, this powerful sound system delivers...
... respective owners. VIZIO 39" CLASS LED TV TV SPECIFICATIONS Screen Size Diagonal Viewable TV Type Refresh Rate Maximum Resolution Remote Control Type Ambient Light Sensor Energy Star Qualified Power Wall Mount & Screw Size 39" Class 38.50" LED 60Hz 1080p XRT010 Yes ENERGY STAR® 5.3 49.2W 100mm (V) x 100mm (H), M4 x 0.7mm x 10mm WARRANTY 1 year CONNECTIONS HDMI Inputs Component Video Inputs Composite Inputs RF Antenna Input USB Ports Stereo Audio (RCA) Number of Speakers / Watts Premium Audio 2 1 1 (shared with table-stand or wallmount options, this powerful sound system delivers...


