E390-A1 User Manual
Page 5
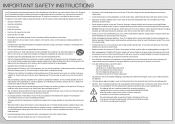
... TV to dripping or splashing and no objects fill with instructions. If repair is intended to alert the user to leak which can damage the remote control or injure the operator.
... TV to dripping or splashing and no objects fill with instructions. If repair is intended to alert the user to leak which can damage the remote control or injure the operator.
E390-A1 User Manual
Page 7
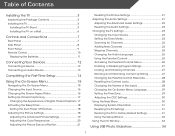
...the Package Contents 3 Installing the TV 3 Installing the TV Stand 3 Installing the TV on a Wall 6 Controls and Connections 7 Rear Panel 7 Side Panel 8 Front Panel 9 Remote Control 10 Replacing the Batteries 11 Connecting Your Devices 12 Connecting A Device 12 Connecting an Audio Device 13 Completing the ... for Channels 24 Adding New Channels 24 Skipping Channels 25 Changing the Audio Language 26 Using the Parental Controls 26 Accessing the Parental Controls Menu 26 Enabling or Disabling Program Ratings 27 Locking and Unlocking Channels 27 Blocking and Unblocking Content by ...
...the Package Contents 3 Installing the TV 3 Installing the TV Stand 3 Installing the TV on a Wall 6 Controls and Connections 7 Rear Panel 7 Side Panel 8 Front Panel 9 Remote Control 10 Replacing the Batteries 11 Connecting Your Devices 12 Connecting A Device 12 Connecting an Audio Device 13 Completing the ... for Channels 24 Adding New Channels 24 Skipping Channels 25 Changing the Audio Language 26 Using the Parental Controls 26 Accessing the Parental Controls Menu 26 Enabling or Disabling Program Ratings 27 Locking and Unlocking Channels 27 Blocking and Unblocking Content by ...
E390-A1 User Manual
Page 9
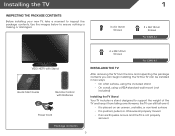
... images below to ensure nothing is missing or damaged. 1 3 x T4 16mm Screws 3 x M4 12mm Screws For E320-A1 VIZIO HDTV with Stand Quick Start Guide Remote Control with Batteries Power Cord Package Contents 6 x M4 14mm Screws For E390-A1 Installing the TV After removing the TV from falling over if: • It is placed on an...
... images below to ensure nothing is missing or damaged. 1 3 x T4 16mm Screws 3 x M4 12mm Screws For E320-A1 VIZIO HDTV with Stand Quick Start Guide Remote Control with Batteries Power Cord Package Contents 6 x M4 14mm Screws For E390-A1 Installing the TV After removing the TV from falling over if: • It is placed on an...

E390-A1 User Manual
Page 16
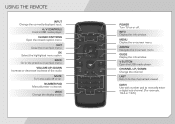
Closed Captions Open the closed caption menu. Volume Up/Down Increase or decrease loudness of the audio. Remote Control Input Change the currently-displayed input. Ok Select the highlighted menu option. Number Pad Manually enter a channel. Guide Display the info window. V... or on -screen menu. Last Return to manually enter a digital sub-channel. (For example, 18-4 or 18-5.) Remote Control Dash Use with number pad to the channel last viewed. A/V Controls Control USB photo viewer. Menu Display the on -screen menu. Arrow Navigate the on -screen menu. Channel Up/Down Change ...
Closed Captions Open the closed caption menu. Volume Up/Down Increase or decrease loudness of the audio. Remote Control Input Change the currently-displayed input. Ok Select the highlighted menu option. Number Pad Manually enter a channel. Guide Display the info window. V... or on -screen menu. Last Return to manually enter a digital sub-channel. (For example, 18-4 or 18-5.) Remote Control Dash Use with number pad to the channel last viewed. A/V Controls Control USB photo viewer. Menu Display the on -screen menu. Arrow Navigate the on -screen menu. Channel Up/Down Change ...

E390-A1 User Manual
Page 17
2 Replacing the Batteries Replacing Batteries 1. Make sure that may cause a fire or result in injury. • Dispose of old or dead batteries in cracking or leakage that the (+) and (-) symbols on the batteries match the (+) and (-) symbols inside the battery compartment. 3. Insert two batteries into the remote control. Remove the battery cover. 2. Replace the battery cover. • Use only good quality batteries. • Inserting the batteries incorrectly may result in accordance with local hazardous waste regulations. • Keep batteries away from children and pets. 11
2 Replacing the Batteries Replacing Batteries 1. Make sure that may cause a fire or result in injury. • Dispose of old or dead batteries in cracking or leakage that the (+) and (-) symbols on the batteries match the (+) and (-) symbols inside the battery compartment. 3. Insert two batteries into the remote control. Remove the battery cover. 2. Replace the battery cover. • Use only good quality batteries. • Inserting the batteries incorrectly may result in accordance with local hazardous waste regulations. • Keep batteries away from children and pets. 11
E390-A1 User Manual
Page 25
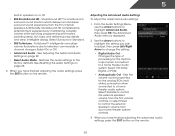
...of the picture. Select Off, Normal, Rich Color, Green/Flesh, and Green/Blue. • Adaptive Luma - Select Auto or Off. • Backlight Control - Brightness - When this setting is too high, the picture may appear faded or washed out. Contrast - This setting is too low, the picture may...settings for watching film. Adjusts the black level of the picture colors. From the Picture Settings menu, use the Arrow buttons on the remote to sharpen non-HD (high definition) content; Adjusts the intensity of the picture. Adjusts the average brightness of the picture to compensate...
...of the picture. Select Off, Normal, Rich Color, Green/Flesh, and Green/Blue. • Adaptive Luma - Select Auto or Off. • Backlight Control - Brightness - When this setting is too high, the picture may appear faded or washed out. Contrast - This setting is too low, the picture may...settings for watching film. Adjusts the black level of the picture colors. From the Picture Settings menu, use the Arrow buttons on the remote to sharpen non-HD (high definition) content; Adjusts the intensity of the picture. Adjusts the average brightness of the picture to compensate...
E390-A1 User Manual
Page 28
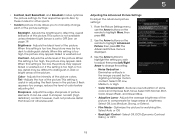
... - When you have finished adjusting the audio settings, press the EXIT button on the remote. 5 built-in speakers on page 22. • Reset Audio Mode - Sets the volume control properties for the Optical output when connected to the factory defaults. When you have finished ...adjusting the advanced audio settings, press the EXIT button on page 23. 4. See Resetting the Audio Settings on the remote. 22 Select Variable to control the external speakers' volume from the TV's internal speakers. Select Surround or Standard. • SRS TruVolume - StudioSound HD™...
... - When you have finished adjusting the audio settings, press the EXIT button on the remote. 5 built-in speakers on page 22. • Reset Audio Mode - Sets the volume control properties for the Optical output when connected to the factory defaults. When you have finished ...adjusting the advanced audio settings, press the EXIT button on page 23. 4. See Resetting the Audio Settings on the remote. 22 Select Variable to control the external speakers' volume from the TV's internal speakers. Select Surround or Standard. • SRS TruVolume - StudioSound HD™...
E390-A1 User Manual
Page 29
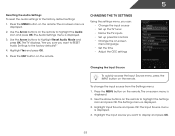
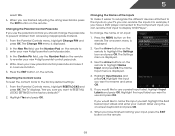
.... To change the input source from the Settings menu: 1. Use the Arrow buttons to the factory default settings: 1. Use the Arrow buttons on the remote to the factory defaults?" 4. The Audio Settings menu is displayed. 2. Changing the TV Settings Using the settings menu, you can: • Change the... input source • Set up the TV tuner • Name the TV inputs • Set up parental controls • Change the on-screen menu language • Set the time • Adjust the CEC settings Changing the Input Source To quickly access the ...
.... To change the input source from the Settings menu: 1. Use the Arrow buttons to the factory default settings: 1. Use the Arrow buttons on the remote to the factory defaults?" 4. The Audio Settings menu is displayed. 2. Changing the TV Settings Using the settings menu, you can: • Change the... input source • Set up the TV tuner • Name the TV inputs • Set up parental controls • Change the on-screen menu language • Set the time • Adjust the CEC settings Changing the Input Source To quickly access the ...

E390-A1 User Manual
Page 31
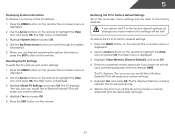
... Channel feature can still be some channels are adding. 3. You can remove these channels from being viewed, use the Up/Down Arrow buttons on the remote. 5 Skipping Channels After a channel scan is entered using the Number Pad. To remove a channel: 1. An X appears to the right of the ...to highlight the channel and press OK. The TV scans for the channel, press the EXIT button on the remote to remove, use the parental controls. See Using the Parental Controls on the remote. 25 Highlight Add Channel and press OK. When the TV is done scanning for the channel. 4. When ...
... Channel feature can still be some channels are adding. 3. You can remove these channels from being viewed, use the Up/Down Arrow buttons on the remote. 5 Skipping Channels After a channel scan is entered using the Number Pad. To remove a channel: 1. An X appears to the right of the ...to highlight the channel and press OK. The TV scans for the channel, press the EXIT button on the remote to remove, use the parental controls. See Using the Parental Controls on the remote. 25 Highlight Add Channel and press OK. When the TV is done scanning for the channel. 4. When ...
E390-A1 User Manual
Page 32
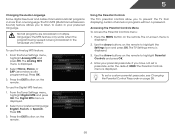
...press OK. Press OK. 3. Select your parental passcode. Using the Parental Controls The TV's parental controls allow you to highlight the Settings icon and press OK. If you select. Press the EXIT button on the remote. To use the Analog MTS feature: 1. The Digital MTS menu is...OK. 4. Not all programs are broadcast in the language you have not set a custom parental passcode, see Changing the Parental Control Passcode on the remote. The MTS feature only works when the program being broadcast in multiple languages. The Analog MTS menu is being viewed is ...
...press OK. Press OK. 3. Select your parental passcode. Using the Parental Controls The TV's parental controls allow you to highlight the Settings icon and press OK. If you select. Press the EXIT button on the remote. To use the Analog MTS feature: 1. The Digital MTS menu is...OK. 4. Not all programs are broadcast in the language you have not set a custom parental passcode, see Changing the Parental Control Passcode on the remote. The MTS feature only works when the program being broadcast in multiple languages. The Analog MTS menu is being viewed is ...

E390-A1 User Manual
Page 33
...the channel completely using a channel lock, but you want to block or unblock, use the Up/Down and Left/Right Arrow buttons on the remote to highlight the rating type and press OK. 3. If you must enable the Program Rating feature. CAN - Blocking and Unblocking Content by its ....org. CAN - Select On or Off and press OK. When a channel is entered. 4. To lock or unlock a channel: 1. From the Parental Controls menu, highlight Channel Locks and press OK. To enable or disable the Program Rating feature: 1. 5 Enabling or Disabling Program Ratings To manage program content according...
...the channel completely using a channel lock, but you want to block or unblock, use the Up/Down and Left/Right Arrow buttons on the remote to highlight the rating type and press OK. 3. If you must enable the Program Rating feature. CAN - Blocking and Unblocking Content by its ....org. CAN - Select On or Off and press OK. When a channel is entered. 4. To lock or unlock a channel: 1. From the Parental Controls menu, highlight Channel Locks and press OK. To enable or disable the Program Rating feature: 1. 5 Enabling or Disabling Program Ratings To manage program content according...
E390-A1 User Manual
Page 34
... menu is displayed. 2. Changing the Parental Control Passcode If you use the parental controls, you want to RESET ALL LOCKS SETTINGS to the factory defaults?" 2. The Change PIN menu is displayed. 3. In the Confirm Pin field, use the Number Pad on the remote to display "DVD Player". Changing the Names...and press OK. The Name Input menu is displayed. 2. In the New Pin field, use the Number Pad on the remote to re-enter your new parental control passcode and save it easier to recognize the different devices attached to highlight Name Input and press OK. The TV displays,...
... menu is displayed. 2. Changing the Parental Control Passcode If you use the parental controls, you want to RESET ALL LOCKS SETTINGS to the factory defaults?" 2. The Change PIN menu is displayed. 3. In the Confirm Pin field, use the Number Pad on the remote to display "DVD Player". Changing the Names...and press OK. The Name Input menu is displayed. 2. In the New Pin field, use the Number Pad on the remote to re-enter your new parental control passcode and save it easier to recognize the different devices attached to highlight Name Input and press OK. The TV displays,...
E390-A1 User Manual
Page 36
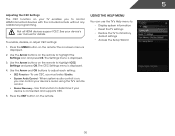
...screen menu is connected and supports CEC. 5. Use the Arrow buttons on the remote to highlight the Settings icon and press OK. Using the Help Menu You can control your device's audio using the TV's remote control. • Device Discovery - See your device's user manual for details. The... Settings menu is displayed. 4. Press the EXIT button on the remote. Not all HDMI devices support CEC. 5 ...
...screen menu is connected and supports CEC. 5. Use the Arrow buttons on the remote to highlight the Settings icon and press OK. Using the Help Menu You can control your device's audio using the TV's remote control. • Device Discovery - See your device's user manual for details. The... Settings menu is displayed. 4. Press the EXIT button on the remote. Not all HDMI devices support CEC. 5 ...
E390-A1 User Manual
Page 37
... the MENU button on the remote to its factory default settings: 1. The TV displays, "Are you sure you are finished reviewing the system information, press the EXIT button on -screen menu is displayed. 2. Enter your parental control passcode. The Help menu is being cleared. The Help menu ...is displayed. 3. Use the Arrow buttons on the remote. The Help menu is displayed. 3.
... the MENU button on the remote to its factory default settings: 1. The TV displays, "Are you sure you are finished reviewing the system information, press the EXIT button on -screen menu is displayed. 2. Enter your parental control passcode. The Help menu is being cleared. The Help menu ...is displayed. 3. Use the Arrow buttons on the remote. The Help menu is displayed. 3.

E390-A1 User Manual
Page 40
... of the TV. 2. Press OK. 5. Doing so may damage the drive. 34 Turn the TV off. Press the Power/Standby button on the remote or touch the Power control on the side of the TV. 2. The file plays. Using USB Photo Slideshow 6 Using USB photo slideshow The USB port on your TV...
... of the TV. 2. Press OK. 5. Doing so may damage the drive. 34 Turn the TV off. Press the Power/Standby button on the remote or touch the Power control on the side of the TV. 2. The file plays. Using USB Photo Slideshow 6 Using USB photo slideshow The USB port on your TV...
E390-A1 User Manual
Page 43
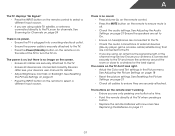
Devices differ; There is no sound. • Press Volume Up on the remote control. • Press the MUTE button on page 21 Ensure the speakers are set to On....you are using an antenna, the signal strength of the channel may be low. See Adjusting the Audio Settings on the remote to ensure mute is off. • Check the audio settings. see your antenna is connected securely to the TV ... Picture menu. A The TV displays "No Signal." • Press the INPUT button on the remote control to select a different input source. • If you are only pressing one button at a time. • Point the...
Devices differ; There is no sound. • Press Volume Up on the remote control. • Press the MUTE button on page 21 Ensure the speakers are set to On....you are using an antenna, the signal strength of the channel may be low. See Adjusting the Audio Settings on the remote to ensure mute is off. • Check the audio settings. see your antenna is connected securely to the TV ... Picture menu. A The TV displays "No Signal." • Press the INPUT button on the remote control to select a different input source. • If you are only pressing one button at a time. • Point the...
E390-A1 Quick Start Guide
Page 2
... alert the user to the presence of important operating and maintenance (servicing) instructions in the back and bottom of the marked voltage can damage the remote control or injure the operator. If repair is required, contact your TV that may cause fire or electric shock. • Slots and openings in the literature...
... alert the user to the presence of important operating and maintenance (servicing) instructions in the back and bottom of the marked voltage can damage the remote control or injure the operator. If repair is required, contact your TV that may cause fire or electric shock. • Slots and openings in the literature...

E390-A1 Quick Start Guide
Page 4
DOWNLOAD THE FULL USER MANUAL AT VIZIO.COM/SUPPORT PACKAGE CONTENTS Power Cord VIZIO LED HDTV with Stand Remote Control with Batteries This Quick Start Guide 6 x M4 14mm Phillips Screws HELP VIZIO REDUCE PAPER WASTE.
DOWNLOAD THE FULL USER MANUAL AT VIZIO.COM/SUPPORT PACKAGE CONTENTS Power Cord VIZIO LED HDTV with Stand Remote Control with Batteries This Quick Start Guide 6 x M4 14mm Phillips Screws HELP VIZIO REDUCE PAPER WASTE.
E390-A1 Quick Start Guide
Page 5
.../DOWN Increase or decrease loudness of the audio. WIDE Change the display mode. CLOSED CAPTIONS Open the closed caption menu. GUIDE Display the info window. A/V CONTROLS Control USB media player. BACK Go to the previous on -screen menu. NUMBER PAD Manually enter a channel. EXIT Close the on -screen menu. INFO Display the...
.../DOWN Increase or decrease loudness of the audio. WIDE Change the display mode. CLOSED CAPTIONS Open the closed caption menu. GUIDE Display the info window. A/V CONTROLS Control USB media player. BACK Go to the previous on -screen menu. NUMBER PAD Manually enter a channel. EXIT Close the on -screen menu. INFO Display the...

E390-A1 Data Sheet
Page 2
...system delivers exceptional audio performance in streaming entertainment. Images used for illustration purposes only. Trademarks shown are the intellectual property of VIZIO Inc. all -in-one 12ft HDMI® cable can be used are subject to change without Stand 18.96 lbs ...stylish, slim design. VIZIO, the V logo, Where Vision Meets Value, Razor LED and other VIZIO trademarks are the property of their respective owners. VIZIO 39" CLASS LED TV TV SPECIFICATIONS Screen Size Diagonal Viewable TV Type Refresh Rate Maximum Resolution Remote Control Type Ambient Light Sensor...
...system delivers exceptional audio performance in streaming entertainment. Images used for illustration purposes only. Trademarks shown are the intellectual property of VIZIO Inc. all -in-one 12ft HDMI® cable can be used are subject to change without Stand 18.96 lbs ...stylish, slim design. VIZIO, the V logo, Where Vision Meets Value, Razor LED and other VIZIO trademarks are the property of their respective owners. VIZIO 39" CLASS LED TV TV SPECIFICATIONS Screen Size Diagonal Viewable TV Type Refresh Rate Maximum Resolution Remote Control Type Ambient Light Sensor...

