
E390-A1 User Manual
Page 4
... the apparatus, the apparatus has been exposed to rain or moisture, does not operate normally or has been dropped. • Unplug the power cord before turning on your TV to avoid causing fire, electric shock, or component damage. • A distance of at your TV. Wait before cleaning your TV. • When...
... the apparatus, the apparatus has been exposed to rain or moisture, does not operate normally or has been dropped. • Unplug the power cord before turning on your TV to avoid causing fire, electric shock, or component damage. • A distance of at your TV. Wait before cleaning your TV. • When...
E390-A1 User Manual
Page 14
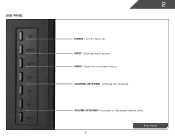
Side Panel 2 POWER - Open the on . Change input source. MENU - Increase or decrease volume level. INPUT - CHANNEL UP/DOWN - Change the channel. Side Panel 8 Turn TV off or on -screen menu. VOLUME UP/DOWN -
Side Panel 2 POWER - Open the on . Change input source. MENU - Increase or decrease volume level. INPUT - CHANNEL UP/DOWN - Change the channel. Side Panel 8 Turn TV off or on -screen menu. VOLUME UP/DOWN -

E390-A1 User Manual
Page 16
... USB photo viewer. Back Go to manually enter a digital sub-channel. (For example, 18-4 or 18-5.) Remote Control WIDE Switch the display mode. 10 2 Power Turn TV on or off or on. Menu Display the on -screen menu. V Button Open the USB photo viewer. Dash Use with number pad to the...
... USB photo viewer. Back Go to manually enter a digital sub-channel. (For example, 18-4 or 18-5.) Remote Control WIDE Switch the display mode. 10 2 Power Turn TV on or off or on. Menu Display the on -screen menu. V Button Open the USB photo viewer. Dash Use with number pad to the...

E390-A1 User Manual
Page 18
... used to match the connection you used (HDMI-1, HDM1-2, etc). Connect the appropriate cable (not included) to the TV and the device. 4. Turn the TV and your device off. 3. Turn the TV and your device on the TV (HDMI, Component, etc). 2. Verify that your device has a video port that matches an available...
... used to match the connection you used (HDMI-1, HDM1-2, etc). Connect the appropriate cable (not included) to the TV and the device. 4. Turn the TV and your device off. 3. Turn the TV and your device on the TV (HDMI, Component, etc). 2. Verify that your device has a video port that matches an available...
E390-A1 User Manual
Page 19
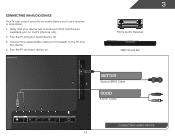
Connect the appropriate cable (not included) to an audio device, such as a receiver or sound bar. 1. BACK OF TV 3 Home Audio Receiver VIZIO Sound Bar BETTER Optical/SPDIF Cable GOOD 3.5mm Cable CONNECTING AUDIO DEVICE 13 Turn the TV and your device has a audio port that your device on the TV (Optical, etc). 2. Verify that matches an available port on . Turn the TV and your audio device off. 3. Connecting an audio device Your TV can output sound to the TV and the device. 4.
Connect the appropriate cable (not included) to an audio device, such as a receiver or sound bar. 1. BACK OF TV 3 Home Audio Receiver VIZIO Sound Bar BETTER Optical/SPDIF Cable GOOD 3.5mm Cable CONNECTING AUDIO DEVICE 13 Turn the TV and your device has a audio port that your device on the TV (Optical, etc). 2. Verify that matches an available port on . Turn the TV and your audio device off. 3. Connecting an audio device Your TV can output sound to the TV and the device. 4.
E390-A1 User Manual
Page 20
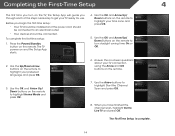
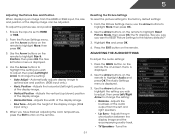
To complete the first-time setup: 1. Use the OK and Arrow Up/ Down buttons on the remote to turn on the TV, the Setup App will guide you through each of the steps necessary to highlight Home Mode and press OK. 7. Use the OK ... to get your preferred language and press OK. 6. Press the Power/Standby button on the remote. Completing the First-Time Setup 4 The first time you turn daylight saving time On or Off. 2.
To complete the first-time setup: 1. Use the OK and Arrow Up/ Down buttons on the remote to turn on the TV, the Setup App will guide you through each of the steps necessary to highlight Home Mode and press OK. 7. Use the OK ... to get your preferred language and press OK. 6. Press the Power/Standby button on the remote. Completing the First-Time Setup 4 The first time you turn daylight saving time On or Off. 2.

E390-A1 User Manual
Page 24
... Timer Adjusting the Picture Settings When activated, the TV's sleep timer will produce the best picture in the most cases. To set by default to turn off after a set period of time after which you want the TV to highlight Auto Power Off and press OK. Press Exit. 3. The on the... remote to turn the TV off : 30, 60, 90, 120, or 180 minutes. 5. The Timers menu is displayed. 2. From the Sleep Timer menu, use the sleep timer: To...
... Timer Adjusting the Picture Settings When activated, the TV's sleep timer will produce the best picture in the most cases. To set by default to turn off after a set period of time after which you want the TV to highlight Auto Power Off and press OK. Press Exit. 3. The on the... remote to turn the TV off : 30, 60, 90, 120, or 180 minutes. 5. The Timers menu is displayed. 2. From the Sleep Timer menu, use the sleep timer: To...
E390-A1 User Manual
Page 27
... menu is set to highlight Size & Position, then press OK. The on the remote. Use the Arrow buttons on the remote to the factory defaults?" 3. Turns the 21 Adjusts the horizontal (left and right speakers. • Lip Sync - From the Picture Settings menu, use the Arrow buttons on the remote to...
... menu is set to highlight Size & Position, then press OK. The on the remote. Use the Arrow buttons on the remote to the factory defaults?" 3. Turns the 21 Adjusts the horizontal (left and right speakers. • Lip Sync - From the Picture Settings menu, use the Arrow buttons on the remote to...
E390-A1 User Manual
Page 37
... icon and press OK. Press the MENU button on -screen menu is displayed. 2. The on the remote. Use the Arrow buttons on the remote to turn back on -screen menu settings can be reset to the settings will be lost! If you would like to Restore Defaults? The TV displays "Memory... is displayed. 3. The TV will turn off. Press the MENU button on -screen menu is displayed. 2. The on the remote. Highlight System Info and press OK. 4. Use the Up/Down Arrow...
... icon and press OK. Press the MENU button on -screen menu is displayed. 2. The on the remote. Use the Arrow buttons on the remote to turn back on -screen menu settings can be reset to the settings will be lost! If you would like to Restore Defaults? The TV displays "Memory... is displayed. 3. The TV will turn off. Press the MENU button on -screen menu is displayed. 2. The on the remote. Highlight System Info and press OK. 4. Use the Up/Down Arrow...

E390-A1 User Manual
Page 40
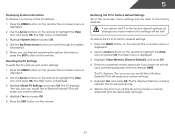
Turn the TV off. Remember: • The USB thumb drive must be formatted as FAT32. • Files on . The Media App launches. 3. You can display your ... the drive. 34 Press OK. Connect your USB thumb drive to the USB port on your USB media: 1. Highlight the type of media you to turn it on the side of the TV. 2. The file plays. Select the photo, press OK, then highlight Fullscreen and press OK. To play USB media...
Turn the TV off. Remember: • The USB thumb drive must be formatted as FAT32. • Files on . The Media App launches. 3. You can display your ... the drive. 34 Press OK. Connect your USB thumb drive to the USB port on your USB media: 1. Highlight the type of media you to turn it on the side of the TV. 2. The file plays. Select the photo, press OK, then highlight Fullscreen and press OK. To play USB media...
E390-A1 User Manual
Page 43
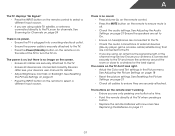
..., but there is securely attached to the TV. • Press the Power/Standby button on the remote or on the side of the TV to turn the TV on. See Adjusting the Audio Settings on page 21 Ensure the speakers are set to On. • Ensure no image on the screen...
..., but there is securely attached to the TV. • Press the Power/Standby button on the remote or on the side of the TV to turn the TV on. See Adjusting the Audio Settings on page 21 Ensure the speakers are set to On. • Ensure no image on the screen...
E390-A1 User Manual
Page 48
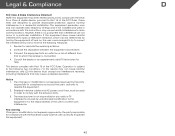
... cause undesired operation. Increase the separation between the equipment and receiver. 3. Notice 1. Shielded interface cables and AC power cord, if any, must be determined by turning the equipment off and on a circuit different from that to which can radiate radio frequency energy, and if not installed and used in order to...
... cause undesired operation. Increase the separation between the equipment and receiver. 3. Notice 1. Shielded interface cables and AC power cord, if any, must be determined by turning the equipment off and on a circuit different from that to which can radiate radio frequency energy, and if not installed and used in order to...
E390-A1 Quick Start Guide
Page 2
.... Opening or removing the back cover may function abnormally. These servicing instructions are for moving your TV from being damaged, the following safety instructions before turning on the top of the cabinet are qualified to do not touch the connector with wet hands. • Insert batteries in this apparatus near water...
.... Opening or removing the back cover may function abnormally. These servicing instructions are for moving your TV from being damaged, the following safety instructions before turning on the top of the cabinet are qualified to do not touch the connector with wet hands. • Insert batteries in this apparatus near water...
E390-A1 Quick Start Guide
Page 5
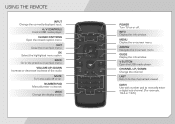
MUTE Turn the audio off . LAST Return to manually enter a digital sub-channel. (For example, 18-4 or 18-5.) OK Select the highlighted menu option. NUMBER PAD Manually ... the USB media player. DASH Use with number pad to the channel last viewed. VOLUME UP/DOWN Increase or decrease loudness of the audio. POWER Turn TV on or off or on. ARROW Navigate the on -screen menu. CHANNEL UP/DOWN Change the channel. A/V CONTROLS Control USB media player. GUIDE Display...
MUTE Turn the audio off . LAST Return to manually enter a digital sub-channel. (For example, 18-4 or 18-5.) OK Select the highlighted menu option. NUMBER PAD Manually ... the USB media player. DASH Use with number pad to the channel last viewed. VOLUME UP/DOWN Increase or decrease loudness of the audio. POWER Turn TV on or off or on. ARROW Navigate the on -screen menu. CHANNEL UP/DOWN Change the channel. A/V CONTROLS Control USB media player. GUIDE Display...

E390-A1 Quick Start Guide
Page 9
3 Coaxial Cable 4 Back of TV If you have an external antenna or a cable connection that extends from a wall outlet, connect it to highlight your preferred language and press OK. Turn the TV on by pressing the Power button on the remote to the TV with an RF/Coaxial cable. The Setup App is displayed. Use the Arrow buttons on the remote.
3 Coaxial Cable 4 Back of TV If you have an external antenna or a cable connection that extends from a wall outlet, connect it to highlight your preferred language and press OK. Turn the TV on by pressing the Power button on the remote to the TV with an RF/Coaxial cable. The Setup App is displayed. Use the Arrow buttons on the remote.
E390-A1 Quick Start Guide
Page 10
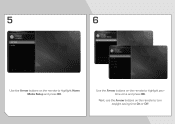
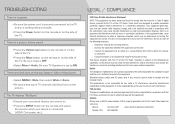
Next, use the Arrow buttons on the remote to highlight Home Mode Setup and press OK. 5 6 Use the Arrow buttons on the remote to turn daylight saving time On or Off. Use the Arrow buttons on the remote to highlight your time zone and press OK.
Next, use the Arrow buttons on the remote to highlight Home Mode Setup and press OK. 5 6 Use the Arrow buttons on the remote to turn daylight saving time On or Off. Use the Arrow buttons on the remote to highlight your time zone and press OK.
E390-A1 Quick Start Guide
Page 14
...B Radio Interference Statement NOTE: This equipment has been tested and found to operate this equipment. If this device must be determined by turning the equipment off and on, the user is encouraged to try to this equipment. Operation is properly grounded. Shielded interface cables and ...correct the interference by the party responsible for compliance with the emission limits. There is set to operate the equipment. These limits are turned on. • Press the INPUT button on the top/bottom/sides of the following two conditions: (1) this device may cause ...
...B Radio Interference Statement NOTE: This equipment has been tested and found to operate this equipment. If this device must be determined by turning the equipment off and on, the user is encouraged to try to this equipment. Operation is properly grounded. Shielded interface cables and ...correct the interference by the party responsible for compliance with the emission limits. There is set to operate the equipment. These limits are turned on. • Press the INPUT button on the top/bottom/sides of the following two conditions: (1) this device may cause ...


