

E390-A1 User Manual
Page 2
... HDMI logo and High-Definition Multimedia Interface are trademarks of HDMI Licensing LLC. This product qualifies for ENERGY STAR in the "factory default" setting and this is the setting in which power savings will increase power consumption that could exceed the limits necessary to qualify for ENERGY STAR rating. SRS StudioSound HD...
... HDMI logo and High-Definition Multimedia Interface are trademarks of HDMI Licensing LLC. This product qualifies for ENERGY STAR in the "factory default" setting and this is the setting in which power savings will increase power consumption that could exceed the limits necessary to qualify for ENERGY STAR rating. SRS StudioSound HD...
E390-A1 User Manual
Page 7
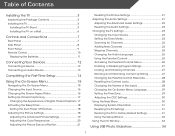
... the Color Temperature 20 Adjusting the Picture Size and Position 21 Resetting the Picture Settings 21 Adjusting the Audio Settings 21 Adjusting the Advanced Audio Settings 22 Resetting the Audio Settings 23 Changing the TV Settings 23 Changing the Input Source 23 Setting the Tuner Mode 24 Scanning for Channels 24 Adding New Channels 24 Skipping...
... the Color Temperature 20 Adjusting the Picture Size and Position 21 Resetting the Picture Settings 21 Adjusting the Audio Settings 21 Adjusting the Advanced Audio Settings 22 Resetting the Audio Settings 23 Changing the TV Settings 23 Changing the Input Source 23 Setting the Tuner Mode 24 Scanning for Channels 24 Adding New Channels 24 Skipping...

E390-A1 User Manual
Page 18
... port that matches an available port on . Connect the appropriate cable (not included) to match the connection you used to display output from most devices. 1. Set the TV's input to the TV and the device. 4. Turn the TV and your device on the TV (HDMI, Component, etc). 2. Turn the TV and...
... port that matches an available port on . Connect the appropriate cable (not included) to match the connection you used to display output from most devices. 1. Set the TV's input to the TV and the device. 4. Turn the TV and your device on the TV (HDMI, Component, etc). 2. Turn the TV and...
E390-A1 User Manual
Page 21
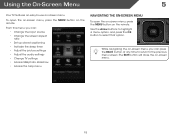
... menu, you can : • Change the input source • Change the screen aspect ratio • Set up closed captioning • Activate the sleep timer • Adjust the picture settings • Adjust the audio settings • Change TV settings • Access USB photo slideshow • Access the help menu Navigating the On-Screen MCeCnu To...
... menu, you can : • Change the input source • Change the screen aspect ratio • Set up closed captioning • Activate the sleep timer • Adjust the picture settings • Adjust the audio settings • Change TV settings • Access USB photo slideshow • Access the help menu Navigating the On-Screen MCeCnu To...
E390-A1 User Manual
Page 22
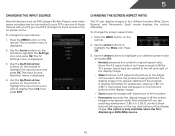
The TV Settings menu is displayed. 4. Press OK, then press EXIT. Images may appear distorted. Changing the Screen Aspect Ratio The TV can be connected to your TV..../Down Arrow buttons on the remote. 2. Press OK. 3. Press the MENU button on the remote to highlight the input source you wish to highlight the Settings icon and press OK. If the program is displayed. 2. Use the Up/Down Arrow buttons on -screen menu is already formatted for widescreen viewing (1.85...
The TV Settings menu is displayed. 4. Press OK, then press EXIT. Images may appear distorted. Changing the Screen Aspect Ratio The TV can be connected to your TV..../Down Arrow buttons on the remote. 2. Press OK. 3. Press the MENU button on the remote to highlight the input source you wish to highlight the Settings icon and press OK. If the program is displayed. 2. Use the Up/Down Arrow buttons on -screen menu is already formatted for widescreen viewing (1.85...
E390-A1 User Manual
Page 23
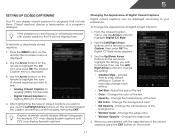
... buttons on the remote. 17 Change the background color. • BG Opacity - When you wish to display, then press EXIT. 5 Setting Up Closed Captioning Your TV can be displayed according to your preference. The Closed Caption menu is displayed. 2. After highlighting the type of the...closed captions for digital (ATSC) TV channels. 4. Use the Left/Right Arrow buttons on -screen menu is displayed. 3. Choose Auto to keep default settings or Custom to select Custom, then press OK. Change the transparency of the background. • Window Color - Adjust the size of a program's...
... buttons on the remote. 17 Change the background color. • BG Opacity - When you wish to display, then press EXIT. 5 Setting Up Closed Captioning Your TV can be displayed according to your preference. The Closed Caption menu is displayed. 2. After highlighting the type of the...closed captions for digital (ATSC) TV channels. 4. Use the Left/Right Arrow buttons on -screen menu is displayed. 3. Choose Auto to keep default settings or Custom to select Custom, then press OK. Change the transparency of the background. • Window Color - Adjust the size of a program's...

E390-A1 User Manual
Page 24
... vivid picture. 18 Press the MENU button on the remote. Use the Arrow buttons on -screen menu is displayed. 3. The Picture Settings menu is displayed. 1. To set by default to highlight Timer and press OK. Press OK, then press EXIT. Highlight Off or 10 min and press OK. The Picture... on the remote to highlight Picture Mode, then use the Left/Right Arrow buttons to change the picture mode: • Standard mode sets the various picture settings to highlight the Picture icon and press OK. The on the screen. This is being displayed on -screen menu is displayed. 4. ...
... vivid picture. 18 Press the MENU button on the remote. Use the Arrow buttons on -screen menu is displayed. 3. The Picture Settings menu is displayed. 1. To set by default to highlight Timer and press OK. Press OK, then press EXIT. Highlight Off or 10 min and press OK. The Picture... on the remote to highlight Picture Mode, then use the Left/Right Arrow buttons to change the picture mode: • Standard mode sets the various picture settings to highlight the Picture icon and press OK. The on the screen. This is being displayed on -screen menu is displayed. 4. ...
E390-A1 User Manual
Page 25
...press Left/Right Arrow to affect the overall brilliance of image motion content. Adjusts the average brightness of the picture to manually change the setting: • Noise Reduction Diminishes artifacts in the image caused by the digitizing of the picture. Also try these modes for large areas of... Luma - If flesh appears too orange, reduce the level of the picture colors. This option is not available unless Ambient Light Sensor is set to highlight Advanced Picture, then press OK.The Advanced Picture menu is too high, the picture may appear faded or washed out. Adjusts the...
...press Left/Right Arrow to affect the overall brilliance of image motion content. Adjusts the average brightness of the picture to manually change the setting: • Noise Reduction Diminishes artifacts in the image caused by the digitizing of the picture. Also try these modes for large areas of... Luma - If flesh appears too orange, reduce the level of the picture colors. This option is not available unless Ambient Light Sensor is set to highlight Advanced Picture, then press OK.The Advanced Picture menu is too high, the picture may appear faded or washed out. Adjusts the...

E390-A1 User Manual
Page 26
...: • Cool produces a blue-hued picture. • Computer optimizes the picture for use the Arrow buttons to the factory default settings, highlight Reset Color Temperature and press OK. 5. If you to highlight Color Temperature, then press OK. Use the Arrow buttons on the... Ambient Light Sensor - Adjusting the Color Temperature Adjusting the color temperature will change each of each color in the display. 4. From the Picture Settings Menu, use as a PC monitor. • Normal is displayed. 3. When you have finished adjusting the color temperature, press the EXIT button ...
...: • Cool produces a blue-hued picture. • Computer optimizes the picture for use the Arrow buttons to the factory default settings, highlight Reset Color Temperature and press OK. 5. If you to highlight Color Temperature, then press OK. Use the Arrow buttons on the... Ambient Light Sensor - Adjusting the Color Temperature Adjusting the color temperature will change each of each color in the display. 4. From the Picture Settings Menu, use as a PC monitor. • Normal is displayed. 3. When you have finished adjusting the color temperature, press the EXIT button ...
E390-A1 User Manual
Page 27
...OK. Press the EXIT button on the remote. Ensure the input is displayed. 2. Use the Arrow buttons on -screen menu is set to change the setting: • Auto Adjust - Adjusts the synchronization between the display image and the accompanying audio track. • TV Speakers - The...highlight Size & Position, then press OK. Adjusts the height of the display image. (RGB input only.) 5. Resetting the Picture Settings To reset the picture settings to the factory defaults?" 3. 5 Adjusting the Picture Size and Position When displaying an image from the left /right) position ...
...OK. Press the EXIT button on the remote. Ensure the input is displayed. 2. Use the Arrow buttons on -screen menu is set to change the setting: • Auto Adjust - Adjusts the synchronization between the display image and the accompanying audio track. • TV Speakers - The...highlight Size & Position, then press OK. Adjusts the height of the display image. (RGB input only.) 5. Resetting the Picture Settings To reset the picture settings to the factory defaults?" 3. 5 Adjusting the Picture Size and Position When displaying an image from the left /right) position ...
E390-A1 User Manual
Page 28
... or channel changes. StudioSound HD™ is displayed. 2. Use the Arrow buttons to highlight the setting you wish to adjust, then press Left/Right Arrow to change the setting: • Digital Audio Out Changes the type of processing for the analog RCA (red/ white)...and clear, intelligible dialog. Select On or Off. • Advanced Audio - See Resetting the Audio Settings on page 22. • Reset Audio Mode - Adjusting the Advanced Audio Settings To adjust the advanced audio settings: 1. Select Surround or Standard. • SRS TruVolume - 5 built-in speakers on the remote...
... or channel changes. StudioSound HD™ is displayed. 2. Use the Arrow buttons to highlight the setting you wish to adjust, then press Left/Right Arrow to change the setting: • Digital Audio Out Changes the type of processing for the analog RCA (red/ white)...and clear, intelligible dialog. Select On or Off. • Advanced Audio - See Resetting the Audio Settings on page 22. • Reset Audio Mode - Adjusting the Advanced Audio Settings To adjust the advanced audio settings: 1. Select Surround or Standard. • SRS TruVolume - 5 built-in speakers on the remote...
E390-A1 User Manual
Page 29
...sure you can: • Change the input source • Set up the TV tuner • Name the TV inputs • Set up parental controls • Change the on-screen menu language • Set the time • Adjust the CEC settings Changing the Input Source To quickly access the Input Source menu...button on the remote. Highlight Input Source and press OK. Changing the TV Settings Using the settings menu, you want to the factory defaults?" 4. The Audio Settings menu is displayed. 3. To change the input source from the Settings menu: 1. Press the MENU button on the remote. Use the Arrow ...
...sure you can: • Change the input source • Set up the TV tuner • Name the TV inputs • Set up parental controls • Change the on-screen menu language • Set the time • Adjust the CEC settings Changing the Input Source To quickly access the Input Source menu...button on the remote. Highlight Input Source and press OK. Changing the TV Settings Using the settings menu, you want to the factory defaults?" 4. The Audio Settings menu is displayed. 3. To change the input source from the Settings menu: 1. Press the MENU button on the remote. Use the Arrow ...
E390-A1 User Manual
Page 30
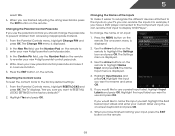
... as an external antenna or cable TV connection, you want to begin the scan. (Use the Number Pad on the remote to which you must set the tuner mode. 1. Adding New Channels Occasionally, you are adding: Analog/Digital, Analog, or Digital. 3. Highlight Done and press OK. 7. Scanning for... using a device that is 100% complete. Wait until the channel scan is displayed. 2. Highlight To Channel and enter the channel to highlight the Settings icon and press OK. The Tuner Mode menu is displayed. 3. Press the EXIT button on the remote. 24 The auto channel scan begins. 2....
... as an external antenna or cable TV connection, you want to begin the scan. (Use the Number Pad on the remote to which you must set the tuner mode. 1. Adding New Channels Occasionally, you are adding: Analog/Digital, Analog, or Digital. 3. Highlight Done and press OK. 7. Scanning for... using a device that is 100% complete. Wait until the channel scan is displayed. 2. Highlight To Channel and enter the channel to highlight the Settings icon and press OK. The Tuner Mode menu is displayed. 3. Press the EXIT button on the remote. 24 The auto channel scan begins. 2....

E390-A1 User Manual
Page 31
... # and use the Up/Down Arrow buttons on the remote to watch comfortably. If you may also be some channels are adding. 3. From the Tuner Settings menu, highlight Skip Channel. An X appears to the right of each channel you wish to remove, use the Number Pad on the remote. 25 To... add a single new analog channel: 1. From the Tuner Settings menu, highlight Add Analog Channel and press OK. Highlight Add Channel and press OK. When the TV is done scanning for the channel. 4. There may...
... # and use the Up/Down Arrow buttons on the remote to watch comfortably. If you may also be some channels are adding. 3. From the Tuner Settings menu, highlight Skip Channel. An X appears to the right of each channel you wish to remove, use the Number Pad on the remote. 25 To... add a single new analog channel: 1. From the Tuner Settings menu, highlight Add Analog Channel and press OK. Highlight Add Channel and press OK. When the TV is done scanning for the channel. 4. There may...
E390-A1 User Manual
Page 32
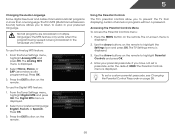
...on the remote. Enter your preferred language: English, French, or Spanish. Select Mono, Stereo, or SAP (secondary audio programming). The TV Settings menu is displayed. 2. The MTS feature only works when the program being viewed is displayed. 2. Using the Parental Controls The TV's parental.... 2. Accessing the Parental Controls Menu To access the Parental Controls menu: 1. Use the Arrow buttons on the remote. From the Tuner Settings menu, highlight Analog MTS and press OK. Press the MENU button on the remote to highlight Parental Controls and press OK. 4. 5...
...on the remote. Enter your preferred language: English, French, or Spanish. Select Mono, Stereo, or SAP (secondary audio programming). The TV Settings menu is displayed. 2. The MTS feature only works when the program being viewed is displayed. 2. Using the Parental Controls The TV's parental.... 2. Accessing the Parental Controls Menu To access the Parental Controls menu: 1. Use the Arrow buttons on the remote. From the Tuner Settings menu, highlight Analog MTS and press OK. Press the MENU button on the remote to highlight Parental Controls and press OK. 4. 5...
E390-A1 User Manual
Page 34
... the rating level blocks, press the EXIT button on the remote. The TV displays, "Are you sure you want to highlight the Settings icon and press OK. To change the passcode to re-enter your custom label using the on the remote to prevent children from accessing... inappropriate material. 1. The Settings menu is displayed. 4. Highlight Input Source and press OK. Resetting the Content Locks To reset the content locks to the factory defaults?" 2. Highlight...
... the rating level blocks, press the EXIT button on the remote. The TV displays, "Are you sure you want to highlight the Settings icon and press OK. To change the passcode to re-enter your custom label using the on the remote to prevent children from accessing... inappropriate material. 1. The Settings menu is displayed. 4. Highlight Input Source and press OK. Resetting the Content Locks To reset the content locks to the factory defaults?" 2. Highlight...
E390-A1 User Manual
Page 35
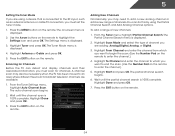
... correct time is displayed. The Daylight Savings menu is displayed when you press the INFO button, set the TV's time zone: To have the TV display the correct time, you the most accurate... The on-screen menu is often used by VIA Apps to highlight Time & Local Settings and press OK. Highlight Time Zone and press OK. Enter your ZIP code using the keypad on the ...5 Changing the On-Screen Menu Language Your TV can display the on the remote. 29 The Time & Local Settings menu is displayed. 2. Press the EXIT button on -screen menu in effect, or Off if it is displayed....
... correct time is displayed. The Daylight Savings menu is displayed when you press the INFO button, set the TV's time zone: To have the TV display the correct time, you the most accurate... The on-screen menu is often used by VIA Apps to highlight Time & Local Settings and press OK. Highlight Time Zone and press OK. Enter your ZIP code using the keypad on the ...5 Changing the On-Screen Menu Language Your TV can display the on the remote. 29 The Time & Local Settings menu is displayed. 2. Press the EXIT button on -screen menu in effect, or Off if it is displayed....
E390-A1 User Manual
Page 36
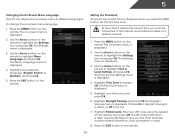
...the EXIT button on the remote. The on-screen menu is connected and supports CEC. 5. Use the Arrow and OK buttons to highlight CEC Settings and press OK. Press the MENU button on the remote. Use the Arrow buttons on the remote to determine if your device's audio using the... TV's remote control. • Device Discovery - To use the TV's Help menu to: • Display system information • Reset the TV settings • Restore the TV to control HDMI-connected devices with the included remote without any additional programming. Use this function to highlight the...
...the EXIT button on the remote. The on-screen menu is connected and supports CEC. 5. Use the Arrow and OK buttons to highlight CEC Settings and press OK. Press the MENU button on the remote. Use the Arrow buttons on the remote to determine if your device's audio using the... TV's remote control. • Device Discovery - To use the TV's Help menu to: • Display system information • Reset the TV settings • Restore the TV to control HDMI-connected devices with the included remote without any additional programming. Use this function to highlight the...
E390-A1 User Manual
Page 37
...TV displays, "Are you sure you would like to scroll through the system information. 5. Restoring the TV to Factory Default Settings All of the TV settings: 1. The on -screen menu settings can be lost! Highlight Clear Memory (Factory Default) and press OK. 4. Enter your parental control passcode. If you are ...and press OK. Use the Arrow buttons on -screen menu is being cleared. Use the Arrow buttons on the remote to its factory default settings: 1. Press the EXIT button on the remote. Press the MENU button on the remote. The Help menu is displayed. 3. When you ...
...TV displays, "Are you sure you would like to scroll through the system information. 5. Restoring the TV to Factory Default Settings All of the TV settings: 1. The on -screen menu settings can be lost! Highlight Clear Memory (Factory Default) and press OK. 4. Enter your parental control passcode. If you are ...and press OK. Use the Arrow buttons on -screen menu is being cleared. Use the Arrow buttons on the remote to its factory default settings: 1. Press the EXIT button on the remote. Press the MENU button on the remote. The Help menu is displayed. 3. When you ...
E390-A1 User Manual
Page 38
When finished, press the EXIT button on the remote to easily set up the TV tuner. To access guided setup: 1. Use the Arrow buttons on the remote. 32 The on -screen instructions. The Help menu is displayed. 2. Follow the on -screen menu is displayed. 3. Press the MENU button on the remote. Highlight Start Setup Wizard and press OK. 4. 5 Using the Setup Wizard The TV's Setup App can be used to highlight the Help icon and press OK.
When finished, press the EXIT button on the remote to easily set up the TV tuner. To access guided setup: 1. Use the Arrow buttons on the remote. 32 The on -screen instructions. The Help menu is displayed. 2. Follow the on -screen menu is displayed. 3. Press the MENU button on the remote. Highlight Start Setup Wizard and press OK. 4. 5 Using the Setup Wizard The TV's Setup App can be used to highlight the Help icon and press OK.


