E320VP User Manual
Page 2
... constitute a risk of electric shock or component damage, switch off the power before turning on your HDTV. Never push any objects on an unstable cart, stand, or table. For more information, contact your HDTV from overheating, be replaced when using different voltage than the specified voltage may compromise the integrity of important operating and servicing instructions in fire or electric shock. 17. The...
... constitute a risk of electric shock or component damage, switch off the power before turning on your HDTV. Never push any objects on an unstable cart, stand, or table. For more information, contact your HDTV from overheating, be replaced when using different voltage than the specified voltage may compromise the integrity of important operating and servicing instructions in fire or electric shock. 17. The...
E320VP User Manual
Page 3
... to repair your dealer for an extended period of your HDTV changes substantially. Unplug your HDTV during a lightning storm or when it will protect your HDTV in an area with instructions. If any way. Operating your HDTV from moisture. Do not attempt to power surges. 21. Do not touch the power cord during electrical storms. 20. VIZIO E320VP User Manual 19. To reduce risk of time.
... to repair your dealer for an extended period of your HDTV changes substantially. Unplug your HDTV during a lightning storm or when it will protect your HDTV in an area with instructions. If any way. Operating your HDTV from moisture. Do not attempt to power surges. 21. Do not touch the power cord during electrical storms. 20. VIZIO E320VP User Manual 19. To reduce risk of time.
E320VP User Manual
Page 6
... 1 SETTING UP YOUR HDTV 10 Finding a Location for Your HDTV ...10 Attaching the TV Stand...10 Wall Mounting your HDTV...11 CHAPTER 2 BASIC CONTROLS AND CONNECTIONS 12 Front Panel ...12 Side Button Controls...12 Rear Panel Connection ...13 Side Panel Connections ...13 CHAPTER 3 VIZIO REMOTE CONTROL 14 Installing the Batteries ...14 Remote Control Range...14 VIZIO Remote Control Precautions...14 Remote Control Buttons ...15 CHAPTER 4 GETTING STARTED 16 CHAPTER 5 USING YOUR HDTV FOR THE FIRST TIME 17 Select Input Source ...17 Watching a TV Program ...17 Viewing Digital TV Program...
... 1 SETTING UP YOUR HDTV 10 Finding a Location for Your HDTV ...10 Attaching the TV Stand...10 Wall Mounting your HDTV...11 CHAPTER 2 BASIC CONTROLS AND CONNECTIONS 12 Front Panel ...12 Side Button Controls...12 Rear Panel Connection ...13 Side Panel Connections ...13 CHAPTER 3 VIZIO REMOTE CONTROL 14 Installing the Batteries ...14 Remote Control Range...14 VIZIO Remote Control Precautions...14 Remote Control Buttons ...15 CHAPTER 4 GETTING STARTED 16 CHAPTER 5 USING YOUR HDTV FOR THE FIRST TIME 17 Select Input Source ...17 Watching a TV Program ...17 Viewing Digital TV Program...

E320VP User Manual
Page 7
VIZIO E320VP User Manual Slideshow Mode...28 Repeat...28 Sort By ...28 Duration ...28 Slideshow Effect ...28 Thumbnail Size ...28 Info ...28 CHAPTER 8 ADJUSTING YOUR HDTV SETTINGS 29 Using the On-screen Display (OSD) ...29 Input Menu...29 Wide Menu ...30 Normal...30 Wide ...30 Panoramic...30 Stretch...30 CC (Closed Caption) Menu ...30 Adjust closed caption options...30 Analog Closed Caption ...30 Digital Closed Caption ...30 Digital CC Style...31 Sleep Timer Menu ...31 Picture Menu ...31 Picture Mode...31 Backlight ...31 Brightness ...31 Contrast...
VIZIO E320VP User Manual Slideshow Mode...28 Repeat...28 Sort By ...28 Duration ...28 Slideshow Effect ...28 Thumbnail Size ...28 Info ...28 CHAPTER 8 ADJUSTING YOUR HDTV SETTINGS 29 Using the On-screen Display (OSD) ...29 Input Menu...29 Wide Menu ...30 Normal...30 Wide ...30 Panoramic...30 Stretch...30 CC (Closed Caption) Menu ...30 Adjust closed caption options...30 Analog Closed Caption ...30 Digital Closed Caption ...30 Digital CC Style...31 Sleep Timer Menu ...31 Picture Menu ...31 Picture Mode...31 Backlight ...31 Brightness ...31 Contrast...
E320VP User Manual
Page 10
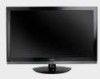
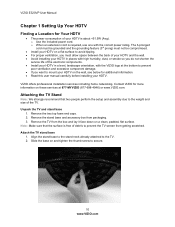
VIZIO E320VP User Manual Chapter 1 Setting Up Your HDTV Finding a Location for Your HDTV The power consumption of your HDTV is about
VIZIO E320VP User Manual Chapter 1 Setting Up Your HDTV Finding a Location for Your HDTV The power consumption of your HDTV is about
E320VP User Manual
Page 12
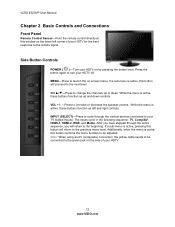
... the various devices connected to the beginning. Side Button Controls POWER ( )-Turn your HDTV off. INPUT (SELECT)-Press to cycle through the entire sequence, you will proceed to turn your HDTV on the lower left and right controls. Note: When using an AV (composite) connection, the yellow cable needs to be adjusted. MENU-Press to the green jack on -screen menu. VIZIO E320VP User Manual Chapter 2 Basic Controls and Connections Front Panel Remote Control Sensor-Point the remote control directly at...
... the various devices connected to the beginning. Side Button Controls POWER ( )-Turn your HDTV off. INPUT (SELECT)-Press to cycle through the entire sequence, you will proceed to turn your HDTV on the lower left and right controls. Note: When using an AV (composite) connection, the yellow cable needs to be adjusted. MENU-Press to the green jack on -screen menu. VIZIO E320VP User Manual Chapter 2 Basic Controls and Connections Front Panel Remote Control Sensor-Point the remote control directly at...
E320VP User Manual
Page 13
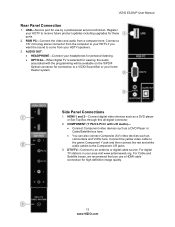
... white audio cables to an antenna or digital cable source. For digital TV stations in your HDTV speakers. 3. Version 6/15/2010 13 www.VIZIO.com COMPONENT (Y Pb/Cb Pr/Cr with the programming will be available on the S/PDIF Optical connector for these ports. 2. VIZIO E320VP User Manual Rear Panel Connection 1. Connect a 1/8" mini plug stereo connector from the computer to your HDTV if you use a HDMI cable connection for use by a professional service technician. Register your HDTV to receive future product updates including upgrades for connection...
... white audio cables to an antenna or digital cable source. For digital TV stations in your HDTV speakers. 3. Version 6/15/2010 13 www.VIZIO.com COMPONENT (Y Pb/Cb Pr/Cr with the programming will be available on the S/PDIF Optical connector for these ports. 2. VIZIO E320VP User Manual Rear Panel Connection 1. Connect a 1/8" mini plug stereo connector from the computer to your HDTV if you use a HDMI cable connection for use by a professional service technician. Register your HDTV to receive future product updates including upgrades for connection...
E320VP User Manual
Page 15
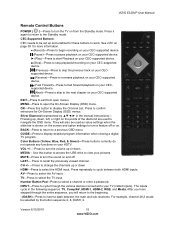
... the following sequence: TV, Comp/AV, HDMI-1, HDMI-2, RGB, and Media. Pressing up or down . AV-Press to a previous OSD menu. TV-Press to turn the sound on from open the On-Screen Display (OSD) menu. VIZIO E320VP User Manual Remote Control Buttons POWER ( )-Press to turn the TV on and off or on your HDTV. EXIT-Press to exit from the Standby mode. MENU-Press to cycle between the main and...
... the following sequence: TV, Comp/AV, HDMI-1, HDMI-2, RGB, and Media. Pressing up or down . AV-Press to a previous OSD menu. TV-Press to turn the sound on from open the On-Screen Display (OSD) menu. VIZIO E320VP User Manual Remote Control Buttons POWER ( )-Press to turn the TV on and off or on your HDTV. EXIT-Press to exit from the Standby mode. MENU-Press to cycle between the main and...

E320VP User Manual
Page 19
... best image quality of any of your HDTV. Connect your antenna or coaxial cable to the green jack on the side of the cable types available and it won't provide the high-quality video and audio that HDMI can use one of transmitting stereo sound and standard definition video (480i). Based on your Cable box or right out of one yellow cable for transmitting video and two cables for digital displays. Better (analog) Component...
... best image quality of any of your HDTV. Connect your antenna or coaxial cable to the green jack on the side of the cable types available and it won't provide the high-quality video and audio that HDMI can use one of transmitting stereo sound and standard definition video (480i). Based on your Cable box or right out of one yellow cable for transmitting video and two cables for digital displays. Better (analog) Component...
E320VP User Manual
Page 20
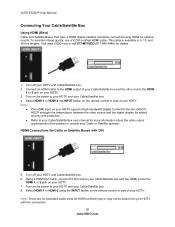
... HDMI-2 the INPUT button on your HDTV. 7. Turn off your HDTV. VIZIO E320VP User Manual Connecting Your Cable/Satellite Box Using HDMI (Best) Cable and Satellite Boxes that have a HDMI digital interface should be audio from your HDTV with DVI 5. Note: There are no dedicated audio ports for HDMI so there may or may not be connected using the INPUT button on your Cable/Satellite box. 4. Visit www.VIZIO.com or call 877-MYVIZIO (877-698-4946) for more information about the video output...
... HDMI-2 the INPUT button on your HDTV. 7. Turn off your HDTV. VIZIO E320VP User Manual Connecting Your Cable/Satellite Box Using HDMI (Best) Cable and Satellite Boxes that have a HDMI digital interface should be audio from your HDTV with DVI 5. Note: There are no dedicated audio ports for HDMI so there may or may not be connected using the INPUT button on your Cable/Satellite box. 4. Visit www.VIZIO.com or call 877-MYVIZIO (877-698-4946) for more information about the video output...
E320VP User Manual
Page 22
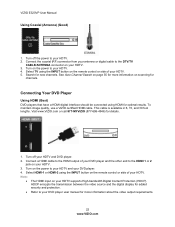
... the video source and the digital display for more information on your HDTV. 3. Turn off the power to your DVD player user manual for added security and protection. Refer to your HDTV and DVD player. 2. Note: The HDMI input on scanning for optimal results. VIZIO E320VP User Manual Using Coaxial (Antenna) (Good) 1. See Auto Channel Search on page 35 for more information about the video output requirements. 22 www.VIZIO.com To maintain image quality, use a VIZIO certified HDMI cable. Turn...
... the video source and the digital display for more information on your HDTV. 3. Turn off the power to your DVD player user manual for added security and protection. Refer to your HDTV and DVD player. 2. Note: The HDMI input on scanning for optimal results. VIZIO E320VP User Manual Using Coaxial (Antenna) (Good) 1. See Auto Channel Search on page 35 for more information about the video output requirements. 22 www.VIZIO.com To maintain image quality, use a VIZIO certified HDMI cable. Turn...
E320VP User Manual
Page 34
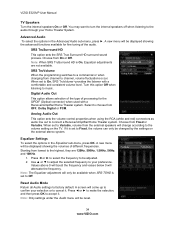
... a Receiver/Amplifier/Home Theater system. Values above 0 will boost the frequency and values below 0 will change according to cancel it . When set to Off. A screen will be adjusted. 2. Digital Audio Out This option allows selection of the type of the audio. Analog Audio Out This option sets the volume control properties when using the RCA (white and red) connectors as audio line out to factory default. Starting from the external speakers will...
... a Receiver/Amplifier/Home Theater system. Values above 0 will boost the frequency and values below 0 will change according to cancel it . When set to Off. A screen will be adjusted. 2. Digital Audio Out This option allows selection of the type of the audio. Analog Audio Out This option sets the volume control properties when using the RCA (white and red) connectors as audio line out to factory default. Starting from the external speakers will...
E320VP User Manual
Page 35
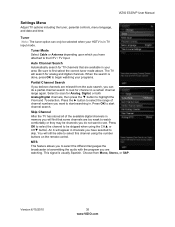
VIZIO E320VP User Manual Settings Menu Adjust TV options including the tuner, parental controls, menu language, and date and time. Press OK to see. Skip Channel After the TV has stored all of channel numbers you do a partial channel search to start channel search. An X will still be channels you want to start searching in. This signal is transmitting the audio with the program you believe channels are available in a certain channel range again...
VIZIO E320VP User Manual Settings Menu Adjust TV options including the tuner, parental controls, menu language, and date and time. Press OK to see. Skip Channel After the TV has stored all of channel numbers you do a partial channel search to start channel search. An X will still be channels you want to start searching in. This signal is transmitting the audio with the program you believe channels are available in a certain channel range again...

E320VP User Manual
Page 41
... working correctly. No power (VIZIO logo is off . Make sure your AC power cable is powered ON. Check the connections of external devices that device to change programs or channels. Perform a power cycle by the cable box, VCR, external tuner, or satellite receiver. VIZIO E320VP User Manual Troubleshooting Guide If your HDTV fails or the performance changes dramatically, check the display in the Picture Menu. Check the video settings and compatibility of external devices Check the video cables of external...
... working correctly. No power (VIZIO logo is off . Make sure your AC power cable is powered ON. Check the connections of external devices that device to change programs or channels. Perform a power cycle by the cable box, VCR, external tuner, or satellite receiver. VIZIO E320VP User Manual Troubleshooting Guide If your HDTV fails or the performance changes dramatically, check the display in the Picture Menu. Check the video settings and compatibility of external devices Check the video cables of external...

E320VP User Manual
Page 43
... a power cycle by using an antenna, the signal strength of your television for each input. Reinsert the power cable and power on the remote control or side of the channel may be achieved by removing the AC power cable from the back of image accuracy. Audio Troubleshooting Issue Solution No audio Press Volume + (Up) on the television. Your HDTV retains the viewing mode from the HDTV Settings App. Version 6/15/2010 43 www.VIZIO.com...
... a power cycle by using an antenna, the signal strength of your television for each input. Reinsert the power cable and power on the remote control or side of the channel may be achieved by removing the AC power cable from the back of image accuracy. Audio Troubleshooting Issue Solution No audio Press Volume + (Up) on the television. Your HDTV retains the viewing mode from the HDTV Settings App. Version 6/15/2010 43 www.VIZIO.com...
E320VP User Manual
Page 44
... information on warranty service or repair, after the warranty period, contact our Support Department at the remote sensor on your VIZIO model number, serial number, and date of purchase available before attempting to service excellence. The remote control will not Check the Advanced Audio menu located in unnecessary shipping charges billed to 9 pm Saturday - VIZIO E320VP User Manual Remote Control Troubleshooting Issue Solution The remote control will not work . In the HDTV Settings App, select Tuner, then Auto Channel Scan. Audio adjust TV Volume. This...
... information on warranty service or repair, after the warranty period, contact our Support Department at the remote sensor on your VIZIO model number, serial number, and date of purchase available before attempting to service excellence. The remote control will not Check the Advanced Audio menu located in unnecessary shipping charges billed to 9 pm Saturday - VIZIO E320VP User Manual Remote Control Troubleshooting Issue Solution The remote control will not work . In the HDTV Settings App, select Tuner, then Auto Channel Scan. Audio adjust TV Volume. This...
E320VP User Manual
Page 48
... PERIOD OF TIME SET FORTH ABOVE. VIZIO E320VP User Manual Warranty ONE-YEAR LIMITED WARRANTY ON PARTS AND LABOR (Covers units purchased as new in United States and Puerto Rico Only) VIZIO provides a warranty to you configured as originally purchased. To obtain warranty service, contact VIZIO Technical Support via email: TechSupport@VIZIO.com or via phone at 877 MY VIZIO (877.698.4946) from warranty service or replacement, whichever is...
... PERIOD OF TIME SET FORTH ABOVE. VIZIO E320VP User Manual Warranty ONE-YEAR LIMITED WARRANTY ON PARTS AND LABOR (Covers units purchased as new in United States and Puerto Rico Only) VIZIO provides a warranty to you configured as originally purchased. To obtain warranty service, contact VIZIO Technical Support via email: TechSupport@VIZIO.com or via phone at 877 MY VIZIO (877.698.4946) from warranty service or replacement, whichever is...
E320VP User Manual
Page 50
... Menu Language 38 Parental Controls Menu 36 Time & Local Settings 38 Tuner 35 Setup Wizard 16 Sharpness 32 Skip Channel 35 Slideshow Duration 28, 40 Effect 28, 40 Mode 28, 39 Repeat 28, 39 Specifications 45 Technical Support 44 Time Zone setting 38 Tint 32 Troubleshooting 41 Tuner Menu Analog MTS 35 Auto Search 35 Skip Channel 35 Tuner Mode 35 TV Menu 29 Partial Channel Search 35 TV Stand Attaching 10 USB Port 27 Video Adapter cable 19 Wall mounting 11 Warranty...
... Menu Language 38 Parental Controls Menu 36 Time & Local Settings 38 Tuner 35 Setup Wizard 16 Sharpness 32 Skip Channel 35 Slideshow Duration 28, 40 Effect 28, 40 Mode 28, 39 Repeat 28, 39 Specifications 45 Technical Support 44 Time Zone setting 38 Tint 32 Troubleshooting 41 Tuner Menu Analog MTS 35 Auto Search 35 Skip Channel 35 Tuner Mode 35 TV Menu 29 Partial Channel Search 35 TV Stand Attaching 10 USB Port 27 Video Adapter cable 19 Wall mounting 11 Warranty...

E320VP Quick Start Guide
Page 1
... TO ACCESS SIDE INPUTS HDTV TIPS Make sure you in your TV by VIZIO engineers for compatibility with HDMI outputs to the Green Component Y Connector. Insert thumb screw and tighten. (see fig. 1) FIG. 2 3. Get a VIZIO Blu-ray™ Disc Player. 2. E320VP LED LCD HDTV 1 BEFORE YOU BEGIN What's In the Box • VIZIO HDTV • VIZIO Remote Control (including 2 AA batteries) • Power Cord • User Manual (read Safety Guidelines) • Registration Card • Quickstart Guide 2 INSTALLING YOUR HDTV...
... TO ACCESS SIDE INPUTS HDTV TIPS Make sure you in your TV by VIZIO engineers for compatibility with HDMI outputs to the Green Component Y Connector. Insert thumb screw and tighten. (see fig. 1) FIG. 2 3. Get a VIZIO Blu-ray™ Disc Player. 2. E320VP LED LCD HDTV 1 BEFORE YOU BEGIN What's In the Box • VIZIO HDTV • VIZIO Remote Control (including 2 AA batteries) • Power Cord • User Manual (read Safety Guidelines) • Registration Card • Quickstart Guide 2 INSTALLING YOUR HDTV...
E320VP Quick Start Guide
Page 2
... -screen instruction to HD because your remote repeatedly until a picture re-appears. If HD content is securely connected to your HDTV. 3. After powering on the TV, press the INPUT button on -screen. The Initial Setup menu should fill the screen. Exit the Setup Wizard. When the TV displays an HD resolution the Panoramic viewing mode will always be changed. For channel scan, see Fig. 5). E320VP LED LCD HDTV QUICKSTART GUIDE 5 SETUP (Cont.) Fig. 1 1. Select the appropriate signal source by using...
... -screen instruction to HD because your remote repeatedly until a picture re-appears. If HD content is securely connected to your HDTV. 3. After powering on the TV, press the INPUT button on -screen. The Initial Setup menu should fill the screen. Exit the Setup Wizard. When the TV displays an HD resolution the Panoramic viewing mode will always be changed. For channel scan, see Fig. 5). E320VP LED LCD HDTV QUICKSTART GUIDE 5 SETUP (Cont.) Fig. 1 1. Select the appropriate signal source by using...


