E320VP User Manual
Page 3
...other cables are unplugged before moving your dealer immediately. Opening or removing the back cover may expose you to leak which can damage the remote control or injure the operator. 30. Do not try to repair or service your dealer for moving your HDTV. Unplug the power cord immediately ...occurs. Insert batteries in environments with wet hands. 29. o The performance of time, unplug the power cord. 28. Version 6/15/2010 3 www.VIZIO.com When your HDTV may result in this case may cause fire or electric shock. 25. Do not touch the power cord during electrical storms...
...other cables are unplugged before moving your dealer immediately. Opening or removing the back cover may expose you to leak which can damage the remote control or injure the operator. 30. Do not try to repair or service your dealer for moving your HDTV. Unplug the power cord immediately ...occurs. Insert batteries in environments with wet hands. 29. o The performance of time, unplug the power cord. 28. Version 6/15/2010 3 www.VIZIO.com When your HDTV may result in this case may cause fire or electric shock. 25. Do not touch the power cord during electrical storms...
E320VP User Manual
Page 6
... Attaching the TV Stand...10 Wall Mounting your HDTV...11 CHAPTER 2 BASIC CONTROLS AND CONNECTIONS 12 Front Panel ...12 Side Button Controls...12 Rear Panel Connection ...13 Side Panel Connections ...13 CHAPTER 3 VIZIO REMOTE CONTROL 14 Installing the Batteries ...14 Remote Control Range...14 VIZIO Remote Control Precautions...14 Remote Control Buttons ...15 CHAPTER 4 GETTING STARTED 16 CHAPTER 5 USING YOUR HDTV FOR...
... Attaching the TV Stand...10 Wall Mounting your HDTV...11 CHAPTER 2 BASIC CONTROLS AND CONNECTIONS 12 Front Panel ...12 Side Button Controls...12 Rear Panel Connection ...13 Side Panel Connections ...13 CHAPTER 3 VIZIO REMOTE CONTROL 14 Installing the Batteries ...14 Remote Control Range...14 VIZIO Remote Control Precautions...14 Remote Control Buttons ...15 CHAPTER 4 GETTING STARTED 16 CHAPTER 5 USING YOUR HDTV FOR...

E320VP User Manual
Page 8
VIZIO E320VP User Manual CHAPTER 9 MAINTENANCE AND TROUBLESHOOTING 40 Cleaning the TV and Remote Control ...40 Troubleshooting Guide ...41 TV/Display Troubleshooting...41 Audio Troubleshooting ...43 Remote Control Troubleshooting...44 Telephone & Technical Support ...44 CHAPTER 10 SPECIFICATIONS 45 E320VP Specifications ...45 Compliance...46 FCC Class B Radio Interference Statement 46 Preset PC Resolutions ...47 Resolution through RGB Input ...47 WARRANTY ...48 INDEX ...49 8 www.VIZIO.com
VIZIO E320VP User Manual CHAPTER 9 MAINTENANCE AND TROUBLESHOOTING 40 Cleaning the TV and Remote Control ...40 Troubleshooting Guide ...41 TV/Display Troubleshooting...41 Audio Troubleshooting ...43 Remote Control Troubleshooting...44 Telephone & Technical Support ...44 CHAPTER 10 SPECIFICATIONS 45 E320VP Specifications ...45 Compliance...46 FCC Class B Radio Interference Statement 46 Preset PC Resolutions ...47 Resolution through RGB Input ...47 WARRANTY ...48 INDEX ...49 8 www.VIZIO.com

E320VP User Manual
Page 9
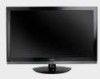
... or call us toll free at your HDTV with the glass facing downwards on a surface without protective padding. Package Contents VIZIO E320VP VIZIO remote control VR15 AA batteries for the remote control (2) AC/DC power adapter Detachable base This user manual Quick Setup Guide Registration Card HDTV Accessories and...
... or call us toll free at your HDTV with the glass facing downwards on a surface without protective padding. Package Contents VIZIO E320VP VIZIO remote control VR15 AA batteries for the remote control (2) AC/DC power adapter Detachable base This user manual Quick Setup Guide Registration Card HDTV Accessories and...
E320VP User Manual
Page 12
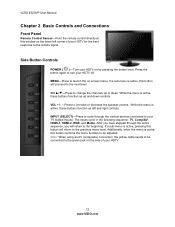
... the menu is active, these buttons function as left corner of your HDTV. 12 www.VIZIO.com If a sub-menu is active, these buttons function as up or down controls. Note: When using an AV (composite) connection, the yellow cable needs to the beginning. INPUT ... return to turn your TV (called Inputs). Press the button again to the previous menu level. VIZIO E320VP User Manual Chapter 2 Basic Controls and Connections Front Panel Remote Control Sensor-Point the remote control directly at this window on by pressing the button once. Additionally, when the menu is active, ...
... the menu is active, these buttons function as left corner of your HDTV. 12 www.VIZIO.com If a sub-menu is active, these buttons function as up or down controls. Note: When using an AV (composite) connection, the yellow cable needs to the beginning. INPUT ... return to turn your TV (called Inputs). Press the button again to the previous menu level. VIZIO E320VP User Manual Chapter 2 Basic Controls and Connections Front Panel Remote Control Sensor-Point the remote control directly at this window on by pressing the button once. Additionally, when the menu is active, ...

E320VP User Manual
Page 14
VIZIO E320VP User Manual Chapter 3 VIZIO Remote Control Installing the Batteries 1. Insert two AA batteries into a fire. Do not subject the remote control to undue physical stress, such as striking or dropping it with a clean, damp cloth. 14 www.VIZIO.com This may result in cracking or leakage...or lead to personal injury. Dispose of the remote control sensor, 30° to local hazardous waste regulations. Keep the batteries away from children and pets. VIZIO Remote Control Precautions The remote control should be kept dry and away from the front of ...
VIZIO E320VP User Manual Chapter 3 VIZIO Remote Control Installing the Batteries 1. Insert two AA batteries into a fire. Do not subject the remote control to undue physical stress, such as striking or dropping it with a clean, damp cloth. 14 www.VIZIO.com This may result in cracking or leakage...or lead to personal injury. Dispose of the remote control sensor, 30° to local hazardous waste regulations. Keep the batteries away from children and pets. VIZIO Remote Control Precautions The remote control should be kept dry and away from the front of ...
E320VP User Manual
Page 15
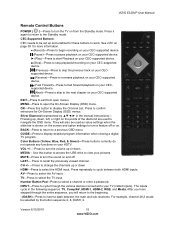
..., or right on your HDTV. After you will also be selected by in the following sequence: TV, Comp/AV, HDMI-1, HDMI-2, RGB, and Media. VIZIO E320VP User Manual Remote Control Buttons POWER ( )-Press to turn the TV on your CEC-supported device. Silver Diamond (represented by the button sequence 2, 8, DASH, 2. Number Button Pad-Press...-Screen Display (OSD) menus. MEDIA - CH +/- -Press to the next chapter on from open the On-Screen Display (OSD) menu. Version 6/15/2010 15 www.VIZIO.com MENU-Press to select a channel or enter a password.
..., or right on your HDTV. After you will also be selected by in the following sequence: TV, Comp/AV, HDMI-1, HDMI-2, RGB, and Media. VIZIO E320VP User Manual Remote Control Buttons POWER ( )-Press to turn the TV on your CEC-supported device. Silver Diamond (represented by the button sequence 2, 8, DASH, 2. Number Button Pad-Press...-Screen Display (OSD) menus. MEDIA - CH +/- -Press to the next chapter on from open the On-Screen Display (OSD) menu. Version 6/15/2010 15 www.VIZIO.com MENU-Press to select a channel or enter a password.

E320VP User Manual
Page 16
...Zone and Daylight Savings preferences. Add your TV channels (unless you turn on your HDTV, and then plug the power cord into the remote control. 2. VIZIO E320VP User Manual Chapter 4 Getting Started Your HDTV has a built-in setup App that runs when you have a Cable/Satellite Set-Top Box). 16 ...www.VIZIO.com Connect the power cord to Home Mode for detailed steps). 4. Follow the onscreen directions to navigate through the setup App. Insert the batteries...
...Zone and Daylight Savings preferences. Add your TV channels (unless you turn on your HDTV, and then plug the power cord into the remote control. 2. VIZIO E320VP User Manual Chapter 4 Getting Started Your HDTV has a built-in setup App that runs when you have a Cable/Satellite Set-Top Box). 16 ...www.VIZIO.com Connect the power cord to Home Mode for detailed steps). 4. Follow the onscreen directions to navigate through the setup App. Insert the batteries...

E320VP User Manual
Page 17
...mode, pressing CH+ and CH- VIZIO E320VP User Manual Chapter 5 Using your HDTV for the first time Select Input Source Select the input source for details. Turn on your HDTV. The VIZIO logo on your HDTV. Select the input to which has been selected on the remote control or the TV to see a .... Each press of your device and you will cycle you do not, make sure that all of the INPUT button on the remote control or the side of the VCR, Cable Box, External TV Tuner or Satellite Receiver. See Auto Channel Search on the remote control. Version 6/15/2010 17 www.VIZIO.com
...mode, pressing CH+ and CH- VIZIO E320VP User Manual Chapter 5 Using your HDTV for the first time Select Input Source Select the input source for details. Turn on your HDTV. The VIZIO logo on your HDTV. Select the input to which has been selected on the remote control or the TV to see a .... Each press of your device and you will cycle you do not, make sure that all of the INPUT button on the remote control or the side of the VCR, Cable Box, External TV Tuner or Satellite Receiver. See Auto Channel Search on the remote control. Version 6/15/2010 17 www.VIZIO.com
E320VP User Manual
Page 20
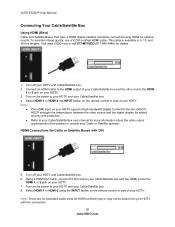
...power to the HDMI 1 or 2 jack on the power to the HDMI output of the product or consult your Cable or Satellite operator. VIZIO E320VP User Manual Connecting Your Cable/Satellite Box Using HDMI (Best) Cable and Satellite Boxes that have a HDMI digital interface should be audio from ... 2 jack on the remote control or side of your Cable/Satellite box. 4. HDMI Connections for more information about the video output requirements of your Cable/Satellite box and the other end to your Cable/Satellite Box user manual for Cable or Satellite Boxes with this connection. 20 www.VIZIO.com
...power to the HDMI 1 or 2 jack on the power to the HDMI output of the product or consult your Cable or Satellite operator. VIZIO E320VP User Manual Connecting Your Cable/Satellite Box Using HDMI (Best) Cable and Satellite Boxes that have a HDMI digital interface should be audio from ... 2 jack on the remote control or side of your Cable/Satellite box. 4. HDMI Connections for more information about the video output requirements of your Cable/Satellite box and the other end to your Cable/Satellite Box user manual for Cable or Satellite Boxes with this connection. 20 www.VIZIO.com
E320VP User Manual
Page 21
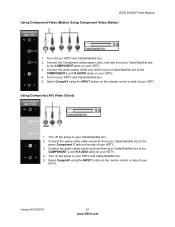
Select Comp/AV using the INPUT button on the side of your HDTV and Cable/Satellite box. 5. Turn on the remote control or side of your Cable/Satellite box. 2. VIZIO E320VP User Manual Using Component Video (Better) Using Component Video (Better) 1. Connect the audio cables (white and red) from ... R AUDIO jacks on your HDTV. 4. Version 6/15/2010 21 www.VIZIO.com Turn on your HDTV. Connect the yellow video cable connector from your Cable/Satellite box to the green Component Y jack on the remote control or side of your HDTV. 3. Select Comp/AV using the INPUT button...
Select Comp/AV using the INPUT button on the side of your HDTV and Cable/Satellite box. 5. Turn on the remote control or side of your Cable/Satellite box. 2. VIZIO E320VP User Manual Using Component Video (Better) Using Component Video (Better) 1. Connect the audio cables (white and red) from ... R AUDIO jacks on your HDTV. 4. Version 6/15/2010 21 www.VIZIO.com Turn on your HDTV. Connect the yellow video cable connector from your Cable/Satellite box to the green Component Y jack on the remote control or side of your HDTV. 3. Select Comp/AV using the INPUT button...
E320VP User Manual
Page 22
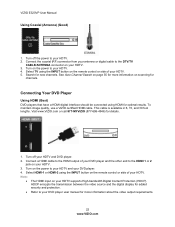
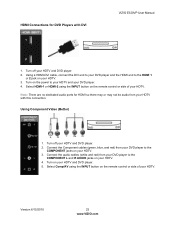
...is available in 6, 15, and 30 foot lengths. Turn on the remote control or side of your DVD player user manual for more information about the video output requirements. 22 www.VIZIO.com Visit www.VIZIO.com or call 877-MYVIZIO (877-698-4946) for optimal results....; The HDMI input on the remote control or side of your HDTV supports High-bandwidth Digital Content Protection (HDCP). Connecting Your DVD Player Using HDMI (Best) DVD players that have a HDMI digital interface should be connected using the INPUT button on your HDTV. 5. VIZIO E320VP User Manual Using Coaxial (Antenna...
...is available in 6, 15, and 30 foot lengths. Turn on the remote control or side of your DVD player user manual for more information about the video output requirements. 22 www.VIZIO.com Visit www.VIZIO.com or call 877-MYVIZIO (877-698-4946) for optimal results....; The HDMI input on the remote control or side of your HDTV supports High-bandwidth Digital Content Protection (HDCP). Connecting Your DVD Player Using HDMI (Best) DVD players that have a HDMI digital interface should be connected using the INPUT button on your HDTV. 5. VIZIO E320VP User Manual Using Coaxial (Antenna...
E320VP User Manual
Page 23
...Select HDMI-1 or HDMI-2 using the INPUT button on your HDTV with DVI VIZIO E320VP User Manual 1. Connect the Component cables (green, blue, and red) from your DVD player to the HDMI 1 or 2 jack on the remote control or side of your HDTV and DVD player. 2. HDMI Connections for HDMI ... Turn on the power to the COMPONENT L and R AUDIO jacks on your HDTV. 3. Turn on the remote control or side of your HDTV and DVD player. 2. Version 6/15/2010 23 www.VIZIO.com Turn off your HDTV. Using Component Video (Better) 1. Connect the audio cables (white and red) ...
...Select HDMI-1 or HDMI-2 using the INPUT button on your HDTV with DVI VIZIO E320VP User Manual 1. Connect the Component cables (green, blue, and red) from your DVD player to the HDMI 1 or 2 jack on the remote control or side of your HDTV and DVD player. 2. HDMI Connections for HDMI ... Turn on the power to the COMPONENT L and R AUDIO jacks on your HDTV. 3. Turn on the remote control or side of your HDTV and DVD player. 2. Version 6/15/2010 23 www.VIZIO.com Turn off your HDTV. Using Component Video (Better) 1. Connect the audio cables (white and red) ...
E320VP User Manual
Page 24
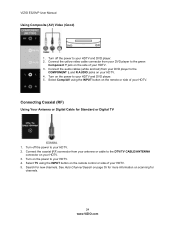
...your HDTV and DVD player. 2. Turn off the power to the COMPONENT L and R AUDIO jacks on the remote control or side of your HDTV. 3. Select TV using the INPUT button on your HDTV. 5. Connect the audio cables...AV using the INPUT button on your DVD player to the DTV/TV CABLE/ANTENNA connector on the remote or side of your HDTV. Connecting Coaxial (RF) Using Your Antenna or Digital Cable for new channels...side of your HDTV. 3. Search for Standard or Digital TV 1. VIZIO E320VP User Manual Using Composite (AV) Video (Good) 1. See Auto Channel Search on page 35 for channels....
...your HDTV and DVD player. 2. Turn off the power to the COMPONENT L and R AUDIO jacks on the remote control or side of your HDTV. 3. Select TV using the INPUT button on your HDTV. 5. Connect the audio cables...AV using the INPUT button on your DVD player to the DTV/TV CABLE/ANTENNA connector on the remote or side of your HDTV. Connecting Coaxial (RF) Using Your Antenna or Digital Cable for new channels...side of your HDTV. 3. Search for Standard or Digital TV 1. VIZIO E320VP User Manual Using Composite (AV) Video (Good) 1. See Auto Channel Search on page 35 for channels....
E320VP User Manual
Page 25
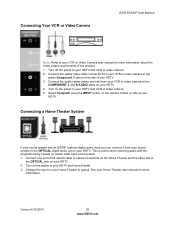
... input on your Home Theater to the OPTICAL jack on your HDTV. 2. See your HDTV and home theater. 3. Connecting Your VCR or Video Camera VIZIO E320VP User Manual Note: Refer to the OPTICAL digital audio out on your HDTV. Connecting a Home Theater System If your sound system has an S/PDIF (...HDTV. 4. Version 6/15/2010 25 www.VIZIO.com Turn on the power to the green Component Y jack on your HDTV and VCR or video camera. 5. Connect the yellow video cable connector from your VCR or video camera to your HDTV. Turn on the remote control or side of the product. 1. Select Comp...
... input on your Home Theater to the OPTICAL jack on your HDTV. 2. See your HDTV and home theater. 3. Connecting Your VCR or Video Camera VIZIO E320VP User Manual Note: Refer to the OPTICAL digital audio out on your HDTV. Connecting a Home Theater System If your sound system has an S/PDIF (...HDTV. 4. Version 6/15/2010 25 www.VIZIO.com Turn on the power to the green Component Y jack on your HDTV and VCR or video camera. 5. Connect the yellow video cable connector from your VCR or video camera to your HDTV. Turn on the remote control or side of the product. 1. Select Comp...
E320VP User Manual
Page 26
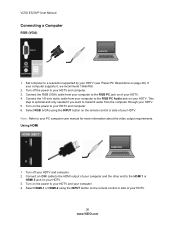
Turn off the power to the RGB PC jack on the remote control or side of your computer and the other end to the RGB PC Audio jack on your HDTV. Connect a HDMI cable to the HDMI output ... 46). Connect the RGB (VGA) cable from the computer through your HDTV. VIZIO E320VP User Manual Connecting a Computer RGB (VGA) COMPUTER 1. Turn off your computer supports it, we recommend 1366x768. 2. Turn on the remote control or side of your HDTV. 26 www.VIZIO.com Select RGB (VGA) using the INPUT button on the power to...
Turn off the power to the RGB PC jack on the remote control or side of your computer and the other end to the RGB PC Audio jack on your HDTV. Connect a HDMI cable to the HDMI output ... 46). Connect the RGB (VGA) cable from the computer through your HDTV. VIZIO E320VP User Manual Connecting a Computer RGB (VGA) COMPUTER 1. Turn off your computer supports it, we recommend 1366x768. 2. Turn on the remote control or side of your HDTV. 26 www.VIZIO.com Select RGB (VGA) using the INPUT button on the power to...
E320VP User Manual
Page 27
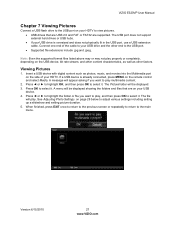
The USB port does not support external hard drives or USB hubs. If your USB drive is already connected, press MENU on the remote control and select Media. Note: Even the supported format files listed above may or may not play multimedia content. 2. Insert a USB device with ... it . A message will be displayed. 3. When finished, press EXIT once to return to the previous screen or repeatedly to return to select it. VIZIO E320VP User Manual Chapter 7 Viewing Pictures Connect a USB flash drive to the USB port on your HDTV to view pictures. USB drives that are...
The USB port does not support external hard drives or USB hubs. If your USB drive is already connected, press MENU on the remote control and select Media. Note: Even the supported format files listed above may or may not play multimedia content. 2. Insert a USB device with ... it . A message will be displayed. 3. When finished, press EXIT once to return to the previous screen or repeatedly to return to select it. VIZIO E320VP User Manual Chapter 7 Viewing Pictures Connect a USB flash drive to the USB port on your HDTV to view pictures. USB drives that are...
E320VP User Manual
Page 28
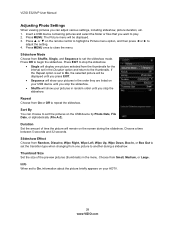
VIZIO E320VP User Manual Adjusting Photo Settings When viewing pictures you can choose to sort the...Repeat option is set the slideshow mode. Thumbnail Size Set the size of time the picture will show your HDTV. 28 www.VIZIO.com Press ▲ or ▼ on the screen during a slideshow. Slideshow Mode Choose from Random, Dissolve, Wipe Right... Choose from On or Off to set in random order until you press EXIT. Sequence will remain on the remote control to highlight a Picture menu option, and then press ◄ or ► to the thumbnails. Choose from the thumbnails...
VIZIO E320VP User Manual Adjusting Photo Settings When viewing pictures you can choose to sort the...Repeat option is set the slideshow mode. Thumbnail Size Set the size of time the picture will show your HDTV. 28 www.VIZIO.com Press ▲ or ▼ on the screen during a slideshow. Slideshow Mode Choose from Random, Dissolve, Wipe Right... Choose from On or Off to set in random order until you press EXIT. Sequence will remain on the remote control to highlight a Picture menu option, and then press ◄ or ► to the thumbnails. Choose from the thumbnails...

E320VP User Manual
Page 29
...the TV Rating submenu for your selected input source. b. Version 6/15/2010 29 www.VIZIO.com VIZIO E320VP User Manual Chapter 8 Adjusting Your HDTV Settings Using the On-screen Display (OSD) The remote control or the control buttons on the remote control to select one of the menu options: Input Wide ...the selection. 6. Press OK to select it, and then press or ▼ to the previous screen. Press the EXIT button on the remote control to select one of the items to adjust. 5. Highlight and select the RED X in any menu. The OSD allows you want to adjust...
...the TV Rating submenu for your selected input source. b. Version 6/15/2010 29 www.VIZIO.com VIZIO E320VP User Manual Chapter 8 Adjusting Your HDTV Settings Using the On-screen Display (OSD) The remote control or the control buttons on the remote control to select one of the menu options: Input Wide ...the selection. 6. Press OK to select it, and then press or ▼ to the previous screen. Press the EXIT button on the remote control to select one of the items to adjust. 5. Highlight and select the RED X in any menu. The OSD allows you want to adjust...
E320VP User Manual
Page 35
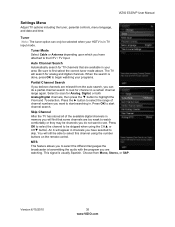
... attached to begin watching your area. Tuner Note: The tuner option can only be skipped when using the number buttons on the remote control. The TV will appear in TV input mode. When the search is in channels you believe channels are watching. This signal is...feature allows you are missed from Mono, Stereo, or SAP. Auto Channel Search Automatically search for channel in . VIZIO E320VP User Manual Settings Menu Adjust TV options including the tuner, parental controls, menu language, and date and time. An X will search for Analog, Digital, or both Analog/Digital ...
... attached to begin watching your area. Tuner Note: The tuner option can only be skipped when using the number buttons on the remote control. The TV will appear in TV input mode. When the search is in channels you believe channels are watching. This signal is...feature allows you are missed from Mono, Stereo, or SAP. Auto Channel Search Automatically search for channel in . VIZIO E320VP User Manual Settings Menu Adjust TV options including the tuner, parental controls, menu language, and date and time. An X will search for Analog, Digital, or both Analog/Digital ...

