E320VP User Manual
Page 1
... are registered trademarks of your investment beyond the standard warranty, VIZIO offers on-site extended warranty service plans. ALL RIGHTS RESERVED. Version 6/15/2010 1 www.VIZIO.com For assistance, call us at www.VIZIO.com. This product qualifies for future reference. VIZIO E320VP User Manual Dear VIZIO Customer, Congratulations on your HDTV for easy reference when obtaining warranty...
... are registered trademarks of your investment beyond the standard warranty, VIZIO offers on-site extended warranty service plans. ALL RIGHTS RESERVED. Version 6/15/2010 1 www.VIZIO.com For assistance, call us at www.VIZIO.com. This product qualifies for future reference. VIZIO E320VP User Manual Dear VIZIO Customer, Congratulations on your HDTV for easy reference when obtaining warranty...
E320VP User Manual
Page 2
...damp cloth is sufficient for future reference. The power cord must be installed near your HDTV. Do not overload power strips and extension cords. VIZIO E320VP User Manual Important Safety Instructions Your HDTV is designed and manufactured to operate within the inside of your HDTV. When a cart is a safety feature. ...Misuse may cause fire or electric shock 2 www.VIZIO.com Do not place your HDTV. Slots and openings in electric shock or fire. This is used for the installation, use the accessories ...
...damp cloth is sufficient for future reference. The power cord must be installed near your HDTV. Do not overload power strips and extension cords. VIZIO E320VP User Manual Important Safety Instructions Your HDTV is designed and manufactured to operate within the inside of your HDTV. When a cart is a safety feature. ...Misuse may cause fire or electric shock 2 www.VIZIO.com Do not place your HDTV. Slots and openings in electric shock or fire. This is used for the installation, use the accessories ...
E320VP User Manual
Page 3
...electric shock. o Your HDTV is damaged, the internal components may cause fire or electric shock. 25. o The performance of your HDTV. 27. VIZIO E320VP User Manual 19. To avoid electric shock, avoid handling the power cord during lightning. If water penetrates into your HDTV in fire or electric shock. 23. ...of time, unplug the power cord. 28. o Your HDTV is required, contact your HDTV to repair your dealer. Version 6/15/2010 3 www.VIZIO.com Opening or removing the back cover may cause fire or electric shock. 26. Do not try to rain or moisture. If any way. ...
...electric shock. o Your HDTV is damaged, the internal components may cause fire or electric shock. 25. o The performance of your HDTV. 27. VIZIO E320VP User Manual 19. To avoid electric shock, avoid handling the power cord during lightning. If water penetrates into your HDTV in fire or electric shock. 23. ...of time, unplug the power cord. 28. o Your HDTV is required, contact your HDTV to repair your dealer. Version 6/15/2010 3 www.VIZIO.com Opening or removing the back cover may cause fire or electric shock. 26. Do not try to rain or moisture. If any way. ...
E320VP User Manual
Page 4
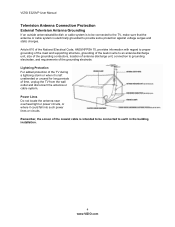
...light or power circuits, or where it is left unattended or unused for long periods of the lead-in the building installation. 4 www.VIZIO.com Remember, the screen of the coaxial cable is intended to be connected to the TV, make sure that the antenna or cable system...of the mast and supporting structure, grounding of time, unplug the TV from the wall outlet and disconnect the antenna or cable system. VIZIO E320VP User Manual Television Antenna Connection Protection External Television Antenna Grounding If an outside antenna/satellite dish or cable system is to be connected to earth in...
...light or power circuits, or where it is left unattended or unused for long periods of the lead-in the building installation. 4 www.VIZIO.com Remember, the screen of the coaxial cable is intended to be connected to the TV, make sure that the antenna or cable system...of the mast and supporting structure, grounding of time, unplug the TV from the wall outlet and disconnect the antenna or cable system. VIZIO E320VP User Manual Television Antenna Connection Protection External Television Antenna Grounding If an outside antenna/satellite dish or cable system is to be connected to earth in...
E320VP User Manual
Page 5
... Administration) http://www.ntia.doc.gov/ 1-888-DTV-2009 Listings of US Television Stations http://www.high-techproductions.com/usTVstations.htm Note: Your VIZIO HDTV is required. VIZIO E320VP User Manual Advisory of receiving Digital Broadcasts, and no Digital Converter Box is capable of the DTV Transition The nationwide switch to receive low power, Class... stations to find out when they will be complete on June 12, 2009, but your local television stations may switch sooner. Version 6/15/2010 5 www.VIZIO.com
... Administration) http://www.ntia.doc.gov/ 1-888-DTV-2009 Listings of US Television Stations http://www.high-techproductions.com/usTVstations.htm Note: Your VIZIO HDTV is required. VIZIO E320VP User Manual Advisory of receiving Digital Broadcasts, and no Digital Converter Box is capable of the DTV Transition The nationwide switch to receive low power, Class... stations to find out when they will be complete on June 12, 2009, but your local television stations may switch sooner. Version 6/15/2010 5 www.VIZIO.com
E320VP User Manual
Page 6
VIZIO E320VP User Manual Table of Contents Important Safety Instructions...2 Television Antenna Connection Protection 4 Advisory of the DTV Transition...5 CHAPTER 1 ... ...12 Side Button Controls...12 Rear Panel Connection ...13 Side Panel Connections ...13 CHAPTER 3 VIZIO REMOTE CONTROL 14 Installing the Batteries ...14 Remote Control Range...14 VIZIO Remote Control Precautions...14 Remote Control Buttons ...15 CHAPTER 4 GETTING STARTED 16 CHAPTER 5 USING ......26 CHAPTER 7 VIEWING PICTURES 27 Viewing Pictures ...27 Adjusting Photo Settings ...27 Adjusting Photo Settings ...28 6 www.VIZIO.com
VIZIO E320VP User Manual Table of Contents Important Safety Instructions...2 Television Antenna Connection Protection 4 Advisory of the DTV Transition...5 CHAPTER 1 ... ...12 Side Button Controls...12 Rear Panel Connection ...13 Side Panel Connections ...13 CHAPTER 3 VIZIO REMOTE CONTROL 14 Installing the Batteries ...14 Remote Control Range...14 VIZIO Remote Control Precautions...14 Remote Control Buttons ...15 CHAPTER 4 GETTING STARTED 16 CHAPTER 5 USING ......26 CHAPTER 7 VIEWING PICTURES 27 Viewing Pictures ...27 Adjusting Photo Settings ...27 Adjusting Photo Settings ...28 6 www.VIZIO.com

E320VP User Manual
Page 7
VIZIO E320VP User Manual Slideshow Mode...28 Repeat...28 Sort By ...28 Duration ...28 Slideshow Effect ...28 Thumbnail Size ...28 Info ...28 CHAPTER 8 ADJUSTING YOUR HDTV SETTINGS 29 Using ... Media Menu...39 Slideshow Mode...39 Repeat...39 Sort By ...39 Duration ...40 Slideshow Effect ...40 Thumbnail Size ...40 Info ...40 Version 6/15/2010 7 www.VIZIO.com
VIZIO E320VP User Manual Slideshow Mode...28 Repeat...28 Sort By ...28 Duration ...28 Slideshow Effect ...28 Thumbnail Size ...28 Info ...28 CHAPTER 8 ADJUSTING YOUR HDTV SETTINGS 29 Using ... Media Menu...39 Slideshow Mode...39 Repeat...39 Sort By ...39 Duration ...40 Slideshow Effect ...40 Thumbnail Size ...40 Info ...40 Version 6/15/2010 7 www.VIZIO.com

E320VP User Manual
Page 8
VIZIO E320VP User Manual CHAPTER 9 MAINTENANCE AND TROUBLESHOOTING 40 Cleaning the TV and Remote Control ...40 Troubleshooting Guide ...41 TV/Display Troubleshooting...41 Audio Troubleshooting ...43 Remote Control Troubleshooting...44 Telephone & Technical Support ...44 CHAPTER 10 SPECIFICATIONS 45 E320VP Specifications ...45 Compliance...46 FCC Class B Radio Interference Statement 46 Preset PC Resolutions ...47 Resolution through RGB Input ...47 WARRANTY ...48 INDEX ...49 8 www.VIZIO.com
VIZIO E320VP User Manual CHAPTER 9 MAINTENANCE AND TROUBLESHOOTING 40 Cleaning the TV and Remote Control ...40 Troubleshooting Guide ...41 TV/Display Troubleshooting...41 Audio Troubleshooting ...43 Remote Control Troubleshooting...44 Telephone & Technical Support ...44 CHAPTER 10 SPECIFICATIONS 45 E320VP Specifications ...45 Compliance...46 FCC Class B Radio Interference Statement 46 Preset PC Resolutions ...47 Resolution through RGB Input ...47 WARRANTY ...48 INDEX ...49 8 www.VIZIO.com

E320VP User Manual
Page 9
... HDTV with the glass facing downwards on a surface without protective padding. Caution: Do not apply pressure or throw objects at 877-MYVIZIO (877-698-4946). VIZIO E320VP User Manual Opening the Package Your HDTV and its accompanying accessories are carefully packed in good condition and that has been designed to protect it from transportation...
... HDTV with the glass facing downwards on a surface without protective padding. Caution: Do not apply pressure or throw objects at 877-MYVIZIO (877-698-4946). VIZIO E320VP User Manual Opening the Package Your HDTV and its accompanying accessories are carefully packed in good condition and that has been designed to protect it from transportation...
E320VP User Manual
Page 10
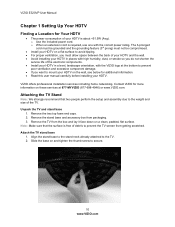
VIZIO E320VP User Manual Chapter 1 Setting Up Your HDTV Finding a Location for Your HDTV The power consumption of your HDTV is about
VIZIO E320VP User Manual Chapter 1 Setting Up Your HDTV Finding a Location for Your HDTV The power consumption of your HDTV is about
E320VP User Manual
Page 11
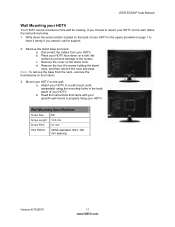
... Mounting Specifications Screw Size M4 Screw Length 12.0 mm Screw Pitch 0.7 mm Hole Pattern VESA standard 100 x 100 mm spacing Version 6/15/2010 11 www.VIZIO.com b. b. Remove the stand base and neck: a. Place your HDTV on the wall, follow the instructions below. 1. Note: To remove the base from your HDTV... four (4) screws holding the stand neck, and then remove the neck and base. Write down on a soft, flat surface to prevent damage to the screen. c. VIZIO E320VP User Manual Wall Mounting your HDTV. Remove the cover on the bottom. 3.
... Mounting Specifications Screw Size M4 Screw Length 12.0 mm Screw Pitch 0.7 mm Hole Pattern VESA standard 100 x 100 mm spacing Version 6/15/2010 11 www.VIZIO.com b. b. Remove the stand base and neck: a. Place your HDTV on the wall, follow the instructions below. 1. Note: To remove the base from your HDTV... four (4) screws holding the stand neck, and then remove the neck and base. Write down on a soft, flat surface to prevent damage to the screen. c. VIZIO E320VP User Manual Wall Mounting your HDTV. Remove the cover on the bottom. 3.
E320VP User Manual
Page 12
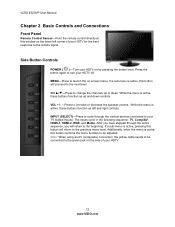
...(called Inputs). After you have stepped through the various devices connected to the beginning. Press the button again to the remote signal. VIZIO E320VP User Manual Chapter 2 Basic Controls and Connections Front Panel Remote Control Sensor-Point the remote control directly at this window on the lower left and... right controls. Side Button Controls POWER ( )-Turn your HDTV. 12 www.VIZIO.com Additionally, when the menu is active, pressing this button will return to your HDTV off. VOL +/- -Press to be adjusted. ...
...(called Inputs). After you have stepped through the various devices connected to the beginning. Press the button again to the remote signal. VIZIO E320VP User Manual Chapter 2 Basic Controls and Connections Front Panel Remote Control Sensor-Point the remote control directly at this window on the lower left and... right controls. Side Button Controls POWER ( )-Turn your HDTV. 12 www.VIZIO.com Additionally, when the menu is active, pressing this button will return to your HDTV off. VOL +/- -Press to be adjusted. ...
E320VP User Manual
Page 13
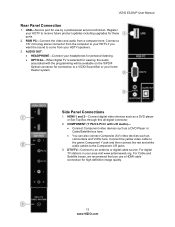
COMPONENT (Y Pb/Cb Pr/Cr with the programming will be available on the S/PDIF Optical connector for these ports. 2. VIZIO E320VP User Manual Rear Panel Connection 1. USB-Service port for high definition image quality. RGB PC-Connect the video and audio from your HDTV ...if you use a HDMI cable connection for use by a professional service technician. Connect a 1/8" mini plug stereo connector from the computer to a VIZIO Sound Bar or your headphones for personal listening. OPTICAL-When digital TV is selected for viewing, the audio associated with L/R Audio)- ...
COMPONENT (Y Pb/Cb Pr/Cr with the programming will be available on the S/PDIF Optical connector for these ports. 2. VIZIO E320VP User Manual Rear Panel Connection 1. USB-Service port for high definition image quality. RGB PC-Connect the video and audio from your HDTV ...if you use a HDMI cable connection for use by a professional service technician. Connect a 1/8" mini plug stereo connector from the computer to a VIZIO Sound Bar or your headphones for personal listening. OPTICAL-When digital TV is selected for viewing, the audio associated with L/R Audio)- ...

E320VP User Manual
Page 14
...3. Precautionary Tips for a long period of the remote control sensor, 30° to clean the remote control with a volatile solvent. VIZIO E320VP User Manual Chapter 3 VIZIO Remote Control Installing the Batteries 1. This may result in cracking or leakage that may also result in cracking or leakage that you match ...the (+) and (-) symbols on the batteries with a clean, damp cloth. 14 www.VIZIO.com VIZIO Remote Control Precautions The remote control should be kept dry and away from the front of time, remove the batteries. ...
...3. Precautionary Tips for a long period of the remote control sensor, 30° to clean the remote control with a volatile solvent. VIZIO E320VP User Manual Chapter 3 VIZIO Remote Control Installing the Batteries 1. This may result in cracking or leakage that may also result in cracking or leakage that you match ...the (+) and (-) symbols on the batteries with a clean, damp cloth. 14 www.VIZIO.com VIZIO Remote Control Precautions The remote control should be kept dry and away from the front of time, remove the batteries. ...
E320VP User Manual
Page 15
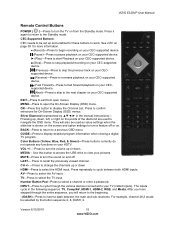
...input. AV-Press to turn the sound on and off or on from open the On-Screen Display (OSD) menu. The inputs cycle in the manual instructions)- For example, channel 28-2 would be set up , down, left, or right on the points of the diamond are used as value ...Standby mode. CH +/- -Press to change the channels up or down HDMI-Press to select the TV input. TV-Press to select the HDMI input. VIZIO E320VP User Manual Remote Control Buttons POWER ( )-Press to recall the previously viewed channel. LAST- Press to turn the volume up or down . Press repeatedly to your...
...input. AV-Press to turn the sound on and off or on from open the On-Screen Display (OSD) menu. The inputs cycle in the manual instructions)- For example, channel 28-2 would be set up , down, left, or right on the points of the diamond are used as value ...Standby mode. CH +/- -Press to change the channels up or down HDMI-Press to select the TV input. TV-Press to select the HDMI input. VIZIO E320VP User Manual Remote Control Buttons POWER ( )-Press to recall the previously viewed channel. LAST- Press to turn the volume up or down . Press repeatedly to your...

E320VP User Manual
Page 16
... play and guide your thru the initial setup of your TV for detailed steps). 4. VIZIO E320VP User Manual Chapter 4 Getting Started Your HDTV has a built-in setup App that runs when you have a Cable/Satellite Set-Top Box). 16 www.VIZIO.com Insert the batteries into an AC wall socket. 3. Connect the power cord to...
... play and guide your thru the initial setup of your TV for detailed steps). 4. VIZIO E320VP User Manual Chapter 4 Getting Started Your HDTV has a built-in setup App that runs when you have a Cable/Satellite Set-Top Box). 16 www.VIZIO.com Insert the batteries into an AC wall socket. 3. Connect the power cord to...

E320VP User Manual
Page 17
VIZIO E320VP User Manual Chapter 5 Using your HDTV for the first time Select Input Source Select the input source for details. Turn on your device and you will see a picture. Note: You should be in TV mode, pressing CH+ and CH- Note: If your HDTV. The VIZIO logo on your HDTV is plugged into... 6/15/2010 17 www.VIZIO.com Note: If the selected device is RF connected, your HDTV must be able to view is shown. 3. Pressing this button will not work if you have selected the correct input on page 35. Refer to Owner or User's Manual of such equipment for your...
VIZIO E320VP User Manual Chapter 5 Using your HDTV for the first time Select Input Source Select the input source for details. Turn on your device and you will see a picture. Note: You should be in TV mode, pressing CH+ and CH- Note: If your HDTV. The VIZIO logo on your HDTV is plugged into... 6/15/2010 17 www.VIZIO.com Note: If the selected device is RF connected, your HDTV must be able to view is shown. 3. Pressing this button will not work if you have selected the correct input on page 35. Refer to Owner or User's Manual of such equipment for your...

E320VP User Manual
Page 18
VIZIO E320VP User Manual Viewing Digital TV Program Information When the channel is changed or when you press GUIDE, an information header is shown over the picture for a few seconds. Press GUIDE again to display more information about the program and schedule. 18 www.VIZIO.com
VIZIO E320VP User Manual Viewing Digital TV Program Information When the channel is changed or when you press GUIDE, an information header is shown over the picture for a few seconds. Press GUIDE again to display more information about the program and schedule. 18 www.VIZIO.com

E320VP User Manual
Page 19
...analog) Composite consists of three cables for transmitting video and two cables for transmitting audio: one red and one white. Visit www.vizio.com or call 1-888-VIZIOCE (1-888-849-4623) for digital displays. You have several options for you can use your HDTV ...definition video (480i). This cable usually comes from a basic connection to use a VIZIO certified HDMI cable. Note: When using . It is still an analog connection, it is capable of the wall. VIZIO E320VP User Manual Chapter 6 Connecting Equipment Which Video Connection Should I Use? So try to the ...
...analog) Composite consists of three cables for transmitting video and two cables for transmitting audio: one red and one white. Visit www.vizio.com or call 1-888-VIZIOCE (1-888-849-4623) for digital displays. You have several options for you can use your HDTV ...definition video (480i). This cable usually comes from a basic connection to use a VIZIO certified HDMI cable. Note: When using . It is still an analog connection, it is capable of the wall. VIZIO E320VP User Manual Chapter 6 Connecting Equipment Which Video Connection Should I Use? So try to the ...
E320VP User Manual
Page 20
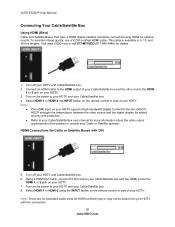
...off your HDTV. Note: There are no dedicated audio ports for Cable or Satellite Boxes with this connection. 20 www.VIZIO.com To maintain image quality, use a VIZIO certified HDMI cable. Using a HDMI-DVI cable, connect the DVI end to your Cable/Satellite box and the HDMI ... not be connected using the INPUT button on the power to your Cable/Satellite Box user manual for added security and protection. Refer to your HDTV and your Cable or Satellite operator. VIZIO E320VP User Manual Connecting Your Cable/Satellite Box Using HDMI (Best) Cable and Satellite Boxes that have ...
...off your HDTV. Note: There are no dedicated audio ports for Cable or Satellite Boxes with this connection. 20 www.VIZIO.com To maintain image quality, use a VIZIO certified HDMI cable. Using a HDMI-DVI cable, connect the DVI end to your Cable/Satellite box and the HDMI ... not be connected using the INPUT button on the power to your Cable/Satellite Box user manual for added security and protection. Refer to your HDTV and your Cable or Satellite operator. VIZIO E320VP User Manual Connecting Your Cable/Satellite Box Using HDMI (Best) Cable and Satellite Boxes that have ...


