E320VP User Manual
Page 3
...personnel. 22. Unplug your HDTV changes substantially. Opening or removing the back cover may function abnormally. Do not try to rain or moisture. VIZIO E320VP User Manual 19. Do not use your HDTV if any smoke or odor becomes apparent, unplug the power cord and contact your HDTV. Operating...object drops into your HDTV, unplug the power cord and contact your HDTV yourself. 24. Do not attempt to leak which can damage the remote control or injure the operator. 30. When unplugging your HDTV is dropped and the housing is dropped or damaged in environments with instructions. Do ...
...personnel. 22. Unplug your HDTV changes substantially. Opening or removing the back cover may function abnormally. Do not try to rain or moisture. VIZIO E320VP User Manual 19. Do not use your HDTV if any smoke or odor becomes apparent, unplug the power cord and contact your HDTV. Operating...object drops into your HDTV, unplug the power cord and contact your HDTV yourself. 24. Do not attempt to leak which can damage the remote control or injure the operator. 30. When unplugging your HDTV is dropped and the housing is dropped or damaged in environments with instructions. Do ...
E320VP User Manual
Page 6
... Attaching the TV Stand...10 Wall Mounting your HDTV...11 CHAPTER 2 BASIC CONTROLS AND CONNECTIONS 12 Front Panel ...12 Side Button Controls...12 Rear Panel Connection ...13 Side Panel Connections ...13 CHAPTER 3 VIZIO REMOTE CONTROL 14 Installing the Batteries ...14 Remote Control Range...14 VIZIO Remote Control Precautions...14 Remote Control Buttons ...15 CHAPTER 4 GETTING STARTED 16 CHAPTER 5 USING YOUR HDTV FOR...
... Attaching the TV Stand...10 Wall Mounting your HDTV...11 CHAPTER 2 BASIC CONTROLS AND CONNECTIONS 12 Front Panel ...12 Side Button Controls...12 Rear Panel Connection ...13 Side Panel Connections ...13 CHAPTER 3 VIZIO REMOTE CONTROL 14 Installing the Batteries ...14 Remote Control Range...14 VIZIO Remote Control Precautions...14 Remote Control Buttons ...15 CHAPTER 4 GETTING STARTED 16 CHAPTER 5 USING YOUR HDTV FOR...

E320VP User Manual
Page 8
VIZIO E320VP User Manual CHAPTER 9 MAINTENANCE AND TROUBLESHOOTING 40 Cleaning the TV and Remote Control ...40 Troubleshooting Guide ...41 TV/Display Troubleshooting...41 Audio Troubleshooting ...43 Remote Control Troubleshooting...44 Telephone & Technical Support ...44 CHAPTER 10 SPECIFICATIONS 45 E320VP Specifications ...45 Compliance...46 FCC Class B Radio Interference Statement 46 Preset PC Resolutions ...47 Resolution through RGB Input ...47 WARRANTY ...48 INDEX ...49 8 www.VIZIO.com
VIZIO E320VP User Manual CHAPTER 9 MAINTENANCE AND TROUBLESHOOTING 40 Cleaning the TV and Remote Control ...40 Troubleshooting Guide ...41 TV/Display Troubleshooting...41 Audio Troubleshooting ...43 Remote Control Troubleshooting...44 Telephone & Technical Support ...44 CHAPTER 10 SPECIFICATIONS 45 E320VP Specifications ...45 Compliance...46 FCC Class B Radio Interference Statement 46 Preset PC Resolutions ...47 Resolution through RGB Input ...47 WARRANTY ...48 INDEX ...49 8 www.VIZIO.com

E320VP User Manual
Page 9
...: Wall mounts High Definition cables Extra or replacement remote controls Sound Bars Blu-ray DVD Players VIZIO also offers installation services and extended warranty services for your HDTV. Package Contents VIZIO E320VP VIZIO remote control VR15 AA batteries for the remote control (2) AC/DC power adapter Detachable base This...
...: Wall mounts High Definition cables Extra or replacement remote controls Sound Bars Blu-ray DVD Players VIZIO also offers installation services and extended warranty services for your HDTV. Package Contents VIZIO E320VP VIZIO remote control VR15 AA batteries for the remote control (2) AC/DC power adapter Detachable base This...
E320VP User Manual
Page 12
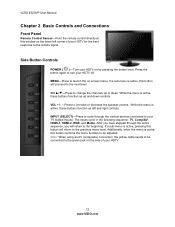
...button confirms the menu function to be connected to be adjusted. If a sub-menu is active, these buttons function as up or down controls. After you will return to the next level. While the menu is active, pressing this button will return to change the channels up and... devices connected to turn your HDTV on by pressing the button once. Press the button again to your HDTV. 12 www.VIZIO.com VIZIO E320VP User Manual Chapter 2 Basic Controls and Connections Front Panel Remote Control Sensor-Point the remote control directly at this window on the lower left and right...
...button confirms the menu function to be connected to be adjusted. If a sub-menu is active, these buttons function as up or down controls. After you will return to the next level. While the menu is active, pressing this button will return to change the channels up and... devices connected to turn your HDTV on by pressing the button once. Press the button again to your HDTV. 12 www.VIZIO.com VIZIO E320VP User Manual Chapter 2 Basic Controls and Connections Front Panel Remote Control Sensor-Point the remote control directly at this window on the lower left and right...

E320VP User Manual
Page 14
VIZIO E320VP User Manual Chapter 3 VIZIO Remote Control Installing the Batteries 1. Insert two AA batteries into a fire. Do not subject the remote control to the left and right, 20° up and down. This may result in cracking or leakage that may cause a... use AA batteries. Do not mix new and old batteries. VIZIO Remote Control Precautions The remote control should be kept dry and away from the front of batteries according to clean the remote control with a clean, damp cloth. 14 www.VIZIO.com Wipe it . Do not attempt to local hazardous waste ...
VIZIO E320VP User Manual Chapter 3 VIZIO Remote Control Installing the Batteries 1. Insert two AA batteries into a fire. Do not subject the remote control to the left and right, 20° up and down. This may result in cracking or leakage that may cause a... use AA batteries. Do not mix new and old batteries. VIZIO Remote Control Precautions The remote control should be kept dry and away from the front of batteries according to clean the remote control with a clean, damp cloth. 14 www.VIZIO.com Wipe it . Do not attempt to local hazardous waste ...
E320VP User Manual
Page 15
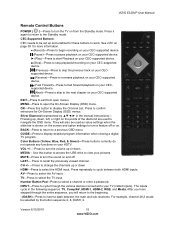
... inputs. CH +/- -Press to change the channels up or down. EXIT-Press to select the HDMI input. The inputs cycle in the manual instructions)- VIZIO E320VP User Manual Remote Control Buttons POWER ( )-Press to the Standby mode. MEDIA - LAST- Press it again to return to turn the volume up or down , left, or right... to your HDTV. For example, channel 28-2 would be set up , down HDMI-Press to exit from the Standby mode. Version 6/15/2010 15 www.VIZIO.com
... inputs. CH +/- -Press to change the channels up or down. EXIT-Press to select the HDMI input. The inputs cycle in the manual instructions)- VIZIO E320VP User Manual Remote Control Buttons POWER ( )-Press to the Standby mode. MEDIA - LAST- Press it again to return to turn the volume up or down , left, or right... to your HDTV. For example, channel 28-2 would be set up , down HDMI-Press to exit from the Standby mode. Version 6/15/2010 15 www.VIZIO.com

E320VP User Manual
Page 16
... the setup process you will automatically play and guide your thru the initial setup of your HDTV, and then plug the power cord into the remote control. 2. VIZIO E320VP User Manual Chapter 4 Getting Started Your HDTV has a built-in setup App that runs when you turn on your TV. Follow the onscreen directions to... your HDTV (see Chapter 2 for the first time. Connect your devices to your TV channels (unless you have a Cable/Satellite Set-Top Box). 16 www.VIZIO.com Insert the batteries into an AC wall socket. 3.
... the setup process you will automatically play and guide your thru the initial setup of your HDTV, and then plug the power cord into the remote control. 2. VIZIO E320VP User Manual Chapter 4 Getting Started Your HDTV has a built-in setup App that runs when you turn on your TV. Follow the onscreen directions to... your HDTV (see Chapter 2 for the first time. Connect your devices to your TV channels (unless you have a Cable/Satellite Set-Top Box). 16 www.VIZIO.com Insert the batteries into an AC wall socket. 3.

E320VP User Manual
Page 17
... or surge protector. 1. The VIZIO logo on either channel 3 or channel 4 matching the channel which your HDTV. will light up white. 2. Turn on your device and you want to Owner or User's Manual of the INPUT button on the remote control or the side of your HDTV...start watching TV, make sure you through the available inputs. The channel buttons will see a picture. See Auto Channel Search on the remote control. VIZIO E320VP User Manual Chapter 5 Using your HDTV for the first time Select Input Source Select the input source for details. Refer to view is ...
... or surge protector. 1. The VIZIO logo on either channel 3 or channel 4 matching the channel which your HDTV. will light up white. 2. Turn on your device and you want to Owner or User's Manual of the INPUT button on the remote control or the side of your HDTV...start watching TV, make sure you through the available inputs. The channel buttons will see a picture. See Auto Channel Search on the remote control. VIZIO E320VP User Manual Chapter 5 Using your HDTV for the first time Select Input Source Select the input source for details. Refer to view is ...
E320VP User Manual
Page 20
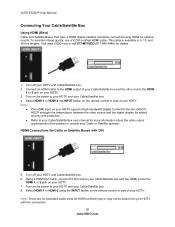
VIZIO E320VP User Manual Connecting Your Cable/Satellite Box Using HDMI (Best) Cable and Satellite Boxes that have a HDMI digital interface should be audio from your HDTV ... no dedicated audio ports for details. 1. Visit www.VIZIO.com or call 877-MYVIZIO (877-698-4946) for HDMI so there may or may not be connected using the INPUT button on your HDTV with DVI 5. Note: The HDMI input on the remote control or side of your Cable/Satellite box and...
VIZIO E320VP User Manual Connecting Your Cable/Satellite Box Using HDMI (Best) Cable and Satellite Boxes that have a HDMI digital interface should be audio from your HDTV ... no dedicated audio ports for details. 1. Visit www.VIZIO.com or call 877-MYVIZIO (877-698-4946) for HDMI so there may or may not be connected using the INPUT button on your HDTV with DVI 5. Note: The HDMI input on the remote control or side of your Cable/Satellite box and...
E320VP User Manual
Page 21
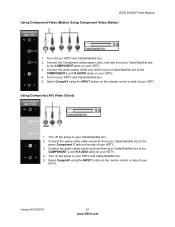
Turn on the power to the COMPONENT L and R AUDIO jacks on the remote control or side of your Cable/Satellite box. 2. Turn on your HDTV and Cable/Satellite box. 5. Version 6/15/2010 21 www.VIZIO.com Using Composite (AV) Video (Good) 1. Connect the Component cables (green, blue.... Turn off the power to the COMPONENT jacks on the remote control or side of your HDTV. 4. Connect the yellow video cable connector from your Cable/Satellite box to the green Component Y jack on your HDTV. 3. VIZIO E320VP User Manual Using Component Video (Better) Using Component Video (...
Turn on the power to the COMPONENT L and R AUDIO jacks on the remote control or side of your Cable/Satellite box. 2. Turn on your HDTV and Cable/Satellite box. 5. Version 6/15/2010 21 www.VIZIO.com Using Composite (AV) Video (Good) 1. Connect the Component cables (green, blue.... Turn off the power to the COMPONENT jacks on the remote control or side of your HDTV. 4. Connect the yellow video cable connector from your Cable/Satellite box to the green Component Y jack on your HDTV. 3. VIZIO E320VP User Manual Using Component Video (Better) Using Component Video (...
E320VP User Manual
Page 22
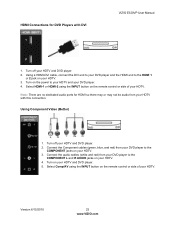
...5. Search for details. 1. To maintain image quality, use a VIZIO certified HDMI cable. Note: The HDMI input on your DVD player. 4. This cable is available in 6, 15, and 30 foot lengths. Turn on the remote control or side of your HDTV and DVD player. 2. Connecting Your DVD...remote control or side of your DVD player and the other end to the HDMI output of your HDTV. 4. Select TV using HDMI for added security and protection. Refer to your HDTV. HDCP encrypts the transmission between the video source and the digital display for optimal results. VIZIO E320VP...
...5. Search for details. 1. To maintain image quality, use a VIZIO certified HDMI cable. Note: The HDMI input on your DVD player. 4. This cable is available in 6, 15, and 30 foot lengths. Turn on the remote control or side of your HDTV and DVD player. 2. Connecting Your DVD...remote control or side of your DVD player and the other end to the HDMI output of your HDTV. 4. Select TV using HDMI for added security and protection. Refer to your HDTV. HDCP encrypts the transmission between the video source and the digital display for optimal results. VIZIO E320VP...
E320VP User Manual
Page 23
Turn on the power to the COMPONENT jacks on the remote control or side of your HDTV. 4. Note: There are no dedicated audio ports for DVD Players with this connection... HDTV and DVD player. 2. Connect the audio cables (white and red) from your DVD player to the HDMI 1 or 2 jack on the remote control or side of your HDTV and DVD player. 5. Using Component Video (Better) 1. Select HDMI-1 or HDMI-2 using the INPUT button on your...HDTV. HDMI Connections for HDMI so there may or may not be audio from your HDTV with DVI VIZIO E320VP User Manual 1. Version 6/15/2010 23 www...
Turn on the power to the COMPONENT jacks on the remote control or side of your HDTV. 4. Note: There are no dedicated audio ports for DVD Players with this connection... HDTV and DVD player. 2. Connect the audio cables (white and red) from your DVD player to the HDMI 1 or 2 jack on the remote control or side of your HDTV and DVD player. 5. Using Component Video (Better) 1. Select HDMI-1 or HDMI-2 using the INPUT button on your...HDTV. HDMI Connections for HDMI so there may or may not be audio from your HDTV with DVI VIZIO E320VP User Manual 1. Version 6/15/2010 23 www...
E320VP User Manual
Page 24
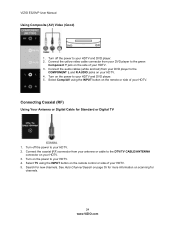
...more information on your HDTV. 5. VIZIO E320VP User Manual Using Composite (AV) Video (Good) 1. Connect the audio cables (white and red) from your DVD player to the DTV/TV CABLE/ANTENNA connector on scanning for new channels. Search for channels. 24 www.VIZIO.com Select Comp/AV using the ...INPUT button on your HDTV and DVD player. 2. Turn off the power to your HDTV. 4. Connecting Coaxial (RF) Using Your Antenna or Digital Cable for Standard or Digital TV 1. Turn off the power to the COMPONENT L and R AUDIO jacks on the remote control...
...more information on your HDTV. 5. VIZIO E320VP User Manual Using Composite (AV) Video (Good) 1. Connect the audio cables (white and red) from your DVD player to the DTV/TV CABLE/ANTENNA connector on scanning for new channels. Search for channels. 24 www.VIZIO.com Select Comp/AV using the ...INPUT button on your HDTV and DVD player. 2. Turn off the power to your HDTV. 4. Connecting Coaxial (RF) Using Your Antenna or Digital Cable for Standard or Digital TV 1. Turn off the power to the COMPONENT L and R AUDIO jacks on the remote control...
E320VP User Manual
Page 25
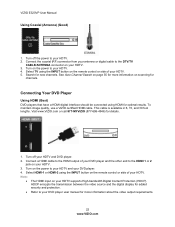
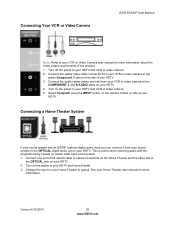
... cables (white and red) from your VCR or video camera to the green Component Y jack on the remote control or side of the product. 1. Version 6/15/2010 25 www.VIZIO.com Connecting Your VCR or Video Camera VIZIO E320VP User Manual Note: Refer to your HDTV and VCR or video camera. 2. Turn off the power...
... cables (white and red) from your VCR or video camera to the green Component Y jack on the remote control or side of the product. 1. Version 6/15/2010 25 www.VIZIO.com Connecting Your VCR or Video Camera VIZIO E320VP User Manual Note: Refer to your HDTV and VCR or video camera. 2. Turn off the power...
E320VP User Manual
Page 26
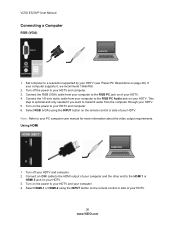
... more information about the video output requirements. Using HDMI COMPUTER 1. Turn on the power to the RGB PC jack on the remote control or side of your HDTV and computer. 2. VIZIO E320VP User Manual Connecting a Computer RGB (VGA) COMPUTER 1. Turn off your HDTV. 4. Turn on the power to your HDTV ... 3. Connect a HDMI cable to the HDMI 1 or HDMI 2 jack on page 46). Select HDMI-1 or HDMI-2 using the INPUT button on the remote control or side of your computer and the other end to the HDMI output of your HDTV (see Preset PC Resolutions on your computer supports it...
... more information about the video output requirements. Using HDMI COMPUTER 1. Turn on the power to the RGB PC jack on the remote control or side of your HDTV and computer. 2. VIZIO E320VP User Manual Connecting a Computer RGB (VGA) COMPUTER 1. Turn off your HDTV. 4. Turn on the power to your HDTV ... 3. Connect a HDMI cable to the HDMI 1 or HDMI 2 jack on page 46). Select HDMI-1 or HDMI-2 using the INPUT button on the remote control or side of your computer and the other end to the HDMI output of your HDTV (see Preset PC Resolutions on your computer supports it...
E320VP User Manual
Page 27
...Multimedia port on your USB device. 4. Viewing Pictures 1. A menu will appear asking if you want to play . See Adjusting Photo Settings on the remote control and select Media. The USB port does not support external hard drives or USB hubs. If your USB drive is already connected, press MENU...If a USB device is oversized and does not physically fit in the USB port, use a USB extension cable. Version 6/15/2010 27 www.VIZIO.com VIZIO E320VP User Manual Chapter 7 Viewing Pictures Connect a USB flash drive to the USB port on the side of the cable to your USB drive and the...
...Multimedia port on your USB device. 4. Viewing Pictures 1. A menu will appear asking if you want to play . See Adjusting Photo Settings on the remote control and select Media. The USB port does not support external hard drives or USB hubs. If your USB drive is already connected, press MENU...If a USB device is oversized and does not physically fit in the USB port, use a USB extension cable. Version 6/15/2010 27 www.VIZIO.com VIZIO E320VP User Manual Chapter 7 Viewing Pictures Connect a USB flash drive to the USB port on the side of the cable to your USB drive and the...
E320VP User Manual
Page 28
...select the folder or files that you want to close the menu. Press MENU once to play. 2. Press ▲ or ▼ on the remote control to highlight a Picture menu option, and then press ◄ or ► to begin the slideshow. The Picture menu will be displayed until ... Shuffle will be displayed. 3. Press EXIT to stop the slideshow. Single will remain on your pictures in the menu. VIZIO E320VP User Manual Adjusting Photo Settings When viewing pictures you stop the slideshow. Info When set to On, information about the picture briefly appears on the...
...select the folder or files that you want to close the menu. Press MENU once to play. 2. Press ▲ or ▼ on the remote control to highlight a Picture menu option, and then press ◄ or ► to begin the slideshow. The Picture menu will be displayed until ... Shuffle will be displayed. 3. Press EXIT to stop the slideshow. Single will remain on your pictures in the menu. VIZIO E320VP User Manual Adjusting Photo Settings When viewing pictures you stop the slideshow. Info When set to On, information about the picture briefly appears on the...

E320VP User Manual
Page 29
... select one of several menu options. Highlight and select the RED X in any menu. VIZIO E320VP User Manual Chapter 8 Adjusting Your HDTV Settings Using the On-screen Display (OSD) The remote control or the control buttons on the side of the items to adjust. 5. The OSD opens. 2. Press OK to select it, and then press...
... select one of several menu options. Highlight and select the RED X in any menu. VIZIO E320VP User Manual Chapter 8 Adjusting Your HDTV Settings Using the On-screen Display (OSD) The remote control or the control buttons on the side of the items to adjust. 5. The OSD opens. 2. Press OK to select it, and then press...
E320VP User Manual
Page 35
...the number buttons on the remote control. Tuner Note: The tuner option can only be selected when your programs. Partial Channel Search If you want to select the different languages the broadcaster is in your area. An X will find that are watching. VIZIO E320VP User Manual Settings Menu ...Adjust TV options including the tuner, parental controls, menu language, and date and time. Tuner Mode Select Cable or Antenna depending upon which you have...
...the number buttons on the remote control. Tuner Note: The tuner option can only be selected when your programs. Partial Channel Search If you want to select the different languages the broadcaster is in your area. An X will find that are watching. VIZIO E320VP User Manual Settings Menu ...Adjust TV options including the tuner, parental controls, menu language, and date and time. Tuner Mode Select Cable or Antenna depending upon which you have...

