User Manual
Page 7
...harmful interference to provide reasonable protection against harmful interference in the United States and other countries. • MPEG Layer-3 audio coding technology licensed from Dolby Laboratories. The afterimage is not permanent and will not occur in this TV is subject to...short period of time. 2) The LCD panel contained in a particular installation. FCC Declaration of Conformity Compliance Statement (Part 15): The Toshiba 40G300U, 40G30U, 46G300U, and 46G30U Televisions comply with this equipment. Wayne, NJ 07470. This is a structural property of LCD technology, is not a sign...
...harmful interference to provide reasonable protection against harmful interference in the United States and other countries. • MPEG Layer-3 audio coding technology licensed from Dolby Laboratories. The afterimage is not permanent and will not occur in this TV is subject to...short period of time. 2) The LCD panel contained in a particular installation. FCC Declaration of Conformity Compliance Statement (Part 15): The Toshiba 40G300U, 40G30U, 46G300U, and 46G30U Televisions comply with this equipment. Wayne, NJ 07470. This is a structural property of LCD technology, is not a sign...
User Manual
Page 8
...menu layout 29 Navigating the menu system 29 Chapter 5: Setting up your TV 30 Initial Setup 30 Selecting the menu language 30 TOSHIBA Logo LED 30 Configuring the antenna input source for the ANT/CABLE terminal 30 Programming channels into the TV's channel memory 31 ... feature 60 Using CableClear® digital noise reduction 60 Using MPEG noise reduction 61 Using the Game Mode feature 61 Using the advanced audio settings features 61 Using the QSound® sound feature 61 Chapter 8: Troubleshooting 62 General troubleshooting 62 Chapter 9: Appendix 65 Specifications 65...
...menu layout 29 Navigating the menu system 29 Chapter 5: Setting up your TV 30 Initial Setup 30 Selecting the menu language 30 TOSHIBA Logo LED 30 Configuring the antenna input source for the ANT/CABLE terminal 30 Programming channels into the TV's channel memory 31 ... feature 60 Using CableClear® digital noise reduction 60 Using MPEG noise reduction 61 Using the Game Mode feature 61 Using the advanced audio settings features 61 Using the QSound® sound feature 61 Chapter 8: Troubleshooting 62 General troubleshooting 62 Chapter 9: Appendix 65 Specifications 65...
User Manual
Page 9
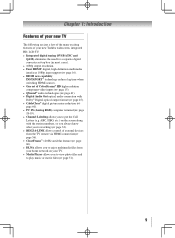
Chapter 1: Introduction Features of your new TV The following are just a few of the many exciting features of your new Toshiba widescreen, integrated HD, LCD TV: • Integrated digital tuning (8VSB ATSC and QAM) eliminates the need for a separate ...REGZA-LINK allows control of ColorStream® HD high-resolution component video inputs ( page 15). • QSound® audio technologies ( page 61). • Digital Audio Out optical audio connection with Dolby® Digital optical output format ( page 45). • CableClear® digital picture noise reduction (&#...
Chapter 1: Introduction Features of your new TV The following are just a few of the many exciting features of your new Toshiba widescreen, integrated HD, LCD TV: • Integrated digital tuning (8VSB ATSC and QAM) eliminates the need for a separate ...REGZA-LINK allows control of ColorStream® HD high-resolution component video inputs ( page 15). • QSound® audio technologies ( page 61). • Digital Audio Out optical audio connection with Dolby® Digital optical output format ( page 45). • CableClear® digital picture noise reduction (&#...
User Manual
Page 11
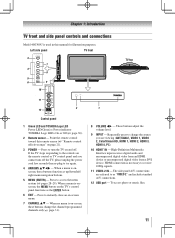
...necessary to try again. 4無 ARROWS pqtu - These buttons adjust the volume level. 9無 INPUT - High-Definition Multimedia Interface input receives digital audio and uncompressed digital video from an HDMI device or uncompressed digital video from a DVI device. Press to turn off . To access photo or music ... page 31). 1 8無 VOLUME tu - Left side panel TV front 3 7 4 8 5 6 9 10 TV top 11 2 12 Control panel 1無 Green LED and TOSHIBA Logo LED Power LED(Green) = Power indicator TOSHIBA Logo LED= On or Off ( page 30). 2無 Remote sensor -
...necessary to try again. 4無 ARROWS pqtu - These buttons adjust the volume level. 9無 INPUT - High-Definition Multimedia Interface input receives digital audio and uncompressed digital video from an HDMI device or uncompressed digital video from a DVI device. Press to turn off . To access photo or music ... page 31). 1 8無 VOLUME tu - Left side panel TV front 3 7 4 8 5 6 9 10 TV top 11 2 12 Control panel 1無 Green LED and TOSHIBA Logo LED Power LED(Green) = Power indicator TOSHIBA Logo LED= On or Off ( page 30). 2無 Remote sensor -
User Manual
Page 12
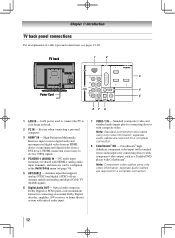
...) for a complete connection. 8無 ColorStream® HD - ColorStream® highdefinition component video input (with composite video. separate audio cables are required for connecting devices with component video output, such as a Toshiba DVD player with optical audio input. 7無 VIDEO-1 IN - Chapter 1: Introduction TV back panel connections For an explanation of cable types and...
...) for a complete connection. 8無 ColorStream® HD - ColorStream® highdefinition component video input (with composite video. separate audio cables are required for connecting devices with component video output, such as a Toshiba DVD player with optical audio input. 7無 VIDEO-1 IN - Chapter 1: Introduction TV back panel connections For an explanation of cable types and...

User Manual
Page 13
... page 16 and page 19). therefore, separate audio cables are typically color-coded red, green, and blue. An HDMI cable delivers digital audio and video in its native format. Coaxial (F-type) cable Coaxial (F-type) cable is Toshiba's brand of component video.) These cables are ...not required for a complete connection. HDMI® cable (with HDMI Logo " ") Optical audio cable Optical audio cable is for connecting your antenna, cable TV service, and/...
... page 16 and page 19). therefore, separate audio cables are typically color-coded red, green, and blue. An HDMI cable delivers digital audio and video in its native format. Coaxial (F-type) cable Coaxial (F-type) cable is Toshiba's brand of component video.) These cables are ...not required for a complete connection. HDMI® cable (with HDMI Logo " ") Optical audio cable Optical audio cable is for connecting your antenna, cable TV service, and/...
User Manual
Page 14
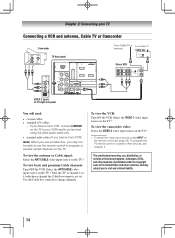
...Copyright Laws of the United States and other devices, see Chapter 3. Chapter 2: Connecting your TV Connecting a VCR and antenna, Cable TV or Camcorder Camcorder AUDIO OUT L R VIDEO TV back panel From Cable TV or From Cable TV antenna Cable box IN CH 3 CH 4 OUT Stereo VCR VIDEO... cables • standard A/V cables −− If you have a mono VCR, connect L/MONO on the TV to your VCR's audio out terminal using the white audio cable only. • standard audio cables (If you have a mono VCR) Note: When you use the remote control to program or access certain features on the...
...Copyright Laws of the United States and other devices, see Chapter 3. Chapter 2: Connecting your TV Connecting a VCR and antenna, Cable TV or Camcorder Camcorder AUDIO OUT L R VIDEO TV back panel From Cable TV or From Cable TV antenna Cable box IN CH 3 CH 4 OUT Stereo VCR VIDEO... cables • standard A/V cables −− If you have a mono VCR, connect L/MONO on the TV to your VCR's audio out terminal using the white audio cable only. • standard audio cables (If you have a mono VCR) Note: When you use the remote control to program or access certain features on the...
User Manual
Page 15
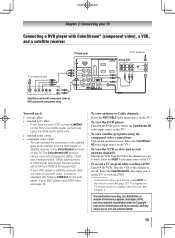
... Turn ON the VCR. Select the ColorStream HD video input source on the TV.* To view satellite programs using the white audio cable only. • standard audio cables • component video cables −− You can be used with component video You will provide the best picture performance...Connecting a DVD player with ColorStream® (component video), a VCR, and a satellite receiver From satellite dish TV back panel From antenna Stereo VCR VIDEO AUDIO L R IN CH 3 CH 4 OUT L R IN from the DVD player or satellite receiver to the ColorStream terminal on the TV. Select the ...
... Turn ON the VCR. Select the ColorStream HD video input source on the TV.* To view satellite programs using the white audio cable only. • standard audio cables • component video cables −− You can be used with component video You will provide the best picture performance...Connecting a DVD player with ColorStream® (component video), a VCR, and a satellite receiver From satellite dish TV back panel From antenna Stereo VCR VIDEO AUDIO L R IN CH 3 CH 4 OUT L R IN from the DVD player or satellite receiver to the ColorStream terminal on the TV. Select the ...
User Manual
Page 16
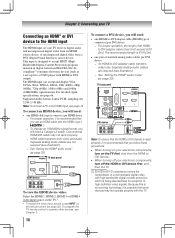
...bandwidth digital content protection, which is recommended that some devices may not work properly. −− HDMI cable transfers both video and audio. To connect an HDMI device, you use an HDMI cable with the TV. Because this is an evolving technology, it is ...−− To display an 1080i/60Hz signal format, you will need a Category 2 cable. For detailed signal specifications, see page 19. Separate analog audio cables are required (see Chapter 3. 16 To connect a DVI device, you follow these procedures: •• When turning on your electronic components, turn...
...bandwidth digital content protection, which is recommended that some devices may not work properly. −− HDMI cable transfers both video and audio. To connect an HDMI device, you use an HDMI cable with the TV. Because this is an evolving technology, it is ...−− To display an 1080i/60Hz signal format, you will need a Category 2 cable. For detailed signal specifications, see page 19. Separate analog audio cables are required (see Chapter 3. 16 To connect a DVI device, you follow these procedures: •• When turning on your electronic components, turn...
User Manual
Page 17
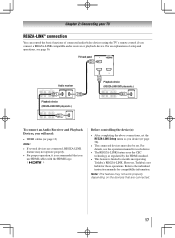
...above connections, set . For an explanation of connected audio/video devices using the TV's remote control if you connect a REGZA-LINK compatible audio receiver or playback device. Refer to models incorporating Toshiba's REGZA-LINK. TV back panel Audio receiver Playback device (REGZA-LINK DVD player,etc.)... device (REGZA-LINK DVD player,etc.) To connect an Audio Receiver and Playback Devices, you will need: • HDMI cables ( page 13) Note: • If several devices are connected. 17 However, Toshiba is recommended that are connected, REGZA-LINK feature may not...
...above connections, set . For an explanation of connected audio/video devices using the TV's remote control if you connect a REGZA-LINK compatible audio receiver or playback device. Refer to models incorporating Toshiba's REGZA-LINK. TV back panel Audio receiver Playback device (REGZA-LINK DVD player,etc.)... device (REGZA-LINK DVD player,etc.) To connect an Audio Receiver and Playback Devices, you will need: • HDMI cables ( page 13) Note: • If several devices are connected. 17 However, Toshiba is recommended that are connected, REGZA-LINK feature may not...
User Manual
Page 18
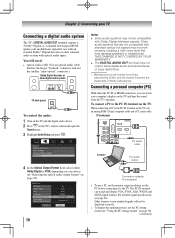
... has the larger "TosLink" connector and not the smaller "mini-optical" connector.) Dolby Digital decoder or other external audio system with optical audio input. For detailed signal specifications ( page 66). The PC IN terminal can watch your device ("Selecting the optical...PC setting feature ( "Using the PC settings feature" on page 50). (continued) Chapter 2: Connecting your TV Connecting a digital audio system The TV's DIGITAL AUDIO OUT terminal outputs a *Dolby® Digital or 2-channel down-mixed PCM (pulse-code modulation) signal for use with an external ...
... has the larger "TosLink" connector and not the smaller "mini-optical" connector.) Dolby Digital decoder or other external audio system with optical audio input. For detailed signal specifications ( page 66). The PC IN terminal can watch your device ("Selecting the optical...PC setting feature ( "Using the PC settings feature" on page 50). (continued) Chapter 2: Connecting your TV Connecting a digital audio system The TV's DIGITAL AUDIO OUT terminal outputs a *Dolby® Digital or 2-channel down-mixed PCM (pulse-code modulation) signal for use with an external ...
User Manual
Page 19
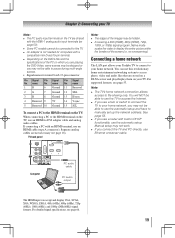
...use the automatic setup. no overscanning). Connecting a home network The LAN port allows your Toshiba TV to connect to file sharing only. For detailed signal specifications, see page 53. Computer PC audio cable PC audio output The HDMI input can use an HDMI cable (type A connector). Manual setup may ...not be able to use an HDMI-to DVI adapter cable and analog audio cables. Note: •• The TV's home network connection allows access to your home network. Separate analog cables are playing the DVD-...
...use the automatic setup. no overscanning). Connecting a home network The LAN port allows your Toshiba TV to connect to file sharing only. For detailed signal specifications, see page 53. Computer PC audio cable PC audio output The HDMI input can use an HDMI cable (type A connector). Manual setup may ...not be able to use an HDMI-to DVI adapter cable and analog audio cables. Note: •• The TV's home network connection allows access to your home network. Separate analog cables are playing the DVD-...

User Manual
Page 25
See notes below . AUX 1 (VCR) Record (2 click AUX 2 (DVD or HTIB) --- ----DVD Angle DVD Sub title DVD Audio DVD Eject Programming the remote control to control your other devices Your Toshiba TV remote control is preprogrammed to operate), follow the steps below . • If the correct code was entered, the device will turn... has this kind of two codes. Chapter 3: Using the remote control REMOTE CONTROL KEY REC SLOW - If your device. SAT (satellite) --- SLOW + ANGLE SUB TITLE AUDIO EJECT Toshiba TV REC MENU* SLOW REW* SLOW FWD* Angle* Sub title...
See notes below . AUX 1 (VCR) Record (2 click AUX 2 (DVD or HTIB) --- ----DVD Angle DVD Sub title DVD Audio DVD Eject Programming the remote control to control your other devices Your Toshiba TV remote control is preprogrammed to operate), follow the steps below . • If the correct code was entered, the device will turn... has this kind of two codes. Chapter 3: Using the remote control REMOTE CONTROL KEY REC SLOW - If your device. SAT (satellite) --- SLOW + ANGLE SUB TITLE AUDIO EJECT Toshiba TV REC MENU* SLOW REW* SLOW FWD* Angle* Sub title...
User Manual
Page 28
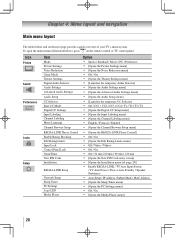
... Sound Preferences Locks Setup Item Mode Picture Settings Noise Reduction Game Mode Theater Settings Digital Audio Selector Audio Settings Advanced Audio Settings Audio Setup CC Selector Base CC Mode Digital CC Settings Input Labeling Channel Labeling Menu Language ...Reduction menu] Off / On [Opens the Theater Settings menu] [Launches the temporary Audio Selector] [Opens the Audio Settings menu] [Opens the Advanced Audio Settings menu] [Opens the Audio Setup menu] [Launches the temporary CC Selector] Off / CC1 / CC2 / CC3 /...
... Sound Preferences Locks Setup Item Mode Picture Settings Noise Reduction Game Mode Theater Settings Digital Audio Selector Audio Settings Advanced Audio Settings Audio Setup CC Selector Base CC Mode Digital CC Settings Input Labeling Channel Labeling Menu Language ...Reduction menu] Off / On [Opens the Theater Settings menu] [Launches the temporary Audio Selector] [Opens the Audio Settings menu] [Opens the Advanced Audio Settings menu] [Opens the Audio Setup menu] [Launches the temporary CC Selector] Off / CC1 / CC2 / CC3 /...
User Manual
Page 33
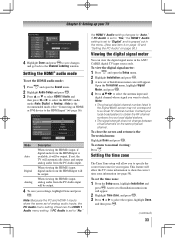
... To save changes, and go back to check. Analog When viewing the HDMI 1 input, analog audio from the PC Audio input will automatically detect and output analog audio from the PC Audio input. If PC Audio is available, it will allow the TV status information to show the correct time zone information (... source only. To close the screen and return to normal viewing: Press . Mode Description Auto When viewing the HDMI 1 input, if digital audio from the HDMI input will allow you want to the Channel Labeling window. Note: Because the PC and HDMI-1 inputs share the same set...
... To save changes, and go back to check. Analog When viewing the HDMI 1 input, analog audio from the PC Audio input will automatically detect and output analog audio from the PC Audio input. If PC Audio is available, it will allow the TV status information to show the correct time zone information (... source only. To close the screen and return to normal viewing: Press . Mode Description Auto When viewing the HDMI 1 input, if digital audio from the HDMI input will allow you want to the Channel Labeling window. Note: Because the PC and HDMI-1 inputs share the same set...
User Manual
Page 35
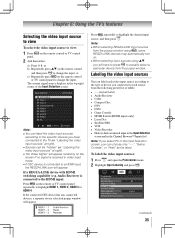
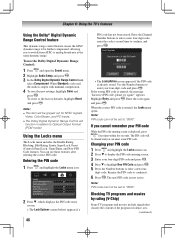
... remote or TV control panel repeatedly to a HDMI input, the REGZA-LINK icon will appear. If a REGZA-LINK device with HDMI switching capability (e.g. Audio Receiver) is connected to highlight HDMI 1, HDMI 2, HDMI 3 or HDMI 4. The current signal source displays in the top right corner of labels: ...• - - (default label) • Audio Receiver • Cable • Compact Disc • DTV • DVD • Game Console • HDMI Switch (HDMI inputs only) • Laser Disc ...
... remote or TV control panel repeatedly to a HDMI input, the REGZA-LINK icon will appear. If a REGZA-LINK device with HDMI switching capability (e.g. Audio Receiver) is connected to highlight HDMI 1, HDMI 2, HDMI 3 or HDMI 4. The current signal source displays in the top right corner of labels: ...• - - (default label) • Audio Receiver • Cable • Compact Disc • DTV • DVD • Game Console • HDMI Switch (HDMI inputs only) • Laser Disc ...
User Manual
Page 44
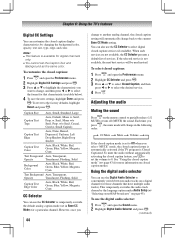
... analog caption mode (set in the following order: 1/2 Mute Mute Volume If the closed caption mode is set to conveniently switch between audio tracks on closed caption setting will automatically change to select the desired service. 4無 Press . w/o Serif, Casual, Cursive, Small ... the closed caption mode" ( page 43) for a particular channel. Note: ••This feature is available for that have multiple audio tracks). To customize the closed caption feature, use the CC Selector to select digital closed captions: 1無 Press and open the Preferences menu....
... analog caption mode (set in the following order: 1/2 Mute Mute Volume If the closed caption mode is set to conveniently switch between audio tracks on closed caption setting will automatically change to select the desired service. 4無 Press . w/o Serif, Casual, Cursive, Small ... the closed caption mode" ( page 43) for a particular channel. Note: ••This feature is available for that have multiple audio tracks). To customize the closed caption feature, use the CC Selector to select digital closed captions: 1無 Press and open the Preferences menu....

User Manual
Page 45
... revert to the factory defaults, highlight Reset and press . MTS also can use this happens, set the MTS feature to reduce the noise. Adjusting the audio quality You can typically leave the TV in SAP mode. When the TV receives a stereo or SAP broadcast, the word "STEREO" or "SAP" appears... The multi-channel TV sound (MTS) feature allows you want to adjust (Bass, Treble, or Balance). 4無 Press or to the Optical Audio Out terminal on the TV (see the current program on the screen but hear the other language instead of sound being broadcast (stereo or monaural...
... revert to the factory defaults, highlight Reset and press . MTS also can use this happens, set the MTS feature to reduce the noise. Adjusting the audio quality You can typically leave the TV in SAP mode. When the TV receives a stereo or SAP broadcast, the word "STEREO" or "SAP" appears... The multi-channel TV sound (MTS) feature allows you want to adjust (Bass, Treble, or Balance). 4無 Press or to the Optical Audio Out terminal on the TV (see the current program on the screen but hear the other language instead of sound being broadcast (stereo or monaural...
User Manual
Page 46
...) Some TV programs and movies include signals that classify the content of the program (violence, sex, (continued) When Standard is selected, the audio is entered, the Locks menu opens. appears. You can not be set to "0000". Use the Number buttons to enter your four-digit ...four- digit code. Note: PIN code can use the Dolby Digital Dynamic Range Control: 1無 Press and open the Sound menu. 2無 Highlight Audio Setup and press . 3無 In the Dolby Digital Dynamic Range Control field, select Compressed. Entering the PIN code 1無 Press and highlight the ...
...) Some TV programs and movies include signals that classify the content of the program (violence, sex, (continued) When Standard is selected, the audio is entered, the Locks menu opens. appears. You can not be set to "0000". Use the Number buttons to enter your four-digit ...four- digit code. Note: PIN code can use the Dolby Digital Dynamic Range Control: 1無 Press and open the Sound menu. 2無 Highlight Audio Setup and press . 3無 In the Dolby Digital Dynamic Range Control field, select Compressed. Entering the PIN code 1無 Press and highlight the ...
User Manual
Page 50
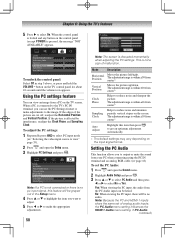
...is affected by interference, readjust the Clock Phase and Sampling Clock. Note: Because the PC and HDMI-1 inputs share the same set the PC Audio: 1無 Press and open the Setup menu. 3無 Highlight PC Settings and press . Note: If a PC is not connected or..., the message "NOT AVAILABLE" appears. Mode Description Horizontal Position Moves the picture left/right. Yes: When viewing the PC input, the audio from center.* Clock Phase Helps to get an optimum adjustment automatically. ** The default settings may vary depending on the control panel (except POWER...
...is affected by interference, readjust the Clock Phase and Sampling Clock. Note: Because the PC and HDMI-1 inputs share the same set the PC Audio: 1無 Press and open the Setup menu. 3無 Highlight PC Settings and press . Note: If a PC is not connected or..., the message "NOT AVAILABLE" appears. Mode Description Horizontal Position Moves the picture left/right. Yes: When viewing the PC input, the audio from center.* Clock Phase Helps to get an optimum adjustment automatically. ** The default settings may vary depending on the control panel (except POWER...


