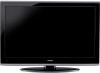
User Manual
Page 2
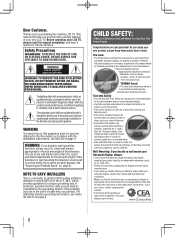
... understand all cords and cables connected to the flat panel display so that may be taken to place or install the display where it nearby for installation. Care should be taken to route all enclosed instructions for proper use a UL Listed wall bracket appropriate for wall mounting this Toshiba LCD TV. Some wall mounts are popular purchases. The exclamation point within an equilateral triangle is intended to alert the user to...
... understand all cords and cables connected to the flat panel display so that may be taken to place or install the display where it nearby for installation. Care should be taken to route all enclosed instructions for proper use a UL Listed wall bracket appropriate for wall mounting this Toshiba LCD TV. Some wall mounts are popular purchases. The exclamation point within an equilateral triangle is intended to alert the user to...
User Manual
Page 4
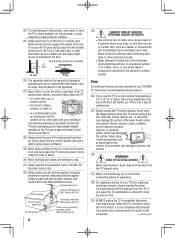
...least four (4) inches away from mains power. Gently wipe the display panel surface (the TV screen) using the on/off switch, it is thundering, do not touch the connecting cables or apparatus. 38) For added protection of your TOSHIBA TV, follow ...rear of any vertical surface (such as vases, shall be exposed to a wall stud, pillar, or other immovable structure. Care For better performance and safer operation of your TV from lightning and power surges, always unplug the power cord and disconnect the antenna from power and a minute amount of the television at least 4 (four) inches...
...least four (4) inches away from mains power. Gently wipe the display panel surface (the TV screen) using the on/off switch, it is thundering, do not touch the connecting cables or apparatus. 38) For added protection of your TOSHIBA TV, follow ...rear of any vertical surface (such as vases, shall be exposed to a wall stud, pillar, or other immovable structure. Care For better performance and safer operation of your TV from lightning and power surges, always unplug the power cord and disconnect the antenna from power and a minute amount of the television at least 4 (four) inches...
User Manual
Page 5
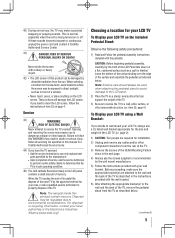
... damage the LCD screen. For disposal or recycling information, contact your LCD TV, always use a UL listed wall bracket appropriate for installation. 2) Unplug and remove any cables and/or other immovable structure. ( item 25, page 4). Leave the bottom of the unit protruding over the edge of the TV. Note: The lamp(s) inside this product can support the weight of the VESA Mounting Pattern show...
... damage the LCD screen. For disposal or recycling information, contact your LCD TV, always use a UL listed wall bracket appropriate for installation. 2) Unplug and remove any cables and/or other immovable structure. ( item 25, page 4). Leave the bottom of the unit protruding over the edge of the TV. Note: The lamp(s) inside this product can support the weight of the VESA Mounting Pattern show...
User Manual
Page 8
... Remote control codes 26 Chapter 4: Menu layout and navigation 28 Main menu layout 28 Setup/Installation menu layout 29 Navigating the menu system 29 Chapter 5: Setting up your TV 30 Initial Setup 30 Selecting the menu language 30 TOSHIBA Logo LED 30 Configuring the antenna input source for the ANT/CABLE terminal 30 Programming channels into the TV's channel memory 31 Programming channels automatically 31 Setting channel skip 31 Labeling channels 32 Setting the HDMI® audio mode 33 Viewing the digital signal...
... Remote control codes 26 Chapter 4: Menu layout and navigation 28 Main menu layout 28 Setup/Installation menu layout 29 Navigating the menu system 29 Chapter 5: Setting up your TV 30 Initial Setup 30 Selecting the menu language 30 TOSHIBA Logo LED 30 Configuring the antenna input source for the ANT/CABLE terminal 30 Programming channels into the TV's channel memory 31 Programming channels automatically 31 Setting channel skip 31 Labeling channels 32 Setting the HDMI® audio mode 33 Viewing the digital signal...
User Manual
Page 12
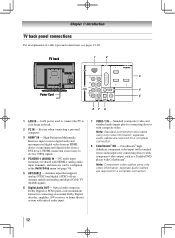
... connection. 12 Antenna input that supports analog (NTSC) and digital (ATSC) off-air antenna signals and analog and digital Cable TV (QAM) signals. 6無 Digital Audio OUT - Note: Standard (composite) video cable carry only video information; Optical audio output in Dolby Digital or PCM (pulse-code modulation) format for connecting an external Dolby Digital decoder, amplifier, A/V receiver, or home theater system with HDMI-1 analog audio input terminals, and their use when connecting a personal computer. 3無 HDMI® IN - For use can be configured in the Audio Setup menu...
... connection. 12 Antenna input that supports analog (NTSC) and digital (ATSC) off-air antenna signals and analog and digital Cable TV (QAM) signals. 6無 Digital Audio OUT - Note: Standard (composite) video cable carry only video information; Optical audio output in Dolby Digital or PCM (pulse-code modulation) format for connecting an external Dolby Digital decoder, amplifier, A/V receiver, or home theater system with HDMI-1 analog audio input terminals, and their use when connecting a personal computer. 3無 HDMI® IN - For use can be configured in the Audio Setup menu...

User Manual
Page 13
... ANT/CABLE input on your TV) are typically color-coded red, green, and blue. LAN cable Standard LAN cable is Toshiba's brand of component video.) These cables are typically colorcoded according to use with video devices with Dolby Digital or PCM (pulse-code modulation) optical audio input to the TV's DIGITAL AUDIO OUT terminal ( page 18). An HDMI cable delivers digital audio and video in this manual are for use with video devices with an HDMI output. Note: HDMI cable provides better picture...
... ANT/CABLE input on your TV) are typically color-coded red, green, and blue. LAN cable Standard LAN cable is Toshiba's brand of component video.) These cables are typically colorcoded according to use with video devices with Dolby Digital or PCM (pulse-code modulation) optical audio input to the TV's DIGITAL AUDIO OUT terminal ( page 18). An HDMI cable delivers digital audio and video in this manual are for use with video devices with an HDMI output. Note: HDMI cable provides better picture...
User Manual
Page 18
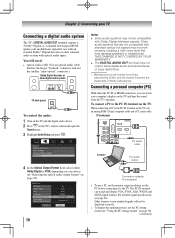
... digital audio system TV back panel To control the audio: 1無 Turn on the TV and the digital audio device. 2無 Press on the TV's remote control and open the Sound menu. 3無 Highlight Audio Setup and press . Note: •• Some audio systems may not be displayed correctly. • To display the optimum picture, use an analog RGB (15-pin) computer cable and a PC audio cable. For detailed signal specifications ( page 66). Older audio...
... digital audio system TV back panel To control the audio: 1無 Turn on the TV and the digital audio device. 2無 Press on the TV's remote control and open the Sound menu. 3無 Highlight Audio Setup and press . Note: •• Some audio systems may not be displayed correctly. • To display the optimum picture, use an analog RGB (15-pin) computer cable and a PC audio cable. For detailed signal specifications ( page 66). Older audio...
User Manual
Page 19
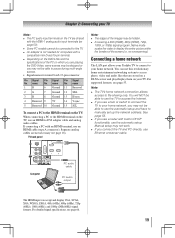
... PC audio cable PC audio output The HDMI input can use this TV. •• An adapter is not needed for computers with a compatible mini D-sub15-pin terminal. •• Depending on the DVD's title and the specifications of the PC on which you are playing the DVD-Video, some scenes may be skipped or you use a router with an HDMI terminal, use the automatic setup and have to manually set...
... PC audio cable PC audio output The HDMI input can use this TV. •• An adapter is not needed for computers with a compatible mini D-sub15-pin terminal. •• Depending on the DVD's title and the specifications of the PC on which you are playing the DVD-Video, some scenes may be skipped or you use a router with an HDMI terminal, use the automatic setup and have to manually set...
User Manual
Page 22
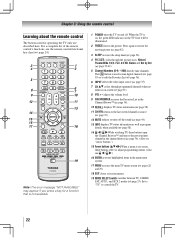
... turns off . Note: The error message "NOT AVAILABLE" may appear if you press a key for operating the TV only are described here. Chapter 3: Using the remote control Learning about the remote control The buttons used to tune digital channels ( page 39) or to edit the Favorites List ( page 36). 6無 INPUT selects the video input source ( page 35). 7無 CH pq cycles through the picture sizes...
... turns off . Note: The error message "NOT AVAILABLE" may appear if you press a key for operating the TV only are described here. Chapter 3: Using the remote control Learning about the remote control The buttons used to tune digital channels ( page 39) or to edit the Favorites List ( page 36). 6無 INPUT selects the video input source ( page 35). 7無 CH pq cycles through the picture sizes...
User Manual
Page 28
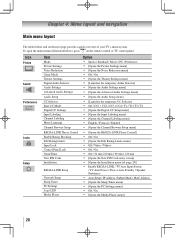
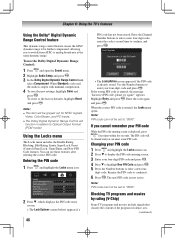
...The tables below ), press on the next page provide a quick overview of your TV's menu system. Icon Picture Sound Preferences Locks Setup Item Mode Picture Settings Noise Reduction Game Mode Theater Settings Digital Audio Selector Audio Settings Advanced Audio Settings Audio Setup CC Selector Base CC Mode Digital CC Settings Input Labeling Channel Labeling Menu Language Channel Browser Setup REGZA-LINK Player Control Enable Rating Blocking Edit Rating Limits Input Lock Control Panel Lock GameTimer New PIN Code Installation REGZA-LINK Setup Network Setup Sleep Timer PC Settings Logo LED Media...
...The tables below ), press on the next page provide a quick overview of your TV's menu system. Icon Picture Sound Preferences Locks Setup Item Mode Picture Settings Noise Reduction Game Mode Theater Settings Digital Audio Selector Audio Settings Advanced Audio Settings Audio Setup CC Selector Base CC Mode Digital CC Settings Input Labeling Channel Labeling Menu Language Channel Browser Setup REGZA-LINK Player Control Enable Rating Blocking Edit Rating Limits Input Lock Control Panel Lock GameTimer New PIN Code Installation REGZA-LINK Setup Network Setup Sleep Timer PC Settings Logo LED Media...

User Manual
Page 31
... the Setup menu. 3無 Highlight Installation and press . 4無 (A new set of Installation menu icons will automatically cycle through the channels, the message "Scanning channels, please wait" appears (as shown below to view the programmed channels. The list of Channels Found - 73 Scanning Digital Channels Found Channel - 118 Abort The TV will appear, as shown above). 5無 To cancel channel programming, press on the remote control. •• Programming channels when the ANT/ CABLE input is...
... the Setup menu. 3無 Highlight Installation and press . 4無 (A new set of Installation menu icons will automatically cycle through the channels, the message "Scanning channels, please wait" appears (as shown below to view the programmed channels. The list of Channels Found - 73 Scanning Digital Channels Found Channel - 118 Abort The TV will appear, as shown above). 5無 To cancel channel programming, press on the remote control. •• Programming channels when the ANT/ CABLE input is...
User Manual
Page 33
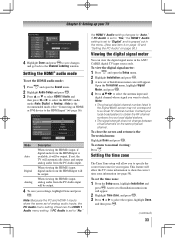
... HDMI-1 inputs share the same set the time zone: 1無 From the Setup menu, highlight Installation and press . Open the Terrestrial menu, highlight Signal Meter, and press . 4無 Press pqtu to select the antenna input and digital channel whose signal you to specify the correct time zone for your region. To return to check. Setting the HDMI® audio mode To set to "No," the HDMI 1 Audio setting changes to "Auto." Mode Description Auto When viewing the HDMI 1 input, if digital audio...
... HDMI-1 inputs share the same set the time zone: 1無 From the Setup menu, highlight Installation and press . Open the Terrestrial menu, highlight Signal Meter, and press . 4無 Press pqtu to select the antenna input and digital channel whose signal you to specify the correct time zone for your region. To return to check. Setting the HDMI® audio mode To set to "No," the HDMI 1 Audio setting changes to "Auto." Mode Description Auto When viewing the HDMI 1 input, if digital audio...
User Manual
Page 44
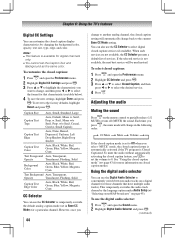
... Color Auto, Black, White, Red, Green, Blue, Yellow, Magenta, Cyan Text Background Auto, Transparent, Opacity Translucent, Flashing, Solid Caption Text Edge Color Auto, Black, White, Red, Green, Blue, Yellow, Magenta, Cyan CC Selector You can use the CC Selector to temporarily override the default analog caption mode (set the volume to 0. When such services are not available, the CC Selector presents a default list of services. This temporarily overrides the audio track chosen by changing the background color, opacity, text size, type...
... Color Auto, Black, White, Red, Green, Blue, Yellow, Magenta, Cyan Text Background Auto, Transparent, Opacity Translucent, Flashing, Solid Caption Text Edge Color Auto, Black, White, Red, Green, Blue, Yellow, Magenta, Cyan CC Selector You can use the CC Selector to temporarily override the default analog caption mode (set the volume to 0. When such services are not available, the CC Selector presents a default list of services. This temporarily overrides the audio track chosen by changing the background color, opacity, text size, type...
User Manual
Page 46
... the Channel Number buttons to enter a new four-digit code, enter the code a second time to confirm, and press . • The Locks/Active screen appears if the PIN code is output with minimal compression. 4無 To save the new settings, highlight Done and press . Reenter the PIN code to the factory defaults, highlight Reset and press . Note: PIN code can not be further compressed, allowing you to switch...
... the Channel Number buttons to enter a new four-digit code, enter the code a second time to confirm, and press . • The Locks/Active screen appears if the PIN code is output with minimal compression. 4無 To save the new settings, highlight Done and press . Reenter the PIN code to the factory defaults, highlight Reset and press . Note: PIN code can not be further compressed, allowing you to switch...
User Manual
Page 50
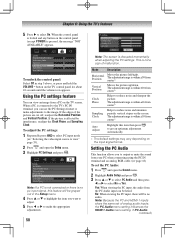
... input mode ( "Selecting the video input source to view" page 35). 2無 Press and open the Sound menu. 2無 Highlight Audio Setup and press . 3無 Press or to select PC Audio and then press or to output or mute the sound from your PC when connecting using the PC IN terminal and an analog RGB cable. ( page 18) To set of the picture...
... input mode ( "Selecting the video input source to view" page 35). 2無 Press and open the Sound menu. 2無 Highlight Audio Setup and press . 3無 Press or to select PC Audio and then press or to output or mute the sound from your PC when connecting using the PC IN terminal and an analog RGB cable. ( page 18) To set of the picture...
User Manual
Page 58
... used to output the sound from the TV speakers. Understanding the last mode memory feature If the power is cut off and on the Audio Receiver, change its broadcast for ATSC signal only) • Stereo, Mono or SAP audio status (when HDMI input mode, Dolby Digital or PCM) • Video resolution • Aspect ratio of incoming video signal (4:3 or 16:9) • V-Chip rating status • Game Timer (if set to Audio Receiver, the TV remote...
... used to output the sound from the TV speakers. Understanding the last mode memory feature If the power is cut off and on the Audio Receiver, change its broadcast for ATSC signal only) • Stereo, Mono or SAP audio status (when HDMI input mode, Dolby Digital or PCM) • Video resolution • Aspect ratio of incoming video signal (4:3 or 16:9) • V-Chip rating status • Game Timer (if set to Audio Receiver, the TV remote...
User Manual
Page 62
... picture are using a ColorStream or HDMI video connection instead. Chapter 8: Troubleshooting General troubleshooting Before calling a service technician, please check this issue. ( page 60) Picture problems General picture problems •• Check the antenna/cable connections ( Chapter 2). •• Press on certain TV channels, please contact your TV's problem is present the units will not turn on the remote control or TV control panel and you can try one of the Text modes...
... picture are using a ColorStream or HDMI video connection instead. Chapter 8: Troubleshooting General troubleshooting Before calling a service technician, please check this issue. ( page 60) Picture problems General picture problems •• Check the antenna/cable connections ( Chapter 2). •• Press on certain TV channels, please contact your TV's problem is present the units will not turn on the remote control or TV control panel and you can try one of the Text modes...
User Manual
Page 67
... faults, defects or problems" are sold and used for commercial purposes for set installation, setup, adjustment of customer controls, and installation or repair of original retail purchase. Limited One (1) Year Warranty on the date of the first rental or thirty (30) days after the date of antenna, satellite or cable systems are effective only if this LCD Television and connected equipment; Labor service charges for a period...
... faults, defects or problems" are sold and used for commercial purposes for set installation, setup, adjustment of customer controls, and installation or repair of original retail purchase. Limited One (1) Year Warranty on the date of the first rental or thirty (30) days after the date of antenna, satellite or cable systems are effective only if this LCD Television and connected equipment; Labor service charges for a period...
User Manual
Page 68
... a Toshiba Authorized Service Provider (ASP). (3) The warranties from TCL's authorized distributors, dealers or resellers ("ADR's") and (ii) located/ operated in such a manner as limited above, and do not provide for set installation, setup, adjustment of customer controls, and installation or repair of your LCD Television online at http://support.toshiba.ca/warranty/. c. f. The time within which an action must provide your warranty rights. Failure to the product for Toshiba Brand Flat Panel Televisions Toshiba of...
... a Toshiba Authorized Service Provider (ASP). (3) The warranties from TCL's authorized distributors, dealers or resellers ("ADR's") and (ii) located/ operated in such a manner as limited above, and do not provide for set installation, setup, adjustment of customer controls, and installation or repair of your LCD Television online at http://support.toshiba.ca/warranty/. c. f. The time within which an action must provide your warranty rights. Failure to the product for Toshiba Brand Flat Panel Televisions Toshiba of...
Brochure
Page 2
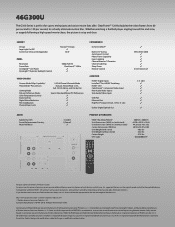
... Input Labeling Channel BrowserTM/Favorites Channel Labeling Sleep Timer Remote Control JACK PACK HDMI® Digital Inputs InstaPortTM Fast HDMI® Switching HDMI®-CEC3 ColorStream® Component Video Input Rear Audio/Video Inputs Side Audio/Video Inputs USB Port Ethernet Port High Res PC Input (S-XGA, 15 Pin, D-sub) Dolby® Digital Optical Out 3 NTSC/ATSC/QAM 3 3 3 3 3 3 4 Item Universal2 4 (1 side) 3 3 3 3 3 3 3 3 3 AUDIO Speaker System Sound Enhancement Circuitry Mute/Half Mute Invisible Q Sound® 3 PRODUCT & PACKAGING VESA® Mounting Pattern4 Unit Dimensions...
... Input Labeling Channel BrowserTM/Favorites Channel Labeling Sleep Timer Remote Control JACK PACK HDMI® Digital Inputs InstaPortTM Fast HDMI® Switching HDMI®-CEC3 ColorStream® Component Video Input Rear Audio/Video Inputs Side Audio/Video Inputs USB Port Ethernet Port High Res PC Input (S-XGA, 15 Pin, D-sub) Dolby® Digital Optical Out 3 NTSC/ATSC/QAM 3 3 3 3 3 3 4 Item Universal2 4 (1 side) 3 3 3 3 3 3 3 3 3 AUDIO Speaker System Sound Enhancement Circuitry Mute/Half Mute Invisible Q Sound® 3 PRODUCT & PACKAGING VESA® Mounting Pattern4 Unit Dimensions...


