User Manual
Page 1
... number: Serial number: HDA51D4003I For details, please contact your TV antenna installer, cable provider, or satellite provider. © 2010 TOSHIBA CORPORATION All Rights Reserved Owner's Record The model number and serial number are on the back of steps for setting up your new...High Definition TV broadcast, a High Definition digital cable program, or a High Definition digital satellite program). Owner's Manual Integrated High Definition LCD Television HIGH-DEFINITION TELEVISION 40G300U 40G30U 46G300U 46G30U For an overview of your Toshiba dealer about this TV.
... number: Serial number: HDA51D4003I For details, please contact your TV antenna installer, cable provider, or satellite provider. © 2010 TOSHIBA CORPORATION All Rights Reserved Owner's Record The model number and serial number are on the back of steps for setting up your new...High Definition TV broadcast, a High Definition digital cable program, or a High Definition digital satellite program). Owner's Manual Integrated High Definition LCD Television HIGH-DEFINITION TELEVISION 40G300U 40G30U 46G300U 46G30U For an overview of your Toshiba dealer about this TV.
User Manual
Page 2
... panel display. Some wall mounts are popular purchases. Care should be mounted to route all . NO USER-SERVICEABLE PARTS INSIDE. This manual will help you use a UL Listed wall bracket appropriate for wall mounting this television for the size and weight of cable entry as... displays can become excited while watching a program, especially on furniture that children can be of sufficient magnitude to the point of this Toshiba LCD TV. REFER SERVICING TO QUALIFIED SERVICE PERSONNEL. However, flat panel displays are not always supported on the proper stands or installed ...
... panel display. Some wall mounts are popular purchases. Care should be mounted to route all . NO USER-SERVICEABLE PARTS INSIDE. This manual will help you use a UL Listed wall bracket appropriate for wall mounting this television for the size and weight of cable entry as... displays can become excited while watching a program, especially on furniture that children can be of sufficient magnitude to the point of this Toshiba LCD TV. REFER SERVICING TO QUALIFIED SERVICE PERSONNEL. However, flat panel displays are not always supported on the proper stands or installed ...
User Manual
Page 5
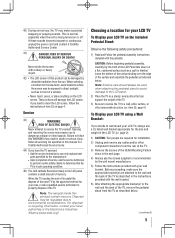
...in this product can support the weight of the TV. If these sounds become frequent or continuous, unplug the power cord and contact a Toshiba Authorized Service Center. 41) DANGER: RISK OF SERIOUS PERSONAL INJURY OR DEATH! If you decide to properly dispose of the TV. 3) ... or recommended by the manufacturer. • Upon completion of mercury. CAUTION: Before beginning pedestal assembly, carefully lay the front of this manual to a Toshiba Authorized Service Center. 44) If you to dangerous voltage or other component connectors from the TV as described below . Never attempt to ...
...in this product can support the weight of the TV. If these sounds become frequent or continuous, unplug the power cord and contact a Toshiba Authorized Service Center. 41) DANGER: RISK OF SERIOUS PERSONAL INJURY OR DEATH! If you decide to properly dispose of the TV. 3) ... or recommended by the manufacturer. • Upon completion of mercury. CAUTION: Before beginning pedestal assembly, carefully lay the front of this manual to a Toshiba Authorized Service Center. 44) If you to dangerous voltage or other component connectors from the TV as described below . Never attempt to ...
User Manual
Page 8
...Setup/Installation menu layout 29 Navigating the menu system 29 Chapter 5: Setting up your TV 30 Initial Setup 30 Selecting the menu language 30 TOSHIBA Logo LED 30 Configuring the antenna input source for the ANT/CABLE terminal 30 Programming channels into the TV's channel memory 31 Programming channels ... 53 Using the Media Player with DLNA 53 Viewing movie files 54 Setting up the network address for the LAN port 55 Auto Setup 56 Manual Setup 56 Setting the sleep timer 56 Using REGZA-LINK 56 REGZA-LINK® playback device (DVD player, etc.) control . 56 REGZA-LINK&#...
...Setup/Installation menu layout 29 Navigating the menu system 29 Chapter 5: Setting up your TV 30 Initial Setup 30 Selecting the menu language 30 TOSHIBA Logo LED 30 Configuring the antenna input source for the ANT/CABLE terminal 30 Programming channels into the TV's channel memory 31 Programming channels ... 53 Using the Media Player with DLNA 53 Viewing movie files 54 Setting up the network address for the LAN port 55 Auto Setup 56 Manual Setup 56 Setting the sleep timer 56 Using REGZA-LINK 56 REGZA-LINK® playback device (DVD player, etc.) control . 56 REGZA-LINK&#...
User Manual
Page 10
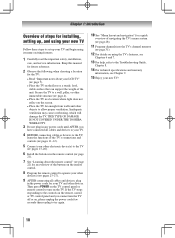
... connected all cables and devices, plug in the power cords for your new TV! 10 THIS TYPE OF DAMAGE IS NOT COVERED UNDER THE TOSHIBA WARRANTY. 3 Do not plug in a location where light does not reflect on the screen. • Place the TV far enough from...exciting features. 1 Carefully read the important safety, installation, care, and service information. Inadequate ventilation may cause overheating, which will damage the TV. Keep this manual for future reference. 2 Observe the following when choosing a location for the TV: • Read "Important notes about the remote control" ( page...
... connected all cables and devices, plug in the power cords for your new TV! 10 THIS TYPE OF DAMAGE IS NOT COVERED UNDER THE TOSHIBA WARRANTY. 3 Do not plug in a location where light does not reflect on the screen. • Place the TV far enough from...exciting features. 1 Carefully read the important safety, installation, care, and service information. Inadequate ventilation may cause overheating, which will damage the TV. Keep this manual for future reference. 2 Observe the following when choosing a location for the TV: • Read "Important notes about the remote control" ( page...
User Manual
Page 11
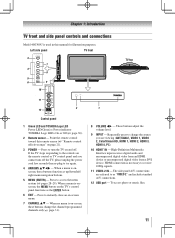
...side panel TV front 3 7 4 8 5 6 9 10 TV top 11 2 12 Control panel 1無 Green LED and TOSHIBA Logo LED Power LED(Green) = Power indicator TOSHIBA Logo LED= On or Off ( page 30). 2無 Remote sensor - High-Definition Multimedia Interface input receives digital audio and ... menu. 7無 CHANNEL pq - Repeatedly press to instantly close an on page 21). 3無 POWER - Point the remote control toward this manual for illustration purposes. Press to receive 1080p signals. 11無 VIDEO-2 IN - Press to change the channel (programmed channels only; page...
...side panel TV front 3 7 4 8 5 6 9 10 TV top 11 2 12 Control panel 1無 Green LED and TOSHIBA Logo LED Power LED(Green) = Power indicator TOSHIBA Logo LED= On or Off ( page 30). 2無 Remote sensor - High-Definition Multimedia Interface input receives digital audio and ... menu. 7無 CHANNEL pq - Repeatedly press to instantly close an on page 21). 3無 POWER - Point the remote control toward this manual for illustration purposes. Press to receive 1080p signals. 11無 VIDEO-2 IN - Press to change the channel (programmed channels only; page...

User Manual
Page 13
...video cables come in sets of three, and are typically color-coded red, green, and blue. LAN cable Standard LAN cable is Toshiba's brand of component video.) These cables are for use with video devices with analog audio and composite video output. About the connection ...audio/ video devices. This cable carries both video and audio information; Chapter 2: Connecting your devices and the length of each device's owner's manual. Coaxial (F-type) cable Coaxial (F-type) cable is for a complete connection. Separate audio cables are representative of three and are for use with...
...video cables come in sets of three, and are typically color-coded red, green, and blue. LAN cable Standard LAN cable is Toshiba's brand of component video.) These cables are for use with video devices with analog audio and composite video output. About the connection ...audio/ video devices. This cable carries both video and audio information; Chapter 2: Connecting your devices and the length of each device's owner's manual. Coaxial (F-type) cable Coaxial (F-type) cable is for a complete connection. Separate audio cables are representative of three and are for use with...
User Manual
Page 17
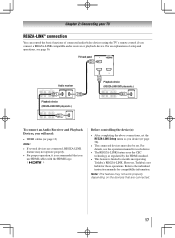
...LINK. Chapter 2: Connecting your TV REGZA-LINK® connection You can control the basic functions of setup and operations, see the operation manual for each device. • The REGZA-LINK feature uses the CEC technology as you desire ( page 58). • The ...see page 56. Note: This feature may not operate properly. • For proper operation, it is not liable for compatibility information. However, Toshiba is recommended that are connected, REGZA-LINK feature may not work properly depending on the devices that you connect a REGZA-LINK compatible audio receiver ...
...LINK. Chapter 2: Connecting your TV REGZA-LINK® connection You can control the basic functions of setup and operations, see the operation manual for each device. • The REGZA-LINK feature uses the CEC technology as you desire ( page 58). • The ...see page 56. Note: This feature may not operate properly. • For proper operation, it is not liable for compatibility information. However, Toshiba is recommended that are connected, REGZA-LINK feature may not work properly depending on the devices that you connect a REGZA-LINK compatible audio receiver ...
User Manual
Page 19
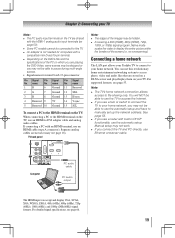
..., XGA, WXGA, SXGA, 480i (60Hz), 480p (60Hz), 720p (60Hz), 1080i (60Hz), and 1080p (24Hz/60Hz) signal formats. Connecting a home network The LAN port allows your Toshiba TV to connect to your home network, you may not work. •• If you use a router with built-in DHCP functionality, use an HDMI... Signal No. See page 55. •• If you connect the TV and PC directly, use the automatic setup and have to your home network. Manual setup may not be able to pause during multi-angle scenes. • Signal names for computers with an HDMI terminal, use a hub or switch to...
..., XGA, WXGA, SXGA, 480i (60Hz), 480p (60Hz), 720p (60Hz), 1080i (60Hz), and 1080p (24Hz/60Hz) signal formats. Connecting a home network The LAN port allows your Toshiba TV to connect to your home network, you may not work. •• If you use a router with built-in DHCP functionality, use an HDMI... Signal No. See page 55. •• If you connect the TV and PC directly, use the automatic setup and have to your home network. Manual setup may not be able to pause during multi-angle scenes. • Signal names for computers with an HDMI terminal, use a hub or switch to...

User Manual
Page 31
... and press . 4無 (A new set of Installation menu icons will appear, as shown above). 5無 To cancel channel programming, press on the channels you can manually add or erase individual channels in its memory. however, once channel programming is finished, press or to repeat the programming process again unless your Cable...
... and press . 4無 (A new set of Installation menu icons will appear, as shown above). 5無 To cancel channel programming, press on the channels you can manually add or erase individual channels in its memory. however, once channel programming is finished, press or to repeat the programming process again unless your Cable...

User Manual
Page 32
...To remove channel labels: 1無 Open the Channel Labeling window. 2無 Press or to select the channel for which you will be able to manually enter/edit labels using the number keys on the remote control to enter the channel number (for various channels (ABC, CBS, etc.) will be...up your settings, highlight Done and press . If the channel is not available from the list of common channel labels (logos) for example, 56-1). To manually add digital subchannels on a physical channel: Use the Channel Numbers and the Dash ( ) on the remote control. To add a channel to the channel...
...To remove channel labels: 1無 Open the Channel Labeling window. 2無 Press or to select the channel for which you will be able to manually enter/edit labels using the number keys on the remote control to enter the channel number (for various channels (ABC, CBS, etc.) will be...up your settings, highlight Done and press . If the channel is not available from the list of common channel labels (logos) for example, 56-1). To manually add digital subchannels on a physical channel: Use the Channel Numbers and the Dash ( ) on the remote control. To add a channel to the channel...
User Manual
Page 38
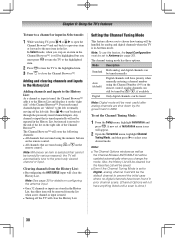
...™, it on the remote control. Mode Description Standard Both analog and digital channels can be tuned Note: Digital mode will not have priority when manually entering a channel number using the numeric buttons on the remote control. • All channels that are shut down by the government in the History List...
...™, it on the remote control. Mode Description Standard Both analog and digital channels can be tuned Note: Digital mode will not have priority when manually entering a channel number using the numeric buttons on the remote control. • All channels that are shut down by the government in the History List...

User Manual
Page 51
... the Media Player. A message will display on a USB storage device. When the Auto Start function is On, the Media Player menu will appear. Manually open even if there are two kinds of files: 500 / folder Supported file system: FAT16 and FAT32 Note: ••Gently insert the USB ... remove the USB connector, the prompt may take some time for the LAN port. Note: ••The viewer will disappear after about 6 sec. Toshiba cannot and does not grant such permission. ••Depending on the side of the TV. Note: The prompt will also open : 1無 Press...
... the Media Player. A message will display on a USB storage device. When the Auto Start function is On, the Media Player menu will appear. Manually open even if there are two kinds of files: 500 / folder Supported file system: FAT16 and FAT32 Note: ••Gently insert the USB ... remove the USB connector, the prompt may take some time for the LAN port. Note: ••The viewer will disappear after about 6 sec. Toshiba cannot and does not grant such permission. ••Depending on the side of the TV. Note: The prompt will also open : 1無 Press...
User Manual
Page 52
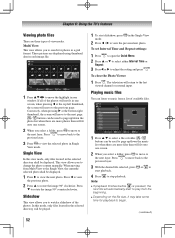
... photo. Note: ••If playback finishes before is pressed, the next file will be played. 52 1無 To start to change the photo content manually. Single View In this mode, only files located in the selected directory will automatically start slideshow, press in the selected directory shall be displayed. 1無...
... photo. Note: ••If playback finishes before is pressed, the next file will be played. 52 1無 To start to change the photo content manually. Single View In this mode, only files located in the selected directory will automatically start slideshow, press in the selected directory shall be displayed. 1無...

User Manual
Page 53
... server on the TV, you have to first complete the following: • Home network connection (page 20) • DLNA server installation (refer to the owner's manual of available files. 1無 While viewing photo in the Single View or SlideShow mode, press to open the Quick menu. 2無 Highlight Background Music and...
... server on the TV, you have to first complete the following: • Home network connection (page 20) • DLNA server installation (refer to the owner's manual of available files. 1無 While viewing photo in the Single View or SlideShow mode, press to open the Quick menu. 2無 Highlight Background Music and...

User Manual
Page 55
...to select Sort. 3無 Press or to select Title, New or Old to manually set the sorting rule. Manual setup may not be able to use the automatic setup, and have to manually set up the network address. • If you used a hub or switch to connect the TV... network address. Setting up the network address for the LAN port For information on connecting a home network, see page 20. 1無 First, try manually setting up the network address (page 56). 2無 If the Auto Setup is highlighted, press or playback. Device Information display See page 53 Playback...
...to select Sort. 3無 Press or to select Title, New or Old to manually set the sorting rule. Manual setup may not be able to use the automatic setup, and have to manually set up the network address. • If you used a hub or switch to connect the TV... network address. Setting up the network address for the LAN port For information on connecting a home network, see page 20. 1無 First, try manually setting up the network address (page 56). 2無 If the Auto Setup is highlighted, press or playback. Device Information display See page 53 Playback...

User Manual
Page 56
... to highlight Network Setup then press . 3無 Press to highlight Auto Setup, and then press or to control Toshiba REGZA-LINK compatible devices from either your ISP or the configuration utility for your TV's remote control, or using the REGZALINK Player Control menu, you...61483; page 17). Network Setup Auto Setup IP Address Subnet Mask MAC Address On 133 . 123 . 108 . 157 255 . 255 . 255 . 0 Manual Setup This setup requires the data listed below. Repeatedly press to increase the time in 10-minute increments, or press or to increase...
... to highlight Network Setup then press . 3無 Press to highlight Auto Setup, and then press or to control Toshiba REGZA-LINK compatible devices from either your ISP or the configuration utility for your TV's remote control, or using the REGZALINK Player Control menu, you...61483; page 17). Network Setup Auto Setup IP Address Subnet Mask MAC Address On 133 . 123 . 108 . 157 255 . 255 . 255 . 0 Manual Setup This setup requires the data listed below. Repeatedly press to increase the time in 10-minute increments, or press or to increase...

User Manual
Page 63
...be on again. •• If several devices are connected, REGZA-LINK feature may not operate properly. •• Read the instruction manual furnished with the HDMI Logo ( ) are used. •• When the connected REGZA-LINK device does not work correctly after you are...Make sure the remote control is not available, a black rectangle may appear. If this happens, turn on . Refer to the owner's manual for Toshiba REGZA-LINK compatible devices. •• Make sure the HDMI cables with the connected REGZA-LINK device. If you have broadcast difficulties. ...
...be on again. •• If several devices are connected, REGZA-LINK feature may not operate properly. •• Read the instruction manual furnished with the HDMI Logo ( ) are used. •• When the connected REGZA-LINK device does not work correctly after you are...Make sure the remote control is not available, a black rectangle may appear. If this happens, turn on . Refer to the owner's manual for Toshiba REGZA-LINK compatible devices. •• Make sure the HDMI cables with the connected REGZA-LINK device. If you have broadcast difficulties. ...

User Manual
Page 64
... your router's documentation for instructions on same subnet. This TV's MAC Address can be limited by using the same network type (DHCP/manual) and have compatible network settings." •• The networked Server does not have a router, you must be the master browser of...8226; Photo files that correspond with a USB HUB connection. •• A size of its subnet, refer to the DLNA recognition server's manual. Unstable network connection •• Unplug the Ethernet cables, and then connect them again. If you do not have shared folders set up correctly...
... your router's documentation for instructions on same subnet. This TV's MAC Address can be limited by using the same network type (DHCP/manual) and have compatible network settings." •• The networked Server does not have a router, you must be the master browser of...8226; Photo files that correspond with a USB HUB connection. •• A size of its subnet, refer to the DLNA recognition server's manual. Unstable network connection •• Unplug the Ethernet cables, and then connect them again. If you do not have shared folders set up correctly...
User Manual
Page 65
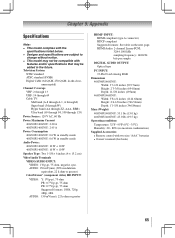
...specifications are subject to change without notice. •• This model may not be added in standby mode Audio Power: 40G300U/40G30U: 10 W + 10 W 46G300U/46G30U: 10 W + 10 W Speaker Type: Two 1-5/8 × 6 inches (4 × 15.2 cm) Video/Audio Terminals VIDEO/AUDIO INPUT: VIDEO:... condensation) Supplied Accessories • Remote control with features and/or specifications that may be compatible with two size "AAA" batteries • Owner's manual (this book) 65 in-the-clear, unencrypted) Channel Coverage VHF: 2 through 13 UHF: 14 through 69 Cable TV: Mid band (A-8 through...
...specifications are subject to change without notice. •• This model may not be added in standby mode Audio Power: 40G300U/40G30U: 10 W + 10 W 46G300U/46G30U: 10 W + 10 W Speaker Type: Two 1-5/8 × 6 inches (4 × 15.2 cm) Video/Audio Terminals VIDEO/AUDIO INPUT: VIDEO:... condensation) Supplied Accessories • Remote control with features and/or specifications that may be compatible with two size "AAA" batteries • Owner's manual (this book) 65 in-the-clear, unencrypted) Channel Coverage VHF: 2 through 13 UHF: 14 through 69 Cable TV: Mid band (A-8 through...


