User Manual
Page 8
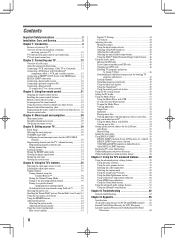
... to control your other devices.. 25 Remote control codes 26 Chapter 4: Menu layout and navigation 28 Main menu layout 28 Setup/Installation menu layout 29 Navigating the menu system 29 Chapter 5: Setting up your TV 30 Initial Setup 30 Selecting the menu language 30 TOSHIBA Logo LED 30 Configuring the antenna input...
... to control your other devices.. 25 Remote control codes 26 Chapter 4: Menu layout and navigation 28 Main menu layout 28 Setup/Installation menu layout 29 Navigating the menu system 29 Chapter 5: Setting up your TV 30 Initial Setup 30 Selecting the menu language 30 TOSHIBA Logo LED 30 Configuring the antenna input...
User Manual
Page 9
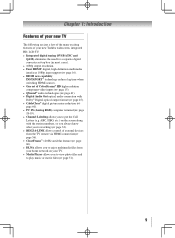
... station numbers, so you always know what you're watching ( page 32). • REGZA-LINK allows control of external devices from the TV remote via HDMI connection( page 56). • ClearFrame™ 120 Hz anti-blur feature ( page 60). • DLNA allows you to ...enjoy multimedia files from your home network on your new Toshiba widescreen, integrated HD, LCD TV: • Integrated digital tuning (8VSB ATSC and QAM) eliminates the need for a separate digital converter set-top box ...
... station numbers, so you always know what you're watching ( page 32). • REGZA-LINK allows control of external devices from the TV remote via HDMI connection( page 56). • ClearFrame™ 120 Hz anti-blur feature ( page 60). • DLNA allows you to ...enjoy multimedia files from your home network on your new Toshiba widescreen, integrated HD, LCD TV: • Integrated digital tuning (8VSB ATSC and QAM) eliminates the need for a separate digital converter set-top box ...
User Manual
Page 10
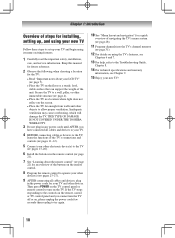
...'s connections and controls ( pages 11-12). 5 Connect your other electronic device(s) to the TV ( pages 13-20). 6 Install the batteries in the remote control ( page 21). 7 See "Learning about your LCD TV" ( page 7). • Place the TV on the floor or a sturdy, level,... its many exciting features. 1 Carefully read the important safety, installation, care, and service information. THIS TYPE OF DAMAGE IS NOT COVERED UNDER THE TOSHIBA WARRANTY. 3 Do not plug in a location where light does not reflect on the screen. • Place the TV far enough from walls and...
...'s connections and controls ( pages 11-12). 5 Connect your other electronic device(s) to the TV ( pages 13-20). 6 Install the batteries in the remote control ( page 21). 7 See "Learning about your LCD TV" ( page 7). • Place the TV on the floor or a sturdy, level,... its many exciting features. 1 Carefully read the important safety, installation, care, and service information. THIS TYPE OF DAMAGE IS NOT COVERED UNDER THE TOSHIBA WARRANTY. 3 Do not plug in a location where light does not reflect on the screen. • Place the TV far enough from walls and...
User Manual
Page 11
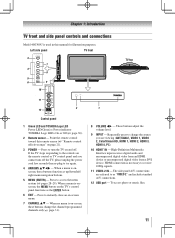
...or music files. 11 If the TV stops responding to the controls on the remote control or TV control panel and you are referred to instantly close an on-screen... MENU (ENTER) - These buttons adjust the volume level. 9無 INPUT - Point the remote control toward this manual for illustration purposes. Repeatedly press to access the menu system ( ... - Chapter 1: Introduction TV front and side panel controls and connections Model 40G300U is used in this remote sensor ( "Remote control effective range" on page 21). 3無 POWER - Left side panel TV front 3 7 ...
...or music files. 11 If the TV stops responding to the controls on the remote control or TV control panel and you are referred to instantly close an on-screen... MENU (ENTER) - These buttons adjust the volume level. 9無 INPUT - Point the remote control toward this manual for illustration purposes. Repeatedly press to access the menu system ( ... - Chapter 1: Introduction TV front and side panel controls and connections Model 40G300U is used in this remote sensor ( "Remote control effective range" on page 21). 3無 POWER - Left side panel TV front 3 7 ...
User Manual
Page 14
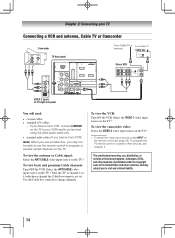
... may not be able to use , distribution, or revision of the United States and other devices, see Chapter 3. The unauthorized recording, use the remote control to program or access certain features on the TV.* To view basic and premium Cable channels: Turn OFF the VCR. Select the VIDEO 1 video...videotapes, DVDs, and other materials is set to). Use the Cable box controls to change channels. Select the ANT/CABLE video input source on the remote control ( page 22). To view the antenna or Cable signal: Select the ANT/CABLE video input source on the TV. Chapter 2: Connecting ...
... may not be able to use , distribution, or revision of the United States and other devices, see Chapter 3. The unauthorized recording, use the remote control to program or access certain features on the TV.* To view basic and premium Cable channels: Turn OFF the VCR. Select the VIDEO 1 video...videotapes, DVDs, and other materials is set to). Use the Cable box controls to change channels. Select the ANT/CABLE video input source on the remote control ( page 22). To view the antenna or Cable signal: Select the ANT/CABLE video input source on the TV. Chapter 2: Connecting ...
User Manual
Page 15
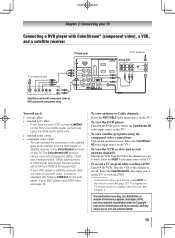
... civil and criminal liability. 15 Select the ColorStream HD video input source on the side panel. Select the ColorStream HD video input source on the remote control ( page 22). To view antenna or Cable channels: Select the ANT/CABLE video input source on the TV.* To record a TV program while... the VCR. Select the VIDEO 1 video input source on the TV.* To view the DVD player: Turn ON the DVD player. To program the TV remote control to view the DVD. ** To select the video input source, press INPUT on the TV.* To view satellite programs using the white audio cable...
... civil and criminal liability. 15 Select the ColorStream HD video input source on the side panel. Select the ColorStream HD video input source on the remote control ( page 22). To view antenna or Cable channels: Select the ANT/CABLE video input source on the TV.* To record a TV program while... the VCR. Select the VIDEO 1 video input source on the TV.* To view the DVD player: Turn ON the DVD player. To program the TV remote control to view the DVD. ** To select the video input source, press INPUT on the TV.* To view satellite programs using the white audio cable...
User Manual
Page 16
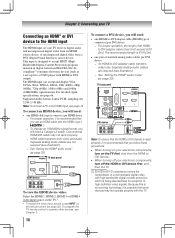
... 2: Connecting your TV Connecting an HDMI® or DVI device to the HDMI input The HDMI input on your electronic components, turn on the remote control ( page 22). For detailed signal specifications, see illustration). −− See "Setting the HDMI® audio mode" ( ... receives digital audio and uncompressed digital video from an HDMI source device, or uncompressed digital video from EIA/CEA-861-D- To program the TV remote control to the HDMI input, see illustration). −− See "Setting the HDMI® audio mode" ( page 33). TV...
... 2: Connecting your TV Connecting an HDMI® or DVI device to the HDMI input The HDMI input on your electronic components, turn on the remote control ( page 22). For detailed signal specifications, see illustration). −− See "Setting the HDMI® audio mode" ( ... receives digital audio and uncompressed digital video from an HDMI source device, or uncompressed digital video from EIA/CEA-861-D- To program the TV remote control to the HDMI input, see illustration). −− See "Setting the HDMI® audio mode" ( page 33). TV...
User Manual
Page 17
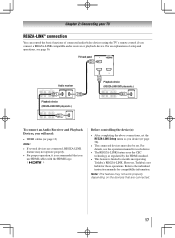
... you will need: • HDMI cables ( page 13) Note: • If several devices are connected. 17 Refer to models incorporating Toshiba's REGZA-LINK. Before controlling the device(s): • After completing the above connections, set the REGZA-LINK Setup menu as regulated by the HDMI standard...( page 58). • The connected devices must also be set. For an explanation of connected audio/video devices using the TV's remote control if you connect a REGZA-LINK compatible audio receiver or playback device. For details, see page 56. Note: This feature may not ...
... you will need: • HDMI cables ( page 13) Note: • If several devices are connected. 17 Refer to models incorporating Toshiba's REGZA-LINK. Before controlling the device(s): • After completing the above connections, set the REGZA-LINK Setup menu as regulated by the HDMI standard...( page 58). • The connected devices must also be set. For an explanation of connected audio/video devices using the TV's remote control if you connect a REGZA-LINK compatible audio receiver or playback device. For details, see page 56. Note: This feature may not ...
User Manual
Page 18
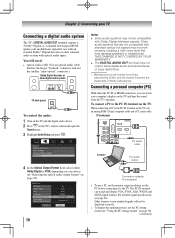
...; To use a PC, set the monitor output resolution on the TV, use the PC setting feature ( "Using the PC settings feature" on the TV's remote control and open the Sound menu. 3無 Highlight Audio Setup and press .
...; To use a PC, set the monitor output resolution on the TV, use the PC setting feature ( "Using the PC settings feature" on the TV's remote control and open the Sound menu. 3無 Highlight Audio Setup and press .
User Manual
Page 21
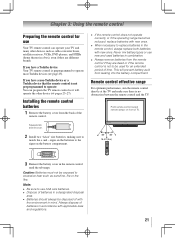
.... •• Batteries should always be used batteries in the remote control, always replace both batteries with applicable laws and regulations. 21 If you have a Toshiba device: Your TV remote control is no obstruction between the remote control and the TV. This will operate the other devices such ...home theater in a box), even if they are dead or if the remote control is not preprogrammed to match the + and - Always dispose of TV. If you have a non-Toshiba device or a Toshiba device that the remote control is not to be disposed of with new ones. ••...
.... •• Batteries should always be used batteries in the remote control, always replace both batteries with applicable laws and regulations. 21 If you have a Toshiba device: Your TV remote control is no obstruction between the remote control and the TV. This will operate the other devices such ...home theater in a box), even if they are dead or if the remote control is not preprogrammed to match the + and - Always dispose of TV. If you have a non-Toshiba device or a Toshiba device that the remote control is not to be disposed of with new ones. ••...
User Manual
Page 22
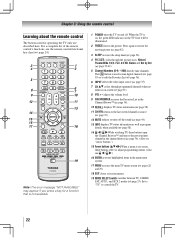
... accesses the Favorites List in the channel history ( page 36). (Also see the remote control functional key chart ( page 24). Chapter 3: Using the remote control Learning about the remote control The buttons used to tune digital channels ( page 39) or to edit the...4:3 HD, Native and Dot by Dot ( page 39-41). 5無 Channel Numbers (0-9, -/100) directly tune channels. For a complete list of the remote control's functions, see "Arrow buttons.") 15無 Arrow buttons (pqtu) When a menu is not available. 1無 POWER turns the TV on -screen menus...
... accesses the Favorites List in the channel history ( page 36). (Also see the remote control functional key chart ( page 24). Chapter 3: Using the remote control Learning about the remote control The buttons used to tune digital channels ( page 39) or to edit the...4:3 HD, Native and Dot by Dot ( page 39-41). 5無 Channel Numbers (0-9, -/100) directly tune channels. For a complete list of the remote control's functions, see "Arrow buttons.") 15無 Arrow buttons (pqtu) When a menu is not available. 1無 POWER turns the TV on -screen menus...

User Manual
Page 23
...higher channel. "AUX 1" to control a DVD player or HTIB. 23 "AUX 2" to control a VCR; Chapter 3: Using the remote control Using the remote control to control your TV remote control to operate a: • Cable converter box or satellite receiver, set the MODE SELECT switch to CABLE/SAT. • VCR,... Set to "TV" to control a cable converter box or satellite receiver; To use those features, you have a non-Toshiba device or a Toshiba device that the remote control is programmed, it may not work on some DVD players). 9無 ENTER Required by some satellite receivers and DVD players...
...higher channel. "AUX 1" to control a DVD player or HTIB. 23 "AUX 2" to control a VCR; Chapter 3: Using the remote control Using the remote control to control your TV remote control to operate a: • Cable converter box or satellite receiver, set the MODE SELECT switch to CABLE/SAT. • VCR,... Set to "TV" to control a cable converter box or satellite receiver; To use those features, you have a non-Toshiba device or a Toshiba device that the remote control is programmed, it may not work on some DVD players). 9無 ENTER Required by some satellite receivers and DVD players...

User Manual
Page 24
...up/down up/down Channel up /down --- Menu left --- Stop Stop SKIP Skip REV* --- --- --- TV/VCR DVD search 24 REMOTE CONTROL KEY Toshiba TV CABLE SAT (satellite) AUX 1 (VCR) AUX 2 (DVD or HTIB) POWER Power Power Power Power Power SLEEP Sleep timer TV...BROWSER DVD TOP Menu* --- --- --- Chapter 3: Using the remote control Remote Control functional key chart Note: key does not send a signal in that remote control mode. •• " TV" = key will affect the TV, even though the remote control is in another mode. •• * Not available ...
...up/down up/down Channel up /down --- Menu left --- Stop Stop SKIP Skip REV* --- --- --- TV/VCR DVD search 24 REMOTE CONTROL KEY Toshiba TV CABLE SAT (satellite) AUX 1 (VCR) AUX 2 (DVD or HTIB) POWER Power Power Power Power Power SLEEP Sleep timer TV...BROWSER DVD TOP Menu* --- --- --- Chapter 3: Using the remote control Remote Control functional key chart Note: key does not send a signal in that remote control mode. •• " TV" = key will affect the TV, even though the remote control is in another mode. •• * Not available ...

User Manual
Page 25
... , press the Channel Number buttons to enter the 3-digit code for your device, use the remote control that came with the device. 5無 Remember to set the switch to the other devices Your Toshiba TV remote control is preprogrammed to either of two codes. See notes below . SAT (satellite) --- If... REC MENU* SLOW REW* SLOW FWD* Angle* Sub title* Audio* Eject* CABLE --- To program your TV remote control to operate a non-Toshiba device (or a Toshiba device that all listed codes, the necessary keys do not operate your device. If more than one code is not preprogrammed to ...
... , press the Channel Number buttons to enter the 3-digit code for your device, use the remote control that came with the device. 5無 Remember to set the switch to the other devices Your Toshiba TV remote control is preprogrammed to either of two codes. See notes below . SAT (satellite) --- If... REC MENU* SLOW REW* SLOW FWD* Angle* Sub title* Audio* Eject* CABLE --- To program your TV remote control to operate a non-Toshiba device (or a Toshiba device that all listed codes, the necessary keys do not operate your device. If more than one code is not preprogrammed to ...

User Manual
Page 26
... Magnavox Memorex Mintek NAD Nakamichi Norcent Onkyo Oritron Panasonic Philips Pioneer Proscan Qwestar RCA Sampo Samsung Sansui Sanyo Sharp Sherwood Sony Sylvania Teac Technics Techwood Toshiba Yamaha Zenith 019 020 021 022, 023, 024, 025 026, 027 028 027 001, 029, 030 087 031 005, 032, 033, ... not be able to operate your device with the TV remote control. If this happens, use a code that is not recognized by the TV remote control. S. Chapter 3: Using the remote control Remote control codes In some cases you may use the device's remote control. Cable converter box ABC 061, 062, 063, ...
... Magnavox Memorex Mintek NAD Nakamichi Norcent Onkyo Oritron Panasonic Philips Pioneer Proscan Qwestar RCA Sampo Samsung Sansui Sanyo Sharp Sherwood Sony Sylvania Teac Technics Techwood Toshiba Yamaha Zenith 019 020 021 022, 023, 024, 025 026, 027 028 027 001, 029, 030 087 031 005, 032, 033, ... not be able to operate your device with the TV remote control. If this happens, use a code that is not recognized by the TV remote control. S. Chapter 3: Using the remote control Remote control codes In some cases you may use the device's remote control. Cable converter box ABC 061, 062, 063, ...
User Manual
Page 28
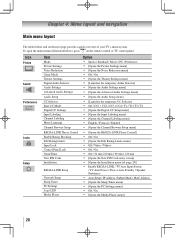
To open the main menus (illustrated below and on the remote control or TV control panel. Icon Picture Sound Preferences Locks Setup Item Mode Picture Settings Noise Reduction Game Mode Theater Settings Digital Audio Selector Audio ...
To open the main menus (illustrated below and on the remote control or TV control panel. Icon Picture Sound Preferences Locks Setup Item Mode Picture Settings Noise Reduction Game Mode Theater Settings Digital Audio Selector Audio ...

User Manual
Page 29
...5 minutes. • To close a menu instantly, press . 29 This is not a sign of malfunction. • When a menu is receiving. on the remote control or TV control panel, open the Icon Terrestrial Item Input Configuration Channel Program Channel Options Channel Tuning Mode Time Zone Signal Meter Option ...Meter menu] System Status System Information [Opens the System Information screen] Navigating the menu system You can use the buttons on the remote control or TV control panel to access and navigate your TV's onscreen menu system. • Press to open , use the up/down/...
...5 minutes. • To close a menu instantly, press . 29 This is not a sign of malfunction. • When a menu is receiving. on the remote control or TV control panel, open the Icon Terrestrial Item Input Configuration Channel Program Channel Options Channel Tuning Mode Time Zone Signal Meter Option ...Meter menu] System Status System Information [Opens the System Information screen] Navigating the menu system You can use the buttons on the remote control or TV control panel to access and navigate your TV's onscreen menu system. • Press to open , use the up/down/...

User Manual
Page 31
.... 4無 (A new set of Installation menu icons will appear, as shown above). 5無 To cancel channel programming, press on the remote control (or highlight Cancel in the onscreen display and press ). Setting channel skip To prevent certain channels from being viewed, channel positions can ...manually add or erase individual channels in the channel memory, you must use the Channel Number buttons on the remote control. •• Programming channels when the ANT/ CABLE input is configured for Cable will automatically cycle through the channels, the...
.... 4無 (A new set of Installation menu icons will appear, as shown above). 5無 To cancel channel programming, press on the remote control (or highlight Cancel in the onscreen display and press ). Setting channel skip To prevent certain channels from being viewed, channel positions can ...manually add or erase individual channels in the channel memory, you must use the Channel Number buttons on the remote control. •• Programming channels when the ANT/ CABLE input is configured for Cable will automatically cycle through the channels, the...

User Manual
Page 32
... window. The software keyboard will appear. 4無 Repeatedly press the corresponding key on the remote control to highlight the desired character on the on the remote control to manually enter/edit labels using the number keys on the remote control. A tick will be able to enter the channel number (for other channels. 6無...
... window. The software keyboard will appear. 4無 Repeatedly press the corresponding key on the remote control to highlight the desired character on the on the remote control to manually enter/edit labels using the number keys on the remote control. A tick will be able to enter the channel number (for other channels. 6無...
User Manual
Page 35
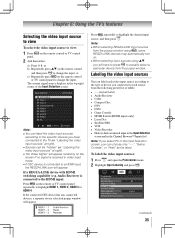
... device from the popup window. If the connected CEC device has any connected devices, a separate device selection popup window will appear randomly on the remote or TV control panel repeatedly to highlight HDMI 1, HDMI 2, HDMI 3 or HDMI 4. To label the video input sources: 1無 Press and...input source to view: 1無 Press on . ••When selecting input sources using , some REGZA-LINK devices may automatically turn on the remote control or TV control panel. 2無 And then either: a) Press 0-8; Note: ••When selecting REGZA-LINK input sources from the popup ...
... device from the popup window. If the connected CEC device has any connected devices, a separate device selection popup window will appear randomly on the remote or TV control panel repeatedly to highlight HDMI 1, HDMI 2, HDMI 3 or HDMI 4. To label the video input sources: 1無 Press and...input source to view: 1無 Press on . ••When selecting input sources using , some REGZA-LINK devices may automatically turn on the remote control or TV control panel. 2無 And then either: a) Press 0-8; Note: ••When selecting REGZA-LINK input sources from the popup ...


