User Manual
Page 1
.... For details, please contact your TV antenna installer, cable provider, or satellite provider. © 2010 TOSHIBA CORPORATION All Rights Reserved Owner's Record The model number and serial number are on the back of steps for setting up your new TV, see page10. Record these numbers whenever you communicate with your TV. Model... digital cable program, or a High Definition digital satellite program). Owner's Manual Integrated High Definition LCD Television HIGH-DEFINITION TELEVISION 40G300U 40G30U 46G300U 46G30U For an overview of your Toshiba dealer about this TV.
.... For details, please contact your TV antenna installer, cable provider, or satellite provider. © 2010 TOSHIBA CORPORATION All Rights Reserved Owner's Record The model number and serial number are on the back of steps for setting up your new TV, see page10. Record these numbers whenever you communicate with your TV. Model... digital cable program, or a High Definition digital satellite program). Owner's Manual Integrated High Definition LCD Television HIGH-DEFINITION TELEVISION 40G300U 40G30U 46G300U 46G30U For an overview of your Toshiba dealer about this TV.
User Manual
Page 2
... and weight of your LCD TV, please read this product. • Don't allow children to climb on or play with furniture and television sets. • Don't place flat panel displays on your new product, please keep it cannot be pushed, pulled over and cause injury. WARNING ...size does NOT fit all instructions supplied by curious children. REFER SERVICING TO QUALIFIED SERVICE PERSONNEL. The use the many exciting features of this Toshiba LCD TV. However, flat panel displays are inappropriately situated on the proper stands or installed according to persons. See item 25 on page 4....
... and weight of your LCD TV, please read this product. • Don't allow children to climb on or play with furniture and television sets. • Don't place flat panel displays on your new product, please keep it cannot be pushed, pulled over and cause injury. WARNING ...size does NOT fit all instructions supplied by curious children. REFER SERVICING TO QUALIFIED SERVICE PERSONNEL. The use the many exciting features of this Toshiba LCD TV. However, flat panel displays are inappropriately situated on the proper stands or installed according to persons. See item 25 on page 4....
User Manual
Page 8
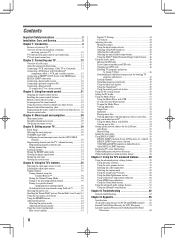
... 28 Main menu layout 28 Setup/Installation menu layout 29 Navigating the menu system 29 Chapter 5: Setting up your TV 30 Initial Setup 30 Selecting the menu language 30 TOSHIBA Logo LED 30 Configuring the antenna input source for the ANT/CABLE terminal 30 Programming channels into ...the TV's channel memory 31 Programming channels automatically 31 Setting channel skip 31 Labeling channels 32 Setting the HDMI® audio mode 33 ...
... 28 Main menu layout 28 Setup/Installation menu layout 29 Navigating the menu system 29 Chapter 5: Setting up your TV 30 Initial Setup 30 Selecting the menu language 30 TOSHIBA Logo LED 30 Configuring the antenna input source for the ANT/CABLE terminal 30 Programming channels into ...the TV's channel memory 31 Programming channels automatically 31 Setting channel skip 31 Labeling channels 32 Setting the HDMI® audio mode 33 ...
User Manual
Page 9
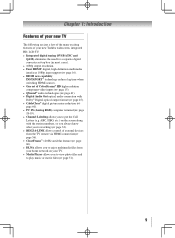
...The following are just a few of the many exciting features of your new Toshiba widescreen, integrated HD, LCD TV: • Integrated digital tuning (8VSB ATSC and QAM) eliminates the need for a separate digital converter set-top box (in most cases). • 1080p output resolution. • ...1080p input support ( page 16). • HDMI new capability INSTAPORT™ technology reduces lag time when switching HDMI sources. • One set of ColorStream® HD high-resolution component video inputs ( page 15). • QSound® audio technologies ( page 61). •...
...The following are just a few of the many exciting features of your new Toshiba widescreen, integrated HD, LCD TV: • Integrated digital tuning (8VSB ATSC and QAM) eliminates the need for a separate digital converter set-top box (in most cases). • 1080p output resolution. • ...1080p input support ( page 16). • HDMI new capability INSTAPORT™ technology reduces lag time when switching HDMI sources. • One set of ColorStream® HD high-resolution component video inputs ( page 15). • QSound® audio technologies ( page 61). •...
User Manual
Page 10
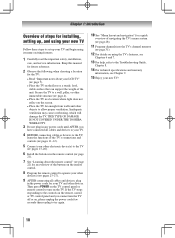
THIS TYPE OF DAMAGE IS NOT COVERED UNDER THE TOSHIBA WARRANTY. 3 Do not plug in the power cords for your TV and other objects to set up , and using its many exciting features. 1 Carefully read the important safety, installation, care, and service information. If the TV stops responding to ... connected all cables and devices, plug in any power cords until AFTER you cannot turn on the TV. Chapter 1: Introduction Overview of steps for installing, setting up your LCD TV" ( page 7). • Place the TV on the floor or a sturdy, level, stable surface that can support the ...
THIS TYPE OF DAMAGE IS NOT COVERED UNDER THE TOSHIBA WARRANTY. 3 Do not plug in the power cords for your TV and other objects to set up , and using its many exciting features. 1 Carefully read the important safety, installation, care, and service information. If the TV stops responding to ... connected all cables and devices, plug in any power cords until AFTER you cannot turn on the TV. Chapter 1: Introduction Overview of steps for installing, setting up your LCD TV" ( page 7). • Place the TV on the floor or a sturdy, level, stable surface that can support the ...

User Manual
Page 13
... TV) are required for stereo left (or mono) audio. Standard A/V cables (red/white/yellow) Standard A/V cables (composite video) usually come in sets of three and are typically color-coded red, green, and blue. These cables (and the related inputs on connecting and using your specific devices, refer...devices may differ from most stores that sell audio/ video devices. Analog RGB (15-pin) computer cable Analog RGB (15-pin) computer cable is Toshiba's brand of component video.) These cables are for connecting a PC to the TV's PC IN terminal ( page 18). HDMI (High-Definition ...
... TV) are required for stereo left (or mono) audio. Standard A/V cables (red/white/yellow) Standard A/V cables (composite video) usually come in sets of three and are typically color-coded red, green, and blue. These cables (and the related inputs on connecting and using your specific devices, refer...devices may differ from most stores that sell audio/ video devices. Analog RGB (15-pin) computer cable Analog RGB (15-pin) computer cable is Toshiba's brand of component video.) These cables are for connecting a PC to the TV's PC IN terminal ( page 18). HDMI (High-Definition ...
User Manual
Page 14
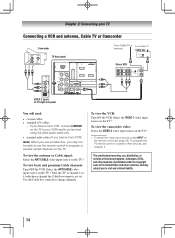
... ( page 22). Use the Cable box controls to ). The unauthorized recording, use, distribution, or revision of television programs, videotapes, DVDs, and other materials is set to change channels. Chapter 2: Connecting your TV Connecting a VCR and antenna, Cable TV or Camcorder Camcorder AUDIO OUT L R VIDEO TV back panel From Cable TV...
... ( page 22). Use the Cable box controls to ). The unauthorized recording, use, distribution, or revision of television programs, videotapes, DVDs, and other materials is set to change channels. Chapter 2: Connecting your TV Connecting a VCR and antenna, Cable TV or Camcorder Camcorder AUDIO OUT L R VIDEO TV back panel From Cable TV...
User Manual
Page 16
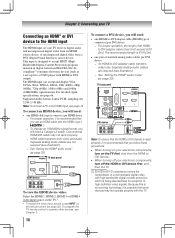
... (60Hz) and 1080p (24Hz/60Hz) signal formats. To program the TV remote control to operate other devices, see illustration). −− See "Setting the HDMI® audio mode" ( page 33). Separate analog audio cables are not required (see Chapter 3. 16 To connect a DVI device,... digital video from an HDMI source device, or uncompressed digital video from EIA/CEA-861-D- compliant[1] consumer electronic devices (such as a set-top box or DVD player with high-bandwidth digital content protection, which is possible that you will need a Category 2 cable. Supported Audio...
... (60Hz) and 1080p (24Hz/60Hz) signal formats. To program the TV remote control to operate other devices, see illustration). −− See "Setting the HDMI® audio mode" ( page 33). Separate analog audio cables are not required (see Chapter 3. 16 To connect a DVI device,... digital video from an HDMI source device, or uncompressed digital video from EIA/CEA-861-D- compliant[1] consumer electronic devices (such as a set-top box or DVD player with high-bandwidth digital content protection, which is possible that you will need a Category 2 cable. Supported Audio...
User Manual
Page 17
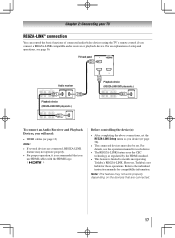
...HDMI cables ( page 13) Note: • If several devices are connected. 17 For details, see page 56. Refer to models incorporating Toshiba's REGZA-LINK. Chapter 2: Connecting your TV REGZA-LINK® connection You can control the basic functions of setup and operations, see the operation ... the CEC technology as you desire ( page 58). • The connected devices must also be set. Before controlling the device(s): • After completing the above connections, set the REGZA-LINK Setup menu as regulated by the HDMI standard. • This feature is limited to ...
...HDMI cables ( page 13) Note: • If several devices are connected. 17 For details, see page 56. Refer to models incorporating Toshiba's REGZA-LINK. Chapter 2: Connecting your TV REGZA-LINK® connection You can control the basic functions of setup and operations, see the operation ... the CEC technology as you desire ( page 58). • The connected devices must also be set. Before controlling the device(s): • After completing the above connections, set the REGZA-LINK Setup menu as regulated by the HDMI standard. • This feature is limited to ...
User Manual
Page 18
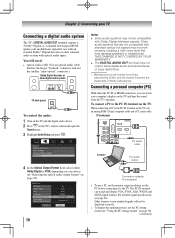
.... •• The DIGITAL AUDIO OUT terminal may not be displayed correctly. • To display the optimum picture, use the PC setting feature ( "Using the PC settings feature" on the TV's remote control and open the Sound menu. 3無 Highlight Audio Setup and press . Other formats or non...61483;"Selecting the optical audio output format" on page 45). 18 Computer PC audio output Conversion adapter (if necessary) • To use a PC, set the monitor output resolution on the PC before connecting it to the PC IN terminal on the TV, use with an external Dolby® Digital...
.... •• The DIGITAL AUDIO OUT terminal may not be displayed correctly. • To display the optimum picture, use the PC setting feature ( "Using the PC settings feature" on the TV's remote control and open the Sound menu. 3無 Highlight Audio Setup and press . Other formats or non...61483;"Selecting the optical audio output format" on page 45). 18 Computer PC audio output Conversion adapter (if necessary) • To use a PC, set the monitor output resolution on the PC before connecting it to the PC IN terminal on the TV, use with an external Dolby® Digital...
User Manual
Page 19
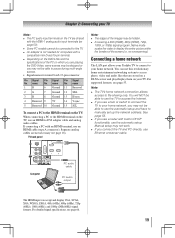
.... •• If you connect the TV and PC directly, use an HDMI-to file sharing only. Connecting a home network The LAN port allows your Toshiba TV to connect to access photo, video and audio files that are stored on a DLNA server and play/display them on your TV. Manual setup... names for computers with an HDMI terminal, use a hub or switch to connect the TV to your home network, you may be able to manually set up the network address. Chapter 2: Connecting your TV Note: •• The PC audio input terminals on the TV are shared with the HDMI-1 analog...
.... •• If you connect the TV and PC directly, use an HDMI-to file sharing only. Connecting a home network The LAN port allows your Toshiba TV to connect to access photo, video and audio files that are stored on a DLNA server and play/display them on your TV. Manual setup... names for computers with an HDMI terminal, use a hub or switch to connect the TV to your home network, you may be able to manually set up the network address. Chapter 2: Connecting your TV Note: •• The PC audio input terminals on the TV are shared with the HDMI-1 analog...
User Manual
Page 22
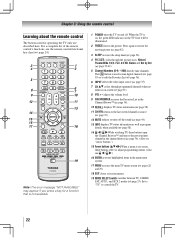
... error message "NOT AVAILABLE" may appear if you press a key for operating the TV only are described here. Press again to control the TV. 22 Set to "TV" to restore the moving picture ( page 42). 3無 SLEEP accesses the sleep timer ( page 56). 4無 PIC SIZE cycles through programmed...
... error message "NOT AVAILABLE" may appear if you press a key for operating the TV only are described here. Press again to control the TV. 22 Set to "TV" to restore the moving picture ( page 42). 3無 SLEEP accesses the sleep timer ( page 56). 4無 PIC SIZE cycles through programmed...

User Manual
Page 23
... chapter, title or time. 19無 REC Starts tape recording. 20無 MODE SELECT switch Set to "TV" to control a VCR; If this happens and you wish to use those features, you have a non-Toshiba device or a Toshiba device that the remote control is programmed, it may not work on some DVD players... play mode to view the picture moving rapidly backward.) 18無 TV/VCR To view one program while recording another, press to select TV mode. SET UP Accesses a DVD's setup menu in the CABLE/SAT mode. "AUX 1" to control the TV; Note: Even after the TV remote control is not ...
... chapter, title or time. 19無 REC Starts tape recording. 20無 MODE SELECT switch Set to "TV" to control a VCR; If this happens and you wish to use those features, you have a non-Toshiba device or a Toshiba device that the remote control is programmed, it may not work on some DVD players... play mode to view the picture moving rapidly backward.) 18無 TV/VCR To view one program while recording another, press to select TV mode. SET UP Accesses a DVD's setup menu in the CABLE/SAT mode. "AUX 1" to control the TV; Note: Even after the TV remote control is not ...

User Manual
Page 24
... FWD TV/VCR/ SEARCH DVD search* --- --- Top Menu MUTE Sound mute TV TV TV TV SET UP/GUIDE Guide* --- Action Menu --- DVD Clear PAUSE/STEP Pause* --- --- Menu up /down t Menu left/ Channel Browser™ --- REMOTE CONTROL KEY Toshiba TV CABLE SAT (satellite) AUX 1 (VCR) AUX 2 (DVD or HTIB) POWER Power Power Power...
... FWD TV/VCR/ SEARCH DVD search* --- --- Top Menu MUTE Sound mute TV TV TV TV SET UP/GUIDE Guide* --- Action Menu --- DVD Clear PAUSE/STEP Pause* --- --- Menu up /down t Menu left/ Channel Browser™ --- REMOTE CONTROL KEY Toshiba TV CABLE SAT (satellite) AUX 1 (VCR) AUX 2 (DVD or HTIB) POWER Power Power Power...

User Manual
Page 25
...control to operate the device, see page 23. 1無 In the remote control code table ( page 26), find one that works. 2無 Set the MODE SELECT switch to the type of two codes. If, after trying all listed codes, the necessary keys do not operate your device. If.... If more than one separately until you find the code for your TV remote control to operate a non-Toshiba device (or a Toshiba device that came with the device. 5無 Remember to set the switch to control your device. To program your device). These VCRs have a switch labeled "VCR1/VCR2." See notes ...
...control to operate the device, see page 23. 1無 In the remote control code table ( page 26), find one that works. 2無 Set the MODE SELECT switch to the type of two codes. If, after trying all listed codes, the necessary keys do not operate your device. If.... If more than one separately until you find the code for your TV remote control to operate a non-Toshiba device (or a Toshiba device that came with the device. 5無 Remember to set the switch to control your device. To program your device). These VCRs have a switch labeled "VCR1/VCR2." See notes ...
User Manual
Page 28
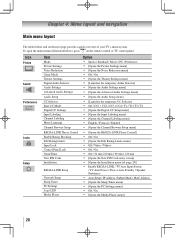
Icon Picture Sound Preferences Locks Setup Item Mode Picture Settings Noise Reduction Game Mode Theater Settings Digital Audio Selector Audio Settings Advanced Audio Settings Audio Setup CC Selector Base CC Mode Digital CC Settings Input Labeling Channel Labeling Menu Language Channel Browser Setup REGZA-LINK ... Preference Auto Setup / IP Address / Subnet Mask / MAC Address [Opens the Sleep Timer menu] [Opens the PC Settings menu] Off / On [Opens the Media Player menu] 28 Chapter 4: Menu layout and navigation Main menu layout The tables below ...
Icon Picture Sound Preferences Locks Setup Item Mode Picture Settings Noise Reduction Game Mode Theater Settings Digital Audio Selector Audio Settings Advanced Audio Settings Audio Setup CC Selector Base CC Mode Digital CC Settings Input Labeling Channel Labeling Menu Language Channel Browser Setup REGZA-LINK ... Preference Auto Setup / IP Address / Subnet Mask / MAC Address [Opens the Sleep Timer menu] [Opens the PC Settings menu] Off / On [Opens the Media Player menu] 28 Chapter 4: Menu layout and navigation Main menu layout The tables below ...

User Manual
Page 29
... move in the corresponding direction in the menu. • Press to save your TV's onscreen menu system. • Press to access and navigate your menu settings or select a highlighted item. (A highlighted menu item appears in a different color in the menu.) • All menus close automatically if you do not make a selection...
... move in the corresponding direction in the menu. • Press to save your TV's onscreen menu system. • Press to access and navigate your menu settings or select a highlighted item. (A highlighted menu item appears in a different color in the menu.) • All menus close automatically if you do not make a selection...

User Manual
Page 30
...the Menu Language field, press t or u to select your preferred language. 2無 Press t or u to select Time Zone and set of menus and messages. Configuring the antenna input source for the ANT/CABLE input on -screen display of Installation menu icons will appear. ...TOSHIBA Logo LED either On or Off. 1無 Press and open the Preferences menu, highlight Menu Language. 2無 Press t or u to select either On or Off and press . To select the menu language: 1無 Press and open the Setup menu, highlight Logo LED. 2無 Press t or u to select your original settings...
...the Menu Language field, press t or u to select your preferred language. 2無 Press t or u to select Time Zone and set of menus and messages. Configuring the antenna input source for the ANT/CABLE input on -screen display of Installation menu icons will appear. ...TOSHIBA Logo LED either On or Off. 1無 Press and open the Preferences menu, highlight Menu Language. 2無 Press t or u to select either On or Off and press . To select the menu language: 1無 Press and open the Setup menu, highlight Logo LED. 2無 Press t or u to select your original settings...

User Manual
Page 31
...already done so ( page 30). 2無 Press and open the Setup menu. 3無 Highlight Installation and press . 4無 (A new set of channels will automatically cycle through the channels, the message "Scanning channels, please wait" appears (as shown below to view the programmed channels. ... q to repeat the programming process again unless your area and store them in the channel memory. While the TV is normal; Setting channel skip To prevent certain channels from being viewed, channel positions can automatically detect all active channels in its memory.
...already done so ( page 30). 2無 Press and open the Setup menu. 3無 Highlight Installation and press . 4無 (A new set of channels will automatically cycle through the channels, the message "Scanning channels, please wait" appears (as shown below to view the programmed channels. ... q to repeat the programming process again unless your area and store them in the channel memory. While the TV is normal; Setting channel skip To prevent certain channels from being viewed, channel positions can automatically detect all active channels in its memory.

User Manual
Page 32
... the channel you want to label. 4無 Press pqtu to the list in the box.To remove the tick, press again. Chapter 5: Setting up your settings, highlight Done and press . 32 The maximum number of labels that they can still be deleted and press . 3無 Highlight Yes from ... channel labels: 1無 Open the Channel Labeling window. 2無 Press or to select the channel for other channels. 6無 To save your settings, highlight Done and press . Assigned channel labels will be able to the list and the box will be skipped and press . If the desired channel...
... the channel you want to label. 4無 Press pqtu to the list in the box.To remove the tick, press again. Chapter 5: Setting up your settings, highlight Done and press . 32 The maximum number of labels that they can still be deleted and press . 3無 Highlight Yes from ... channel labels: 1無 Open the Channel Labeling window. 2無 Press or to select the channel for other channels. 6無 To save your settings, highlight Done and press . Assigned channel labels will be able to the list and the box will be skipped and press . If the desired channel...


