Brochure
Page 2
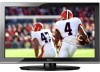
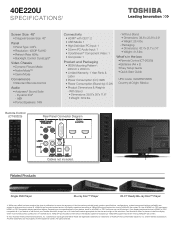
...: 28.4 lbs. - Use of accepting a 1080p/24Hz signal required for viewing 1080p/24 fps content. © 2012 Toshiba America Information Systems, Inc. While every effort has been made at the time of publication to ensure the accuracy of the ...40E220U S P E C I F I C AT I O N S1 Screen Size: 40" • Diagonal Screen Size: 40" Panel • Panel Type: CCFL • Resolution: 1080P Full HD • Refresh Rate: 60Hz • Backlight Control: DynaLight® Video Chassis • Dynamic Picture Mode • Native Mode™ • Game Mode Convenience • Standard Remote Control...
...: 28.4 lbs. - Use of accepting a 1080p/24Hz signal required for viewing 1080p/24 fps content. © 2012 Toshiba America Information Systems, Inc. While every effort has been made at the time of publication to ensure the accuracy of the ...40E220U S P E C I F I C AT I O N S1 Screen Size: 40" • Diagonal Screen Size: 40" Panel • Panel Type: CCFL • Resolution: 1080P Full HD • Refresh Rate: 60Hz • Backlight Control: DynaLight® Video Chassis • Dynamic Picture Mode • Native Mode™ • Game Mode Convenience • Standard Remote Control...
User Guide
Page 10
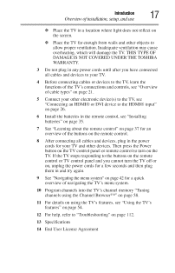
... mode 50 Viewing the digital signal meter 51 Setting the time zone 52 Viewing the system status 52 Resetting Factory Defaults 53 Installing batteries 35 Remote control effective range 36 Learning about the remote control 37 Chapter4: Menu LayoutandNavigation 4..0..
... mode 50 Viewing the digital signal meter 51 Setting the time zone 52 Viewing the system status 52 Resetting Factory Defaults 53 Installing batteries 35 Remote control effective range 36 Learning about the remote control 37 Chapter4: Menu LayoutandNavigation 4..0..
User Guide
Page 13
... Power Down 100 No Signal Power Down 100 Using REGZA-LINK 101 REGZA-LINK® playback device (DVD player, etc.) control 101 Other REGZA-LINK® functions 103 Setting up REGZA-LINK 104 Displaying TV status information 104 Understanding the last mode memory...Noise Reduction 109 MPEG Noise Reduction 110 Game Mode 110 Chapter8: Troubleshooting 1..1..2.. General troubleshooting 112 Picture problems 113 Sound problems 115 Remote control problems 115 Channel tuning problems 115 Closed caption problems 116 Rating blocking (V-Chip) problems 116 No REGZA-LINK® operation ...
... Power Down 100 No Signal Power Down 100 Using REGZA-LINK 101 REGZA-LINK® playback device (DVD player, etc.) control 101 Other REGZA-LINK® functions 103 Setting up REGZA-LINK 104 Displaying TV status information 104 Understanding the last mode memory...Noise Reduction 109 MPEG Noise Reduction 110 Game Mode 110 Chapter8: Troubleshooting 1..1..2.. General troubleshooting 112 Picture problems 113 Sound problems 115 Remote control problems 115 Channel tuning problems 115 Closed caption problems 116 Rating blocking (V-Chip) problems 116 No REGZA-LINK® operation ...
User Guide
Page 17
...Then press tile Power button on the TV control panel or remote control to "Troubleshooting" on the screen. THIS TYPE OF DAMAGE IS NOT COVERED UNDER THE TOSHIBA WARRANTY. 3 Do not plug in any power cords until after you cannot turn on the remote control. 8 After connecting all cables and devices ...to your TV. 4 Before connecting cables or devices to the TV, learn the functions of the TV's connections and controls, see "...
...Then press tile Power button on the TV control panel or remote control to "Troubleshooting" on the screen. THIS TYPE OF DAMAGE IS NOT COVERED UNDER THE TOSHIBA WARRANTY. 3 Do not plug in any power cords until after you cannot turn on the remote control. 8 After connecting all cables and devices ...to your TV. 4 Before connecting cables or devices to the TV, learn the functions of the TV's connections and controls, see "...
User Guide
Page 18
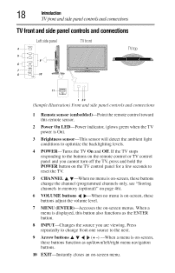
...the source you cannot turn off the TV, press and hold the POWER button on the TV control panel for a few seconds to the buttons on the remote control or TV control panel and you are viewing. Press repeatedly to change the channel (programmed channels only, see "... side panel contlvls and connections TV frontandsidepanelcontrolsandconnections Leftsidepanel f TVfront TVtop I HIT i 77 I 23 (Sample Illustration) Front and side panel controls and connections Remote sensor (embedded)--Point the remote control toward this button also functions as up/down/left/right buttons.
...the source you cannot turn off the TV, press and hold the POWER button on the TV control panel for a few seconds to the buttons on the remote control or TV control panel and you are viewing. Press repeatedly to change the channel (programmed channels only, see "... side panel contlvls and connections TV frontandsidepanelcontrolsandconnections Leftsidepanel f TVfront TVtop I HIT i 77 I 23 (Sample Illustration) Front and side panel controls and connections Remote sensor (embedded)--Point the remote control toward this button also functions as up/down/left/right buttons.
User Guide
Page 24
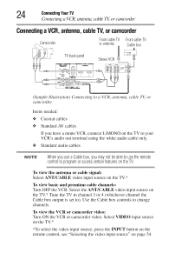
... tile ANT/CABLE video input source on page 54. Select VIDEO input source *To select the video input source, press the INPUT button on the remote control, see "Selecting the video input source" on the TV.* Tune the TV to channel 3 or 4 (whichever channel the Cable box output is set to change...
... tile ANT/CABLE video input source on page 54. Select VIDEO input source *To select the video input source, press the INPUT button on the remote control, see "Selecting the video input source" on the TV.* Tune the TV to channel 3 or 4 (whichever channel the Cable box output is set to change...

User Guide
Page 26
... tile ColorStream HD video input source on tile TV* to view tile DVD. *To select the video input source, press the INPUT button on the remote control, see "Connecting an HDMI® or DVI device to the AUDIO/VIDEO terminal. NOTE Theunauthorizerdecording,use,distribution,or revisionof televisionprogramsv, ideotapesD, VDs,andothermaterialsis prohibitedundertheCopyrightLawsof theUnitedStatesandother...
... tile ColorStream HD video input source on tile TV* to view tile DVD. *To select the video input source, press the INPUT button on the remote control, see "Connecting an HDMI® or DVI device to the AUDIO/VIDEO terminal. NOTE Theunauthorizerdecording,use,distribution,or revisionof televisionprogramsv, ideotapesD, VDs,andothermaterialsis prohibitedundertheCopyrightLawsof theUnitedStatesandother...
User Guide
Page 28
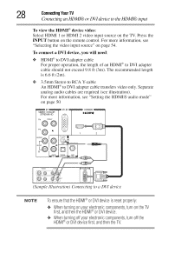
Press the INPUT button on page 54. For more information, see "Selecting tile video input source" on the remote control. Tile recommended length is 6.6 ft (2m). 8 C0nneelingYourTV (_mnecling an HDMI® or DVI device to RCA Y-cable An HDMI o:. 3.5mm Stereo to the HDMI® input To view the HDMI ® device video: Select HDMI 1 or HDMI 2 video input source on the TV. To connect a DVI device, you will need: o:o HDMI ®to DVI adapter cable For proper operation, tile length of an HDMF _to DVI adapter cable should not exceed 9.8 ft (3m).
Press the INPUT button on page 54. For more information, see "Selecting tile video input source" on the remote control. Tile recommended length is 6.6 ft (2m). 8 C0nneelingYourTV (_mnecling an HDMI® or DVI device to RCA Y-cable An HDMI o:. 3.5mm Stereo to the HDMI® input To view the HDMI ® device video: Select HDMI 1 or HDMI 2 video input source on the TV. To connect a DVI device, you will need: o:o HDMI ®to DVI adapter cable For proper operation, tile length of an HDMF _to DVI adapter cable should not exceed 9.8 ft (3m).
User Guide
Page 29
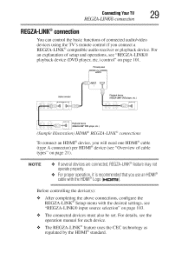
...,t is recommendetdhatyou usean HDM®I cablewiththe HDM®I Logo(H_mw). For an explanation of connected audio/video devices using the TV's remote control if you will need one HDMI ®cable (type A connector) per HDMI ®device (see "Overview of cable types" ...REGZA-LINI( _ connections To connect an HDMF ° device, you connect a REGZA-LINW ') compatible audio receiver or playback device. Before controlling the device(s): o:o After completing the above connections, configure the REGZA-LINK ®Setup menu with the desired settings, see the operation manual...
...,t is recommendetdhatyou usean HDM®I cablewiththe HDM®I Logo(H_mw). For an explanation of connected audio/video devices using the TV's remote control if you will need one HDMI ®cable (type A connector) per HDMI ®device (see "Overview of cable types" ...REGZA-LINI( _ connections To connect an HDMF ° device, you connect a REGZA-LINW ') compatible audio receiver or playback device. Before controlling the device(s): o:o After completing the above connections, configure the REGZA-LINK ®Setup menu with the desired settings, see the operation manual...
User Guide
Page 30
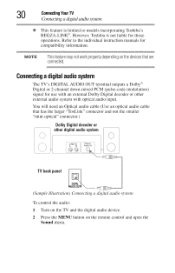
...OUT terminal outputs a Dolby _'_ Digital or 2-channel down-mixed PCM (pulse-code modulation) signal for compatibility information. However, Toshiba is limited to the individual instruction manuals for use with an external Dolby Digital decoder or other external audio system with optical ..." connector.) DolbyDigitaJdecoderor TV backpaneJ (Sanq)le Illustration) Connecting a digital audio ,_vsten_ To control the audio: 1 Turn on the TV and the digital audio device. 2 Press the MENU button on the remote control and open the Sound menu. Refer to models incorporating Toshiba's REGZA-LINK _.
...OUT terminal outputs a Dolby _'_ Digital or 2-channel down-mixed PCM (pulse-code modulation) signal for compatibility information. However, Toshiba is limited to the individual instruction manuals for use with an external Dolby Digital decoder or other external audio system with optical ..." connector.) DolbyDigitaJdecoderor TV backpaneJ (Sanq)le Illustration) Connecting a digital audio ,_vsten_ To control the audio: 1 Turn on the TV and the digital audio device. 2 Press the MENU button on the remote control and open the Sound menu. Refer to models incorporating Toshiba's REGZA-LINK _.

User Guide
Page 35
Chapter3 Usingthe RemoteControl Installingbatteries To install batteries: 1 Remove the battery cover from the back of the remote control. (Sample Illustration) Removing the remote back cover 2 Insert the batteries, corresponding to the (+) and (-) markings on the battery compartment. (Sample Illustration) Installing the batteries 3 Replace the battery cover. Donotexposebatteriestoexcessiveheatsuchas sunshinef,ire,etc. 35
Chapter3 Usingthe RemoteControl Installingbatteries To install batteries: 1 Remove the battery cover from the back of the remote control. (Sample Illustration) Removing the remote back cover 2 Insert the batteries, corresponding to the (+) and (-) markings on the battery compartment. (Sample Illustration) Installing the batteries 3 Replace the battery cover. Donotexposebatteriestoexcessiveheatsuchas sunshinef,ire,etc. 35
User Guide
Page 36
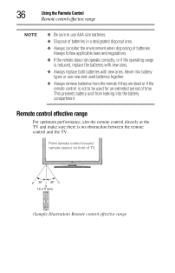
... usenewandusedbatteriestogether. ¢ Alwaysremovebatteriesfromtheremoteif theyaredeador if the remotecontrolis notto beusedforan extendedperiodoftime. Alwaysfollowapplicablelawsandregulations. ¢ Ifthe remotedoesnotoperatecorrectlyo, r if theoperatingrange is no obstruction between the remote control and the TV. (Sample Illustration) Remote control dJt.ctive range 6 Usingthe Remote Control Remote control ej]ective range NOTE o*.oBesureto useAAAsizebatteries. ¢ Disposeof batteriesin a designateddisposalarea. ¢ Alwaysconsidertheenvironmenwt hendisposingofbatteries.
... usenewandusedbatteriestogether. ¢ Alwaysremovebatteriesfromtheremoteif theyaredeador if the remotecontrolis notto beusedforan extendedperiodoftime. Alwaysfollowapplicablelawsandregulations. ¢ Ifthe remotedoesnotoperatecorrectlyo, r if theoperatingrange is no obstruction between the remote control and the TV. (Sample Illustration) Remote control dJt.ctive range 6 Usingthe Remote Control Remote control ej]ective range NOTE o*.oBesureto useAAAsizebatteries. ¢ Disposeof batteriesin a designateddisposalarea. ¢ Alwaysconsidertheenvironmenwt hendisposingofbatteries.
User Guide
Page 37
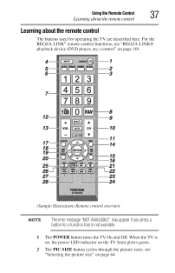
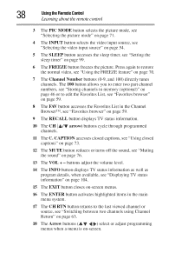
Usingthe Remote Control _'7 Learning about the ren_te control Learningaboutthe remotecontrol The buttons used for operating the TV are described here. ]:or the REGZA-LINK
Usingthe Remote Control _'7 Learning about the ren_te control Learningaboutthe remotecontrol The buttons used for operating the TV are described here. ]:or the REGZA-LINK
User Guide
Page 38
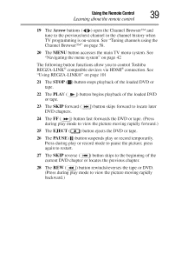
... List in the main menu system. 17 The CH RTN button returns to restore the normal video, see '%Tsingthe FREEZE feature" on -screen. 8 Usingthe Remote Control Learning about the remote cont/vl 3 The PIC MODE button selects the picture mode, see "Selecting the picture mode" on page 71. 4 The INPUT button selects the...
... List in the main menu system. 17 The CH RTN button returns to restore the normal video, see '%Tsingthe FREEZE feature" on -screen. 8 Usingthe Remote Control Learning about the remote cont/vl 3 The PIC MODE button selects the picture mode, see "Selecting the picture mode" on page 71. 4 The INPUT button selects the...
User Guide
Page 39
See "Tuning channels using the Channel Browser TM" on page 42 The following button functions allow you to the previous/next channel in the channel history when TV programming is on-screen. See "Navigating the menu system" on page 58. 20 The MENU button accesses the main TV menu system. Using the Remote Control Learning al_c_ut the remote contl_l _'_Q 19 The Arrow buttons (4 _) open the Channel Browser TM and tune to control Toshiba REGZA-LINK
See "Tuning channels using the Channel Browser TM" on page 42 The following button functions allow you to the previous/next channel in the channel history when TV programming is on-screen. See "Navigating the menu system" on page 58. 20 The MENU button accesses the main TV menu system. Using the Remote Control Learning al_c_ut the remote contl_l _'_Q 19 The Arrow buttons (4 _) open the Channel Browser TM and tune to control Toshiba REGZA-LINK

User Guide
Page 40
IieJtz Option 0_'figP_-fFfi_g s menu ofgo_ _pens the Theater_ftT_°osmenu !i!!:!!_¸i!i!!i'l_iA!_!Oi@'d'I°U!iSis_!i!Ti[_ii'_i!i!iO!°!_'_'_'d'i°US_iT[_'g s menu 4O To open the Installation menus (illustrated below and on the remote control or TV control panel. Chapte4r MenuLayouat ndNavigation Mainmenulayout Tile tables below ), press MENU on tile next pages provide a quick overview of your TV's menu system.
IieJtz Option 0_'figP_-fFfi_g s menu ofgo_ _pens the Theater_ftT_°osmenu !i!!:!!_¸i!i!!i'l_iA!_!Oi@'d'I°U!iSis_!i!Ti[_ii'_i!i!iO!°!_'_'_'d'i°US_iT[_'g s menu 4O To open the Installation menus (illustrated below and on the remote control or TV control panel. Chapte4r MenuLayouat ndNavigation Mainmenulayout Tile tables below ), press MENU on tile next pages provide a quick overview of your TV's menu system.
User Guide
Page 42
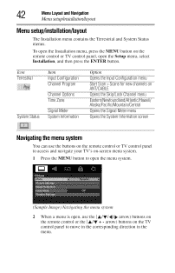
... Installation menu contains the Terrestrial and System Status menus. arrow) buttons on the remote control or TV control panel, open the Setup menu, select Installation, and then press the ENTER button. To open , use the buttons on the remote control or TV control panel to access and navigate your TV's on-screen menu system. 1 Press the...
... Installation menu contains the Terrestrial and System Status menus. arrow) buttons on the remote control or TV control panel, open the Setup menu, select Installation, and then press the ENTER button. To open , use the buttons on the remote control or TV control panel to access and navigate your TV's on-screen menu system. 1 Press the...
User Guide
Page 46
... Image) Input Co,_figuration screen 5 To save your TV stops only on tile channels you want when you press the CH (A/Y arrow) buttons on the remote control or the control panel, store those channels in its memory.
... Image) Input Co,_figuration screen 5 To save your TV stops only on tile channels you want when you press the CH (A/Y arrow) buttons on the remote control or the control panel, store those channels in its memory.
User Guide
Page 48
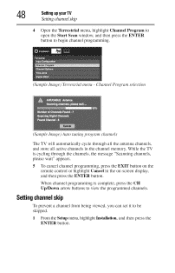
... The TV will automatically cycle through the channels, the message "Scanning channels, please wait" appears. 5 To cancel channel programming, press the EXIT button on the remote control or highlight Cancel in the channel memory.
... The TV will automatically cycle through the channels, the message "Scanning channels, please wait" appears. 5 To cancel channel programming, press the EXIT button on the remote control or highlight Cancel in the channel memory.
User Guide
Page 49
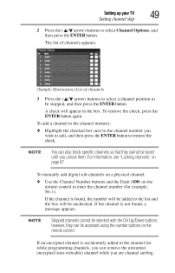
... youunlockthem.Forinformations, ee"Lockingchannels"on page87 To manually add digital sub-channels on a physical channel: o*,o Use the Channel Number buttons and the Dash (1!)0) on the remote control to remove the check. howevert,heycanbeaccessedusingthenumberbuttonson the remotecontrol. If an encrypted channel is found , a message appears. SettingupyourTV 49 Setting channel skip 2 Press the (A/Y arrow) buttons...
... youunlockthem.Forinformations, ee"Lockingchannels"on page87 To manually add digital sub-channels on a physical channel: o*,o Use the Channel Number buttons and the Dash (1!)0) on the remote control to remove the check. howevert,heycanbeaccessedusingthenumberbuttonson the remotecontrol. If an encrypted channel is found , a message appears. SettingupyourTV 49 Setting channel skip 2 Press the (A/Y arrow) buttons...


