
Brochure
Page 1
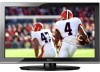
... deeper blacks and more colors, finer details, less visual noise and brighter, realistic pictures. Gaming-Optimized Performance It comes with 1080p Full HD2 resolution. Audyssey® Sound Enhancement Dynamic EQ® technology is an affordable, versatile LCD HDTV packed with this TV makes it easy to plug in a large screen TV, plus the assurance of connections, this feature. Dynamic Backlight Control for...
... deeper blacks and more colors, finer details, less visual noise and brighter, realistic pictures. Gaming-Optimized Performance It comes with 1080p Full HD2 resolution. Audyssey® Sound Enhancement Dynamic EQ® technology is an affordable, versatile LCD HDTV packed with this TV makes it easy to plug in a large screen TV, plus the assurance of connections, this feature. Dynamic Backlight Control for...
Brochure
Page 2
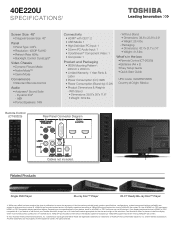
... not work even if your Toshiba television, always use a UL Listed wall bracket appropriate for viewing 1080p/24 fps content. © 2012 Toshiba America Information Systems, Inc. ColorStream, DynaLight and Native Mode are subject to wall mount your display/peripheral device is HDMI® w/ CEC compatible. 4. ABX • Ported Speakers: 14W Connectivity • HDMI® with CEC3: 2 • USB Media: 1 • High Definition PC Input: 1 • 3.5mm PC Audio Input: 1 • ColorStream® Component Video: 1 •...
... not work even if your Toshiba television, always use a UL Listed wall bracket appropriate for viewing 1080p/24 fps content. © 2012 Toshiba America Information Systems, Inc. ColorStream, DynaLight and Native Mode are subject to wall mount your display/peripheral device is HDMI® w/ CEC compatible. 4. ABX • Ported Speakers: 14W Connectivity • HDMI® with CEC3: 2 • USB Media: 1 • High Definition PC Input: 1 • 3.5mm PC Audio Input: 1 • ColorStream® Component Video: 1 •...
User Guide
Page 2
... your flat panel disptay, contact you[ retai_er about professional klsta!la_ion, * Make s_re that the wall where you for purchasing this television. This manual will help you decide to wall mount this television, always use a mounting bracket that has been Listed by an independent laboratory (such as UL_ CSA_ ETE) ana is appropriate rot the size anG wetght of this Toshiba LCD TV. Before operating your new LCD...
... your flat panel disptay, contact you[ retai_er about professional klsta!la_ion, * Make s_re that the wall where you for purchasing this television. This manual will help you decide to wall mount this television, always use a mounting bracket that has been Listed by an independent laboratory (such as UL_ CSA_ ETE) ana is appropriate rot the size anG wetght of this Toshiba LCD TV. Before operating your new LCD...
User Guide
Page 3
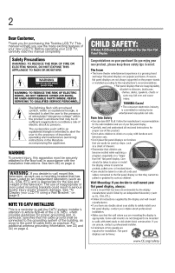
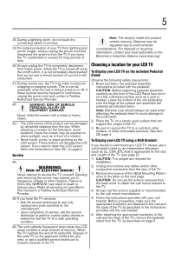
... grounding prong. Installation,Care,andService Installation Follow these instructions. 3) Heed all warnings. 4) Follow all instructions. 5) Do not use caution when moving the cart/product combination to avoid injury from the damaged television. 3 ImportantSafetyInstructions 1) Read these instructions. 2) Keep these recommendations and precautions and heed all warnings when installing your TV: 19) WbaAttRerNieINs G:to NeExcVeEsRsiveexpohseeat tshuech as power-supply cord or plug is damaged...
... grounding prong. Installation,Care,andService Installation Follow these instructions. 3) Heed all warnings. 4) Follow all instructions. 5) Do not use caution when moving the cart/product combination to avoid injury from the damaged television. 3 ImportantSafetyInstructions 1) Read these instructions. 2) Keep these recommendations and precautions and heed all warnings when installing your TV: 19) WbaAttRerNieINs G:to NeExcVeEsRsiveexpohseeat tshuech as power-supply cord or plug is damaged...
User Guide
Page 5
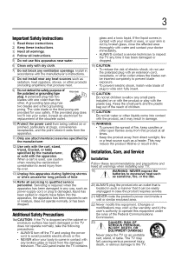
... LCD TV using a Wall Bracket: If you decide to wall mount your LCDTV onthe included Pedestal Stand: Observe the following safety precautions: 1) Read and follow this manual to a Toshiba Authorized Service Provider. 45) If you need to clean the LCD screen, follow the instructions in item 36), on or off using the on page 6. 46) The cold cathode fluorescent lamp inside this product can support the weight...
... LCD TV using a Wall Bracket: If you decide to wall mount your LCDTV onthe included Pedestal Stand: Observe the following safety precautions: 1) Read and follow this manual to a Toshiba Authorized Service Provider. 45) If you need to clean the LCD screen, follow the instructions in item 36), on or off using the on page 6. 46) The cold cathode fluorescent lamp inside this product can support the weight...
User Guide
Page 7
... trademarks of HDMI Licensing LLC in accordance with the instructions, may appear on the screen if a fixed, non-moving image appears for perceived issues resulting from Audyssey Laboratories. This helps ensure you enjoy your audio experience as much as your video experience. •Audyssey ABX TM technology uses _ sophisticated driver analysis and low frequency monitoring to radio communications. This helps ensure you...
... trademarks of HDMI Licensing LLC in accordance with the instructions, may appear on the screen if a fixed, non-moving image appears for perceived issues resulting from Audyssey Laboratories. This helps ensure you enjoy your audio experience as much as your video experience. •Audyssey ABX TM technology uses _ sophisticated driver analysis and low frequency monitoring to radio communications. This helps ensure you...
User Guide
Page 10
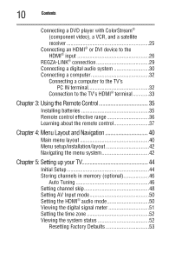
Initial Setup 44 Storing channels in memory (optional 46 Auto Tuning 46 Setting channel skip 48 Setting AV Input mode 50 Setting the HDMI® audio mode 50 Viewing the digital signal meter 51 Setting the time zone 52 Viewing the system status 52 Resetting Factory Defaults 53 Main menu layout 40 Menu setup/installation/layout 42 Navigating the menu system 42 Chapter5: Settingup your TV 4..4.... 0 Contents Connecting a DVD player with ColorStream ® (component video), a VCR, and a satellite receiver 25 Connecting an HDMI® or...
Initial Setup 44 Storing channels in memory (optional 46 Auto Tuning 46 Setting channel skip 48 Setting AV Input mode 50 Setting the HDMI® audio mode 50 Viewing the digital signal meter 51 Setting the time zone 52 Viewing the system status 52 Resetting Factory Defaults 53 Main menu layout 40 Menu setup/installation/layout 42 Navigating the menu system 42 Chapter5: Settingup your TV 4..4.... 0 Contents Connecting a DVD player with ColorStream ® (component video), a VCR, and a satellite receiver 25 Connecting an HDMI® or...

User Guide
Page 16
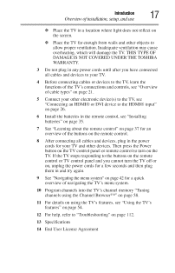
... with 1080p input support, see "Connecting an HDMI@ or DVI device to view photo files and play music, see "CableClear@ digital Noise Reduction" on page 7. 6 Introduction Features Features The following are just a few of the many exciting features. 1 Carefully read the important safety, installation, care, and service information. o}. o:o 1366 x 768 output resolution (C 120U). Overviewofinstallation,setup,anduse Follow these steps to set -top box (in...
... with 1080p input support, see "Connecting an HDMI@ or DVI device to view photo files and play music, see "CableClear@ digital Noise Reduction" on page 7. 6 Introduction Features Features The following are just a few of the many exciting features. 1 Carefully read the important safety, installation, care, and service information. o}. o:o 1366 x 768 output resolution (C 120U). Overviewofinstallation,setup,anduse Follow these steps to set -top box (in...
User Guide
Page 17
... device to the HDMI® input" on page 26. 6 Install the batteries in any power cords until after you cannot turn on the TV control panel or remote control to allow proper ventilation. THIS TYPE OF DAMAGE IS NOT COVERED UNDER THE TOSHIBA WARRANTY. 3 Do not plug in the remote control, see "Using the TV's features" on page 54. 12 For help, refer to "Troubleshooting" on the screen. Place the...
... device to the HDMI® input" on page 26. 6 Install the batteries in any power cords until after you cannot turn on the TV control panel or remote control to allow proper ventilation. THIS TYPE OF DAMAGE IS NOT COVERED UNDER THE TOSHIBA WARRANTY. 3 Do not plug in the remote control, see "Using the TV's features" on page 54. 12 For help, refer to "Troubleshooting" on the screen. Place the...
User Guide
Page 19
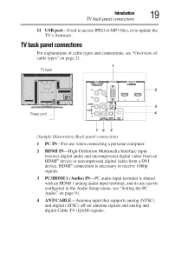
... Interface input receives digital audio and uncompressed digital video from an HDMF _device or uncompressed digital video from a DVI device. TVback 3¸ 4 Powercord} 76 5 (Sanzple Illustration) Back panel connections 1 PC IN--For use can be configured in the Audio Setup menu, see "Overview of cable types" on page 91. 4 ANT/CABLE--Antenna input that supports analog (NTSC) and digital (ATSC) off-air antenna signals and analog and digital Cable TV (QAM) signals. TVbackpanelconnections For explanations of cable types and connections, see "Setting...
... Interface input receives digital audio and uncompressed digital video from an HDMF _device or uncompressed digital video from a DVI device. TVback 3¸ 4 Powercord} 76 5 (Sanzple Illustration) Back panel connections 1 PC IN--For use can be configured in the Audio Setup menu, see "Overview of cable types" on page 91. 4 ANT/CABLE--Antenna input that supports analog (NTSC) and digital (ATSC) off-air antenna signals and analog and digital Cable TV (QAM) signals. TVbackpanelconnections For explanations of cable types and connections, see "Setting...

User Guide
Page 26
... video input source, press the INPUT button on the remote control, see "Connecting an HDMI® or DVI device to the AUDIO/VIDEO terminal. Connectingan HDIVI®I or DVIdevicetothe HDIV®II input Tile HDMF _input on page 54. compliant consumer electronic devices (such as a set-top box or DVD player with HDMI To view antenna or Cable channels: Select the ANT/CABLE video input source on the TV.* To view satellite programs using the component video connections: Turn On tile satellite receiver...
... video input source, press the INPUT button on the remote control, see "Connecting an HDMI® or DVI device to the AUDIO/VIDEO terminal. Connectingan HDIVI®I or DVIdevicetothe HDIV®II input Tile HDMF _input on page 54. compliant consumer electronic devices (such as a set-top box or DVD player with HDMI To view antenna or Cable channels: Select the ANT/CABLE video input source on the TV.* To view satellite programs using the component video connections: Turn On tile satellite receiver...
User Guide
Page 29
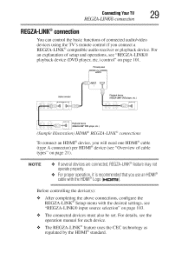
... "Overview of cable types" on page 21 ). For an explanation of connected audio/video devices using the TV's remote control if you will need one HDMI ®cable (type A connector) per HDMI ®device (see the operation manual for each device. Before controlling the device(s): o:o After completing the above connections, configure the REGZA-LINK ®Setup menu with the desired settings, see "REGZA-LINK® playback device (DVD player, etc.) control" on page...
... "Overview of cable types" on page 21 ). For an explanation of connected audio/video devices using the TV's remote control if you will need one HDMI ®cable (type A connector) per HDMI ®device (see the operation manual for each device. Before controlling the device(s): o:o After completing the above connections, configure the REGZA-LINK ®Setup menu with the desired settings, see "REGZA-LINK® playback device (DVD player, etc.) control" on page...
User Guide
Page 32
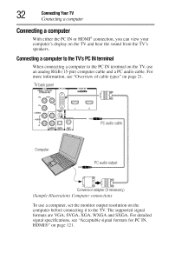
.... For detailed signal specifications, see "Overview of cable types" on the TV, use a computer, set the monitor output resolution on the computer before connecting it to the PC IN terminal on page 21. TVbackpanel _Q PCaudiocable Conversioandapte(rif necessary) (Sample Illustration) Computer connections To use an analog RGB (15-pin) computer cable and a PC audio cable. For more information, see "Acceptable signal formats for PC IN, HDMI®" on...
.... For detailed signal specifications, see "Overview of cable types" on the TV, use a computer, set the monitor output resolution on the computer before connecting it to the PC IN terminal on page 21. TVbackpanel _Q PCaudiocable Conversioandapte(rif necessary) (Sample Illustration) Computer connections To use an analog RGB (15-pin) computer cable and a PC audio cable. For more information, see "Acceptable signal formats for PC IN, HDMI®" on...
User Guide
Page 50
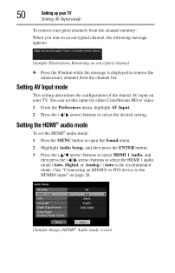
... video. 1 From the Preferences menu, highlight AN Input. 2 Press the (41_ arrow) buttons to the HDMI® input" on your TV. You can set the HDMI _'_audio mode: 1 Press the MENU button to open the Sound menu. 2 Highlight Audio Setup, and then press the ENTER button. 3 Press the (A/Y arrow) buttons to select HDMI 1 Audio, and then press the (_/_ arrow) buttons to select the HDMI 1 audio mode (Auto, Digital, or Analog). (Auto is displayed to remove the unnecessary channel from the channel...
... video. 1 From the Preferences menu, highlight AN Input. 2 Press the (41_ arrow) buttons to the HDMI® input" on your TV. You can set the HDMI _'_audio mode: 1 Press the MENU button to open the Sound menu. 2 Highlight Audio Setup, and then press the ENTER button. 3 Press the (A/Y arrow) buttons to select HDMI 1 Audio, and then press the (_/_ arrow) buttons to select the HDMI 1 audio mode (Auto, Digital, or Analog). (Auto is displayed to remove the unnecessary channel from the channel...
User Guide
Page 79
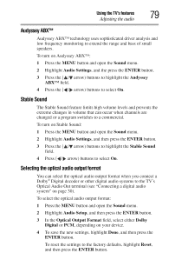
... driver analysis and low frequency monitoring to the factory defaults, highlight Reset, and then press the ENTER button. To select the optical audio output format: 1 Press the MENU button and open the Sound menu. 2 Highlight Audio Settings, and the press the ENTER button. 3 Press the (A/Y arrow) buttons to highlight the Audyssey ABX TM field. 4 Press the (_/_ arrow) buttons to the TV's Optical Audio Out terminal (see "Connecting a digital audio system" on page 30). To turn...
... driver analysis and low frequency monitoring to the factory defaults, highlight Reset, and then press the ENTER button. To select the optical audio output format: 1 Press the MENU button and open the Sound menu. 2 Highlight Audio Settings, and the press the ENTER button. 3 Press the (A/Y arrow) buttons to highlight the Audyssey ABX TM field. 4 Press the (_/_ arrow) buttons to the TV's Optical Audio Out terminal (see "Connecting a digital audio system" on page 30). To turn...
User Guide
Page 112
... the buttons on the remote control or TV control panel and you begin to function, simply unplug the TV from the AC wall outlet, wait approximately one of the Text modes (Tl, T2, T3, or T4). The TV should return to reset the TV. Before you cannot turn off using this chapter or visit the Toshiba technical support Web site at support.toshiba.com...
... the buttons on the remote control or TV control panel and you begin to function, simply unplug the TV from the AC wall outlet, wait approximately one of the Text modes (Tl, T2, T3, or T4). The TV should return to reset the TV. Before you cannot turn off using this chapter or visit the Toshiba technical support Web site at support.toshiba.com...
User Guide
Page 113
... remote control, see "Installing batteries" on page 35. Try the control panel buttons on . If you are watching an analog channel (off-air broadcast or cable TV), you can set to an input on the TV, no device is plugged in the TV picture, see "Using the Locks menu" on page 109. If no picture appears when you cannot view signals from external devices connected to VIDEO, ColorStream HD1, ColorStream ®HD, HDMI 1, HDMI...
... remote control, see "Installing batteries" on page 35. Try the control panel buttons on . If you are watching an analog channel (off-air broadcast or cable TV), you can set to an input on the TV, no device is plugged in the TV picture, see "Using the Locks menu" on page 109. If no picture appears when you cannot view signals from external devices connected to VIDEO, ColorStream HD1, ColorStream ®HD, HDMI 1, HDMI...
User Guide
Page 125
... NO LIABILITY for damages of any program generated from or based on , or relate to the unmodified library. Permission is not needed as "the Independent JPEG Group's software". principally, that you must include source code if you use of this software as the basis of commercial products, provided that "The Graphics Interchange Format(c) is copyright by all files found...
... NO LIABILITY for damages of any program generated from or based on , or relate to the unmodified library. Permission is not needed as "the Independent JPEG Group's software". principally, that you must include source code if you use of this software as the basis of commercial products, provided that "The Graphics Interchange Format(c) is copyright by all files found...
User Guide
Page 128
... antenna 24 [J digital audio selector using 76 digital signal meter viewing 51 F factory defaults reset 53 favorites browser 59 features 16 Freeze feature 70 G GameTimer@ using 88 H HDMI@ audio mode setting 50 History List adding/clearing channels 62 adding/clearing inputs 62 I icon safety 15 Initial setup 44 initial setup main menu layout 40 input lock feature using 87 L last mode memory feature 106 Locks menu setting pin code 80 IV] Media Player open 93 photo files 95 playing music files 96 using...
... antenna 24 [J digital audio selector using 76 digital signal meter viewing 51 F factory defaults reset 53 favorites browser 59 features 16 Freeze feature 70 G GameTimer@ using 88 H HDMI@ audio mode setting 50 History List adding/clearing channels 62 adding/clearing inputs 62 I icon safety 15 Initial setup 44 initial setup main menu layout 40 input lock feature using 87 L last mode memory feature 106 Locks menu setting pin code 80 IV] Media Player open 93 photo files 95 playing music files 96 using...
User Guide
Page 129
... specifications acceptable signal formats 121 audio power 119 channel coverage 118 ColorStream® HD input 120 Digital audio output 120 dimensions 120 HDMI® input 120 HDMI@ signal formats 122 mass (weight) 120 operating conditions 121 PC IN signal formats 121 PC.input 120 power consumption 119 power maximum current 119 power source 119 speaker type 119 supplied accessories 121 TV system 118 video/audio terminals 119 SuiILock TM switching between two channels 63 system status viewing 52 T time zone setting 52 timer use 16 P panel lock feature using 89 parental controls...
... specifications acceptable signal formats 121 audio power 119 channel coverage 118 ColorStream® HD input 120 Digital audio output 120 dimensions 120 HDMI® input 120 HDMI@ signal formats 122 mass (weight) 120 operating conditions 121 PC IN signal formats 121 PC.input 120 power consumption 119 power maximum current 119 power source 119 speaker type 119 supplied accessories 121 TV system 118 video/audio terminals 119 SuiILock TM switching between two channels 63 system status viewing 52 T time zone setting 52 timer use 16 P panel lock feature using 89 parental controls...


