Brochure
Page 2
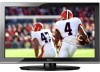
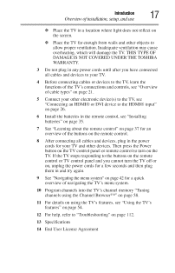
...8482; Player 1. ColorStream, DynaLight and Native Mode are the property of Toshiba America Information Systems, Inc. and/or Toshiba Corporation. All other trademarks are registered trademarks or trademarks of their respective owners...40E220U S P E C I F I C AT I O N S1 Screen Size: 40" • Diagonal Screen Size: 40" Panel • Panel Type: CCFL • Resolution: 1080P Full HD • Refresh Rate: 60Hz • Backlight Control: DynaLight® Video Chassis • Dynamic Picture Mode • Native Mode™ • Game Mode Convenience • Standard Remote Control...
...8482; Player 1. ColorStream, DynaLight and Native Mode are the property of Toshiba America Information Systems, Inc. and/or Toshiba Corporation. All other trademarks are registered trademarks or trademarks of their respective owners...40E220U S P E C I F I C AT I O N S1 Screen Size: 40" • Diagonal Screen Size: 40" Panel • Panel Type: CCFL • Resolution: 1080P Full HD • Refresh Rate: 60Hz • Backlight Control: DynaLight® Video Chassis • Dynamic Picture Mode • Native Mode™ • Game Mode Convenience • Standard Remote Control...
User Guide
Page 10
... a computer 32 Connecting a computer to the TV's PC IN terminal 32 Connection to the TV's HDMI® terminal 33 Chapter3: Usingthe RemoteControl 3..5.. Installing batteries 35 Remote control effective range 36 Learning about the remote control 37 Chapter4: Menu LayoutandNavigation 4..0..
... a computer 32 Connecting a computer to the TV's PC IN terminal 32 Connection to the TV's HDMI® terminal 33 Chapter3: Usingthe RemoteControl 3..5.. Installing batteries 35 Remote control effective range 36 Learning about the remote control 37 Chapter4: Menu LayoutandNavigation 4..0..
User Guide
Page 13
General troubleshooting 112 Picture problems 113 Sound problems 115 Remote control problems 115 Channel tuning problems 115 Closed caption problems 116 Rating blocking (V-Chip) problems 116 No REGZA-LINK® operation 116 HDMI® problems 117 ... C°.te.ts 13 Automatic Power Down 100 No Signal Power Down 100 Using REGZA-LINK 101 REGZA-LINK® playback device (DVD player, etc.) control 101 Other REGZA-LINK® functions 103 Setting up REGZA-LINK 104 Displaying TV status information 104 Understanding the last mode memory feature ...... 106 Chapter7...
General troubleshooting 112 Picture problems 113 Sound problems 115 Remote control problems 115 Channel tuning problems 115 Closed caption problems 116 Rating blocking (V-Chip) problems 116 No REGZA-LINK® operation 116 HDMI® problems 117 ... C°.te.ts 13 Automatic Power Down 100 No Signal Power Down 100 Using REGZA-LINK 101 REGZA-LINK® playback device (DVD player, etc.) control 101 Other REGZA-LINK® functions 103 Setting up REGZA-LINK 104 Displaying TV status information 104 Understanding the last mode memory feature ...... 106 Chapter7...
User Guide
Page 17
... and devices to your other objects to "Troubleshooting" on the remote control. 8 After connecting all cables and devices, plug in any power cords until after you cannot turn on the screen. THIS TYPE OF DAMAGE IS NOT COVERED UNDER THE TOSHIBA WARRANTY. 3 Do not plug in the power cords for a... HDMI® or DVI device to the HDMI® input" on page 26. 6 Install the batteries in the remote control, see "Installing batteries" on page 35. 7 See "Learning about the remote control" on page 37 for an overview of navigating the TV's menu system. 10 Program channels into the TV's channel ...
... and devices to your other objects to "Troubleshooting" on the remote control. 8 After connecting all cables and devices, plug in any power cords until after you cannot turn on the screen. THIS TYPE OF DAMAGE IS NOT COVERED UNDER THE TOSHIBA WARRANTY. 3 Do not plug in the power cords for a... HDMI® or DVI device to the HDMI® input" on page 26. 6 Install the batteries in the remote control, see "Installing batteries" on page 35. 7 See "Learning about the remote control" on page 37 for an overview of navigating the TV's menu system. 10 Program channels into the TV's channel ...
User Guide
Page 18
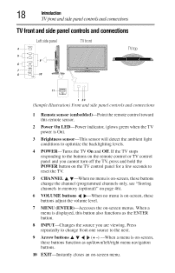
... TVjivnt and side panel contlvls and connections TV frontandsidepanelcontrolsandconnections Leftsidepanel f TVfront TVtop I HIT i 77 I 23 (Sample Illustration) Front and side panel controls and connections Remote sensor (embedded)--Point the remote control toward this remote sensor. 2 Power On LED--Power power is displayed, this button also functions as up/down/left/right buttons. indicator, (glows green...
... TVjivnt and side panel contlvls and connections TV frontandsidepanelcontrolsandconnections Leftsidepanel f TVfront TVtop I HIT i 77 I 23 (Sample Illustration) Front and side panel controls and connections Remote sensor (embedded)--Point the remote control toward this remote sensor. 2 Power On LED--Power power is displayed, this button also functions as up/down/left/right buttons. indicator, (glows green...
User Guide
Page 24
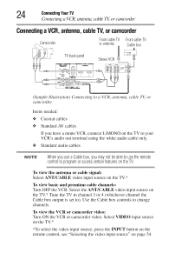
... on the TV to your VCR's audio out terminal using the white audio cable only. •_o Standard audio cables NOTE Whenyouusea Cablebox,youmaynotbeableto usethe remote controlto programor accesscertainfeatureson theTV. I:_ _ _i" _ _@, (Sample Illustration) Connecting to a VCR, amenna, cable TV, or camcorder Items needed: •:* Coaxial cables •*,o Standard AV ... ON the VCR or camcorder on page 54. Select VIDEO input source *To select the video input source, press the INPUT button on the remote control, see "Selecting the video input source" on the TV.* video: video.
... on the TV to your VCR's audio out terminal using the white audio cable only. •_o Standard audio cables NOTE Whenyouusea Cablebox,youmaynotbeableto usethe remote controlto programor accesscertainfeatureson theTV. I:_ _ _i" _ _@, (Sample Illustration) Connecting to a VCR, amenna, cable TV, or camcorder Items needed: •:* Coaxial cables •*,o Standard AV ... ON the VCR or camcorder on page 54. Select VIDEO input source *To select the video input source, press the INPUT button on the remote control, see "Selecting the video input source" on the TV.* video: video.

User Guide
Page 26
... theUnitedStatesandother countriesa, ndmaysubjectyouto civil andcriminalliability. This input is designed to view tile DVD. *To select the video input source, press the INPUT button on the remote control, see "Connecting an HDMI® or DVI device to the HDMI® input" on the TV.* To view satellite programs using the component video connections...
... theUnitedStatesandother countriesa, ndmaysubjectyouto civil andcriminalliability. This input is designed to view tile DVD. *To select the video input source, press the INPUT button on the remote control, see "Connecting an HDMI® or DVI device to the HDMI® input" on the TV.* To view satellite programs using the component video connections...
User Guide
Page 28
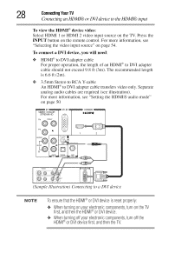
8 C0nneelingYourTV (_mnecling an HDMI® or DVI device to RCA Y-cable An HDMI o:. 3.5mm Stereo to the HDMI® input To view the HDMI ® device video: Select HDMI 1 or HDMI 2 video input source on the TV. For more information, see "Selecting tile video input source" on the remote control. Press the INPUT button on page 54. To connect a DVI device, you will need: o:o HDMI ®to DVI adapter cable For proper operation, tile length of an HDMF _to DVI adapter cable should not exceed 9.8 ft (3m). Tile recommended length is 6.6 ft (2m).
8 C0nneelingYourTV (_mnecling an HDMI® or DVI device to RCA Y-cable An HDMI o:. 3.5mm Stereo to the HDMI® input To view the HDMI ® device video: Select HDMI 1 or HDMI 2 video input source on the TV. For more information, see "Selecting tile video input source" on the remote control. Press the INPUT button on page 54. To connect a DVI device, you will need: o:o HDMI ®to DVI adapter cable For proper operation, tile length of an HDMF _to DVI adapter cable should not exceed 9.8 ft (3m). Tile recommended length is 6.6 ft (2m).
User Guide
Page 29
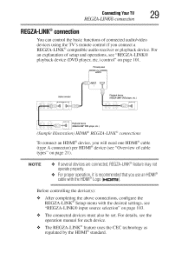
... functions of setup and operations, see "REGZA-LINK® playback device (DVD player, etc.) control" on page 101. For an explanation of connected audio/video devices using the TV's remote control if you will need one HDMI ®cable (type A connector) per HDMI ®device ...HDMf _ REGZA-LINI( _ connections To connect an HDMF ° device, you connect a REGZA-LINW ') compatible audio receiver or playback device. Before controlling the device(s): o:o After completing the above connections, configure the REGZA-LINK ®Setup menu with the desired settings, see "REGZA-LINK® input ...
... functions of setup and operations, see "REGZA-LINK® playback device (DVD player, etc.) control" on page 101. For an explanation of connected audio/video devices using the TV's remote control if you will need one HDMI ®cable (type A connector) per HDMI ®device ...HDMf _ REGZA-LINI( _ connections To connect an HDMF ° device, you connect a REGZA-LINW ') compatible audio receiver or playback device. Before controlling the device(s): o:o After completing the above connections, configure the REGZA-LINK ®Setup menu with the desired settings, see "REGZA-LINK® input ...
User Guide
Page 30
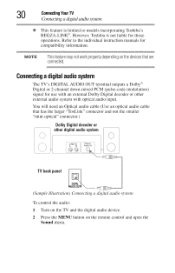
... (Sanq)le Illustration) Connecting a digital audio ,_vsten_ To control the audio: 1 Turn on the TV and the digital audio device. 2 Press the MENU button on the remote control and open the Sound menu. 0 ConnectingYourl"V Connecting a digital... audio system This feature is not liable for those operations. Connectinga digitalaudiosystem The TV's DIGITAL AUDIO OUT terminal outputs a Dolby _'_ Digital or 2-channel down-mixed PCM (pulse-code modulation) signal for compatibility information. However, Toshiba...
... (Sanq)le Illustration) Connecting a digital audio ,_vsten_ To control the audio: 1 Turn on the TV and the digital audio device. 2 Press the MENU button on the remote control and open the Sound menu. 0 ConnectingYourl"V Connecting a digital... audio system This feature is not liable for those operations. Connectinga digitalaudiosystem The TV's DIGITAL AUDIO OUT terminal outputs a Dolby _'_ Digital or 2-channel down-mixed PCM (pulse-code modulation) signal for compatibility information. However, Toshiba...

User Guide
Page 35
Chapter3 Usingthe RemoteControl Installingbatteries To install batteries: 1 Remove the battery cover from the back of the remote control. (Sample Illustration) Removing the remote back cover 2 Insert the batteries, corresponding to the (+) and (-) markings on the battery compartment. (Sample Illustration) Installing the batteries 3 Replace the battery cover. Donotexposebatteriestoexcessiveheatsuchas sunshinef,ire,etc. 35
Chapter3 Usingthe RemoteControl Installingbatteries To install batteries: 1 Remove the battery cover from the back of the remote control. (Sample Illustration) Removing the remote back cover 2 Insert the batteries, corresponding to the (+) and (-) markings on the battery compartment. (Sample Illustration) Installing the batteries 3 Replace the battery cover. Donotexposebatteriestoexcessiveheatsuchas sunshinef,ire,etc. 35
User Guide
Page 36
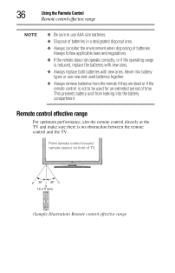
... a designateddisposalarea. ¢ Alwaysconsidertheenvironmenwt hendisposingofbatteries. Alwaysfollowapplicablelawsandregulations. ¢ Ifthe remotedoesnotoperatecorrectlyo, r if theoperatingrange is no obstruction between the remote control and the TV. (Sample Illustration) Remote control dJt.ctive range This preventsbatteryacidfrom leakingintothebattery compartment Remotecontroel ffectiverange For optimum performance, aim the remote control directly at the TV and make sure there is reducedr,eplacethebatterieswith newones. ,,*..Alwaysreplacebothbatterieswith newones.Nevermix battery...
... a designateddisposalarea. ¢ Alwaysconsidertheenvironmenwt hendisposingofbatteries. Alwaysfollowapplicablelawsandregulations. ¢ Ifthe remotedoesnotoperatecorrectlyo, r if theoperatingrange is no obstruction between the remote control and the TV. (Sample Illustration) Remote control dJt.ctive range This preventsbatteryacidfrom leakingintothebattery compartment Remotecontroel ffectiverange For optimum performance, aim the remote control directly at the TV and make sure there is reducedr,eplacethebatterieswith newones. ,,*..Alwaysreplacebothbatterieswith newones.Nevermix battery...
User Guide
Page 37
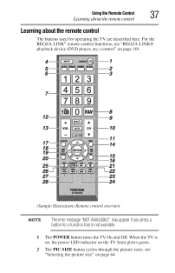
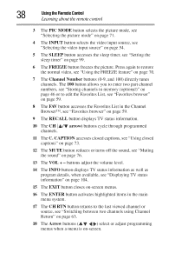
Usingthe Remote Control _'7 Learning about the ren_te control Learningaboutthe remotecontrol The buttons used for operating the TV are described here. ]:or the REGZA-LINK
Usingthe Remote Control _'7 Learning about the ren_te control Learningaboutthe remotecontrol The buttons used for operating the TV are described here. ]:or the REGZA-LINK
User Guide
Page 38
... MUTE button reduces or turns off the sound, see "Setting the sleep timer" on page 99. 6 The FREEZE button freezes the picture. 8 Usingthe Remote Control Learning about the remote cont/vl 3 The PIC MODE button selects the picture mode, see "Selecting the picture mode" on page 71. 4 The INPUT button selects the video...
... MUTE button reduces or turns off the sound, see "Setting the sleep timer" on page 99. 6 The FREEZE button freezes the picture. 8 Usingthe Remote Control Learning about the remote cont/vl 3 The PIC MODE button selects the picture mode, see "Selecting the picture mode" on page 71. 4 The INPUT button selects the video...
User Guide
Page 39
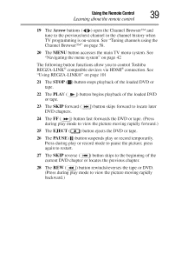
Using the Remote Control Learning al_c_ut the remote contl_l _'_Q 19 The Arrow buttons (4 _) open the Channel Browser TM and tune to the previous/next channel in the channel history when TV programming is on page 42 The following button functions allow you to control Toshiba REGZA-LINK See "Navigating the menu system" on -screen. See "Tuning channels using the Channel Browser TM" on page 58. 20 The MENU button accesses the main TV menu system.
Using the Remote Control Learning al_c_ut the remote contl_l _'_Q 19 The Arrow buttons (4 _) open the Channel Browser TM and tune to the previous/next channel in the channel history when TV programming is on page 42 The following button functions allow you to control Toshiba REGZA-LINK See "Navigating the menu system" on -screen. See "Tuning channels using the Channel Browser TM" on page 58. 20 The MENU button accesses the main TV menu system.

User Guide
Page 40
Chapte4r MenuLayouat ndNavigation Mainmenulayout Tile tables below ), press MENU on tile next pages provide a quick overview of your TV's menu system. To open the Installation menus (illustrated below and on the remote control or TV control panel. IieJtz Option 0_'figP_-fFfi_g s menu ofgo_ _pens the Theater_ftT_°osmenu !i!!:!!_¸i!i!!i'l_iA!_!Oi@'d'I°U!iSis_!i!Ti[_ii'_i!i!iO!°!_'_'_'d'i°US_iT[_'g s menu 4O
Chapte4r MenuLayouat ndNavigation Mainmenulayout Tile tables below ), press MENU on tile next pages provide a quick overview of your TV's menu system. To open the Installation menus (illustrated below and on the remote control or TV control panel. IieJtz Option 0_'figP_-fFfi_g s menu ofgo_ _pens the Theater_ftT_°osmenu !i!!:!!_¸i!i!!i'l_iA!_!Oi@'d'I°U!iSis_!i!Ti[_ii'_i!i!iO!°!_'_'_'d'i°US_iT[_'g s menu 4O
User Guide
Page 42
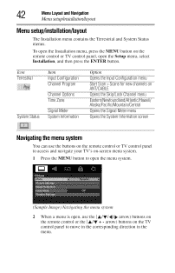
... the Setup menu, select Installation, and then press the ENTER button. To open , use the (A/Y/4t/_ arrow) buttons on the remote control or the (A/Y + - 2 MenuLayouat ndNavigation Menu setup/installafiondayout Menusetup/installation/layout The Installation menu contains the Terrestrial and System Status menus..../menu Alaska/Pacific/Mountain/Oentral _O_Si"O_figT_'_6ffmenu _°_Tfif_f'_{[_sficreen Navigatingthe menusystem You can use the buttons on the remote control or TV control panel to access and navigate your TV's on-screen menu system. 1 Press the MENU button to open the menu...
... the Setup menu, select Installation, and then press the ENTER button. To open , use the (A/Y/4t/_ arrow) buttons on the remote control or the (A/Y + - 2 MenuLayouat ndNavigation Menu setup/installafiondayout Menusetup/installation/layout The Installation menu contains the Terrestrial and System Status menus..../menu Alaska/Pacific/Mountain/Oentral _O_Si"O_figT_'_6ffmenu _°_Tfif_f'_{[_sficreen Navigatingthe menusystem You can use the buttons on the remote control or TV control panel to access and navigate your TV's on-screen menu system. 1 Press the MENU button to open the menu...
User Guide
Page 46
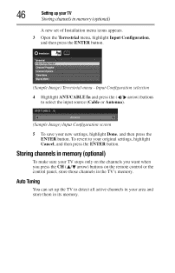
... to detect all active channels in your TV stops only on tile channels you want when you press the CH (A/Y arrow) buttons on the remote control or the control panel, store those channels in its memory. input Co,_figuration selection 4 Highlight ANT/CABLE In and press tile (4/_ arrow) buttons to your new settings...
... to detect all active channels in your TV stops only on tile channels you want when you press the CH (A/Y arrow) buttons on the remote control or the control panel, store those channels in its memory. input Co,_figuration selection 4 Highlight ANT/CABLE In and press tile (4/_ arrow) buttons to your new settings...
User Guide
Page 48
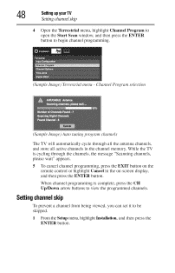
When channel programming is cycling through all the antenna channels, and store all active channels in the on the remote control or highlight Cancel in the channel memory. Channel Program selection (Sample Image) Auto tuning p_vgram channels The TV will automatically cycle through the channels, the ...
When channel programming is cycling through all the antenna channels, and store all active channels in the on the remote control or highlight Cancel in the channel memory. Channel Program selection (Sample Image) Auto tuning p_vgram channels The TV will automatically cycle through the channels, the ...
User Guide
Page 49
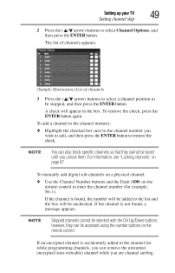
... youunlockthem.Forinformations, ee"Lockingchannels"on page87 To manually add digital sub-channels on a physical channel: o*,o Use the Channel Number buttons and the Dash (1!)0) on the remote control to remove the check. If the channel is accidentally added to select Channel Options, and then press the ENTER button. A check will be skipped, and...
... youunlockthem.Forinformations, ee"Lockingchannels"on page87 To manually add digital sub-channels on a physical channel: o*,o Use the Channel Number buttons and the Dash (1!)0) on the remote control to remove the check. If the channel is accidentally added to select Channel Options, and then press the ENTER button. A check will be skipped, and...


