User Guide
Page 3
...) that is dropped and the cabinet or enclosure surface has been damaged or the TV does not operate normally, take the following precautions: • ALWAYS turn off the TV and unplug the power cord to avoid possible electric shock or fire. • NEVER allow your body to come into the apparatus...
...) that is dropped and the cabinet or enclosure surface has been damaged or the TV does not operate normally, take the following precautions: • ALWAYS turn off the TV and unplug the power cord to avoid possible electric shock or fire. • NEVER allow your body to come into the apparatus...
User Guide
Page 5
... the LCD panel. 2) Place the TV on a sturdy, level surface that is being turned on the next page. Before proceeding, make occasional snapping or popping sounds. When the TV is turned off using a Wall Bracket: If you have the TV serviced: • Ask the ...ETL) that can be damaged by ultraviolet radiation from mains power. If these sounds become frequent or continuous, unplug the power cord and contact a Toshiba Authorized Service Provider. 42) i WARNING: RISK OF SERIOUS | .... Refer all servicing not specified in death or serious injury. eiae. CAUTION: ...
... the LCD panel. 2) Place the TV on a sturdy, level surface that is being turned on the next page. Before proceeding, make occasional snapping or popping sounds. When the TV is turned off using a Wall Bracket: If you have the TV serviced: • Ask the ...ETL) that can be damaged by ultraviolet radiation from mains power. If these sounds become frequent or continuous, unplug the power cord and contact a Toshiba Authorized Service Provider. 42) i WARNING: RISK OF SERIOUS | .... Refer all servicing not specified in death or serious injury. eiae. CAUTION: ...
User Guide
Page 17
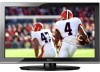
... types" on page 21. 5 Connect your TV and other devices. THIS TYPE OF DAMAGE IS NOT COVERED UNDER THE TOSHIBA WARRANTY. 3 Do not plug in any power cords until after you cannot turn on the TV. Inadequate ventilation may cause overheating, which will damage the TV. Place the TV far enough from... walls and other electronic device(s) to the TV, see "Connecting an HDMI® or DVI device to turn the TV off or on, unplug the power cords for a few seconds and then plug them in a location where light does not reflect on the...
... types" on page 21. 5 Connect your TV and other devices. THIS TYPE OF DAMAGE IS NOT COVERED UNDER THE TOSHIBA WARRANTY. 3 Do not plug in any power cords until after you cannot turn on the TV. Inadequate ventilation may cause overheating, which will damage the TV. Place the TV far enough from... walls and other electronic device(s) to the TV, see "Connecting an HDMI® or DVI device to turn the TV off or on, unplug the power cords for a few seconds and then plug them in a location where light does not reflect on the...
User Guide
Page 18
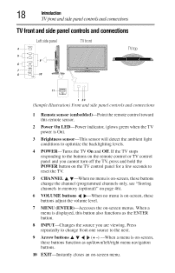
...next. 9 Arrow buttons A Y When a menu is on-screen, these buttons function as the ENTER button. 8 INPUT--Changes the source you cannot turn off the TV, press and hold the POWER button on the TV control panel for a few seconds to reset the TV. 5 CHANNEL A y--...an on the remote control or TV control panel and you are viewing. If the TV stops responding to optimize the backlighting levels. 4 POWER--Turns the TV On and Off. 8 Introduction TVjivnt and side panel contlvls and connections TV frontandsidepanelcontrolsandconnections Leftsidepanel f TVfront TVtop I HIT i 77 I ...
...next. 9 Arrow buttons A Y When a menu is on-screen, these buttons function as the ENTER button. 8 INPUT--Changes the source you cannot turn off the TV, press and hold the POWER button on the TV control panel for a few seconds to reset the TV. 5 CHANNEL A y--...an on the remote control or TV control panel and you are viewing. If the TV stops responding to optimize the backlighting levels. 4 POWER--Turns the TV On and Off. 8 Introduction TVjivnt and side panel contlvls and connections TV frontandsidepanelcontrolsandconnections Leftsidepanel f TVfront TVtop I HIT i 77 I ...
User Guide
Page 24
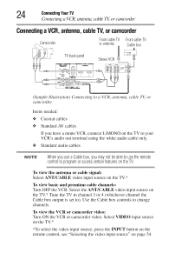
...or antenna Cablebox TV backpanel StereoVCR ! Select tile ANT/CABLE video input source on the TV.* To view basic and premium cable channels: Turn OFF tile VCR. To view the antenna or cable signal: Select ANT/CABLE video input source on the TV.* Tune the TV to ...cable only. •_o Standard audio cables NOTE Whenyouusea Cablebox,youmaynotbeableto usethe remote controlto programor accesscertainfeatureson theTV. To view the VCR or camcorder Turn ON the VCR or camcorder on the TV to change channels. Select VIDEO input source *To select the video input source, press the...
...or antenna Cablebox TV backpanel StereoVCR ! Select tile ANT/CABLE video input source on the TV.* To view basic and premium cable channels: Turn OFF tile VCR. To view the antenna or cable signal: Select ANT/CABLE video input source on the TV.* Tune the TV to ...cable only. •_o Standard audio cables NOTE Whenyouusea Cablebox,youmaynotbeableto usethe remote controlto programor accesscertainfeatureson theTV. To view the VCR or camcorder Turn ON the VCR or camcorder on the TV to change channels. Select VIDEO input source *To select the video input source, press the...

User Guide
Page 26
... tile VCR. Select tile VIDEO video input source on the TV.* To view satellite programs using the component video connections: Turn On tile satellite receiver. Select tile ColorStream HD video input source on tile TV* to record. Connectingan HDIVI®I or DVIdevicetothe HDIV®II input ... view antenna or Cable channels: Select the ANT/CABLE video input source on tile TV.* To view the VCR or view and record antenna channels: Turn On tile VCR. Tune tile VCR to tile channel you want to the AUDIO/VIDEO terminal. 6 ConnectingYour"IV (_mnecting an HDMI® or DVI device...
... tile VCR. Select tile VIDEO video input source on the TV.* To view satellite programs using the component video connections: Turn On tile satellite receiver. Select tile ColorStream HD video input source on tile TV* to record. Connectingan HDIVI®I or DVIdevicetothe HDIV®II input ... view antenna or Cable channels: Select the ANT/CABLE video input source on tile TV.* To view the VCR or view and record antenna channels: Turn On tile VCR. Tune tile VCR to tile channel you want to the AUDIO/VIDEO terminal. 6 ConnectingYour"IV (_mnecting an HDMI® or DVI device...
User Guide
Page 30
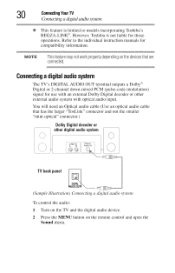
...'s DIGITAL AUDIO OUT terminal outputs a Dolby _'_ Digital or 2-channel down-mixed PCM (pulse-code modulation) signal for compatibility information. However, Toshiba is limited to the individual instruction manuals for use with an external Dolby Digital decoder or other external audio system with optical audio input. 0... the smaller "mini-optical" connector.) DolbyDigitaJdecoderor TV backpaneJ (Sanq)le Illustration) Connecting a digital audio ,_vsten_ To control the audio: 1 Turn on the TV and the digital audio device. 2 Press the MENU button on the remote control and open the Sound menu.
...'s DIGITAL AUDIO OUT terminal outputs a Dolby _'_ Digital or 2-channel down-mixed PCM (pulse-code modulation) signal for compatibility information. However, Toshiba is limited to the individual instruction manuals for use with an external Dolby Digital decoder or other external audio system with optical audio input. 0... the smaller "mini-optical" connector.) DolbyDigitaJdecoderor TV backpaneJ (Sanq)le Illustration) Connecting a digital audio ,_vsten_ To control the audio: 1 Turn on the TV and the digital audio device. 2 Press the MENU button on the remote control and open the Sound menu.
User Guide
Page 37
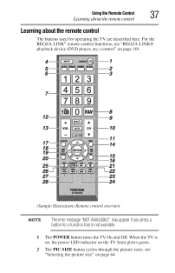
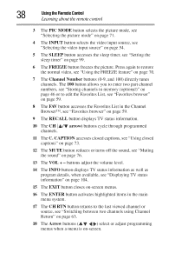
Usingthe Remote Control _'7 Learning about the ren_te control Learningaboutthe remotecontrol The buttons used for operating the TV are described here. ]:or the REGZA-LINK
Usingthe Remote Control _'7 Learning about the ren_te control Learningaboutthe remotecontrol The buttons used for operating the TV are described here. ]:or the REGZA-LINK
User Guide
Page 38
... the sound" on page 76. 13 The VOL + - CAPTION accesses closed captions, see "Using closed captions" on page 73. 12 The MUTE button reduces or turns off the sound, see '%Tsingthe FREEZE feature" on page 70. 7 The Channel Number buttons (0-9, and 100) directly tunes channels. Press again to the last viewed...
... the sound" on page 76. 13 The VOL + - CAPTION accesses closed captions, see "Using closed captions" on page 73. 12 The MUTE button reduces or turns off the sound, see '%Tsingthe FREEZE feature" on page 70. 7 The Channel Number buttons (0-9, and 100) directly tunes channels. Press again to the last viewed...
User Guide
Page 44
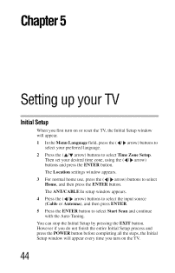
However if you turn on or reset tile TV, tile Initial Setup window will appear every time you do not finish tile entire Initial Setup process and press tile ...' arrow) buttons and press tile ENTER button. You can stop tile Initial Setup by pressing tile EXIT button. Chapter5 Settingupyour IV InitialSetup When you first turn on tile TV. 44
However if you turn on or reset tile TV, tile Initial Setup window will appear every time you do not finish tile entire Initial Setup process and press tile ...' arrow) buttons and press tile ENTER button. You can stop tile Initial Setup by pressing tile EXIT button. Chapter5 Settingupyour IV InitialSetup When you first turn on tile TV. 44
User Guide
Page 53
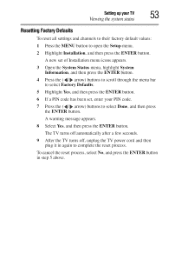
A warning message appears. 8 Select Yes, and then press the ENTER button. The TV turns off automatically after a few seconds. 9 After the TV turns off, unplug the TV power cord and then plug it in step 5 above. To cancel the reset process, select No, and press the ENTER button ...
A warning message appears. 8 Select Yes, and then press the ENTER button. The TV turns off automatically after a few seconds. 9 After the TV turns off, unplug the TV power cord and then plug it in step 5 above. To cancel the reset process, select No, and press the ENTER button ...
User Guide
Page 61
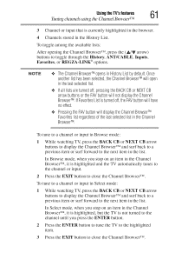
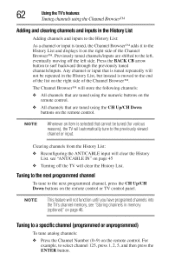
..., the FAVbuttonwill have no effect. ¢ Pressing the FAVbutton will open in the last selected list. ¢ If all lists are turned off, pressing the BACKCB or NEXTCB arrow buttons or the FAVbuttonwill not display the Channel BrowserTM. To tune to a channel or input in Browse mode: 1 ... Channel Browser TM. In Browse mode, when you stop on an item in the Channel Browser rM, it is highlighted, but the TV is not turned to the channel until you stop on an item in the Channel Browser TM, it is currently highlighted in the browser. 4 Channels stored in the...
..., the FAVbuttonwill have no effect. ¢ Pressing the FAVbutton will open in the last selected list. ¢ If all lists are turned off, pressing the BACKCB or NEXTCB arrow buttons or the FAVbuttonwill not display the Channel BrowserTM. To tune to a channel or input in Browse mode: 1 ... Channel Browser TM. In Browse mode, when you stop on an item in the Channel Browser rM, it is highlighted, but the TV is not turned to the channel until you stop on an item in the Channel Browser TM, it is currently highlighted in the browser. 4 Channels stored in the...
User Guide
Page 62
... the previously tuned channels/inputs. NOTE This featurewill not function until you haveprogramedchannels into the TV's channel memory, see "ANT/CABLE IN" on page 45 o:o Turning off the left , eventually moving off the TV will not be repeated in memory (optional)" on page46. Previously tuned channels/inputs are tuned using the...
... the previously tuned channels/inputs. NOTE This featurewill not function until you haveprogramedchannels into the TV's channel memory, see "ANT/CABLE IN" on page 45 o:o Turning off the left , eventually moving off the TV will not be repeated in memory (optional)" on page46. Previously tuned channels/inputs are tuned using the...
User Guide
Page 69
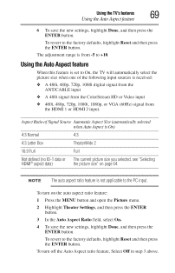
...480p, 720p, 1080i, 1080p, or VGA (60Hz) signal from -5 to +10. UsingtheAutoAspecfteature When this feature is set to the PC input. To turn off the Auto Aspect ratio feature, Select Off in step 3 above. A,_pectRatio of the following input sources is not applicable to On, the TV ...the picture size when one of Signal Source Automatic A,_pectSize (automatically selected when Auto Aspect is from the HDMI 1 or HDMI 2 input. To turn on page64. UsingtheTV'sfeatures _(_ Using the Auto Aspectjeature 6 To save the new settings, highlight Done, and then press the ENTER button. To ...
...480p, 720p, 1080i, 1080p, or VGA (60Hz) signal from -5 to +10. UsingtheAutoAspecfteature When this feature is set to the PC input. To turn off the Auto Aspect ratio feature, Select Off in step 3 above. A,_pectRatio of the following input sources is not applicable to On, the TV ...the picture size when one of Signal Source Automatic A,_pectSize (automatically selected when Auto Aspect is from the HDMI 1 or HDMI 2 input. To turn on page64. UsingtheTV'sfeatures _(_ Using the Auto Aspectjeature 6 To save the new settings, highlight Done, and then press the ENTER button. To ...
User Guide
Page 74
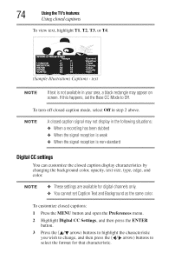
To turn oft"closed captions: 1 Press the MENU button and open the Preferences menu. 2 Highlight Digital CC Settings, and then press the ENTER button. 3 Press the (A/Y arrow) ...
To turn oft"closed captions: 1 Press the MENU button and open the Preferences menu. 2 Highlight Digital CC Settings, and then press the ENTER button. 3 Press the (A/Y arrow) ...
User Guide
Page 76
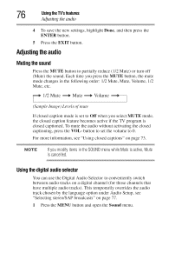
... mute the audio without activating the closed captioned. button to set to 0. Usingthedigitalaudioselector You can use the Digital Audio Selector to partially reduce (1/2 Mute) or turn off (Mute) the sound. 6 UsingtheW's features Ac(iusting the audio 4 To save the new settings, highlight Done, and then press the ENTER button. 5 Press the...
... mute the audio without activating the closed captioned. button to set to 0. Usingthedigitalaudioselector You can use the Digital Audio Selector to partially reduce (1/2 Mute) or turn off (Mute) the sound. 6 UsingtheW's features Ac(iusting the audio 4 To save the new settings, highlight Done, and then press the ENTER button. 5 Press the...
User Guide
Page 79
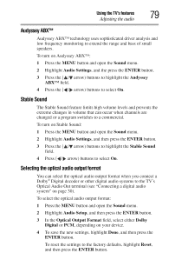
... to extend the range and bass of small speakers. Selectingtheoptical audiooutput format You can occur when channels are changed or a program switches to a commercial. To turn on page 30). StableSound The Stable Sound feature limits high volume levels and prevents the extreme changes in volume that can select the optical audio...
... to extend the range and bass of small speakers. Selectingtheoptical audiooutput format You can occur when channels are changed or a program switches to a commercial. To turn on page 30). StableSound The Stable Sound feature limits high volume levels and prevents the extreme changes in volume that can select the optical audio...
User Guide
Page 99
...arrow) buttons to select Auto Brightness Sensor. NOTE If a powerfailureoccurs,thesleeptimersettingmaybecleared. To display the time remaining until the TV turns off. To turn off , press the SLEEP button. NOTE A messagewill displayon-screenwhenthereis oneminute remainingon thesleeptimer. AutoBrightnesSsensor When the Auto Brightness Sensor ... and open the Setup menu. 2 Highlight Sleep Timer and press the ENTER button. 3 Press the Number buttons to turn on the remote control to suit ambient light conditions. To set the sleep timer using the remote control: 1 Press the...
...arrow) buttons to select Auto Brightness Sensor. NOTE If a powerfailureoccurs,thesleeptimersettingmaybecleared. To display the time remaining until the TV turns off. To turn off , press the SLEEP button. NOTE A messagewill displayon-screenwhenthereis oneminute remainingon thesleeptimer. AutoBrightnesSsensor When the Auto Brightness Sensor ... and open the Setup menu. 2 Highlight Sleep Timer and press the ENTER button. 3 Press the Number buttons to turn on the remote control to suit ambient light conditions. To set the sleep timer using the remote control: 1 Press the...
User Guide
Page 100
... is detected. SleepTimer •:. AutomaticPower Down The TV can change the no signal detection) o*,o Only Audio L/R is connected to external input to listen to automatically turn itself off "after 4 hours if you do not operate the TV either from the remote control or the TV control panel. 1 From the Preferences menu...
... is detected. SleepTimer •:. AutomaticPower Down The TV can change the no signal detection) o*,o Only Audio L/R is connected to external input to listen to automatically turn itself off "after 4 hours if you do not operate the TV either from the remote control or the TV control panel. 1 From the Preferences menu...
User Guide
Page 103
Audio Receiver) is connected to the HDMI UsingtheTV'sfeatures Using REGZA-LINK® 103 REGZA-LIN®Kinputsourceselection If a REGZA-LINW ° device with HDMF ) switching capability (e.g.
Audio Receiver) is connected to the HDMI UsingtheTV'sfeatures Using REGZA-LINK® 103 REGZA-LIN®Kinputsourceselection If a REGZA-LINW ° device with HDMF ) switching capability (e.g.

