
Brochure
Page 1
...uses advanced technology to monitor brightness and automatically adjusts backlight intensity. The 40" E220U is set automatically to improve sound quality through special algorithms, and Audyssey® Bass Extension uses sophisticated... LCD HDTV packed with 1080p Full HD2 resolution. Versatile Connectivity Offering a full jack pack of Toshiba quality and reliability. Step up to a better brand of "pop," and lets you ever...in TV Technology Our new Dynamic Picture Mode creates the right amount of big screen. 40E220U LCD HDTV Step up to Full HD, and full value for deeper blacks and ...
...uses advanced technology to monitor brightness and automatically adjusts backlight intensity. The 40" E220U is set automatically to improve sound quality through special algorithms, and Audyssey® Bass Extension uses sophisticated... LCD HDTV packed with 1080p Full HD2 resolution. Versatile Connectivity Offering a full jack pack of Toshiba quality and reliability. Step up to a better brand of "pop," and lets you ever...in TV Technology Our new Dynamic Picture Mode creates the right amount of big screen. 40E220U LCD HDTV Step up to Full HD, and full value for deeper blacks and ...
User Guide
Page 2
...maintehance (servicing) instructions in serious bodily injury and/or property damage. Wall Mnauting: If you decide to wall meant your r..CD TV, carefully read this Toshiba LCD TV. WARNING To prevent injury, thie a!_paratus must be connected to the grounding system of the building as close to the point of this... DO NOT REMOVE COVER {OR BACI_), NO USER-SERVIC_JBLE PARTS tNSID_, REFER SERVICING TO QUALIFIED SERVICE PERSONNEL, The iightning flash with furniture and television sets. , DolYt place fla_ pane_displays on page 4. WARNING:If you decide to the presence of the U.S.
...maintehance (servicing) instructions in serious bodily injury and/or property damage. Wall Mnauting: If you decide to wall meant your r..CD TV, carefully read this Toshiba LCD TV. WARNING To prevent injury, thie a!_paratus must be connected to the grounding system of the building as close to the point of this... DO NOT REMOVE COVER {OR BACI_), NO USER-SERVIC_JBLE PARTS tNSID_, REFER SERVICING TO QUALIFIED SERVICE PERSONNEL, The iightning flash with furniture and television sets. , DolYt place fla_ pane_displays on page 4. WARNING:If you decide to the presence of the U.S.
User Guide
Page 10
Initial Setup 44 Storing channels in memory (optional 46 Auto Tuning 46 Setting channel skip 48 Setting AV Input mode 50 Setting the HDMI® audio mode 50 Viewing the digital signal meter 51 Setting the time zone 52 Viewing the system status 52 Resetting Factory Defaults 53 0 Contents Connecting a DVD player with ColorStream ®...
Initial Setup 44 Storing channels in memory (optional 46 Auto Tuning 46 Setting channel skip 48 Setting AV Input mode 50 Setting the HDMI® audio mode 50 Viewing the digital signal meter 51 Setting the time zone 52 Viewing the system status 52 Resetting Factory Defaults 53 0 Contents Connecting a DVD player with ColorStream ®...
User Guide
Page 11
... 70 Using the FREEZEfeature 70 Adjusting the picture 71 Selecting the picture mode 71 Adjusting the picture quality 72 Using closed captions 73 Digital CC settings 74 CC Selector 75 C°.,e.,s 11 Chapte6r : UsingtheTV'sfeatures 5..4......
... 70 Using the FREEZEfeature 70 Adjusting the picture 71 Selecting the picture mode 71 Adjusting the picture quality 72 Using closed captions 73 Digital CC settings 74 CC Selector 75 C°.,e.,s 11 Chapte6r : UsingtheTV'sfeatures 5..4......

User Guide
Page 12
... temporarily 86 Using the input lock feature 87 Locking channels 87 Using the GameTimer 88 Using the panel lock feature 89 Using the PC settings feature 90 Setting the PC Audio 91 Using the Media Player 92 Auto Start function 93 To open the Media Player 93 Viewing photo files 95 Playing... music files 96 Viewing photo files and playing music files at the same time 98 Sorting photo or music files 98 Setting the sleep timer 99 Auto Brightness Sensor 99
... temporarily 86 Using the input lock feature 87 Locking channels 87 Using the GameTimer 88 Using the panel lock feature 89 Using the PC settings feature 90 Setting the PC Audio 91 Using the Media Player 92 Auto Start function 93 To open the Media Player 93 Viewing photo files 95 Playing... music files 96 Viewing photo files and playing music files at the same time 98 Sorting photo or music files 98 Setting the sleep timer 99 Auto Brightness Sensor 99
User Guide
Page 13
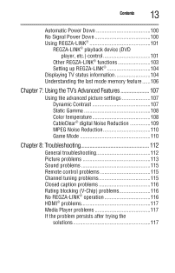
... No Signal Power Down 100 Using REGZA-LINK 101 REGZA-LINK® playback device (DVD player, etc.) control 101 Other REGZA-LINK® functions 103 Setting up REGZA-LINK 104 Displaying TV status information 104 Understanding the last mode memory feature ...... 106 Chapter7: Usingthe TV'sAdvancedFeatures 1..07 Using the advanced picture...
... No Signal Power Down 100 Using REGZA-LINK 101 REGZA-LINK® playback device (DVD player, etc.) control 101 Other REGZA-LINK® functions 103 Setting up REGZA-LINK 104 Displaying TV status information 104 Understanding the last mode memory feature ...... 106 Chapter7: Usingthe TV'sAdvancedFeatures 1..07 Using the advanced picture...

User Guide
Page 16
... music, see page 4. o:o 1920 x 1080 output resolution (E220U). Keep this manual for future reference. 2 To choose a location for a separate digital converter set up your LCD TV" on page 32. Media Player--Allows you to the TV's PC IN terminal" on page 7. o:o 1366 x 768 output resolution (C 120U...the HDMI@ input" on page 92. 6 Introduction Features Features The following are just a few of the many exciting features of your new Toshiba TV: o:o Integrated digital tuning (SVSB ATSC and QAM)-Eliminates the need for the TV: Read "Important notes about your TV and begin using...
... music, see page 4. o:o 1920 x 1080 output resolution (E220U). Keep this manual for future reference. 2 To choose a location for a separate digital converter set up your LCD TV" on page 32. Media Player--Allows you to the TV's PC IN terminal" on page 7. o:o 1366 x 768 output resolution (C 120U...the HDMI@ input" on page 92. 6 Introduction Features Features The following are just a few of the many exciting features of your new Toshiba TV: o:o Integrated digital tuning (SVSB ATSC and QAM)-Eliminates the need for the TV: Read "Important notes about your TV and begin using...
User Guide
Page 19
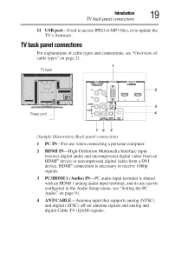
... 5 (Sanzple Illustration) Back panel connections 1 PC IN--For use can be configured in the Audio Setup menu, see "Overview of cable types and connections, see "Setting the PC Audio" on page 21. Introduction 19 TV back panel connections 11 USB port--Used to access JPEG or MP3 files, or to receive...
... 5 (Sanzple Illustration) Back panel connections 1 PC IN--For use can be configured in the Audio Setup menu, see "Overview of cable types and connections, see "Setting the PC Audio" on page 21. Introduction 19 TV back panel connections 11 USB port--Used to access JPEG or MP3 files, or to receive...
User Guide
Page 22
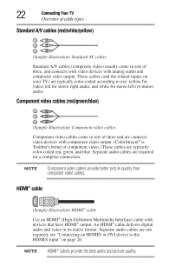
An HDMI ® cable delivers digital audio and video in sets of three and are connects video devices with component video output. (ColorStream ® is Toshiba's brand of component video.) These cables are not required, see "Connecting an HDMI® or DVI device to use:... with analog audio and composite video output. Componenvt ideocables(red/green/blue) (Sample Illustration) Component video cables Component video cables come in sets of three, and connects with video devices with devices that have HDMI ® output. 2 ConnectinYgour"13/ Overview of cable Opes StandardAN...
An HDMI ® cable delivers digital audio and video in sets of three and are connects video devices with component video output. (ColorStream ® is Toshiba's brand of component video.) These cables are not required, see "Connecting an HDMI® or DVI device to use:... with analog audio and composite video output. Componenvt ideocables(red/green/blue) (Sample Illustration) Component video cables Component video cables come in sets of three, and connects with video devices with devices that have HDMI ® output. 2 ConnectinYgour"13/ Overview of cable Opes StandardAN...
User Guide
Page 24
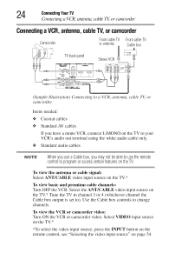
... page 54. Select tile ANT/CABLE video input source on the TV.* Tune the TV to channel 3 or 4 (whichever channel the Cable box output is set to change channels. Select VIDEO input source *To select the video input source, press the INPUT button on the remote control, see "Selecting the video...
... page 54. Select tile ANT/CABLE video input source on the TV.* Tune the TV to channel 3 or 4 (whichever channel the Cable box output is set to change channels. Select VIDEO input source *To select the video input source, press the INPUT button on the remote control, see "Selecting the video...

User Guide
Page 26
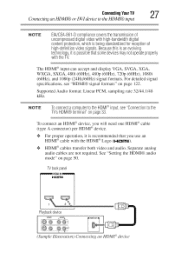
... accept HDCP (High-Bandwidth Digital-Content Protection) program material in digital form from a DVI (Digital Visual Interface) source device. compliant consumer electronic devices (such as a set-top box or DVD player with HDMI 6 ConnectingYour"IV (_mnecting an HDMI® or DVI device to the AUDIO/VIDEO terminal.
... accept HDCP (High-Bandwidth Digital-Content Protection) program material in digital form from a DVI (Digital Visual Interface) source device. compliant consumer electronic devices (such as a set-top box or DVD player with HDMI 6 ConnectingYour"IV (_mnecting an HDMI® or DVI device to the AUDIO/VIDEO terminal.
User Guide
Page 27
...;9cable (type A connector) per HDMI _9device. Supported Audio format: Linear PCM, sampling rate 32/44. 1/48 kHz. o:o For proper operation, it is possiblethatsomedevicesmaynotoperateproperly withtheTV. See "Setting the HDMI® audio mode" on page 122. The HDMI °9input can accept and display VGA, SVGA, XGA, WXGA, SXGA, 480i (60Hz), 480p (60Hz...
...;9cable (type A connector) per HDMI _9device. Supported Audio format: Linear PCM, sampling rate 32/44. 1/48 kHz. o:o For proper operation, it is possiblethatsomedevicesmaynotoperateproperly withtheTV. See "Setting the HDMI® audio mode" on page 122. The HDMI °9input can accept and display VGA, SVGA, XGA, WXGA, SXGA, 480i (60Hz), 480p (60Hz...
User Guide
Page 28
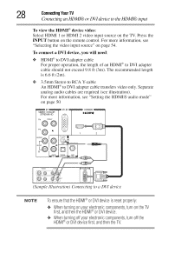
Tile recommended length is 6.6 ft (2m). For more information, see "Selecting tile video input source" on the remote control. To connect a DVI device, you will need: o:o HDMI ®to RCA Y-cable An HDMI o:. 3.5mm Stereo to DVI adapter cable For proper operation, tile length of an HDMF _to DVI adapter cable should not exceed 9.8 ft (3m). Press the INPUT button on page 54. 8 C0nneelingYourTV (_mnecling an HDMI® or DVI device to the HDMI® input To view the HDMI ® device video: Select HDMI 1 or HDMI 2 video input source on the TV.
Tile recommended length is 6.6 ft (2m). For more information, see "Selecting tile video input source" on the remote control. To connect a DVI device, you will need: o:o HDMI ®to RCA Y-cable An HDMI o:. 3.5mm Stereo to DVI adapter cable For proper operation, tile length of an HDMF _to DVI adapter cable should not exceed 9.8 ft (3m). Press the INPUT button on page 54. 8 C0nneelingYourTV (_mnecling an HDMI® or DVI device to the HDMI® input To view the HDMI ® device video: Select HDMI 1 or HDMI 2 video input source on the TV.
User Guide
Page 29
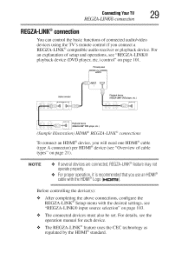
...device. o:o The REGZA-LINK ®feature uses the CEC technology as regulated by the HDMI ® standard. o:o The connected devices must also be set. NOTE .:. Before controlling the device(s): o:o After completing the above connections, configure the REGZA-LINK ®Setup menu with the desired... settings, see "Overview of connected audio/video devices using the TV's remote control if you will need one HDMI ®cable (type A connector) per...
...device. o:o The REGZA-LINK ®feature uses the CEC technology as regulated by the HDMI ® standard. o:o The connected devices must also be set. NOTE .:. Before controlling the device(s): o:o After completing the above connections, configure the REGZA-LINK ®Setup menu with the desired... settings, see "Overview of connected audio/video devices using the TV's remote control if you will need one HDMI ®cable (type A connector) per...
User Guide
Page 31
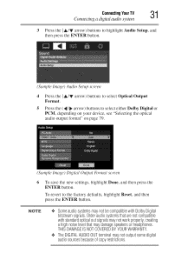
... PCM, depending on your device, see "Selecting the optical audio output format" on page 79. (Sample Image) Digital Output Format scree_ 6 To save the new settings, highlight Done, and then press the ENTER button. THISDAMAGEISNOTCOVEREBDYYOURWARRANTY, ¢ TheDIGITAAL UDIOOUTterminalmaynotoutputsomedigital audiosourcesbecauseof copyrestrictions. ConnectinYgourTV 31 Connecting a digital audio system 3 Press the (&/y arrow) buttons to...
... PCM, depending on your device, see "Selecting the optical audio output format" on page 79. (Sample Image) Digital Output Format scree_ 6 To save the new settings, highlight Done, and then press the ENTER button. THISDAMAGEISNOTCOVEREBDYYOURWARRANTY, ¢ TheDIGITAAL UDIOOUTterminalmaynotoutputsomedigital audiosourcesbecauseof copyrestrictions. ConnectinYgourTV 31 Connecting a digital audio system 3 Press the (&/y arrow) buttons to...
User Guide
Page 32
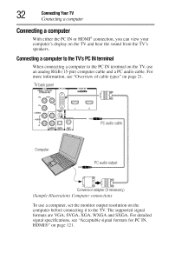
.... For detailed signal specifications, see "Overview of cable types" on the computer before connecting it to the PC IN terminal on the TV, use a computer, set the monitor output resolution on page 21. For more information, see "Acceptable signal formats for PC IN, HDMI®" on the TV and hear the...
.... For detailed signal specifications, see "Overview of cable types" on the computer before connecting it to the PC IN terminal on the TV, use a computer, set the monitor output resolution on page 21. For more information, see "Acceptable signal formats for PC IN, HDMI®" on the TV and hear the...
User Guide
Page 33
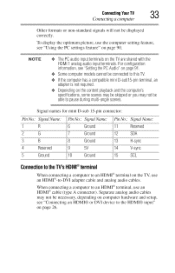
...HDMI® input" on page 90. Separate analog audio cables may not be necessary, depending on computer hardware and setup, see "Using the PC settings feature" on page 26. Somecomputermodelscannotbeconnectedto this TV. •:. Ifthecomputerhasa compatiblemini U-sub15-pinterminal,an adapteris notrequired. •:. Signal Name. 1 R 2 ... No.. Other formats or non-standard signals will not be ableto pauseduringmulti-anglescenes. To display the optimum picture, use the computer setting feature, see "Connecting an HDMI® or DVI device to an HDMF >terminal on page91. •:.
...HDMI® input" on page 90. Separate analog audio cables may not be necessary, depending on computer hardware and setup, see "Using the PC settings feature" on page 26. Somecomputermodelscannotbeconnectedto this TV. •:. Ifthecomputerhasa compatiblemini U-sub15-pinterminal,an adapteris notrequired. •:. Signal Name. 1 R 2 ... No.. Other formats or non-standard signals will not be ableto pauseduringmulti-anglescenes. To display the optimum picture, use the computer setting feature, see "Connecting an HDMI® or DVI device to an HDMF >terminal on page91. •:.
User Guide
Page 38
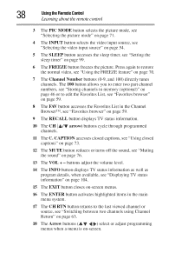
Press again to the last viewed channel or source, see "Setting the sleep timer" on page 99. 6 The FREEZE button freezes the picture. buttons adjust the volume level. 14 The INFO button displays TV status information ...
Press again to the last viewed channel or source, see "Setting the sleep timer" on page 99. 6 The FREEZE button freezes the picture. buttons adjust the volume level. 14 The INFO button displays TV status information ...

User Guide
Page 43
A highlighted menu item appears in a different color in the menu. 4 All menus close automatically if you do not make a selection within approximately 60 seconds, except the signal meter menu, which closes automatically after a few minutes. 5 To close a menu instantly, press the EXIT button. MenuLayoutandNavigation /1.'_ Navigating the menu _ystem I %J 3 Press the ENTER button to save your menu settings or select a highlighted item. NOTE Themenubackgroundmaysometimesappearblack,dependingon thesignaltheTV is receivingT, hisis not a signof malfunction,
A highlighted menu item appears in a different color in the menu. 4 All menus close automatically if you do not make a selection within approximately 60 seconds, except the signal meter menu, which closes automatically after a few minutes. 5 To close a menu instantly, press the EXIT button. MenuLayoutandNavigation /1.'_ Navigating the menu _ystem I %J 3 Press the ENTER button to save your menu settings or select a highlighted item. NOTE Themenubackgroundmaysometimesappearblack,dependingon thesignaltheTV is receivingT, hisis not a signof malfunction,
User Guide
Page 44
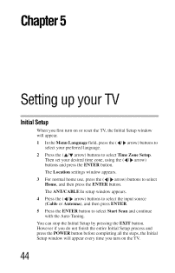
You can stop tile Initial Setup by pressing tile EXIT button. Tile Location settings window appears. 3 For normal home use, press tile (41_ arrow) buttons to select Start Scan and continue with tile Auto Tuning. Chapter5 Settingupyour IV InitialSetup ... to select your desired time zone, using tile (41_' arrow) buttons and press tile ENTER button. However if you turn on tile TV. 44 Then set your preferred language. 2 Press tile (A/Y arrow) buttons to select Time Zone Setup. Tile ANT/CABLE In setup window appears. 4 Press tile (,_1 _ arrow) buttons to...
You can stop tile Initial Setup by pressing tile EXIT button. Tile Location settings window appears. 3 For normal home use, press tile (41_ arrow) buttons to select Start Scan and continue with tile Auto Tuning. Chapter5 Settingupyour IV InitialSetup ... to select your desired time zone, using tile (41_' arrow) buttons and press tile ENTER button. However if you turn on tile TV. 44 Then set your preferred language. 2 Press tile (A/Y arrow) buttons to select Time Zone Setup. Tile ANT/CABLE In setup window appears. 4 Press tile (,_1 _ arrow) buttons to...


