

Owners Manual
Page 2
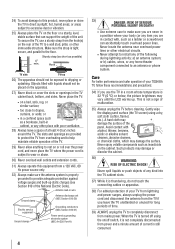
... cords and cables connected to safely install your flat panel display, contact your purchase! The lightning flash with furniture and television sets. • Don't place flat panel displays on furniture that can easily be used as steps, such as UL, CSA, ETL). • Follow all . CHILD SAFETY: It Makes A Difference How and Where You Use Your Flat Panel Display Congratulations on a "larger than a UL Listed wall bracket appropriate for the size and weight...
... cords and cables connected to safely install your flat panel display, contact your purchase! The lightning flash with furniture and television sets. • Don't place flat panel displays on furniture that can easily be used as steps, such as UL, CSA, ETL). • Follow all . CHILD SAFETY: It Makes A Difference How and Where You Use Your Flat Panel Display Congratulations on a "larger than a UL Listed wall bracket appropriate for the size and weight...
Owners Manual
Page 4
...; • too close to drapes, curtains, or walls; When the TV is turned off using a dry, soft cloth (cotton, flannel, etc.). or b) cables, wires, or any of the panel. Such products may damage the surface. Never spray volatile compounds such as a ladder or screwdriver) can support the weight of the unit. Never locate the antenna near overhead power lines or other...
...; • too close to drapes, curtains, or walls; When the TV is turned off using a dry, soft cloth (cotton, flannel, etc.). or b) cables, wires, or any of the panel. Such products may damage the surface. Never spray volatile compounds such as a ladder or screwdriver) can support the weight of the unit. Never locate the antenna near overhead power lines or other...
Owners Manual
Page 5
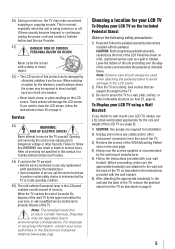
... the appropriate bracket(s) are required for installation. 2) Unplug and remove any cables and/or other component connectors from the rear of the TV. 3) Remove the screws of the VESA Mounting Pattern show in the next page. 4) Always use the screws supplied or recommended by the wall mount manufacturer. 5) Follow the instructions provided with a sharp or heavy object. 42) • The LCD screen of this product can support the weight of the...
... the appropriate bracket(s) are required for installation. 2) Unplug and remove any cables and/or other component connectors from the rear of the TV. 3) Remove the screws of the VESA Mounting Pattern show in the next page. 4) Always use the screws supplied or recommended by the wall mount manufacturer. 5) Follow the instructions provided with a sharp or heavy object. 42) • The LCD screen of this product can support the weight of the...
Owners Manual
Page 8
... Setup 24 Selecting the menu language 24 Configuring the antenna input source for the ANT/CABLE terminal 24 Programming channels into the TV's channel memory..... 25 Programming channels automatically 25 Setting channel skip 25 Setting the HDMI® audio mode 26 Viewing the digital signal meter 27 Setting the time zone 27 Viewing the system status 27 Reset Factory Defaults 27 Chapter 6: Using the TV's features 28 Selecting the video input source to view 28 Labeling the video input sources 28 Tuning channels 29 Tuning channels using...
... Setup 24 Selecting the menu language 24 Configuring the antenna input source for the ANT/CABLE terminal 24 Programming channels into the TV's channel memory..... 25 Programming channels automatically 25 Setting channel skip 25 Setting the HDMI® audio mode 26 Viewing the digital signal meter 27 Setting the time zone 27 Viewing the system status 27 Reset Factory Defaults 27 Chapter 6: Using the TV's features 28 Selecting the video input source to view 28 Labeling the video input sources 28 Tuning channels 29 Tuning channels using...
Owners Manual
Page 12
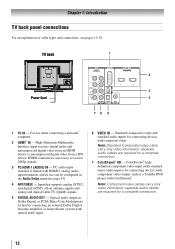
...) format for connecting an external Dolby Digital decoder, amplifier, or home theater system with composite video. Optical audio output in the Audio Setup menu ( page 43). 4無 ANT/CABLE - Note: Standard (composite) video cable carry only video information; HDMI connection is shared with ColorStream®. Note: Component video cables carry only video information; Chapter 1: Introduction TV back panel connections For an explanation of cable types and connections, see pages 13-19. Standard (composite) video and standard audio inputs...
...) format for connecting an external Dolby Digital decoder, amplifier, or home theater system with composite video. Optical audio output in the Audio Setup menu ( page 43). 4無 ANT/CABLE - Note: Standard (composite) video cable carry only video information; HDMI connection is shared with ColorStream®. Note: Component video cables carry only video information; Chapter 1: Introduction TV back panel connections For an explanation of cable types and connections, see pages 13-19. Standard (composite) video and standard audio inputs...
Owners Manual
Page 13
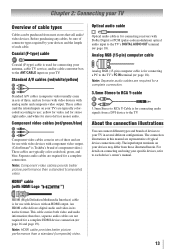
...cable types Cables can connect different types and brands of component video.) These cables are representative of each device's owner's manual. HDMI (High-Definition Multimedia Interface) cable is for connecting receivers with an HDMI output. Note: HDMI cable provides better picture performance than a standard (composite) video. therefore, separate audio cables are for use with video devices with HDMI Logo " ") Optical audio cable Optical audio cable is Toshiba's brand of devices to the TV's DIGITAL AUDIO OUT terminal ( page 18). These cables (and the related inputs...
...cable types Cables can connect different types and brands of component video.) These cables are representative of each device's owner's manual. HDMI (High-Definition Multimedia Interface) cable is for connecting receivers with an HDMI output. Note: HDMI cable provides better picture performance than a standard (composite) video. therefore, separate audio cables are for use with video devices with HDMI Logo " ") Optical audio cable Optical audio cable is Toshiba's brand of devices to the TV's DIGITAL AUDIO OUT terminal ( page 18). These cables (and the related inputs...
Owners Manual
Page 16
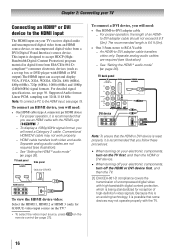
... panel Side panel Only for G310U1 HDMI device To view the HDMI device video: Select the HDMI 1, HDMI 2 or HDMI 3 (only for reception of high-definition video signals. on your TV receives digital audio and uncompressed digital video from an HDMI source device, or uncompressed digital video from EIA/CEA-861-Dcompliant[1] consumer electronic devices (such as a set-top box or DVD player with the HDMI Logo ( ). −− To display a 1080p/60Hz signal format, you will need a Category 2 cable...
... panel Side panel Only for G310U1 HDMI device To view the HDMI device video: Select the HDMI 1, HDMI 2 or HDMI 3 (only for reception of high-definition video signals. on your TV receives digital audio and uncompressed digital video from an HDMI source device, or uncompressed digital video from EIA/CEA-861-Dcompliant[1] consumer electronic devices (such as a set-top box or DVD player with the HDMI Logo ( ). −− To display a 1080p/60Hz signal format, you will need a Category 2 cable...
Owners Manual
Page 18
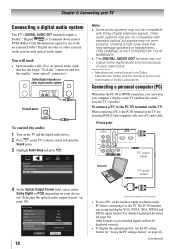
... your device ("Selecting the optical audio output format" on page 38). 18 Conversion adapter (if necessary) • To use a PC, set the monitor output resolution on the TV's remote control and open the Sound menu. 3無 Highlight Audio Setup and press . Chapter 2: Connecting your TV Connecting a digital audio system The TV's DIGITAL AUDIO OUT terminal outputs a Dolby® * Digital or 2-channel down-mixed PCM (Pulse-Code Modulation) signal for use an analog RGB (15-pin) computer cable and a PC audio cable.
... your device ("Selecting the optical audio output format" on page 38). 18 Conversion adapter (if necessary) • To use a PC, set the monitor output resolution on the TV's remote control and open the Sound menu. 3無 Highlight Audio Setup and press . Chapter 2: Connecting your TV Connecting a digital audio system The TV's DIGITAL AUDIO OUT terminal outputs a Dolby® * Digital or 2-channel down-mixed PCM (Pulse-Code Modulation) signal for use an analog RGB (15-pin) computer cable and a PC audio cable.

Owners Manual
Page 21
... to control Toshiba REGZA-LINK compatible devices via HDMI connection. ( Page 47, REGZA-LINK playback device control) 21無 STOP Stops the tape or DVD. 22無 PLAY Begins playback of current DVD chapter, or locates previous chapters. 28無 REW Rewinds/reverses the tape or DVD. (Press during play mode to view the picture moving picture ( page 34). 7無 Channel Numbers (0-9, -/100) directly tune channels. press...
... to control Toshiba REGZA-LINK compatible devices via HDMI connection. ( Page 47, REGZA-LINK playback device control) 21無 STOP Stops the tape or DVD. 22無 PLAY Begins playback of current DVD chapter, or locates previous chapters. 28無 REW Rewinds/reverses the tape or DVD. (Press during play mode to view the picture moving picture ( page 34). 7無 Channel Numbers (0-9, -/100) directly tune channels. press...
Owners Manual
Page 22
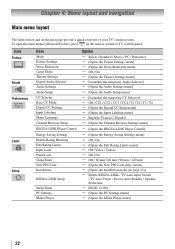
Icon Picture Sound Preferences Locks Setup Item Mode Picture Settings Noise Reduction Game Mode Theater Settings Digital Audio Selector Audio Settings Audio Setup CC Selector Base CC Mode Digital CC Settings Input Labeling Menu Language Channel Browser Setup REGZA-LINK Player Control Energy Saving Settings Enable Rating Blocking Edit Rating Limits Input Lock Panel Lock GameTimer New PIN Code Installation REGZA-LINK Setup Sleep Timer PC Settings Media Player Option Sports / Standard / Movie / PC / Preference [Opens the Picture Settings menu] [Opens the Noise ...
Icon Picture Sound Preferences Locks Setup Item Mode Picture Settings Noise Reduction Game Mode Theater Settings Digital Audio Selector Audio Settings Audio Setup CC Selector Base CC Mode Digital CC Settings Input Labeling Menu Language Channel Browser Setup REGZA-LINK Player Control Energy Saving Settings Enable Rating Blocking Edit Rating Limits Input Lock Panel Lock GameTimer New PIN Code Installation REGZA-LINK Setup Sleep Timer PC Settings Media Player Option Sports / Standard / Movie / PC / Preference [Opens the Picture Settings menu] [Opens the Noise ...
Owners Manual
Page 26
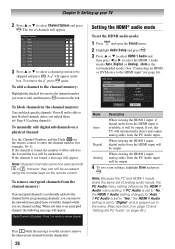
...) channel while you unlock them. ( Page 41 Locking channels) To manually add digital subchannels on a physical channel: Use the Channel Numbers and the Dash ( ) on remote to remove channel Setting the HDMI® audio mode To set the HDMI audio mode: 1無 Press and open the Sound menu. 2無 Highlight Audio Setup and press . 3無 Press p or q to select HDMI 1 Audio and then press t or u to select the HDMI 1 audio mode (Auto, Digital, or Analog). (Auto is set to "No," the HDMI 1 Audio setting changes to enter the channel number...
...) channel while you unlock them. ( Page 41 Locking channels) To manually add digital subchannels on a physical channel: Use the Channel Numbers and the Dash ( ) on remote to remove channel Setting the HDMI® audio mode To set the HDMI audio mode: 1無 Press and open the Sound menu. 2無 Highlight Audio Setup and press . 3無 Press p or q to select HDMI 1 Audio and then press t or u to select the HDMI 1 audio mode (Auto, Digital, or Analog). (Auto is set to "No," the HDMI 1 Audio setting changes to enter the channel number...
Owners Manual
Page 31
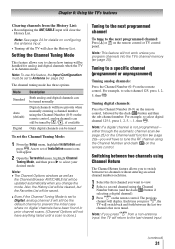
... ANT/CABLE list will be handled for details on the remote control, followed by / , if available Only digital channels can be tuned by the dash ( ) button and then the sub-channel number. Note: This feature will not work unless you change the mode. For example, to the last-viewed input. (continued) 31 Note: If a digital channel is in prior channel scans. (Channel Options will not have priority when manually entering a channel number using Channel...
... ANT/CABLE list will be handled for details on the remote control, followed by / , if available Only digital channels can be tuned by the dash ( ) button and then the sub-channel number. Note: This feature will not work unless you change the mode. For example, to the last-viewed input. (continued) 31 Note: If a digital channel is in prior channel scans. (Channel Options will not have priority when manually entering a channel number using Channel...

Owners Manual
Page 34
... of the following input sources is received: • A 480i, 480p, 720p, 1080i digital signal from the ANT/CABLE input • A 480i signal from the VIDEO input • A 480i signal from the ColorStream HD input • A 480i, 480p, 720p, 1080i, 1080p, or VGA (60Hz) signal from four different modes, as needed. 6無 To save the new settings, highlight Done and press . To turn off the auto aspect ratio feature...
... of the following input sources is received: • A 480i, 480p, 720p, 1080i digital signal from the ANT/CABLE input • A 480i signal from the VIDEO input • A 480i signal from the ColorStream HD input • A 480i, 480p, 720p, 1080i, 1080p, or VGA (60Hz) signal from four different modes, as needed. 6無 To save the new settings, highlight Done and press . To turn off the auto aspect ratio feature...
Owners Manual
Page 38
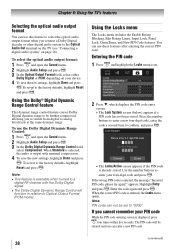
... Sound menu. 2無 Highlight Audio Setup and press . 3無 In the Optical Output Format field, select either Dolby Digital or PCM, depending on page 18). If you connect a Dolby Digital decoder or other digital audio system to select the optical audio output format when you cannot remember your four-digit code and press . To revert to the factory defaults, highlight Reset and press . Entering the PIN code 1無 Press and highlight the Locks menu...
... Sound menu. 2無 Highlight Audio Setup and press . 3無 In the Optical Output Format field, select either Dolby Digital or PCM, depending on page 18). If you connect a Dolby Digital decoder or other digital audio system to select the optical audio output format when you cannot remember your four-digit code and press . To revert to the factory defaults, highlight Reset and press . Entering the PIN code 1無 Press and highlight the Locks menu...
Owners Manual
Page 43
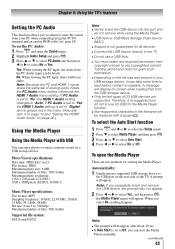
... size and amount in the menu. (Also see item 3 on page 12 and "Setting the HDMI® Audio mode" on page 26.) Using the Media Player Using the Media Player with a square( ). When you select No, nothing happens. If PC Audio is set to "No" the HDMI 1 Audio setting changes to "Auto" If PC Audio is set to "Yes" the HDMI 1 Audio setting is set to "Digital" and is grayed out in your PC when connecting using the Media Player...
... size and amount in the menu. (Also see item 3 on page 12 and "Setting the HDMI® Audio mode" on page 26.) Using the Media Player Using the Media Player with a square( ). When you select No, nothing happens. If PC Audio is set to "No" the HDMI 1 Audio setting changes to "Auto" If PC Audio is set to "Yes" the HDMI 1 Audio setting is set to "Digital" and is grayed out in your PC when connecting using the Media Player...
Owners Manual
Page 48
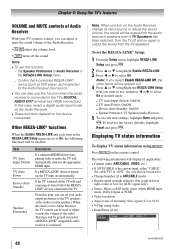
...). • Channel number (if in ANT/CABLE mode) • Digital signal strength indicator (bar graph in the REGZA-LINK Setup menu are set ) (continued) 48 Turn the TV off all of the Audio Receiver. • adjust the volume level. • turns off the sound. If a REGZA-LINK® device is selected for the Audio Receiver input source. ••You can adjust or mute the sound volume of the REGZALINK® devices connected to...
...). • Channel number (if in ANT/CABLE mode) • Digital signal strength indicator (bar graph in the REGZA-LINK Setup menu are set ) (continued) 48 Turn the TV off all of the Audio Receiver. • adjust the volume level. • turns off the sound. If a REGZA-LINK® device is selected for the Audio Receiver input source. ••You can adjust or mute the sound volume of the REGZALINK® devices connected to...
Owners Manual
Page 53
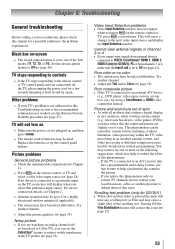
... solution to the remote control or TV control panel and you press on the remote control or TV, press a second time. Set the closed caption feature is set to Off ( page 41). TV will not turn off - Noisy picture •• If you cannot view signals from external devices connected to VIDEO, ColorStream® HDMI 1, HDMI 2, HDMI 3 (only for a few seconds then plug it back in their programming. Cannot view external signals or channel 3 or 4 •...
... solution to the remote control or TV control panel and you press on the remote control or TV, press a second time. Set the closed caption feature is set to Off ( page 41). TV will not turn off - Noisy picture •• If you cannot view signals from external devices connected to VIDEO, ColorStream® HDMI 1, HDMI 2, HDMI 3 (only for a few seconds then plug it back in their programming. Cannot view external signals or channel 3 or 4 •...
Owners Manual
Page 54
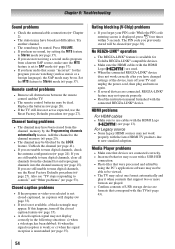
... program or video you selected is not closed-captioned, no sound, try setting the MTS feature to Stereo mode ( page 37). •• If you hear audio that seems "incorrect" for Toshiba REGZA-LINK® compatible devices. •• Make sure the HDMI cables with the HDMI Logo ( ) are used. •• When the connected REGZA-LINK® device does not work properly with a USB HUB connection...
... program or video you selected is not closed-captioned, no sound, try setting the MTS feature to Stereo mode ( page 37). •• If you hear audio that seems "incorrect" for Toshiba REGZA-LINK® compatible devices. •• Make sure the HDMI cables with the HDMI Logo ( ) are used. •• When the connected REGZA-LINK® device does not work properly with a USB HUB connection...
Owners Manual
Page 57
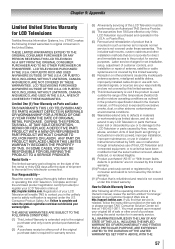
...) days after the date of the operating instructions in the United States. Read the owner's manual thoroughly before installing or operating this LCD Television and connected equipment; How to Obtain Warranty Service After following limited warranties to original consumers in the Owner's manual, review the section entitled "Concierge" located on our Customer Support Web site at http://support.toshiba.com. OR PUERTO RICO AND USED ANYWHERE OUTSIDE OF THE U.S.A. OR...
...) days after the date of the operating instructions in the United States. Read the owner's manual thoroughly before installing or operating this LCD Television and connected equipment; How to Obtain Warranty Service After following limited warranties to original consumers in the Owner's manual, review the section entitled "Concierge" located on our Customer Support Web site at http://support.toshiba.com. OR PUERTO RICO AND USED ANYWHERE OUTSIDE OF THE U.S.A. OR...

Owners Manual
Page 58
... ("ADR's") and (ii) located/ operated in Canada. e. Service on Parts and Labour TCL warrants the Television and its parts against material defects in materials or workmanship that result in the Television failing for set installation, setup, adjustment of customer controls, and installation or repair of God, alteration, power failures, power surges or power shortages, lightning, other electrical faults, or repairs, modifications or replacements by persons other external cause or event...
... ("ADR's") and (ii) located/ operated in Canada. e. Service on Parts and Labour TCL warrants the Television and its parts against material defects in materials or workmanship that result in the Television failing for set installation, setup, adjustment of customer controls, and installation or repair of God, alteration, power failures, power surges or power shortages, lightning, other electrical faults, or repairs, modifications or replacements by persons other external cause or event...


