
Owners Manual
Page 7
FCC Declaration of Conformity Compliance Statement (Part 15): Toshiba 32C110U1, 40E210U1 and 55G310U1 Television models comply with Part 15... approved by Bitstream, Inc. Such pixels are designed to Part 15 of the FCC rules. therefore, Toshiba is : Toshiba America Information Systems, Inc. 9740 Irvine Blvd.; This is a structural property of LCD technology, is ... is not a sign of HDMI Licensing LLC in the United States and other countries. • MPEG Layer-3 audio coding technology licensed from that interference will disappear in a short period of time. 2) The LCD panel contained in...
FCC Declaration of Conformity Compliance Statement (Part 15): Toshiba 32C110U1, 40E210U1 and 55G310U1 Television models comply with Part 15... approved by Bitstream, Inc. Such pixels are designed to Part 15 of the FCC rules. therefore, Toshiba is : Toshiba America Information Systems, Inc. 9740 Irvine Blvd.; This is a structural property of LCD technology, is ... is not a sign of HDMI Licensing LLC in the United States and other countries. • MPEG Layer-3 audio coding technology licensed from that interference will disappear in a short period of time. 2) The LCD panel contained in...
Owners Manual
Page 8
...Connecting an HDMI® or DVI device to the HDMI input 16 REGZA-LINK® connection 17 Connecting a digital audio system 18 Connecting a personal computer (PC 18 Chapter 3: Using the remote control 20 Installing the remote control batteries... (DVD player, etc.) control 47 REGZA-LINK® input source selection 47 VOLUME and MUTE controls of Audio Receiver........... 48 Other REGZA-LINK® functions 48 Displaying TV status information 48 Understanding the last mode memory ...Warranty for LCD Televisions....... 57 Limited Canadian Warranty for Toshiba Brand Flat Panel Televisions 58
...Connecting an HDMI® or DVI device to the HDMI input 16 REGZA-LINK® connection 17 Connecting a digital audio system 18 Connecting a personal computer (PC 18 Chapter 3: Using the remote control 20 Installing the remote control batteries... (DVD player, etc.) control 47 REGZA-LINK® input source selection 47 VOLUME and MUTE controls of Audio Receiver........... 48 Other REGZA-LINK® functions 48 Displaying TV status information 48 Understanding the last mode memory ...Warranty for LCD Televisions....... 57 Limited Canadian Warranty for Toshiba Brand Flat Panel Televisions 58
Owners Manual
Page 9
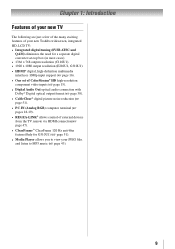
Chapter 1: Introduction Features of your new TV The following are just a few of the many exciting features of your new Toshiba widescreen, integrated HD, LCD TV: • Integrated digital tuning (8VSB ATSC and QAM) eliminates the need for a separate digital converter ... support ( page 16). • One set of ColorStream® HD high-resolution component video inputs ( page 15). • Digital Audio Out optical audio connection with Dolby® Digital optical output format ( page 38). • CableClear® digital picture noise reduction ( page 51). •...
Chapter 1: Introduction Features of your new TV The following are just a few of the many exciting features of your new Toshiba widescreen, integrated HD, LCD TV: • Integrated digital tuning (8VSB ATSC and QAM) eliminates the need for a separate digital converter ... support ( page 16). • One set of ColorStream® HD high-resolution component video inputs ( page 15). • Digital Audio Out optical audio connection with Dolby® Digital optical output format ( page 38). • CableClear® digital picture noise reduction ( page 51). •...

Owners Manual
Page 11
...to turn off . These buttons adjust the volume level. 9無 INPUT - High-Definition Multimedia Interface input receives digital audio and uncompressed digital video from an HDMI device or uncompressed digital video from a DVI device. Press to instantly close an ... buttons function as the ENTER button. 6無 EXIT - Left side panel TV front 3 7 4 8 5 6 9 TV top 10 55G310U1 Control panel 11 32C110U1/40E210U1 Control panel 21 1無 Green LED Power LED (Green) = Power indicator 2無 Remote sensor (embedded) - Repeatedly press to receive 1080p signals. 11&#...
...to turn off . These buttons adjust the volume level. 9無 INPUT - High-Definition Multimedia Interface input receives digital audio and uncompressed digital video from an HDMI device or uncompressed digital video from a DVI device. Press to instantly close an ... buttons function as the ENTER button. 6無 EXIT - Left side panel TV front 3 7 4 8 5 6 9 TV top 10 55G310U1 Control panel 11 32C110U1/40E210U1 Control panel 21 1無 Green LED Power LED (Green) = Power indicator 2無 Remote sensor (embedded) - Repeatedly press to receive 1080p signals. 11&#...
Owners Manual
Page 12
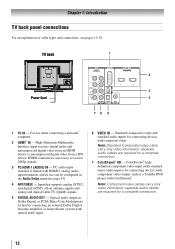
...; PC IN - Optical audio output in the Audio Setup menu ( page 43). 4無 ANT/CABLE - PC audio input terminal is necessary to receive 1080p signals. 3無 PC/HDMI 1 (AUDIO) IN - ColorStream® highdefinition component video input (with standard stereo audio inputs) for connecting devices with component video output, such as a Toshiba DVD player with optical...
...; PC IN - Optical audio output in the Audio Setup menu ( page 43). 4無 ANT/CABLE - PC audio input terminal is necessary to receive 1080p signals. 3無 PC/HDMI 1 (AUDIO) IN - ColorStream® highdefinition component video input (with standard stereo audio inputs) for connecting devices with component video output, such as a Toshiba DVD player with optical...
Owners Manual
Page 13
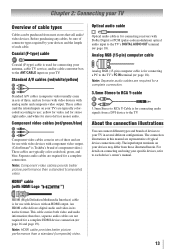
... connecting receivers with an HDMI output. These cables (and the related inputs on your TV. Note: Separate audio cables are typically colorcoded according to use with video devices with component video output. (ColorStream® is Toshiba's brand of component video.) These cables are typically color-coded red, green, and blue. HDMI (High...
... connecting receivers with an HDMI output. These cables (and the related inputs on your TV. Note: Separate audio cables are typically colorcoded according to use with video devices with component video output. (ColorStream® is Toshiba's brand of component video.) These cables are typically color-coded red, green, and blue. HDMI (High...
Owners Manual
Page 14
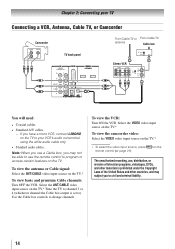
..., use a Cable box, you may subject you to ). Use the Cable box controls to your TV Connecting a VCR, Antenna, Cable TV, or Camcorder Camcorder AUDIO OUT L R VIDEO TV back panel 1 From Cable TV or From Cable TV antenna Cable box IN CH 3 CH 4 OUT Stereo VCR VIDEO...and premium Cable channels: Turn OFF the VCR. To view the VCR: Turn ON the VCR. Chapter 2: Connecting your VCR's audio out terminal using the white audio cable only. • Standard audio cables. Note: When you use , distribution, or revision of the United States and other materials is set to civil and ...
..., use a Cable box, you may subject you to ). Use the Cable box controls to your TV Connecting a VCR, Antenna, Cable TV, or Camcorder Camcorder AUDIO OUT L R VIDEO TV back panel 1 From Cable TV or From Cable TV antenna Cable box IN CH 3 CH 4 OUT Stereo VCR VIDEO...and premium Cable channels: Turn OFF the VCR. To view the VCR: Turn ON the VCR. Chapter 2: Connecting your VCR's audio out terminal using the white audio cable only. • Standard audio cables. Note: When you use , distribution, or revision of the United States and other materials is set to civil and ...
Owners Manual
Page 15
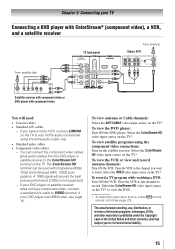
...−− If your DVD player or satellite receiver does not have a mono VCR, connect L/MONO on the TV to your VCR's audio out terminal using the component video connections: Turn on the satellite receiver. Select the ColorStream HD video input source on the TV. The ColorStream ...HD terminal can connect the component video cables (plus audio cables) from ANT OUT to TV Y PB PR Satellite IN COMPONENT VIDEO S-VIDEO VIDEO OUT OUT AUDIO OUT L R Satellite receiver with component video or DVD player with Progressive (480p, 720p) and...
...−− If your DVD player or satellite receiver does not have a mono VCR, connect L/MONO on the TV to your VCR's audio out terminal using the component video connections: Turn on the satellite receiver. Select the ColorStream HD video input source on the TV. The ColorStream ...HD terminal can connect the component video cables (plus audio cables) from ANT OUT to TV Y PB PR Satellite IN COMPONENT VIDEO S-VIDEO VIDEO OUT OUT AUDIO OUT L R Satellite receiver with component video or DVD player with Progressive (480p, 720p) and...
Owners Manual
Page 16
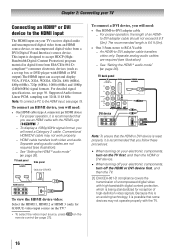
...the HDMI 1, HDMI 2 or HDMI 3 (only for reception of an HDMIto-DVI adapter cable should not exceed 9.8 ft (3m). Separate analog audio cables are not required (see page 19. Because this is an evolving technology, it is possible that you will need a Category 2 cable. The... connect a DVI device, you follow these procedures: •• When turning on your electronic components, turn off your TV receives digital audio and uncompressed digital video from an HDMI source device, or uncompressed digital video from EIA/CEA-861-Dcompliant[1] consumer electronic devices (such as ...
...the HDMI 1, HDMI 2 or HDMI 3 (only for reception of an HDMIto-DVI adapter cable should not exceed 9.8 ft (3m). Separate analog audio cables are not required (see page 19. Because this is an evolving technology, it is possible that you will need a Category 2 cable. The... connect a DVI device, you follow these procedures: •• When turning on your electronic components, turn off your TV receives digital audio and uncompressed digital video from an HDMI source device, or uncompressed digital video from EIA/CEA-861-Dcompliant[1] consumer electronic devices (such as ...
Owners Manual
Page 17
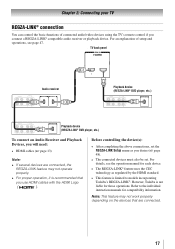
... Playback device (REGZA-LINK® DVD player, etc.) Playback device (REGZA-LINK® DVD player, etc.) To connect an Audio Receiver and Playback Devices, you will need: • HDMI cables ( page 13) Note: •• If several devices... manuals for those operations. Before controlling the device(s): • After completing the above connections, set . However, Toshiba is recommended that are connected. 17 Refer to models incorporating Toshiba's REGZA-LINK®. Note: This feature may not operate properly. •• For proper operation, it is...
... Playback device (REGZA-LINK® DVD player, etc.) Playback device (REGZA-LINK® DVD player, etc.) To connect an Audio Receiver and Playback Devices, you will need: • HDMI cables ( page 13) Note: •• If several devices... manuals for those operations. Before controlling the device(s): • After completing the above connections, set . However, Toshiba is recommended that are connected. 17 Refer to models incorporating Toshiba's REGZA-LINK®. Note: This feature may not operate properly. •• For proper operation, it is...
Owners Manual
Page 18
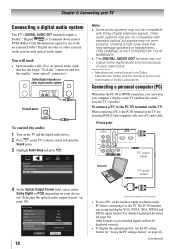
... and display VGA, SVGA, XGA, WXGA and SXGA signal formats. THIS DAMAGE IS NOT COVERED BY YOUR WARRANTY. •• The DIGITAL AUDIO OUT terminal may not be displayed correctly. • To display the optimum picture, use the PC setting feature ( "Using the PC ... on page 42). (continued) Connecting a personal computer (PC) With either Dolby Digital or PCM, depending on your TV Connecting a digital audio system The TV's DIGITAL AUDIO OUT terminal outputs a Dolby® * Digital or 2-channel down-mixed PCM (Pulse-Code Modulation) signal for use with an external Dolby...
... and display VGA, SVGA, XGA, WXGA and SXGA signal formats. THIS DAMAGE IS NOT COVERED BY YOUR WARRANTY. •• The DIGITAL AUDIO OUT terminal may not be displayed correctly. • To display the optimum picture, use the PC setting feature ( "Using the PC ... on page 42). (continued) Connecting a personal computer (PC) With either Dolby Digital or PCM, depending on your TV Connecting a digital audio system The TV's DIGITAL AUDIO OUT terminal outputs a Dolby® * Digital or 2-channel down-mixed PCM (Pulse-Code Modulation) signal for use with an external Dolby...

Owners Manual
Page 19
name 1R Pin Signal No. no overscanning). Such as a Toshiba PC with a compatible mini D-sub15-pin terminal. •• Depending on the DVD's title and the specifications of the screen (i.e. TV back panel 1 Computer PC audio cable PC audio output HDMI-to the HDMI terminal on the TV, use an HDMI cable (...able to pause during multi-angle scenes. • Signal names for computers with an HDMI terminal, use an HDMI-to-DVI adapter cable and analog audio cables. To connect a PC to the HDMI terminal on the TV: When connecting a PC with a DVI terminal to -DVI adapter cable 19 name...
name 1R Pin Signal No. no overscanning). Such as a Toshiba PC with a compatible mini D-sub15-pin terminal. •• Depending on the DVD's title and the specifications of the screen (i.e. TV back panel 1 Computer PC audio cable PC audio output HDMI-to the HDMI terminal on the TV, use an HDMI cable (...able to pause during multi-angle scenes. • Signal names for computers with an HDMI terminal, use an HDMI-to-DVI adapter cable and analog audio cables. To connect a PC to the HDMI terminal on the TV: When connecting a PC with a DVI terminal to -DVI adapter cable 19 name...
Owners Manual
Page 22
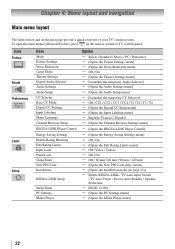
...panel. Icon Picture Sound Preferences Locks Setup Item Mode Picture Settings Noise Reduction Game Mode Theater Settings Digital Audio Selector Audio Settings Audio Setup CC Selector Base CC Mode Digital CC Settings Input Labeling Menu Language Channel Browser Setup REGZA-LINK ... [Opens the Noise Reduction menu] Off / On [Opens the Theater Settings menu] [Launches the temporary Audio Selector] [Opens the Audio Settings menu] [Opens the Audio Setup menu] [Launches the temporary CC Selector] Off / CC1 / CC2 / CC3 / CC4 / T1 / T2...
...panel. Icon Picture Sound Preferences Locks Setup Item Mode Picture Settings Noise Reduction Game Mode Theater Settings Digital Audio Selector Audio Settings Audio Setup CC Selector Base CC Mode Digital CC Settings Input Labeling Menu Language Channel Browser Setup REGZA-LINK ... [Opens the Noise Reduction menu] Off / On [Opens the Theater Settings menu] [Launches the temporary Audio Selector] [Opens the Audio Settings menu] [Opens the Audio Setup menu] [Launches the temporary CC Selector] Off / CC1 / CC2 / CC3 / CC4 / T1 / T2...
Owners Manual
Page 26
... box will be accessed using the number keys on the screen to the HDMI input" ( page 16). Analog When viewing the HDMI 1 input, analog audio from the channel list. 26 Note: Because the PC and HDMI-1 inputs share the same set to "Digital" and is grayed out in the menu.... (Also see item 2 on page 12 and "Setting the PC Audio" on the remote control to the channel list by programming channels, you tune to be output. 4無 To save your TV 2無 Press p or q to...
... box will be accessed using the number keys on the screen to the HDMI input" ( page 16). Analog When viewing the HDMI 1 input, analog audio from the channel list. 26 Note: Because the PC and HDMI-1 inputs share the same set to "Digital" and is grayed out in the menu.... (Also see item 2 on page 12 and "Setting the PC Audio" on the remote control to the channel list by programming channels, you tune to be output. 4無 To save your TV 2無 Press p or q to...
Owners Manual
Page 28
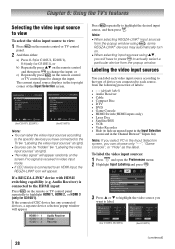
... source according to the type of device you can label the video input sources according to the specific devices you want to change the input. Audio Receiver) is connected to highlight HDMI 1, HDMI 2, or HDMI 3 (only for G310U1) Note: ••You can choose only "- -", ..."Game Console", or "Hide" as the label. Video Audio Receiver Cable Compact Disc DTV Video Audio Receiver Cable Compact Disc DTV (for C110U1, E210U1) (for G310U1), or b) Repeatedly press on the remote control or TV...
... source according to the type of device you can label the video input sources according to the specific devices you want to change the input. Audio Receiver) is connected to highlight HDMI 1, HDMI 2, or HDMI 3 (only for G310U1) Note: ••You can choose only "- -", ..."Game Console", or "Hide" as the label. Video Audio Receiver Cable Compact Disc DTV Video Audio Receiver Cable Compact Disc DTV (for C110U1, E210U1) (for G310U1), or b) Repeatedly press on the remote control or TV...

Owners Manual
Page 37
...screen when is pressed. Each time you press , the mute mode will change in SAP mode. To use to set the volume to a second audio program on the item selected). 5無 To save the new settings, highlight Done and press . However, occasionally there is Closed Captioned. To reset...;If the stereo sound is active, the Mute will be cancelled. To listen to stereo sound: 1無 Press and open the Sound menu. 2無 Highlight Audio Settings and press . 3無 Press or to highlight the item you want to adjust (Bass, Treble, or Balance). 4無 Press &#...
...screen when is pressed. Each time you press , the mute mode will change in SAP mode. To use to set the volume to a second audio program on the item selected). 5無 To save the new settings, highlight Done and press . However, occasionally there is Closed Captioned. To reset...;If the stereo sound is active, the Mute will be cancelled. To listen to stereo sound: 1無 Press and open the Sound menu. 2無 Highlight Audio Settings and press . 3無 Press or to highlight the item you want to adjust (Bass, Treble, or Balance). 4無 Press &#...
Owners Manual
Page 38
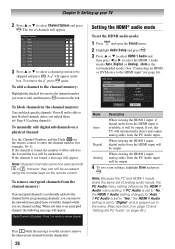
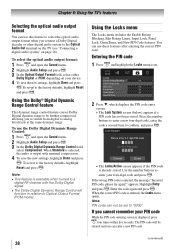
... Format (PCM mode). appears. You can use the Dolby Digital Dynamic Range Control: 1無 Press and open the Sound menu. 2無 Highlight Audio Setup and press . 3無 In the Optical Output Format field, select either Dolby Digital or PCM, depending on page 18). Use the number ... Lock System screen (below) appears if a PIN code has not been stored. Enter the code again and press . When Standard is selected, the audio is displayed, press four times within five seconds. Highlight Retry and press . To revert to enter your four-digit code and press . Chapter 6: Using...
... Format (PCM mode). appears. You can use the Dolby Digital Dynamic Range Control: 1無 Press and open the Sound menu. 2無 Highlight Audio Setup and press . 3無 In the Optical Output Format field, select either Dolby Digital or PCM, depending on page 18). Use the number ... Lock System screen (below) appears if a PIN code has not been stored. Enter the code again and press . When Standard is selected, the audio is displayed, press four times within five seconds. Highlight Retry and press . To revert to enter your four-digit code and press . Chapter 6: Using...
Owners Manual
Page 43
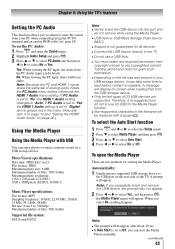
... 48 kHz Bit rate: from copyright owners to use copyrighted content. Note: Because the PC and HDMI-1 inputs share the same set the PC Audio: 1無 Press and open the Media Player There are supported. Photo Viewer specifications: Data type: JPEG Exif ver2.1 File format: JPEG Maximum ...: 1無 Gently insert a supported USB storage device to select On or Off. No: When viewing the PC input, there will appear. Toshiba cannot and does not grant such permission. ••Depending on the rear side of analog audio inputs, the PC Audio menu setting influences the HDMI...
... 48 kHz Bit rate: from copyright owners to use copyrighted content. Note: Because the PC and HDMI-1 inputs share the same set the PC Audio: 1無 Press and open the Media Player There are supported. Photo Viewer specifications: Data type: JPEG Exif ver2.1 File format: JPEG Maximum ...: 1無 Gently insert a supported USB storage device to select On or Off. No: When viewing the PC input, there will appear. Toshiba cannot and does not grant such permission. ••Depending on the rear side of analog audio inputs, the PC Audio menu setting influences the HDMI...

Owners Manual
Page 46
... sleep timer setting may be cleared. Automatic Power Down The TV will automatically turn itself off after 15 minutes when no signal detection.) • Only Audio L/R is off . Note: • The default setting of 12 hours. Chapter 6: Using the TV's features Setting the sleep timer You can change , and press ...
... sleep timer setting may be cleared. Automatic Power Down The TV will automatically turn itself off after 15 minutes when no signal detection.) • Only Audio L/R is off . Note: • The default setting of 12 hours. Chapter 6: Using the TV's features Setting the sleep timer You can change , and press ...
Owners Manual
Page 47
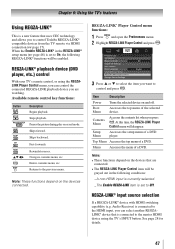
... menu of the selected device. REGZA-LINK® input source selection If a REGZA-LINK® device with HDMI switching capability (e.g. Audio Receiver) is connected to the master HDMI device using the REGZALINK Player Control menu, you can control the connected REGZA-LINK playback device...the following conditions: −−A non-HDMI input is currently selected. −−The Enable REGZA-LINK item is set to control Toshiba REGZA-LINK® compatible devices from the TV remote via HDMI connection ( page 17). Available remote control key functions: Button pqtu...
... menu of the selected device. REGZA-LINK® input source selection If a REGZA-LINK® device with HDMI switching capability (e.g. Audio Receiver) is connected to the master HDMI device using the REGZALINK Player Control menu, you can control the connected REGZA-LINK playback device...the following conditions: −−A non-HDMI input is currently selected. −−The Enable REGZA-LINK item is set to control Toshiba REGZA-LINK® compatible devices from the TV remote via HDMI connection ( page 17). Available remote control key functions: Button pqtu...


