
Operating Instructions
Page 5
... accessories 6 Description and location of parts 7 Getting started 16 Connections 1: Installing the speakers 17 2: Connecting the speakers 19 3: Connecting the TV 21 4a: Connecting the video equipment ...........22 4b: Connecting the audio equipment...........28 5: Connecting the antennas (aerials 28 6: Connecting the AC power cord (mains lead 29 Preparing the Receiver Initializing...
... accessories 6 Description and location of parts 7 Getting started 16 Connections 1: Installing the speakers 17 2: Connecting the speakers 19 3: Connecting the TV 21 4a: Connecting the video equipment ...........22 4b: Connecting the audio equipment...........28 5: Connecting the antennas (aerials 28 6: Connecting the AC power cord (mains lead 29 Preparing the Receiver Initializing...
Operating Instructions
Page 10
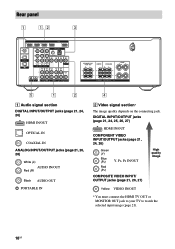
...) HDMI IN/OUT OPTICAL IN COAXIAL IN ANALOG INPUT/OUTPUT jacks (page 21, 26, 28) White (L) AUDIO IN/OUT Red (R) Black AUDIO OUT PORTABLE IN 4 B Video signal section* The image quality depends on the connecting jack. DIGITAL INPUT/OUTPUT jacks (page 21, 24, 25, 26, 27) HDMI IN/OUT COMPONENT.../OUTPUT jacks (page 21, 24, 26) Green (Y) Blue (PB) Red (PR) Y, PB, PR IN/OUT COMPOSITE VIDEO INPUT/ OUTPUT jacks (page 21, 26, 27) High quality image Yellow VIDEO IN/OUT * You must connect the HDMI TV OUT or MONITOR OUT jack to your TV to watch the selected input image (page...
...) HDMI IN/OUT OPTICAL IN COAXIAL IN ANALOG INPUT/OUTPUT jacks (page 21, 26, 28) White (L) AUDIO IN/OUT Red (R) Black AUDIO OUT PORTABLE IN 4 B Video signal section* The image quality depends on the connecting jack. DIGITAL INPUT/OUTPUT jacks (page 21, 24, 25, 26, 27) HDMI IN/OUT COMPONENT.../OUTPUT jacks (page 21, 24, 26) Green (Y) Blue (PB) Red (PR) Y, PB, PR IN/OUT COMPOSITE VIDEO INPUT/ OUTPUT jacks (page 21, 26, 27) High quality image Yellow VIDEO IN/OUT * You must connect the HDMI TV OUT or MONITOR OUT jack to your TV to watch the selected input image (page...
Operating Instructions
Page 11
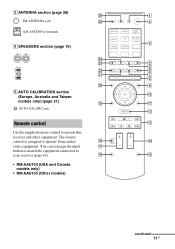
... and Taiwan models only) (page 31) ql qa AUTO CAL MIC jack qs Remote control qd Use the supplied remote control to operate Sony audio/ qk qf video equipment. The remote control is assigned to operate this receiver and other equipment. You can reassign the input qj button to match the equipment...
... and Taiwan models only) (page 31) ql qa AUTO CAL MIC jack qs Remote control qd Use the supplied remote control to operate Sony audio/ qk qf video equipment. The remote control is assigned to operate this receiver and other equipment. You can reassign the input qj button to match the equipment...
Operating Instructions
Page 14
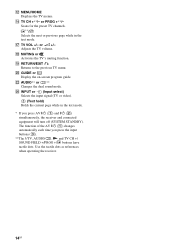
... input buttons (C). **The 5/TV, AUDIO/ , N and TV CH +/ SOUND FIELD +/PROG +/c buttons have tactile dots. Z INPUT or (Input select) Selects the input signal (TV or video). (Text hold) Holds the current page while in the text mode. or PROG +**/- Scans for the preset TV channels. Q TV VOL +/- Adjusts the TV volume...
... input buttons (C). **The 5/TV, AUDIO/ , N and TV CH +/ SOUND FIELD +/PROG +/c buttons have tactile dots. Z INPUT or (Input select) Selects the input signal (TV or video). (Text hold) Holds the current page while in the text mode. or PROG +**/- Scans for the preset TV channels. Q TV VOL +/- Adjusts the TV volume...

Operating Instructions
Page 16
...models) Select the speaker pattern (page 30), then perform Auto Calibration (page 31). Select the connection according to the jacks on your audio/video equipment connected to "Auto", "Dolby Digital" and "DTS" respectively (as of September 2010). For details, refer to "Bitstream" (with.../Optical)", and "DTS (Coaxial/Optical)" are set to the operating instructions supplied with system software version 3.5). HDMI COMPONENT VIDEO Y PB/CB PR/CR VIDEO Digital Analog High quality image Connecting the audio equipment (page 28) Setting the audio output settings on the connected equipment To...
...models) Select the speaker pattern (page 30), then perform Auto Calibration (page 31). Select the connection according to the jacks on your audio/video equipment connected to "Auto", "Dolby Digital" and "DTS" respectively (as of September 2010). For details, refer to "Bitstream" (with.../Optical)", and "DTS (Coaxial/Optical)" are set to the operating instructions supplied with system software version 3.5). HDMI COMPONENT VIDEO Y PB/CB PR/CR VIDEO Digital Analog High quality image Connecting the audio equipment (page 28) Setting the audio output settings on the connected equipment To...
Operating Instructions
Page 21
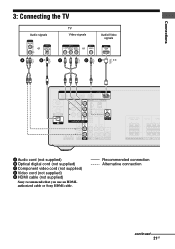
Recommended connection Alternative connection continued 21GB Connections 3: Connecting the TV Audio signals TV Video signals or or A B* C D Audio/Video signals ARC E* ** A Audio cord (not supplied) B Optical digital cord (not supplied) C Component video cord (not supplied) D Video cord (not supplied) E HDMI cable (not supplied) Sony recommends that you use an HDMIauthorized cable or Sony HDMI cable.
Recommended connection Alternative connection continued 21GB Connections 3: Connecting the TV Audio signals TV Video signals or or A B* C D Audio/Video signals ARC E* ** A Audio cord (not supplied) B Optical digital cord (not supplied) C Component video cord (not supplied) D Video cord (not supplied) E HDMI cable (not supplied) Sony recommends that you use an HDMIauthorized cable or Sony HDMI cable.
Operating Instructions
Page 22
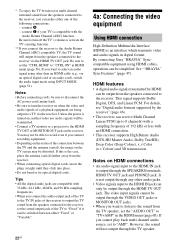
... sampling frequencies. • When you connect recording equipment. • Depending on the receiver. If this is an interface which transmits video and audio signals in HDMI menu (page 56). By connecting Sony "BRAVIA" Synccompatible equipment using INPUT MODE (page 51). If you connect the receiver to the receiver via an optical digital...
... sampling frequencies. • When you connect recording equipment. • Depending on the receiver. If this is an interface which transmits video and audio signals in HDMI menu (page 56). By connecting Sony "BRAVIA" Synccompatible equipment using INPUT MODE (page 51). If you connect the receiver to the receiver via an optical digital...
Operating Instructions
Page 23
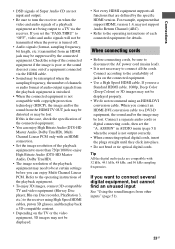
...cable. Connections • DSD signals of Super Audio CD are not input and output. • Be sure to turn the receiver on when the video and audio signals of a playback equipment are being output to a TV via the HDMI cable. • Sound may be interrupted when the sampling frequency...Audio Return Channel (ARC). • Refer to the operating instructions of the playback equipment. • To enjoy 3D images, connect 3D-compatible TV and video equipment (Blu-ray Disc player, Blu-ray Disc recorder, PlayStation 3, etc.) to be suppressed by the specific HDMI version. If this is turned off. ...
...cable. Connections • DSD signals of Super Audio CD are not input and output. • Be sure to turn the receiver on when the video and audio signals of a playback equipment are being output to a TV via the HDMI cable. • Sound may be interrupted when the sampling frequency...Audio Return Channel (ARC). • Refer to the operating instructions of the playback equipment. • To enjoy 3D images, connect 3D-compatible TV and video equipment (Blu-ray Disc player, Blu-ray Disc recorder, PlayStation 3, etc.) to be suppressed by the specific HDMI version. If this is turned off. ...
Operating Instructions
Page 24
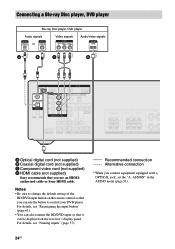
... a Blu-ray Disc player, DVD player Blu-ray Disc player, DVD player Audio signals Video signals Audio/video signals or A* B C D A Optical digital cord (not supplied) B Coaxial digital cord (not supplied) C Component video cord (not supplied) D HDMI cable (not supplied) Sony recommends that you connect equipment equipped with a OPTICAL jack, set the "A. For details, see...
... a Blu-ray Disc player, DVD player Blu-ray Disc player, DVD player Audio signals Video signals Audio/video signals or A* B C D A Optical digital cord (not supplied) B Coaxial digital cord (not supplied) C Component video cord (not supplied) D HDMI cable (not supplied) Sony recommends that you connect equipment equipped with a OPTICAL jack, set the "A. For details, see...
Operating Instructions
Page 25
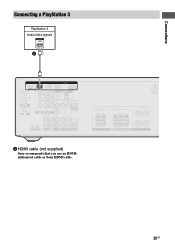
Connections Connecting a PlayStation 3 PlayStation 3 Audio/video signals A A HDMI cable (not supplied) Sony recommends that you use an HDMIauthorized cable or Sony HDMI cable. 25GB
Connections Connecting a PlayStation 3 PlayStation 3 Audio/video signals A A HDMI cable (not supplied) Sony recommends that you use an HDMIauthorized cable or Sony HDMI cable. 25GB
Operating Instructions
Page 26
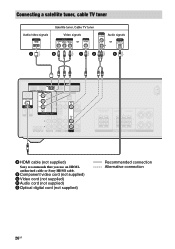
Connecting a satellite tuner, cable TV tuner Audio/video signals Satellite tuner, Cable TV tuner Video signals or Audio signals or A B CD E A HDMI cable (not supplied) Sony recommends that you use an HDMIauthorized cable or Sony HDMI cable. B Component video cord (not supplied) C Video cord (not supplied) D Audio cord (not supplied) E Optical digital cord (not supplied) Recommended connection Alternative connection 26GB
Connecting a satellite tuner, cable TV tuner Audio/video signals Satellite tuner, Cable TV tuner Video signals or Audio signals or A B CD E A HDMI cable (not supplied) Sony recommends that you use an HDMIauthorized cable or Sony HDMI cable. B Component video cord (not supplied) C Video cord (not supplied) D Audio cord (not supplied) E Optical digital cord (not supplied) Recommended connection Alternative connection 26GB
Operating Instructions
Page 27
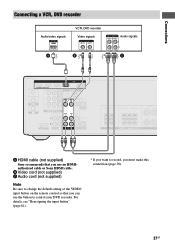
For details, see "Reassigning the input button" (page 61). * If you want to control your DVD recorder. B Video cord (not supplied) C Audio cord (not supplied) Note Be sure to change the default setting of the VIDEO input button on the remote control so that you use the button to record, you must make this connection (page 38). 27GB Connections Connecting a VCR, DVD recorder Audio/video signals VCR, DVD recorder Video signals Audio signals A B* * C A HDMI cable (not supplied) Sony recommends that you can use an HDMIauthorized cable or Sony HDMI cable.
For details, see "Reassigning the input button" (page 61). * If you want to control your DVD recorder. B Video cord (not supplied) C Audio cord (not supplied) Note Be sure to change the default setting of the VIDEO input button on the remote control so that you use the button to record, you must make this connection (page 38). 27GB Connections Connecting a VCR, DVD recorder Audio/video signals VCR, DVD recorder Video signals Audio signals A B* * C A HDMI cable (not supplied) Sony recommends that you can use an HDMIauthorized cable or Sony HDMI cable.
Operating Instructions
Page 29
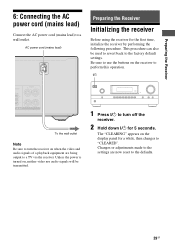
Changes or adjustments made to the settings are being output to a TV via the receiver. The "CLEARING" appears on , neither video nor audio signals will be used to revert back to "CLEARED". Unless the power is turned on the display panel for 5 seconds. This procedure can... Before using the receiver for the first time, initialize the receiver by performing the following procedure. Be sure to use the buttons on when the video and audio signals of a playback equipment are now reset to a wall outlet. Preparing the Receiver 6: Connecting the AC power cord (mains lead) Connect the AC...
Changes or adjustments made to the settings are being output to a TV via the receiver. The "CLEARING" appears on , neither video nor audio signals will be used to revert back to "CLEARED". Unless the power is turned on the display panel for 5 seconds. This procedure can... Before using the receiver for the first time, initialize the receiver by performing the following procedure. Be sure to use the buttons on when the video and audio signals of a playback equipment are now reset to a wall outlet. Preparing the Receiver 6: Connecting the AC power cord (mains lead) Connect the AC...
Operating Instructions
Page 38
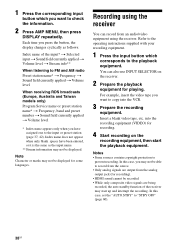
... Volume level * Index name appears only when you may not be recorded. • While only composite video signals are output from an audio/video equipment using the receiver. Insert a blank video tape, etc. In this case, you have been entered, or it is the same as follows:... the recording equipment, then start up and interrupt the recording. 1 Press the corresponding input button which corresponds to copy into the recording equipment (VIDEO) for recording. 4 Start recording on the receiver. 2 Prepare the playback equipment for playing. You can record from the analog output jack (...
... Volume level * Index name appears only when you may not be recorded. • While only composite video signals are output from an audio/video equipment using the receiver. Insert a blank video tape, etc. In this case, you have been entered, or it is the same as follows:... the recording equipment, then start up and interrupt the recording. 1 Press the corresponding input button which corresponds to copy into the recording equipment (VIDEO) for recording. 4 Start recording on the receiver. 2 Prepare the playback equipment for playing. You can record from the analog output jack (...
Operating Instructions
Page 44
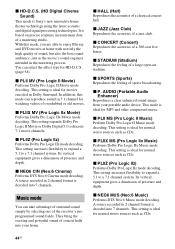
... setting is ideal for normal stereo sources such as the movie's sound engineer intended in Dolby Surround. It is ideal for watching videos of sports broadcasting. x NEO6 CIN (Neo:6 Cinema) Performs DTS Neo:6 Cinema mode decoding. This mode is based on precise ...concert hall. They bring the exciting and powerful sound of a mastering studio. With this mode can reproduce sound in 2 channel format is Sony's new innovative home theater technology using the latest acoustic and digital signal processing technologies. x SPORTS (Sports) Reproduces the feeling of overdubbed or...
... setting is ideal for normal stereo sources such as the movie's sound engineer intended in Dolby Surround. It is ideal for watching videos of sports broadcasting. x NEO6 CIN (Neo:6 Cinema) Performs DTS Neo:6 Cinema mode decoding. This mode is based on precise ...concert hall. They bring the exciting and powerful sound of a mastering studio. With this mode can reproduce sound in 2 channel format is Sony's new innovative home theater technology using the latest acoustic and digital signal processing technologies. x SPORTS (Sports) Reproduces the feeling of overdubbed or...
Operating Instructions
Page 51
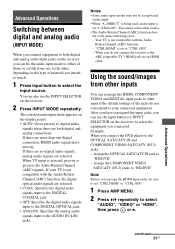
... audio signals input to the DIGITAL OPTICAL jack. • ANALOG: Specifies the analog audio signals input to the OPTICAL SAT/CATV IN and COMPONENT VIDEO SAT/CATV (IN 2) jacks. - Advanced Operations continued 51GB When TV input is selected, priority is not compatible with the Audio Return Channel ... inputs You can also use the input button (or INPUT SELECTOR on the display panel. • AUTO: Gives priority to select "AUDIO", "VIDEO" or "HDMI", then press or b. When you do not correspond to "CTRL OFF". - Advanced Operations Switching between digital and analog audio (INPUT...
... audio signals input to the DIGITAL OPTICAL jack. • ANALOG: Specifies the analog audio signals input to the OPTICAL SAT/CATV IN and COMPONENT VIDEO SAT/CATV (IN 2) jacks. - Advanced Operations continued 51GB When TV input is selected, priority is not compatible with the Audio Return Channel ... inputs You can also use the input button (or INPUT SELECTOR on the display panel. • AUTO: Gives priority to select "AUDIO", "VIDEO" or "HDMI", then press or b. When you do not correspond to "CTRL OFF". - Advanced Operations Switching between digital and analog audio (INPUT...
Operating Instructions
Page 52
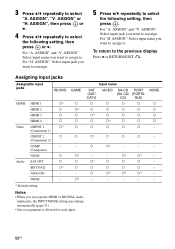
... input name you want to reassign. 5 Press V/v repeatedly to select "A. ASSIGN", "V. Assigning input jacks Assignable input jacks BD/DVD GAME HDMI HDMI 1 a* a HDMI 2 a a* HDMI 3 a a HDMI 4 a a Video CMPNT 1 a* a (Component 1) CMPNT 2 a a (Component 2) COMP - - (Composite) NONE a a* Audio SAT OPT a a BD COAX a* a ANALOG - - ASSIGN": Select input jack you want to assign to reassign. a*... reassignment is allowed for each input. 52GB For "H. NONE - a* Input name SAT (SAT/ CATV) VIDEO SA-CD PORT NONE (SA-CD/ (PORTA- a a* - - - - -
... input name you want to reassign. 5 Press V/v repeatedly to select "A. ASSIGN", "V. Assigning input jacks Assignable input jacks BD/DVD GAME HDMI HDMI 1 a* a HDMI 2 a a* HDMI 3 a a HDMI 4 a a Video CMPNT 1 a* a (Component 1) CMPNT 2 a a (Component 2) COMP - - (Composite) NONE a a* Audio SAT OPT a a BD COAX a* a ANALOG - - ASSIGN": Select input jack you want to assign to reassign. a*... reassignment is allowed for each input. 52GB For "H. NONE - a* Input name SAT (SAT/ CATV) VIDEO SA-CD PORT NONE (SA-CD/ (PORTA- a a* - - - - -

Operating Instructions
Page 56
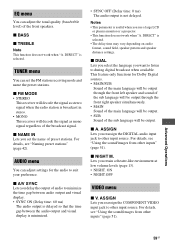
...speakers bass level [BASS] Front speakers treble level [TREBLE] FM station receiving mode [FM MODE] Naming preset stations [NAME IN] Synchronizes audio with video output [A/V SYNC] Digital broadcast language selection [DUAL] Digital audio input assignment [A. SYNC ON, SYNC OFF Default setting BASS 0 dB TRE 0 dB...CTRL ON ON, AUTO, OFF OFF AMP, TV+AMP AMP For details, see "Naming preset stations" (page 42). ASSIGN] Night mode [NIGHT M.] Video input assignment [V. ON, NIGHT.OFF NIGHT.OFF For details, see "Naming inputs" (page 37). a)Europe, Australia and Taiwan models only. ASSIGN] ...
...speakers bass level [BASS] Front speakers treble level [TREBLE] FM station receiving mode [FM MODE] Naming preset stations [NAME IN] Synchronizes audio with video output [A/V SYNC] Digital broadcast language selection [DUAL] Digital audio input assignment [A. SYNC ON, SYNC OFF Default setting BASS 0 dB TRE 0 dB...CTRL ON ON, AUTO, OFF OFF AMP, TV+AMP AMP For details, see "Naming preset stations" (page 42). ASSIGN] Night mode [NIGHT M.] Video input assignment [V. ON, NIGHT.OFF NIGHT.OFF For details, see "Naming inputs" (page 37). a)Europe, Australia and Taiwan models only. ASSIGN] ...
Operating Instructions
Page 59
x NAME IN Lets you set the FM station receiving mode and name the preset stations. x A/V SYNC Lets you reassign the COMPONENT VIDEO input jack to suit your preference. For details, see "Naming preset stations" (page 42). x NIGHT M. DIRECT" is not delayed. TUNER menu You can... Lets you want to listen to other input source. For details, see "Using the sound/images from other inputs" (page 51). ON • NIGHT.OFF VIDEO menu x V. Notes • This parameter is useful when you retain a theater-like environment at low volume levels (page 13). • NIGHT. Lets you use...
x NAME IN Lets you set the FM station receiving mode and name the preset stations. x A/V SYNC Lets you reassign the COMPONENT VIDEO input jack to suit your preference. For details, see "Naming preset stations" (page 42). x NIGHT M. DIRECT" is not delayed. TUNER menu You can... Lets you want to listen to other input source. For details, see "Using the sound/images from other inputs" (page 51). ON • NIGHT.OFF VIDEO menu x V. Notes • This parameter is useful when you retain a theater-like environment at low volume levels (page 13). • NIGHT. Lets you use...
Operating Instructions
Page 66
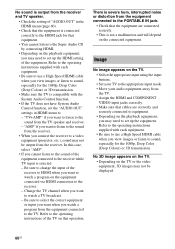
...connected to the receiver. - Refer to watch a TV broadcast. - There is severe hum, interrupted noise or distortion from the equipment connected to a video equipment (projector, etc.), sound may not be displayed. 66GB "AMP" if you want to watch a program from the equipment connected to set up ...; Set your TV to the appropriate input mode. • Move your audio equipment away from the TV. • Assign the HDMI and COMPONENT VIDEO input jacks correctly. • Make sure that cables are connected securely. • This is not a malfunction and will depend on the connected equipment...
...connected to the receiver. - Refer to watch a TV broadcast. - There is severe hum, interrupted noise or distortion from the equipment connected to a video equipment (projector, etc.), sound may not be displayed. 66GB "AMP" if you want to watch a program from the equipment connected to set up ...; Set your TV to the appropriate input mode. • Move your audio equipment away from the TV. • Assign the HDMI and COMPONENT VIDEO input jacks correctly. • Make sure that cables are connected securely. • This is not a malfunction and will depend on the connected equipment...


