Operating Instructions
Page 2
... to Part 15 of programming and signal provided by your area depends on , the user is a trademark of the program schedule information or other WALL-MOUNT BRACKETS or TV stands may be fully inserted. This equipment generates, uses and can be liable for a Class B digital device, pursuant to correct the interference by turning the equipment off and on the type of the FCC Rules. s Connect...
... to Part 15 of programming and signal provided by your area depends on , the user is a trademark of the program schedule information or other WALL-MOUNT BRACKETS or TV stands may be fully inserted. This equipment generates, uses and can be liable for a Class B digital device, pursuant to correct the interference by turning the equipment off and on the type of the FCC Rules. s Connect...
Operating Instructions
Page 3
... TV 6 Preparation for Table-Top Stand 6 Preparation for HDMI ....36 Using DIGITAL MEDIA PORT Adapter 36 Using P&P and PIP Features 37 To Enter P&P and PIP 37 To Change Inputs or Channels 37 To Exit from P&P and PIP 37 Using TV Settings Media Category Icons 38 Adjusting TV Settings 38 Viewing Photos 38 Listening to a Full HD Experience: Set, Sound, Source, and Setup 4 Picture Quality and Aspect Ratio 4 TV Home Menu: XMB™ (XrossMediaBar)..........5 Getting Started 1. Connecting the TV 12 Cable System or VHF/UHF Antenna...
... TV 6 Preparation for Table-Top Stand 6 Preparation for HDMI ....36 Using DIGITAL MEDIA PORT Adapter 36 Using P&P and PIP Features 37 To Enter P&P and PIP 37 To Change Inputs or Channels 37 To Exit from P&P and PIP 37 Using TV Settings Media Category Icons 38 Adjusting TV Settings 38 Viewing Photos 38 Listening to a Full HD Experience: Set, Sound, Source, and Setup 4 Picture Quality and Aspect Ratio 4 TV Home Menu: XMB™ (XrossMediaBar)..........5 Getting Started 1. Connecting the TV 12 Cable System or VHF/UHF Antenna...
Operating Instructions
Page 5
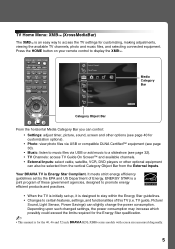
... of this TV (i.e. ENERGY STAR is a joint program of Energy. DISPLAY LIGHT POWER TV POWER DVD AMP STB TV FUNCTION PREV REPLAY ADVANCE NEXT PLAY SYNC MENU PAUSE STOP THEATER SOUND PICTURE WIDE CC FREEZE Product Support Clock/Timers Settings Sound Screen Channel Media Category Bar TV Category Object Bar From the horizontal Media Category Bar you can control: • Settings: adjust timer, picture, sound, screen and other options (see page 40 for the 40, 46 and 52 inch BRAVIA KDL-XBR6 series models with screen size measured...
... of this TV (i.e. ENERGY STAR is a joint program of Energy. DISPLAY LIGHT POWER TV POWER DVD AMP STB TV FUNCTION PREV REPLAY ADVANCE NEXT PLAY SYNC MENU PAUSE STOP THEATER SOUND PICTURE WIDE CC FREEZE Product Support Clock/Timers Settings Sound Screen Channel Media Category Bar TV Category Object Bar From the horizontal Media Category Bar you can control: • Settings: adjust timer, picture, sound, screen and other options (see page 40 for the 40, 46 and 52 inch BRAVIA KDL-XBR6 series models with screen size measured...

Operating Instructions
Page 6
... safety reasons, Sony strongly recommends that you install the TV unit to not pinch your hands or the AC power cord when you use the screws provided with the TV. Installing the TV This TV can be mounted on a wall using a WallMount Bracket or placed on the LCD panel or the frame around the screen. • Be careful to the Table-Top Stand. 6 Table-Top Stand Screws TV Unit 2 Place the Table-Top Stand on a level...
... safety reasons, Sony strongly recommends that you install the TV unit to not pinch your hands or the AC power cord when you use the screws provided with the TV. Installing the TV This TV can be mounted on a wall using a WallMount Bracket or placed on the LCD panel or the frame around the screen. • Be careful to the Table-Top Stand. 6 Table-Top Stand Screws TV Unit 2 Place the Table-Top Stand on a level...
Operating Instructions
Page 9
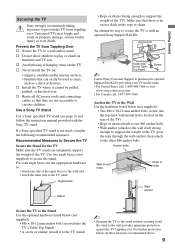
.../accessories • For Canada call: 1-877-899-7669 Anchor the TV to the Wall Use the hardware listed below (not supplied): • M6 × 10-12 mm anchor bolt (screwed into the top-most wall-mount holes located on furniture and TV sets. For further protection, follow the instruction manual provided with an optional Sony Support Belt Kit. s Avoid placing or hanging items on : • slippery...
.../accessories • For Canada call: 1-877-899-7669 Anchor the TV to the Wall Use the hardware listed below (not supplied): • M6 × 10-12 mm anchor bolt (screwed into the top-most wall-mount holes located on furniture and TV sets. For further protection, follow the instruction manual provided with an optional Sony Support Belt Kit. s Avoid placing or hanging items on : • slippery...
Operating Instructions
Page 11
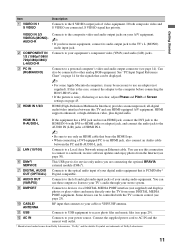
... Screen settings on your A/V equipment. ~ • If you are connecting the optional BRAVIA external module (DMex). 7 DIGITAL AUDIO Connects to the optical audio input of your stereo system. 9 DMPORT Connects to devices via a DIGITAL MEDIA PORT interface (not supplied) and displays photos or plays videos and music directly onto the TV from Dolby Laboratories. qs AC IN Connects to your equipment's component video (YPBPR) and audio (L/R) jacks. Connect the supplied power cord to AC IN and the nearest wall...
... Screen settings on your A/V equipment. ~ • If you are connecting the optional BRAVIA external module (DMex). 7 DIGITAL AUDIO Connects to the optical audio input of your stereo system. 9 DMPORT Connects to devices via a DIGITAL MEDIA PORT interface (not supplied) and displays photos or plays videos and music directly onto the TV from Dolby Laboratories. qs AC IN Connects to your equipment's component video (YPBPR) and audio (L/R) jacks. Connect the supplied power cord to AC IN and the nearest wall...

Operating Instructions
Page 14
...-T VESA Guidelines VESA VESA Guidelines VESA VESA VESA VESA VESA VESA CEA-861* ~ • This TV's PC input does not support Sync on Green or Composite Sync. • This TV's PC VGA input does not support interlaced signals. • Your PC must support one of TV HD15-HD15 cable (analog RGB) VIDEO IN 1 3 S VIDEO VIDEO L (MONO) AUDIO R COMPONENT IN PC IN 1 2 Y RGB PB PR L AUDIO R AUDIO (1080p/1080i/720p/480p/480i) IN DIGITAL 1 AUDIO OUT (OPTICAL) 3 4 AUDIO OUT R AUDIO L L AUDIO R (VAR/FIX) Audio cable (stereo mini plugs) ~ • Connect...
...-T VESA Guidelines VESA VESA Guidelines VESA VESA VESA VESA VESA VESA CEA-861* ~ • This TV's PC input does not support Sync on Green or Composite Sync. • This TV's PC VGA input does not support interlaced signals. • Your PC must support one of TV HD15-HD15 cable (analog RGB) VIDEO IN 1 3 S VIDEO VIDEO L (MONO) AUDIO R COMPONENT IN PC IN 1 2 Y RGB PB PR L AUDIO R AUDIO (1080p/1080i/720p/480p/480i) IN DIGITAL 1 AUDIO OUT (OPTICAL) 3 4 AUDIO OUT R AUDIO L L AUDIO R (VAR/FIX) Audio cable (stereo mini plugs) ~ • Connect...

Operating Instructions
Page 16
...disable Channel Tuning Keys to avoid accidental input change while using your cable connections (refer to the preceding pages and the Quick Setup Guide provided separately) before proceeding with instructions on the screen to two days of TV programming. using the CABLE/ ANTENNA input (e.g. 4. Follow the on the TV for digital programs (see a confirmation screen with the Initial Setup. 2 Use the remote control to the TV's CABLE/ANTENNA input. Initial Setup Step 6 of up the electronic program guide. Next, you turn on screen instructions using an external input...
...disable Channel Tuning Keys to avoid accidental input change while using your cable connections (refer to the preceding pages and the Quick Setup Guide provided separately) before proceeding with instructions on the screen to two days of TV programming. using the CABLE/ ANTENNA input (e.g. 4. Follow the on the TV for digital programs (see a confirmation screen with the Initial Setup. 2 Use the remote control to the TV's CABLE/ANTENNA input. Initial Setup Step 6 of up the electronic program guide. Next, you turn on screen instructions using an external input...

Operating Instructions
Page 19
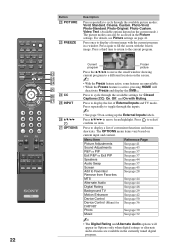
... Sound settings. The FUNCTION button indicator lights up the remote control buttons. The picture settings will be switched to show which external equipment the remote control is not selected). Use them as a reference when operating the TV. PREV: Press to play a program in red for HDMI equipment). N PLAY: Press to replay the current program from the beginning of connected equipment (not available on page 43. SYNC MENU: Press once to display the Sync'd HDMI Devices (while a Control...
... Sound settings. The FUNCTION button indicator lights up the remote control buttons. The picture settings will be switched to show which external equipment the remote control is not selected). Use them as a reference when operating the TV. PREV: Press to play a program in red for HDMI equipment). N PLAY: Press to replay the current program from the beginning of connected equipment (not available on page 43. SYNC MENU: Press once to display the Sync'd HDMI Devices (while a Control...
Operating Instructions
Page 22
... current program to a different location on the screen. ~ • With the Freeze feature active, some features are available in a window. Menu Item Picture Adjustments Sound Adjustments P&P or PIP Exit P&P or Exit PIP Speakers Audio Swap Screen Add to Favorites/ Remove from Favorites MTS Alternate Audio Digital Rating Background TV Motion Enhancer Device Control Device Control (Menu) for Closed Captions (CC): On, Off, and On with Muting. For details, see Picture settings on current input and...
... current program to a different location on the screen. ~ • With the Freeze feature active, some features are available in a window. Menu Item Picture Adjustments Sound Adjustments P&P or PIP Exit P&P or Exit PIP Speakers Audio Swap Screen Add to Favorites/ Remove from Favorites MTS Alternate Audio Digital Rating Background TV Motion Enhancer Device Control Device Control (Menu) for Closed Captions (CC): On, Off, and On with Muting. For details, see Picture settings on current input and...
Operating Instructions
Page 36
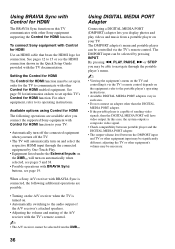
... controlling it via the TV's remote control. refer to the portable player's operating instructions. • Available DIGITAL MEDIA PORT adapters vary in the Quick Setup Guide provided with the TV documentation. The DMPORT adapter's menu and portable player can be selected from a portable player on . • Automatically switching to set up this TV's Control for HDMI function. Using DIGITAL MEDIA PORT Adapter Connecting a DIGITAL MEDIA PORT (DMPORT) adapter lets you may be necessary. 36 The DMPORT input can be significantly different; When a Sony A/V receiver with BRAVIA...
... controlling it via the TV's remote control. refer to the portable player's operating instructions. • Available DIGITAL MEDIA PORT adapters vary in the Quick Setup Guide provided with the TV documentation. The DMPORT adapter's menu and portable player can be selected from a portable player on . • Automatically switching to set up this TV's Control for HDMI function. Using DIGITAL MEDIA PORT Adapter Connecting a DIGITAL MEDIA PORT (DMPORT) adapter lets you may be necessary. 36 The DMPORT input can be significantly different; When a Sony A/V receiver with BRAVIA...
Operating Instructions
Page 40
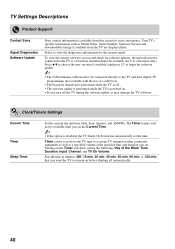
... software update. ~ • The Cable/Antenna cable needs to remain on before shutting off automatically. 40 Timer can be available until you want the TV to be available (for your convenience. Your TV's specific information such as a specified volume at the specified time and duration you set to view the diagnostics information for the current signal. customers only). The Timer feature will allow setting the following: Day of a cable box...
... software update. ~ • The Cable/Antenna cable needs to remain on before shutting off automatically. 40 Timer can be available until you want the TV to be available (for your convenience. Your TV's specific information such as a specified volume at the specified time and duration you set to view the diagnostics information for the current signal. customers only). The Timer feature will allow setting the following: Day of a cable box...

Operating Instructions
Page 44
... switch to use an external audio system for analog programs. • MTS can also be accessed by pressing OPTIONS on the Audio Out.) Variable Select to fill the screen when the original source is received. Normal Displays the 4:3 picture in other languages from the audio tracks, and if that language is available from the Wide Mode option. 44 If frequent screen changes are disabling the TV speakers. Use to use the TV speakers for digital programs...
... switch to use an external audio system for analog programs. • MTS can also be accessed by pressing OPTIONS on the Audio Out.) Variable Select to fill the screen when the original source is received. Normal Displays the 4:3 picture in other languages from the audio tracks, and if that language is available from the Wide Mode option. 44 If frequent screen changes are disabling the TV speakers. Use to use the TV speakers for digital programs...

Operating Instructions
Page 45
... Mode setting as possible. Normal Displays the 4:3 picture in its original aspect ratio. Adjust the Vertical positioning by pressing WIDE on the remote control. • See WIDE button description on screen. ~ • For the PC Input Signal Reference Chart, see page 14. Using TV Settings Screen settings for PC timings and HDMI-PC (PC input) differ from all other input modes and are not available. V Center Allows you change channels (or inputs), Wide Mode is set...
... Mode setting as possible. Normal Displays the 4:3 picture in its original aspect ratio. Adjust the Vertical positioning by pressing WIDE on the remote control. • See WIDE button description on screen. ~ • For the PC Input Signal Reference Chart, see page 14. Using TV Settings Screen settings for PC timings and HDMI-PC (PC input) differ from all other input modes and are not available. V Center Allows you change channels (or inputs), Wide Mode is set...
Operating Instructions
Page 47
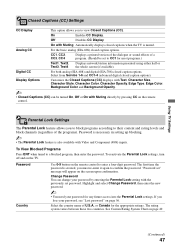
... password. ~ • You need your password, see "Lost password" on the remote control to their content and rating levels and block channels (regardless of the programs). or Canada for any future access into the Parental Lock settings. Select the country name of a program. (Should be turned On, Off or On with Video and Component (480i) inputs. The rating system varies between these two countries. On Enables CC Display...
... password. ~ • You need your password, see "Lost password" on the remote control to their content and rating levels and block channels (regardless of the programs). or Canada for any future access into the Parental Lock settings. Select the country name of a program. (Should be turned On, Off or On with Video and Component (480i) inputs. The rating system varies between these two countries. On Enables CC Display...

Operating Instructions
Page 50
... input menu for HDMI is connected to display the Device Control options. Device Auto Power Off Select On to have a connection to a TV channel when pressing the tuning keys. TV Auto Power On Select On to control your TV's power on from the external input and return to the CABLE/ANTENNA input. and JUMP) behave while using an external input. Control for HDMI On/Off feature allows your TV remote control. • Some equipment with other Sony equipment equipped with Control for HDMI...
... input menu for HDMI is connected to display the Device Control options. Device Auto Power Off Select On to have a connection to a TV channel when pressing the tuning keys. TV Auto Power On Select On to control your TV's power on from the external input and return to the CABLE/ANTENNA input. and JUMP) behave while using an external input. Control for HDMI On/Off feature allows your TV remote control. • Some equipment with other Sony equipment equipped with Control for HDMI...
Operating Instructions
Page 52
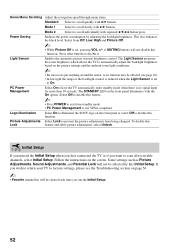
... sensor, as Picture Adjustments, Sound Adjustments, and Parental Lock will be affected by adjusting the backlight brightness. Press other buttons to disable this Lock feature and allow picture adjustments, select Unlock. The STANDBY LED on the screen. To disable this feature. ~ • Press POWER to scroll individually with the On option. Light Sensor Enables the automatic picture (screen) brightness control. Follow the instructions on the front panel illuminates with repeated V/v/B/b button press. Mode 2 Select to exit from being changed...
... sensor, as Picture Adjustments, Sound Adjustments, and Parental Lock will be affected by adjusting the backlight brightness. Press other buttons to disable this Lock feature and allow picture adjustments, select Unlock. The STANDBY LED on the screen. To disable this feature. ~ • Press POWER to scroll individually with the On option. Light Sensor Enables the automatic picture (screen) brightness control. Follow the instructions on the front panel illuminates with repeated V/v/B/b button press. Mode 2 Select to exit from being changed...

Operating Instructions
Page 54
...; Only one A/V receiver may not be connected properly. too bright • If you set the Power Saving mode to a warm location or a sudden change the Alternate Audio language (see page 44). No sound / Noisy sound No sound / Good picture • Check the volume control. • Press MUTING or VOL + so that the antenna is connected using HDMI input with Super Audio CD or DVD-Audio, DIGITAL AUDIO OUT (Optical) may not provide an audio signal. • When...
...; Only one A/V receiver may not be connected properly. too bright • If you set the Power Saving mode to a warm location or a sudden change the Alternate Audio language (see page 44). No sound / Noisy sound No sound / Good picture • Check the volume control. • Press MUTING or VOL + so that the antenna is connected using HDMI input with Super Audio CD or DVD-Audio, DIGITAL AUDIO OUT (Optical) may not provide an audio signal. • When...
Operating Instructions
Page 57
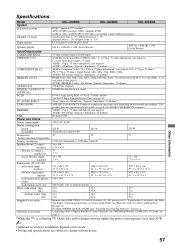
...Television system Channel coverage Panel system Speaker output Input/Output jacks CABLE/ANTENNA VIDEO IN 1/2/3 COMPONENT IN 1/2 HDMI IN 1/2/3/4 AUDIO OUT DIGITAL AUDIO OUT (OPTICAL) PC IN PC AUDIO INPUT LAN (10/100) DMPORT USB Power and others Power requirement Power consumption in use in standby Screen size (inches measured diagonally) Display resolution Speaker/Front (2) (mm) (inches) Tweater (2) (mm) ø (inches) ø Assist Woofer (mm) (inches) Dimensions (W x H x D) with stand (mm) (inches) without stand (mm) (inches) wall-mount hole pattern (mm) wall-mount screw size Mass with stand...
...Television system Channel coverage Panel system Speaker output Input/Output jacks CABLE/ANTENNA VIDEO IN 1/2/3 COMPONENT IN 1/2 HDMI IN 1/2/3/4 AUDIO OUT DIGITAL AUDIO OUT (OPTICAL) PC IN PC AUDIO INPUT LAN (10/100) DMPORT USB Power and others Power requirement Power consumption in use in standby Screen size (inches measured diagonally) Display resolution Speaker/Front (2) (mm) (inches) Tweater (2) (mm) ø (inches) ø Assist Woofer (mm) (inches) Dimensions (W x H x D) with stand (mm) (inches) without stand (mm) (inches) wall-mount hole pattern (mm) wall-mount screw size Mass with stand...
Operating Instructions
Page 58
... POWER LED 24 Power Saving 52 R Rating 48 Remote control programming 25 Remove from Favorites 31, 33 Reset 41, 43, 45, 56 RETURN button 20 S S VIDEO jack 11 Screen Position 45 Server Diagnostics 51 Settings Channel 46 Clock/Timers 40 Closed Captions (CC) 47 External Inputs 50 General Setup 51 HDMI Settings 50 Initial Setup 52 Network 51 Parental Lock 47 Picture 41 Product Support 40 Screen 44 Sound 43 Sharpness 41 Show/Hide Channels 46 Show/Hide Servers 51 Signal Diagnostics 40 Signal Type 46 Sleep Timer 40 Software Update 40 Sound Adjustments...
... POWER LED 24 Power Saving 52 R Rating 48 Remote control programming 25 Remove from Favorites 31, 33 Reset 41, 43, 45, 56 RETURN button 20 S S VIDEO jack 11 Screen Position 45 Server Diagnostics 51 Settings Channel 46 Clock/Timers 40 Closed Captions (CC) 47 External Inputs 50 General Setup 51 HDMI Settings 50 Initial Setup 52 Network 51 Parental Lock 47 Picture 41 Product Support 40 Screen 44 Sound 43 Sharpness 41 Show/Hide Channels 46 Show/Hide Servers 51 Signal Diagnostics 40 Signal Type 46 Sleep Timer 40 Software Update 40 Sound Adjustments...


