Operating Instructions
Page 2
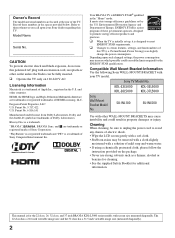
... are trademarks or registered marks of Dolby Laboratories. Owner's Record The model and serial numbers are located at the rear of Energy. and other WALL-MOUNT BRACKETS may be sure to unplug the power cord to certain features, settings, and functionalities of these numbers in the "Home" mode. Patent No. 5,717,422 U.S. Your BRAVIA TV is a trademark of Sony Computer Entertainment Inc. Patent No. 6,816,141 Manufactured...
... are trademarks or registered marks of Dolby Laboratories. Owner's Record The model and serial numbers are located at the rear of Energy. and other WALL-MOUNT BRACKETS may be sure to unplug the power cord to certain features, settings, and functionalities of these numbers in the "Home" mode. Patent No. 5,717,422 U.S. Your BRAVIA TV is a trademark of Sony Computer Entertainment Inc. Patent No. 6,816,141 Manufactured...
Operating Instructions
Page 3
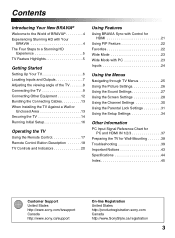
... Connecting Cables 13 When Installing the TV Against a Wall or Enclosed Area 13 Securing the TV 14 Running Initial Setup 16 Operating the TV Using the Remote Control 17 Remote Control Button Description 18 TV Controls and Indicators 20 Using Features Using BRAVIA Sync with Control for HDMI 21 Using PIP Feature 22 Favorites 22 Wide Mode 23 Wide Mode with PC 23 Inputs 24 Using the Menus Navigating through TV Menus 25 Using the Picture Settings 26 Using the Sound Settings 27 Using the Screen Settings 28 Using the Channel Settings...
... Connecting Cables 13 When Installing the TV Against a Wall or Enclosed Area 13 Securing the TV 14 Running Initial Setup 16 Operating the TV Using the Remote Control 17 Remote Control Button Description 18 TV Controls and Indicators 20 Using Features Using BRAVIA Sync with Control for HDMI 21 Using PIP Feature 22 Favorites 22 Wide Mode 23 Wide Mode with PC 23 Inputs 24 Using the Menus Navigating through TV Menus 25 Using the Picture Settings 26 Using the Sound Settings 27 Using the Screen Settings 28 Using the Channel Settings...
Operating Instructions
Page 4
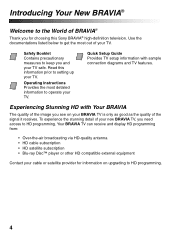
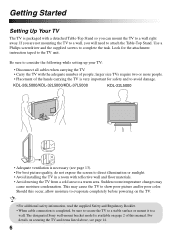
... keep you need access to HD programming. Use the documentations listed below to operate your TV. Quick Setup Guide Provides TV setup information with Your BRAVIA The quality of the image you for information on your BRAVIA TV is only as good as the quality of the signal it receives. Your BRAVIA TV can receive and display HD programming from: • Over-the-air broadcasting via HD-quality antenna • HD cable subscription •...
... keep you need access to HD programming. Use the documentations listed below to operate your TV. Quick Setup Guide Provides TV setup information with Your BRAVIA The quality of the image you for information on your BRAVIA TV is only as good as the quality of the signal it receives. Your BRAVIA TV can receive and display HD programming from: • Over-the-air broadcasting via HD-quality antenna • HD cable subscription •...
Operating Instructions
Page 5
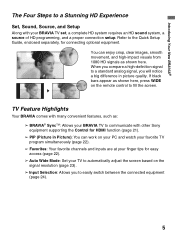
... access (page 22). ➢ Auto Wide Mode: Set your TV to automatically adjust the screen based on the remote control to fill the screen. When you compare a high-definition signal to a standard analog signal, you to easily switch between the connected equipment (page 24). 5 TV Feature Highlights Your BRAVIA comes with other Sony equipment supporting the Control for connecting optional equipment. Refer to the Quick Setup Guide, enclosed separately, for HDMI function (page 21). ➢ PIP (Picture in Picture...
... access (page 22). ➢ Auto Wide Mode: Set your TV to automatically adjust the screen based on the remote control to fill the screen. When you compare a high-definition signal to a standard analog signal, you to easily switch between the connected equipment (page 24). 5 TV Feature Highlights Your BRAVIA comes with other Sony equipment supporting the Control for connecting optional equipment. Refer to the Quick Setup Guide, enclosed separately, for HDMI function (page 21). ➢ PIP (Picture in Picture...
Operating Instructions
Page 6
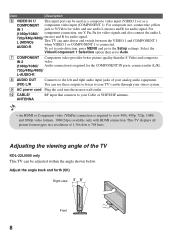
... attachment instruction taped to a wall. larger size TVs require two or more people. • Placement of this occur, allow moisture to evaporate completely before powering on securing the TV and items listed above, see page 13). • For best picture quality, do not expose the screen to direct illumination or sunlight. • Avoid installing the TV in a room with a detached Table-Top Stand so...
... attachment instruction taped to a wall. larger size TVs require two or more people. • Placement of this occur, allow moisture to evaporate completely before powering on securing the TV and items listed above, see page 13). • For best picture quality, do not expose the screen to direct illumination or sunlight. • Avoid installing the TV in a room with a detached Table-Top Stand so...
Operating Instructions
Page 7
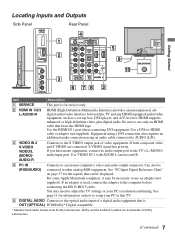
... may need to adjust the TV settings or your PC to this TV and any HDMI-equipped audio/video equipment, such as a set-top box, DVD player, and A/V receiver. Use VIDEO IN 2 with AUDIO L (mono) and R. 4 PC IN (RGB/AUDIO) Connects to -HDMI cable or adapter (not supplied). See "PC Input Signal Reference Chart" on page 37 for information on how to setup your PC's resolution and timing. HDMI supports enhanced, or high-definition video, plus digital audio. Equipment using a DVI connection also requires...
... may need to adjust the TV settings or your PC to this TV and any HDMI-equipped audio/video equipment, such as a set-top box, DVD player, and A/V receiver. Use VIDEO IN 2 with AUDIO L (mono) and R. 4 PC IN (RGB/AUDIO) Connects to -HDMI cable or adapter (not supplied). See "PC Input Signal Reference Chart" on page 37 for information on how to setup your PC's resolution and timing. HDMI supports enhanced, or high-definition video, plus digital audio. Equipment using a DVI connection also requires...
Operating Instructions
Page 8
... antenna. • An HDMI or Component video (YPBPR) connection is connected. Select the Video/Component 1 Selection option then set to auto detection, press MENU and go to Y/Video for video and use these outputs to listen to your TV's audio through your stereo system. 9 AC power cord Plug the cord into the nearest wall outlet. 0 CABLE/ ANTENNA RF input that connects to your analog audio equipment. You can use audio L (mono) and R for audio signal. For composite use Y, PB, PR for video signals and also connect...
... antenna. • An HDMI or Component video (YPBPR) connection is connected. Select the Video/Component 1 Selection option then set to auto detection, press MENU and go to Y/Video for video and use these outputs to listen to your TV's audio through your stereo system. 9 AC power cord Plug the cord into the nearest wall outlet. 0 CABLE/ ANTENNA RF input that connects to your analog audio equipment. You can use audio L (mono) and R for audio signal. For composite use Y, PB, PR for video signals and also connect...
Operating Instructions
Page 15
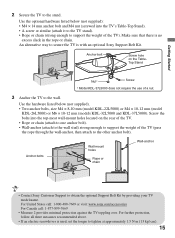
... anchor bolt). • Wall-anchor (attach to the wall stud) strong enough to support the weight of a nut. 3 Anchor the TV to the other anchor bolt). Make sure that there is used, set the torque to the stand. Use the hardware listed below (not supplied): • M4 × 14 mm anchor bolt and M4 nut (screwed into the top-most wall-mount holes located on the TableTop Stand Nut* Screw * Model KDL...
... anchor bolt). • Wall-anchor (attach to the wall stud) strong enough to support the weight of a nut. 3 Anchor the TV to the other anchor bolt). Make sure that there is used, set the torque to the stand. Use the hardware listed below (not supplied): • M4 × 14 mm anchor bolt and M4 nut (screwed into the top-most wall-mount holes located on the TableTop Stand Nut* Screw * Model KDL...
Operating Instructions
Page 18
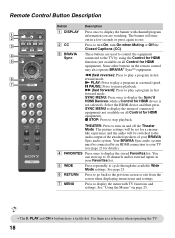
... the remote control may also operate BRAVIA® SyncTM equipment. N PLAY: Press to play a program in fast forward mode. M (fast forward): Press to play a program in fast rewind mode. Select the HDMI device and then press SYNC MENU to display the menu of your BRAVIA Sync audio system. Remote Control Button Description 1 2 3 DISPLAY CC POWER 4 5 WIDE INPUT 6 7 TOOLS Button Description 1 DISPLAY 2 CC 3 BRAVIA Sync Press once to display the banner with TV functions and settings. The picture settings will be set for...
... the remote control may also operate BRAVIA® SyncTM equipment. N PLAY: Press to play a program in fast forward mode. M (fast forward): Press to play a program in fast rewind mode. Select the HDMI device and then press SYNC MENU to display the menu of your BRAVIA Sync audio system. Remote Control Button Description 1 2 3 DISPLAY CC POWER 4 5 WIDE INPUT 6 7 TOOLS Button Description 1 DISPLAY 2 CC 3 BRAVIA Sync Press once to display the banner with TV functions and settings. The picture settings will be set for...
Operating Instructions
Page 20
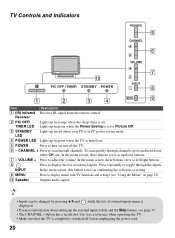
... sleep timer is set to Picture Off. 3 STANDBY LED Lights up in red when your TV is in PC power saving mode. 4 POWER LED Lights up in green when the Power Saving is completely switched off the TV. 6 - To scan quickly through the inputs. Press repeatedly to turn on page 25). 0 Speaker Outputs audio signal. • Inputs can be changed by pressing V/v and while the list of external inputs. In the menu screen, these buttons serve as confirming the selection or setting. 9 MENU Press to display the list...
... sleep timer is set to Picture Off. 3 STANDBY LED Lights up in red when your TV is in PC power saving mode. 4 POWER LED Lights up in green when the Power Saving is completely switched off the TV. 6 - To scan quickly through the inputs. Press repeatedly to turn on page 25). 0 Speaker Outputs audio signal. • Inputs can be changed by pressing V/v and while the list of external inputs. In the menu screen, these buttons serve as confirming the selection or setting. 9 MENU Press to display the list...
Operating Instructions
Page 21
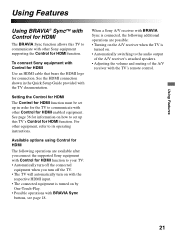
... audio output of the A/V receiver's attached speakers. • Adjusting the volume and muting of the A/V receiver with the TV's remote control. 21 See the HDMI connection shown in order for the TV to communicate with other equipment, refer to its operating instructions. For other Control for HDMI enabled equipment. When a Sony A/V receiver with BRAVIA Sync is turned on. • Automatically switching to set up this TV to your TV: • Automatically turn on with the respective HDMI input...
... audio output of the A/V receiver's attached speakers. • Adjusting the volume and muting of the A/V receiver with the TV's remote control. 21 See the HDMI connection shown in order for the TV to communicate with other equipment, refer to its operating instructions. For other Control for HDMI enabled equipment. When a Sony A/V receiver with BRAVIA Sync is turned on. • Automatically switching to set up this TV to your TV: • Automatically turn on with the respective HDMI input...
Operating Instructions
Page 22
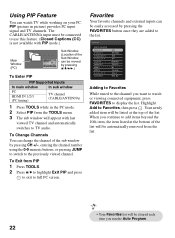
... HDMI IN 1/2/3 (PC timing) TV channel (CABLE/ANTENNA) 1 Press TOOLS while in picture) provides PC input signal and TV channels. To Change Channels You can watch or viewing connected equipment, press FAVORITES to display the list. Favorites Your favorite channels and external inputs can be moved by pressing the FAVORITES button once they are added to the channel you run the Auto Program. 22 Favorites Add to Favorites Cable 4.61 Antenna 12 Componente 3 Antenna 24.6 Cable 34 Cable 36.1 HDMI 1 HDMI 3 Antenna...
... HDMI IN 1/2/3 (PC timing) TV channel (CABLE/ANTENNA) 1 Press TOOLS while in picture) provides PC input signal and TV channels. To Change Channels You can watch or viewing connected equipment, press FAVORITES to display the list. Favorites Your favorite channels and external inputs can be moved by pressing the FAVORITES button once they are added to the channel you run the Auto Program. 22 Favorites Add to Favorites Cable 4.61 Antenna 12 Componente 3 Antenna 24.6 Cable 34 Cable 36.1 HDMI 1 HDMI 3 Antenna...
Operating Instructions
Page 25
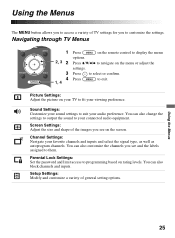
... channels you see on the menu or adjust the settings. Parental Lock Settings: Set the password and limit access to programming based on your TV to fit your connected audio equipment. Using the Menus 25 Setup Settings: Modify and customize a variety of TV settings for you to customize the settings. Sound Settings: Customize your sound settings to suit your favorite channels and inputs and select the signal type, as well as autoprogram channels. Picture Settings: Adjust the picture on rating levels. Using the Menus The MENU button...
... channels you see on the menu or adjust the settings. Parental Lock Settings: Set the password and limit access to programming based on your TV to fit your connected audio equipment. Using the Menus 25 Setup Settings: Modify and customize a variety of TV settings for you to customize the settings. Sound Settings: Customize your sound settings to suit your favorite channels and inputs and select the signal type, as well as autoprogram channels. Picture Settings: Adjust the picture on rating levels. Using the Menus The MENU button...
Operating Instructions
Page 34
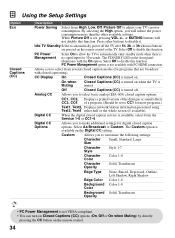
... closed caption modes (for digital closed caption options. While Picture Off is no buttons are broadcast with closed captioning). PC Power Management option is turned off the TV after 1h, 2h, or 3h when no signal input for most programs.) Text1, Text2, Displays network/station information presented using Text3, Text4 either half or the whole screen (if available). Digital CC When the digital closed caption service is available on the front panel illuminates with PC-HDMI connection. Using the Setup Settings...
... closed caption modes (for digital closed caption options. While Picture Off is no buttons are broadcast with closed captioning). PC Power Management option is turned off the TV after 1h, 2h, or 3h when no signal input for most programs.) Text1, Text2, Displays network/station information presented using Text3, Text4 either half or the whole screen (if available). Digital CC When the digital closed caption service is available on the front panel illuminates with PC-HDMI connection. Using the Setup Settings...
Operating Instructions
Page 38
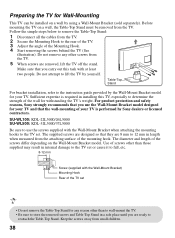
... Wall-Mount Bracket when attaching the mounting hooks to the TV set • Do not remove the Table-Top Stand for any reason other screws from the TV. The supplied screws are removed, lift the TV off the stand. Keep the screws away from the TV. 2 Secure the Mounting Hook to the rear of the TV. 3 Adjust the angle of the Mounting Hook. 4 Start removing the screws behind the TV (See illustration). Table-Top Stand For bracket installation, refer to the instruction guide provided by Sony...
... Wall-Mount Bracket when attaching the mounting hooks to the TV set • Do not remove the Table-Top Stand for any reason other screws from the TV. The supplied screws are removed, lift the TV off the stand. Keep the screws away from the TV. 2 Secure the Mounting Hook to the rear of the TV. 3 Adjust the angle of the Mounting Hook. 4 Start removing the screws behind the TV (See illustration). Table-Top Stand For bracket installation, refer to the instruction guide provided by Sony...

Operating Instructions
Page 39
... remote, press the POWER button on the TV set. (The TV will clear all of your customized settings including the Parental Lock setting. Cannot receive any channels • Make sure the power cord is connected securely. • Turn on your TV signal source. To receive or select UHF channels over an antenna, make sure that Signal Type in the Eco settings. press the MUTING button again or press VOL + to the Quick Setup Guide provided for your remote control; WARNING: The factory reset...
... remote, press the POWER button on the TV set. (The TV will clear all of your customized settings including the Parental Lock setting. Cannot receive any channels • Make sure the power cord is connected securely. • Turn on your TV signal source. To receive or select UHF channels over an antenna, make sure that Signal Type in the Eco settings. press the MUTING button again or press VOL + to the Quick Setup Guide provided for your remote control; WARNING: The factory reset...
Operating Instructions
Page 40
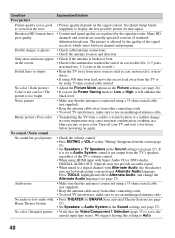
... / The picture is connected using HDMI input with Super Audio CD or DVD-Audio, DIGITAL AUDIO OUT (Optical) may not provide an audio signal. • When tuned to a digital channel with • Press THEATER for that the Video/Component 1 Selection (page 35) is not output from a cold to a warm location or a sudden change the Alternate Audio language (see page 27). Blurry picture / Poor color • Transporting the TV from the TV's speakers regardless of the signal received, which...
... / The picture is connected using HDMI input with Super Audio CD or DVD-Audio, DIGITAL AUDIO OUT (Optical) may not provide an audio signal. • When tuned to a digital channel with • Press THEATER for that the Video/Component 1 Selection (page 35) is not output from a cold to a warm location or a sudden change the Alternate Audio language (see page 27). Blurry picture / Poor color • Transporting the TV from the TV's speakers regardless of the signal received, which...
Operating Instructions
Page 41
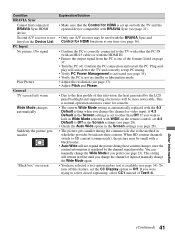
... find connected BRAVIA Sync HDMI device Second A/V receiver is not listed on the Device List PC Input No picture / No signal Poor Picture General TV screen feels warm Wide Mode changes automatically Suddenly the picture gets smaller "Black box" on screen Explanation/Solution • Make sure that the Control for HDMI is set up on both the TV and the optional device compatible with BRAVIA Sync (see page 21). • Only one A/V receiver may be used...
... find connected BRAVIA Sync HDMI device Second A/V receiver is not listed on the Device List PC Input No picture / No signal Poor Picture General TV screen feels warm Wide Mode changes automatically Suddenly the picture gets smaller "Black box" on screen Explanation/Solution • Make sure that the Control for HDMI is set up on both the TV and the optional device compatible with BRAVIA Sync (see page 21). • Only one A/V receiver may be used...
Operating Instructions
Page 44
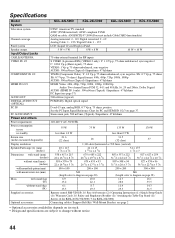
... the PC Input Signal Reference Chart for KDL-22L5000) Optional accessories Connecting cables / Support Belt Kit / Wall-Mount Bracket: see page 2 • Optional accessories availability depends on its stock. • Design and specifications are subject to change without stand (kg) 6.1 8.7 11.4 14.3 (lb.) 13.5 19.3 25.3 31.5 Supplied accessories Remote control RM-YD028 (1) / Size AA batteries (2) / Operating Instructions (1) / Quick Setup Guide (1) / Warranty Card (1) / Safety and Regulatory Booklet (1) / Attaching the Table-Top Stand (1) / Screws (4 for KDL-26/32...
... the PC Input Signal Reference Chart for KDL-22L5000) Optional accessories Connecting cables / Support Belt Kit / Wall-Mount Bracket: see page 2 • Optional accessories availability depends on its stock. • Design and specifications are subject to change without stand (kg) 6.1 8.7 11.4 14.3 (lb.) 13.5 19.3 25.3 31.5 Supplied accessories Remote control RM-YD028 (1) / Size AA batteries (2) / Operating Instructions (1) / Quick Setup Guide (1) / Warranty Card (1) / Safety and Regulatory Booklet (1) / Attaching the Table-Top Stand (1) / Screws (4 for KDL-26/32...

Operating Instructions
Page 45
... Picture 26 Picture Adjustments Lock 36 Picture Mode 26 PIP 22 Pitch 29 POWER button 19, 20 POWER LED 20 Product Support 36 R Rating 31 Reset 26, 27, 42 RETURN button 18 S SERVICE 7 Settings Channel 30 Parental Lock 31 Picture 26 Screen 28 Setup 34 Sound 27 Sharpness 26 Show/Hide Channels 30 Sleep Timer 35 Sound Mode 27 Speaker 27 STANDBY LED 20 Steady Sound 27 T TOOLS 19 Treble 27 Troubleshooting 39-42 TV Rating 32 (Continued) 45 Other Information Index 0-9 buttons 19 4:3 Default 28 A AC power cord 8 Add Digital Channels 30 Advanced Settings 26 Alternate Audio...
... Picture 26 Picture Adjustments Lock 36 Picture Mode 26 PIP 22 Pitch 29 POWER button 19, 20 POWER LED 20 Product Support 36 R Rating 31 Reset 26, 27, 42 RETURN button 18 S SERVICE 7 Settings Channel 30 Parental Lock 31 Picture 26 Screen 28 Setup 34 Sound 27 Sharpness 26 Show/Hide Channels 30 Sleep Timer 35 Sound Mode 27 Speaker 27 STANDBY LED 20 Steady Sound 27 T TOOLS 19 Treble 27 Troubleshooting 39-42 TV Rating 32 (Continued) 45 Other Information Index 0-9 buttons 19 4:3 Default 28 A AC power cord 8 Add Digital Channels 30 Advanced Settings 26 Alternate Audio...


