Operating Instructions
Page 1
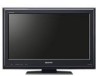
Operating Instructions LCD Digital Color TV KDL-37L5000 KDL-32L5000 KDL-26L5000 KDL-22L5000 © 2009 Sony Corporation Sony Customer Support U.S.A.: www.sony.com/tvsupport Canada: www.sony.ca/support United States 1.800.222.SONY Canada 1.877.899.SONY Please Do Not Return the Product to the Store
Operating Instructions LCD Digital Color TV KDL-37L5000 KDL-32L5000 KDL-26L5000 KDL-22L5000 © 2009 Sony Corporation Sony Customer Support U.S.A.: www.sony.com/tvsupport Canada: www.sony.ca/support United States 1.800.222.SONY Canada 1.877.899.SONY Please Do Not Return the Product to the Store
Operating Instructions
Page 2
... Sony Computer Entertainment Inc. Picture/Sound, Power Savings) can be fully inserted. ❑ Operate the TV only on the package. • Never use this TV. KDL-22L5000 KDL-26L5000 KDL-32L5000 KDL-37L5000 Sony Wall.... Refer to avoid any chance of electric shock. • Wipe the LCD screen gently with a soft cloth. • Stubborn stains may be removed...TV. Owner's Record The model and serial numbers are trademarks or registered marks of Sony Corporation. It meets strict energy efficiency guidelines set up, it is for the 22 class, 26, 32 class, and 37 inch BRAVIA KDL...
... Sony Computer Entertainment Inc. Picture/Sound, Power Savings) can be fully inserted. ❑ Operate the TV only on the package. • Never use this TV. KDL-22L5000 KDL-26L5000 KDL-32L5000 KDL-37L5000 Sony Wall.... Refer to avoid any chance of electric shock. • Wipe the LCD screen gently with a soft cloth. • Stubborn stains may be removed...TV. Owner's Record The model and serial numbers are trademarks or registered marks of Sony Corporation. It meets strict energy efficiency guidelines set up, it is for the 22 class, 26, 32 class, and 37 inch BRAVIA KDL...
Operating Instructions
Page 3
... Feature 22 Favorites 22 Wide Mode 23 Wide Mode with PC 23 Inputs 24 Using the Menus Navigating through TV Menus 25 Using the Picture Settings 26 Using the Sound Settings 27 Using the Screen Settings 28 Using the Channel Settings 30 Using the Parental Lock ...and HDMI IN 1/2/3 37 Preparing the TV for Wall-Mounting 38 Troubleshooting 39 Important Notices 43 Specifications 44 Index 45 Customer Support United States http://www.sony.com/tvsupport Canada http://www.sony.ca/support On-line Registration United States http://productregistration.sony.com Canada http://www.SonyStyle.ca/...
... Feature 22 Favorites 22 Wide Mode 23 Wide Mode with PC 23 Inputs 24 Using the Menus Navigating through TV Menus 25 Using the Picture Settings 26 Using the Sound Settings 27 Using the Screen Settings 28 Using the Channel Settings 30 Using the Parental Lock ...and HDMI IN 1/2/3 37 Preparing the TV for Wall-Mounting 38 Troubleshooting 39 Important Notices 43 Specifications 44 Index 45 Customer Support United States http://www.sony.com/tvsupport Canada http://www.sony.ca/support On-line Registration United States http://productregistration.sony.com Canada http://www.SonyStyle.ca/...

Operating Instructions
Page 4
Read this Sony BRAVIA® high-definition television. Quick Setup Guide Provides TV setup information with Your BRAVIA The quality of the image you see on upgrading to HD programming. 4 To experience the stunning detail of your TV. Your BRAVIA TV can receive and display HD ... the documentations listed below to get the most detailed information to operate your TV. Operating Instructions Provides the most out of your TV. Experiencing Stunning HD with sample connection diagrams and TV features. Introducing Your New BRAVIA® Welcome to the World of BRAVIA...
Read this Sony BRAVIA® high-definition television. Quick Setup Guide Provides TV setup information with Your BRAVIA The quality of the image you see on upgrading to HD programming. 4 To experience the stunning detail of your TV. Your BRAVIA TV can receive and display HD ... the documentations listed below to get the most detailed information to operate your TV. Operating Instructions Provides the most out of your TV. Experiencing Stunning HD with sample connection diagrams and TV features. Introducing Your New BRAVIA® Welcome to the World of BRAVIA...
Operating Instructions
Page 5
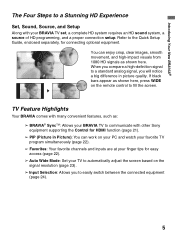
... Set, Sound, Source, and Setup Along with other Sony equipment supporting the Control for HDMI function (page 21). ➢ PIP (Picture in picture quality. If black bars appear as : ➢ BRAVIA® SyncTM: Allows your BRAVIA TV to automatically adjust the screen based on the signal resolution... here. Refer to the Quick Setup Guide, enclosed separately, for easy access (page 22). ➢ Auto Wide Mode: Set your TV to communicate with your finger tips for connecting optional equipment. You can work on the remote control to easily switch between the connected equipment...
... Set, Sound, Source, and Setup Along with other Sony equipment supporting the Control for HDMI function (page 21). ➢ PIP (Picture in picture quality. If black bars appear as : ➢ BRAVIA® SyncTM: Allows your BRAVIA TV to automatically adjust the screen based on the signal resolution... here. Refer to the Quick Setup Guide, enclosed separately, for easy access (page 22). ➢ Auto Wide Mode: Set your TV to communicate with your finger tips for connecting optional equipment. You can work on the remote control to easily switch between the connected equipment...
Operating Instructions
Page 6
..., allow moisture to evaporate completely before powering on page 2 of this manual. KDL-26L5000/KDL-32L5000/KDL-37L5000 KDL-22L5000 • Adequate ventilation is necessary (see page 14. 6 Sudden room temperature changes may cause the TV to show poor picture and/or poor color. If you are not mounting the... TV to a wall, you can mount the TV to a wall right away. Look for safety and to avoid damage. The designated Sony wall-mount bracket model is available on the TV. • For additional safety information, read the ...
..., allow moisture to evaporate completely before powering on page 2 of this manual. KDL-26L5000/KDL-32L5000/KDL-37L5000 KDL-22L5000 • Adequate ventilation is necessary (see page 14. 6 Sudden room temperature changes may cause the TV to show poor picture and/or poor color. If you are not mounting the... TV to a wall, you can mount the TV to a wall right away. Look for safety and to avoid damage. The designated Sony wall-mount bracket model is available on the TV. • For additional safety information, read the ...
Operating Instructions
Page 7
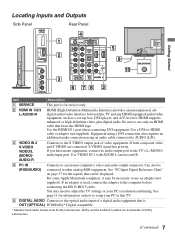
... RGB equipment. See "PC Input Signal Reference Chart" on how to the optical audio input of video equipment. You may be necessary to the TV's L (MONO) audio input port. See page 11 for information on page 37 for service only. 2 HDMI IN 1/2/3 L-AUDIO-R HDMI (High...-Definition Multimedia Interface) provides an uncompressed, alldigital audio/video interface between this TV. 5 DIGITAL AUDIO Connects to setup your PC's resolution and timing. HDMI supports enhanced, or high-definition video, plus digital audio. Use the HDMI...
... RGB equipment. See "PC Input Signal Reference Chart" on how to the optical audio input of video equipment. You may be necessary to the TV's L (MONO) audio input port. See page 11 for information on page 37 for service only. 2 HDMI IN 1/2/3 L-AUDIO-R HDMI (High...-Definition Multimedia Interface) provides an uncompressed, alldigital audio/video interface between this TV. 5 DIGITAL AUDIO Connects to setup your PC's resolution and timing. HDMI supports enhanced, or high-definition video, plus digital audio. Use the HDMI...
Operating Instructions
Page 8
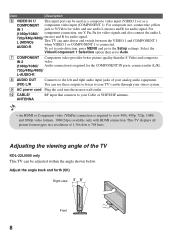
... all picture format types in a resolution of the TV KDL-22L5000 only This TV can auto detect and switch between the VIDEO 1 and COMPONENT 1 when ...formats. 1080/24p is connected. Adjusting the viewing angle of 1,366 dots × 768 lines. L (MONO)AUDIO-R This TV can be used as a composite video input (VIDEO 1) or as a COMPONENT component video input (COMPONENT 1). To set to... 2 video. (1080p/1080i/ Audio connection is required for video and use these outputs to listen to your TV's audio through your stereo system. 9 AC power cord Plug the cord into the nearest wall outlet. 0 CABLE...
... all picture format types in a resolution of the TV KDL-22L5000 only This TV can auto detect and switch between the VIDEO 1 and COMPONENT 1 when ...formats. 1080/24p is connected. Adjusting the viewing angle of 1,366 dots × 768 lines. L (MONO)AUDIO-R This TV can be used as a composite video input (VIDEO 1) or as a COMPONENT component video input (COMPONENT 1). To set to... 2 video. (1080p/1080i/ Audio connection is required for video and use these outputs to listen to your TV's audio through your stereo system. 9 AC power cord Plug the cord into the nearest wall outlet. 0 CABLE...
Operating Instructions
Page 9
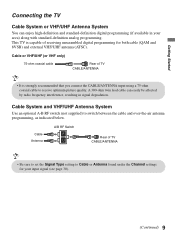
... A-B RF switch (not supplied) to switch between the cable and over-the-air antenna programming, as indicated below. Getting Started Connecting the TV Cable System or VHF/UHF Antenna System You can easily be affected by radio frequency interference, resulting in your input signal (see page 30).... (Continued) 9 This TV is strongly recommended that you connect the CABLE/ANTENNA input using a 75-ohm coaxial cable to Cable or Antenna found under the Channel settings...
... A-B RF switch (not supplied) to switch between the cable and over-the-air antenna programming, as indicated below. Getting Started Connecting the TV Cable System or VHF/UHF Antenna System You can easily be affected by radio frequency interference, resulting in your input signal (see page 30).... (Continued) 9 This TV is strongly recommended that you connect the CABLE/ANTENNA input using a 75-ohm coaxial cable to Cable or Antenna found under the Channel settings...

Operating Instructions
Page 10
... satellite box PR L (MONO) AUDIO R 1 2 COMPONENT IN (1080p/1080i/ 720p/480p/480i) 1 AUDIO OUT (FIX) L AUDIO R 3 IN HDMI cable Shown with DVI Connection Rear of TV VIDEO AUDIO PC IN VIDEO IN Y PB RGB DIGITAL AUDIO OUT (OPTICAL) PR L (MONO) AUDIO R 1 2 COMPONENT IN (1080p/1080i/ 720p/480p/480i) 1 AUDIO OUT (FIX... an HDMI output, connect the DVI output to the HDMI IN 1 (with DVI-to-HDMI cable or adapter) and connect the audio output to your TV via the HDMI or component video (with audio) input located on the back of HDMI IN 1. HD Cable Box/HD Satellite Box You can enjoy...
... satellite box PR L (MONO) AUDIO R 1 2 COMPONENT IN (1080p/1080i/ 720p/480p/480i) 1 AUDIO OUT (FIX) L AUDIO R 3 IN HDMI cable Shown with DVI Connection Rear of TV VIDEO AUDIO PC IN VIDEO IN Y PB RGB DIGITAL AUDIO OUT (OPTICAL) PR L (MONO) AUDIO R 1 2 COMPONENT IN (1080p/1080i/ 720p/480p/480i) 1 AUDIO OUT (FIX... an HDMI output, connect the DVI output to the HDMI IN 1 (with DVI-to-HDMI cable or adapter) and connect the audio output to your TV via the HDMI or component video (with audio) input located on the back of HDMI IN 1. HD Cable Box/HD Satellite Box You can enjoy...

Operating Instructions
Page 11
... a PC with a DVI or HDMI output. (Refer to the separate Quick Setup Guide.) HD15-HD15 cable (analog RGB) Audio cable (stereo mini plugs) Rear of TV VIDEO AUDIO PC IN VIDEO IN Y PB RGB DIGITAL AUDIO OUT (OPTICAL) PR L (MONO) AUDIO R 1 2 COMPONENT IN (1080p/1080i/ 720p/480p/480i) 1 AUDIO ...OUT (FIX) L AUDIO R 3 IN • Connect the PC IN jack to the TV and no signal has been output from the PC for your PC by connecting an HD15-HD15 cable connection as shown below. Getting Started Shown...
... a PC with a DVI or HDMI output. (Refer to the separate Quick Setup Guide.) HD15-HD15 cable (analog RGB) Audio cable (stereo mini plugs) Rear of TV VIDEO AUDIO PC IN VIDEO IN Y PB RGB DIGITAL AUDIO OUT (OPTICAL) PR L (MONO) AUDIO R 1 2 COMPONENT IN (1080p/1080i/ 720p/480p/480i) 1 AUDIO ...OUT (FIX) L AUDIO R 3 IN • Connect the PC IN jack to the TV and no signal has been output from the PC for your PC by connecting an HD15-HD15 cable connection as shown below. Getting Started Shown...

Operating Instructions
Page 12
... Analog audio Digital audio equipment system recorder equipment (A/V Receiver/ HomeTheater) Camcorder • Refer to the Quick Setup Guide (supplied) when connecting other equipment to your TV. 12
... Analog audio Digital audio equipment system recorder equipment (A/V Receiver/ HomeTheater) Camcorder • Refer to the Quick Setup Guide (supplied) when connecting other equipment to your TV. 12
Operating Instructions
Page 13
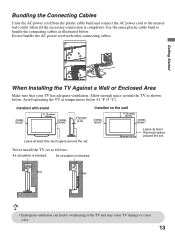
...cord to the nearest wall outlet when all the necessary connection is blocked. Getting Started When Installing the TV Against a Wall or Enclosed Area Make sure that your TV has adequate ventilation. Never install the TV set . Do not bundle the AC power cord with stand 4 inches (10 cm) 11 7/8 ... cm) 4 inches (10 cm) 4 inches (10 cm) Leave at temperatures below . Installed with other connecting cables. Air circulation is completed. Avoid operating the TV at least this much space around the TV as shown below. Use the same plastic cable band to overheating of the...
...cord to the nearest wall outlet when all the necessary connection is blocked. Getting Started When Installing the TV Against a Wall or Enclosed Area Make sure that your TV has adequate ventilation. Never install the TV set . Do not bundle the AC power cord with stand 4 inches (10 cm) 11 7/8 ... cm) 4 inches (10 cm) 4 inches (10 cm) Leave at temperatures below . Installed with other connecting cables. Air circulation is completed. Avoid operating the TV at least this much space around the TV as shown below. Use the same plastic cable band to overheating of the...
Operating Instructions
Page 14
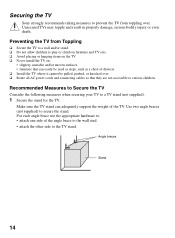
...accessible to a TV stand (not supplied). 1 Secure the stand for the TV. Make sure the TV stand can easily be used as steps, such as a chest of the angle brace to the wall stud. • attach the other side to the TV stand. Securing the TV Sony strongly recommends ...taking measures to secure the stand. Recommended Measures to Secure the TV Consider the following measures when securing your TV to curious children. Angle braces Stand 14 Unsecured TVs may topple and result in property damage,...
...accessible to a TV stand (not supplied). 1 Secure the stand for the TV. Make sure the TV stand can easily be used as steps, such as a chest of the angle brace to the wall stud. • attach the other side to the TV stand. Securing the TV Sony strongly recommends ...taking measures to secure the stand. Recommended Measures to Secure the TV Consider the following measures when securing your TV to curious children. Angle braces Stand 14 Unsecured TVs may topple and result in property damage,...
Operating Instructions
Page 15
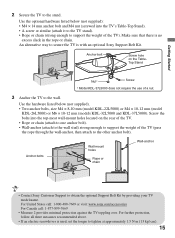
... is with an optional Sony Support Belt Kit. Use the optional hardware listed below (not supplied). • Two anchor bolts, size M4 × 8-10 mm (model KDL-22L5000) or M4 × 10-12 mm (model KDL-26L5000) or M6 × 10-12 mm (models KDL-32L5000 and KDL-37L5000). Use the hardware...into the top-most wall-mount holes located on the TableTop Stand Nut* Screw * Model KDL-37L5000 does not require the use of the TV). For United States call: 1-800-488-7669 or visit: www.sony.com/accessories For Canada call: 1-877-899-7669 • Measure 2 provides minimal protection against...
... is with an optional Sony Support Belt Kit. Use the optional hardware listed below (not supplied). • Two anchor bolts, size M4 × 8-10 mm (model KDL-22L5000) or M4 × 10-12 mm (model KDL-26L5000) or M6 × 10-12 mm (models KDL-32L5000 and KDL-37L5000). Use the hardware...into the top-most wall-mount holes located on the TableTop Stand Nut* Screw * Model KDL-37L5000 does not require the use of the TV). For United States call: 1-800-488-7669 or visit: www.sony.com/accessories For Canada call: 1-877-899-7669 • Measure 2 provides minimal protection against...

Operating Instructions
Page 16
...your cable connections before beginning the Initial Setup. Refer to navigate and highlight options where applicable. Follow the help text provided on the TV. for more details see page 23. 16 Select WIDE INPUT V/v/B/b buttons: Allow you to select the highlighted option and advance to... Initial Setup. "Home" optimizes the picture for ENERGY STAR compliant mode. Retail Home • Connect either your cable or antenna to the TV (you will appear. 2 Use the remote control buttons described below to the next screen. 3 Auto Program will scan for the screen display...
...your cable connections before beginning the Initial Setup. Refer to navigate and highlight options where applicable. Follow the help text provided on the TV. for more details see page 23. 16 Select WIDE INPUT V/v/B/b buttons: Allow you to select the highlighted option and advance to... Initial Setup. "Home" optimizes the picture for ENERGY STAR compliant mode. Retail Home • Connect either your cable or antenna to the TV (you will appear. 2 Use the remote control buttons described below to the next screen. 3 Auto Program will scan for the screen display...
Operating Instructions
Page 17
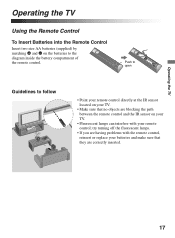
... they are correctly inserted. 17 try turning off the fluorescent lamps. • If you are having problems with your remote control; Operating the TV Operating the TV Using the Remote Control To Insert Batteries into the Remote Control Insert two size AA batteries (supplied) by matching e and E on your... TV. • Fluorescent lamps can interfere with the remote control, reinsert or replace your batteries and make sure that no objects are blocking the ...
... they are correctly inserted. 17 try turning off the fluorescent lamps. • If you are having problems with your remote control; Operating the TV Operating the TV Using the Remote Control To Insert Batteries into the Remote Control Insert two size AA batteries (supplied) by matching e and E on your... TV. • Fluorescent lamps can interfere with the remote control, reinsert or replace your batteries and make sure that no objects are blocking the ...
Operating Instructions
Page 18
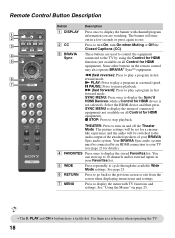
...Description 1 2 3 DISPLAY CC POWER 4 5 WIDE INPUT 6 7 TOOLS Button Description 1 DISPLAY 2 CC 3 BRAVIA Sync Press once to display the banner with TV functions and settings. X PAUSE: Press to stop playback. N PLAY: Press to play a program in your Favorites list. 5 WIDE Press repeatedly to cycle through...21 for details). 4 FAVORITES Press once to display the menu with channel/program information you are used to control the equipment connected to the TV by an HDMI connection to exit. Some other buttons on page 25. • The 5, PLAY and CH + buttons have a tactile ...
...Description 1 2 3 DISPLAY CC POWER 4 5 WIDE INPUT 6 7 TOOLS Button Description 1 DISPLAY 2 CC 3 BRAVIA Sync Press once to display the banner with TV functions and settings. X PAUSE: Press to stop playback. N PLAY: Press to play a program in your Favorites list. 5 WIDE Press repeatedly to cycle through...21 for details). 4 FAVORITES Press once to display the menu with channel/program information you are used to control the equipment connected to the TV by an HDMI connection to exit. Some other buttons on page 25. • The 5, PLAY and CH + buttons have a tactile ...
Operating Instructions
Page 19
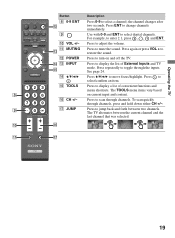
... POWER qf qd INPUT qg qf V/v/B/b qg TOOLS qh CH +/- qj JUMP qh Description Press 0-9 to display a list of External Inputs and TV mode. Press ENT to select digital channels. Use with 0-9 and ENT to change channels immediately. Press to turn on current input and content. ... repeatedly to mute the sound. Press to toggle through the inputs. For example, to scan through channels, press and hold down either CH +/-. Operating the TV DISPLAY CC POWER WIDE INPUT TOOLS 8 9 0 Button 8 0-9 ENT qs 9 0 VOL +/- JUMP JUMP qa qj 19 The TOOLS menu items vary based...
... POWER qf qd INPUT qg qf V/v/B/b qg TOOLS qh CH +/- qj JUMP qh Description Press 0-9 to display a list of External Inputs and TV mode. Press ENT to select digital channels. Use with 0-9 and ENT to change channels immediately. Press to turn on current input and content. ... repeatedly to mute the sound. Press to toggle through the inputs. For example, to scan through channels, press and hold down either CH +/-. Operating the TV DISPLAY CC POWER WIDE INPUT TOOLS 8 9 0 Button 8 0-9 ENT qs 9 0 VOL +/- JUMP JUMP qa qj 19 The TOOLS menu items vary based...
Operating Instructions
Page 20
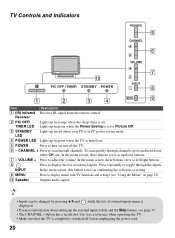
...up /down either CH -/+. In the menu screen, these buttons serve as a reference when operating the TV. • Make sure that the TV is set . TIMER LED Lights up in green when the TV is displayed. • For more information about setting up in green when the Power Saving is completely ...switched off the TV. 6 - Press repeatedly to adjust the volume. CHANNEL + Press to Picture Off. 3 STANDBY LED Lights up in red when your TV is in PC power saving mode. 4 POWER LED Lights up the external inputs ...
...up /down either CH -/+. In the menu screen, these buttons serve as a reference when operating the TV. • Make sure that the TV is set . TIMER LED Lights up in green when the TV is displayed. • For more information about setting up in green when the Power Saving is completely ...switched off the TV. 6 - Press repeatedly to adjust the volume. CHANNEL + Press to Picture Off. 3 STANDBY LED Lights up in red when your TV is in PC power saving mode. 4 POWER LED Lights up the external inputs ...


