Operating Guide
Page 8
... in the EMC regulation for using connection cables shorter than 0.0005% mercury or 0.004% lead. Attention The electromagnetic fields at the specific frequencies may influence the picture and sound of this product. For more than 3 meters (9.8 feet). Disposal of waste batteries (applicable in combination with the limits for a digital device pursuant to Subpart B of Part 15 of FCC Rules. By...
... in the EMC regulation for using connection cables shorter than 0.0005% mercury or 0.004% lead. Attention The electromagnetic fields at the specific frequencies may influence the picture and sound of this product. For more than 3 meters (9.8 feet). Disposal of waste batteries (applicable in combination with the limits for a digital device pursuant to Subpart B of Part 15 of FCC Rules. By...
Operating Guide
Page 10
... could occur. ejecting the memory card when the access lamp (p. 21) is lit or flashing GB 10 removing the battery pack or AC Adaptor from images and screen indicators that supports the signal format for your camcorder. If any way. LCD Panel The LCD screen is turned on, do not affect the recording in this manual, illustrations and on-screen displays The example images used for understandability. And...
... could occur. ejecting the memory card when the access lamp (p. 21) is lit or flashing GB 10 removing the battery pack or AC Adaptor from images and screen indicators that supports the signal format for your camcorder. If any way. LCD Panel The LCD screen is turned on, do not affect the recording in this manual, illustrations and on-screen displays The example images used for understandability. And...
Operating Guide
Page 11
...; Power cord (Mains lead) (1) HDMI cable (1) USB connection support cable (1) The USB connection support cable is too short for connection. "Operating Guide" (This manual) (1) Only for HDR-CX320/CX320E/CX380/ CX380E/CX390E Rechargeable battery pack NP-FV30 (1) Only for use with high definition image quality (HD) is called "recording media." In this manual, the DVD disc recorded with this manual are based on the many functions of your camcorder within the support page. Check...
...; Power cord (Mains lead) (1) HDMI cable (1) USB connection support cable (1) The USB connection support cable is too short for connection. "Operating Guide" (This manual) (1) Only for HDR-CX320/CX320E/CX380/ CX380E/CX390E Rechargeable battery pack NP-FV30 (1) Only for use with high definition image quality (HD) is called "recording media." In this manual, the DVD disc recorded with this manual are based on the many functions of your camcorder within the support page. Check...
Operating Guide
Page 14
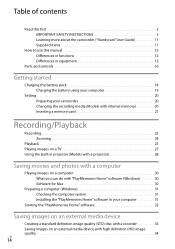
... 12 Parts and controls 16 Getting started Charging the battery pack 18 Charging the battery using your computer 19 Setting 20 Preparing your camcorder 20 Changing the recording media (Models with internal memory 20 Inserting a memory card 21 Recording/Playback Recording 23 Zooming 24 Playback 25 Playing images on a TV 27 Using the built-in projector (Models with a projector 28 Saving movies and photos with a computer Playing images on a computer 30 What you can do with "PlayMemories Home" software (Windows 30 Software for Mac 30...
... 12 Parts and controls 16 Getting started Charging the battery pack 18 Charging the battery using your computer 19 Setting 20 Preparing your camcorder 20 Changing the recording media (Models with internal memory 20 Inserting a memory card 21 Recording/Playback Recording 23 Zooming 24 Playback 25 Playing images on a TV 27 Using the built-in projector (Models with a projector 28 Saving movies and photos with a computer Playing images on a computer 30 What you can do with "PlayMemories Home" software (Windows 30 Software for Mac 30...
Operating Guide
Page 19
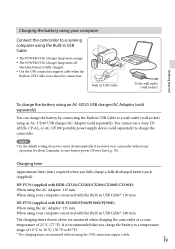
... with HDR-CX320/CX320E/CX380/CX380E/CX390E): When using the AC Adaptor: 115 min. You cannot use a Sony CPAH2R, CP-AL, or AC-UP100 portable power supply device (sold separately) to a wall outlet (wall socket) using an AC-UD10 USB charger/AC Adaptor (sold separately) You can charge the battery by connecting the Built-in USB Cable to charge the camcorder. Notes In the default setting, the power turns...
... with HDR-CX320/CX320E/CX380/CX380E/CX390E): When using the AC Adaptor: 115 min. You cannot use a Sony CPAH2R, CP-AL, or AC-UP100 portable power supply device (sold separately) to a wall outlet (wall socket) using an AC-UD10 USB charger/AC Adaptor (sold separately) You can charge the battery by connecting the Built-in USB Cable to charge the camcorder. Notes In the default setting, the power turns...
Operating Guide
Page 21
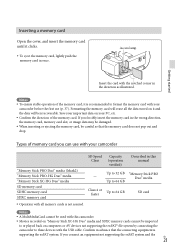
...). Save your important data on your camcorder "Memory Stick PRO Duo" media (Mark2) "Memory Stick PRO-HG Duo" media "Memory Stick XC-HG Duo" media SD memory card SDHC memory card SDXC memory card SD Speed Class Capacity (operation verified) Described in once. Types of memory card you connect an equipment not supporting the exFAT system and the GB 21 Inserting a memory card Open the cover, and insert the memory card until it clicks. To eject the memory card, lightly push the memory card in this camcorder. Movies recorded on "Memory Stick...
...). Save your important data on your camcorder "Memory Stick PRO Duo" media (Mark2) "Memory Stick PRO-HG Duo" media "Memory Stick XC-HG Duo" media SD memory card SDHC memory card SDXC memory card SD Speed Class Capacity (operation verified) Described in once. Types of memory card you connect an equipment not supporting the exFAT system and the GB 21 Inserting a memory card Open the cover, and insert the memory card until it clicks. To eject the memory card, lightly push the memory card in this camcorder. Movies recorded on "Memory Stick...
Operating Guide
Page 23
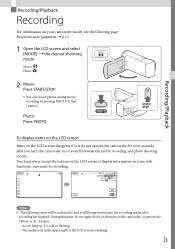
... turn the camcorder on or switch between the movie recording and photo shooting modes. STBY W STBY 2h 25m 00:00:00 14h 48m 60i >9999 16:9 L 8.9M T MODE AUTO Notes The following page: Functions and equipment p.12 1 Open the LCD screen and select [MODE] the desired shooting mode. During this time, do not operate the camcorder for recording. Movie: Photo: 2 Movie: Press START/STOP. You can record photos during movie recording by pressing PHOTO (Dual Capture). Photo: Press PHOTO. Recording/Playback Recording...
... turn the camcorder on or switch between the movie recording and photo shooting modes. STBY W STBY 2h 25m 00:00:00 14h 48m 60i >9999 16:9 L 8.9M T MODE AUTO Notes The following page: Functions and equipment p.12 1 Open the LCD screen and select [MODE] the desired shooting mode. During this time, do not operate the camcorder for recording. Movie: Photo: 2 Movie: Press START/STOP. You can record photos during movie recording by pressing PHOTO (Dual Capture). Photo: Press PHOTO. Recording/Playback Recording...

Operating Guide
Page 27
... will automatically switch to output images, HDMI output takes priority. High definition Standard definition Yellow White HDMI Cable (supplied) Red AV Cable (sold separately) for highly-detailed, photo-like depiction of subtle textures and colors. On "Photo TV HD" This camcorder is connected, and the connectors used. Notes Refer to a TV. 3 Play a movie or a photo on the TV to the connected jack. 2 Connect the camcorder to the instruction manuals of the...
... will automatically switch to output images, HDMI output takes priority. High definition Standard definition Yellow White HDMI Cable (supplied) Red AV Cable (sold separately) for highly-detailed, photo-like depiction of subtle textures and colors. On "Photo TV HD" This camcorder is connected, and the connectors used. Notes Refer to a TV. 3 Play a movie or a photo on the TV to the connected jack. 2 Connect the camcorder to the instruction manuals of the...
Operating Guide
Page 28
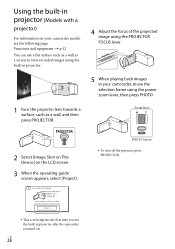
.... GB 28 PHOTO button To turn off the projector, press PROJECTOR. This screen appears the first time you use the built-in projector after the camcorder is turned on your camcorder, move the selection frame using the PROJECTOR FOCUS lever. 5 When playing back images in projector (Models with a projector) For information on . Zoom lever 2 Select [Image Shot on This Device] on the LCD screen. 3 When the operating guide screen appears...
.... GB 28 PHOTO button To turn off the projector, press PROJECTOR. This screen appears the first time you use the built-in projector after the camcorder is turned on your camcorder, move the selection frame using the PROJECTOR FOCUS lever. 5 When playing back images in projector (Models with a projector) For information on . Zoom lever 2 Select [Image Shot on This Device] on the LCD screen. 3 When the operating guide screen appears...
Operating Guide
Page 30
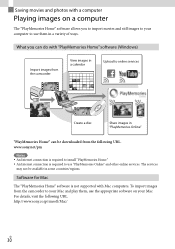
....sony.net/pm Notes An Internet connection is required to install "PlayMemories Home." An Internet connection is not supported with "PlayMemories Home" software (Windows) Import images from the camcorder View images in a calendar Upload to online services Create a disc Share images in "PlayMemories Online" "PlayMemories Home" can do with Mac computers. To import images from the following URL. Saving movies and photos with a computer Playing images on your computer to use them , use "PlayMemories Online" and other online services...
....sony.net/pm Notes An Internet connection is required to install "PlayMemories Home." An Internet connection is not supported with "PlayMemories Home" software (Windows) Import images from the camcorder View images in a calendar Upload to online services Create a disc Share images in "PlayMemories Online" "PlayMemories Home" can do with Mac computers. To import images from the following URL. Saving movies and photos with a computer Playing images on your computer to use them , use "PlayMemories Online" and other online services...
Operating Guide
Page 32
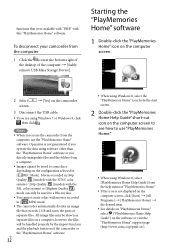
... the computer screen. 2 Select screen. [Yes] on the camcorder 3 Disconnect the USB cable. If you operate the data using Windows 8, select [PlayMemories Home Help Guide] from a computer. Images cannot be saved to use the "PlayMemories Home" software. To disconnect your camcorder from the computer, use "PlayMemories Home." When using software other than the "PlayMemories Home" software or you directly manipulate files and the folders from the help menu of "PlayMemories...
... the computer screen. 2 Select screen. [Yes] on the camcorder 3 Disconnect the USB cable. If you operate the data using Windows 8, select [PlayMemories Home Help Guide] from a computer. Images cannot be saved to use the "PlayMemories Home" software. To disconnect your camcorder from the computer, use "PlayMemories Home." When using software other than the "PlayMemories Home" software or you directly manipulate files and the folders from the help menu of "PlayMemories...
Operating Guide
Page 33
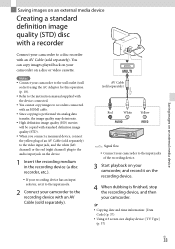
... the recording device. 3 Start playback on your camcorder, and record it to the input mode. 2 Connect your camcorder to the recording device with an AV Cable (sold separately). Saving images on an external media device Saving images on an external media device Creating a standard definition image quality (STD) disc with a recorder Connect your camcorder to a disc recorder with an AV Cable (sold separately). You can copy images played back on your camcorder. Copying date and time information: [Data Code] (p. 37) Using 4:3 screen size display device: [TV Type...
... the recording device. 3 Start playback on your camcorder, and record it to the input mode. 2 Connect your camcorder to the recording device with an AV Cable (sold separately). Saving images on an external media device Saving images on an external media device Creating a standard definition image quality (STD) disc with a recorder Connect your camcorder to a disc recorder with an AV Cable (sold separately). You can copy images played back on your camcorder. Copying date and time information: [Data Code] (p. 37) Using 4:3 screen size display device: [TV Type...
Operating Guide
Page 36
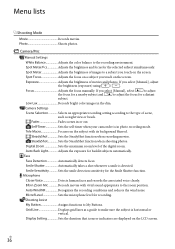
... displayed on the screen. Fader Fades scenes in the dim. SteadyShot Sets the SteadyShot function when shooting photos. Smile Shutter Automatically takes a shot whenever a smile is detected. GB 36 Camera/Mic Manual Settings White Balance Adjusts the color balance to the zoom position. SteadyShot Sets the SteadyShot function when recording movies. Exposure Adjusts the brightness of the digital zoom. Auto Wind NR Recognizes the recording conditions and reduces the wind noise. Focus Adjusts the focus manually. Blt-in photo recording mode. Menu lists Shooting Mode Movie...
... displayed on the screen. Fader Fades scenes in the dim. SteadyShot Sets the SteadyShot function when shooting photos. Smile Shutter Automatically takes a shot whenever a smile is detected. GB 36 Camera/Mic Manual Settings White Balance Adjusts the color balance to the zoom position. SteadyShot Sets the SteadyShot function when recording movies. Exposure Adjusts the brightness of the digital zoom. Auto Wind NR Recognizes the recording conditions and reduces the wind noise. Focus Adjusts the focus manually. Blt-in photo recording mode. Menu lists Shooting Mode Movie...
Operating Guide
Page 37
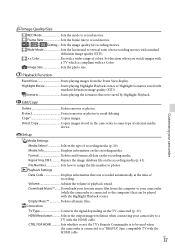
... was recorded automatically at the time of recording media (p. 20). File Number Sets how to assign the file number to a TV with the HDMI cable. Set this item when you watch images with standard definition image quality (STD). Highlight Movie Starts playing Highlight Playback scenes or Highlight Scenarios saved with a TV which is connected to avoid deleting. Customizing your camcorder to photos. Playback Settings Data Code Displays information that were saved by Highlight Playback. Setup Media Settings Media Select Selects the type of recording.
... was recorded automatically at the time of recording media (p. 20). File Number Sets how to assign the file number to a TV with the HDMI cable. Set this item when you watch images with standard definition image quality (STD). Highlight Movie Starts playing Highlight Playback scenes or Highlight Scenarios saved with a TV which is connected to avoid deleting. Customizing your camcorder to photos. Playback Settings Data Code Displays information that were saved by Highlight Playback. Setup Media Settings Media Select Selects the type of recording.
Operating Guide
Page 38
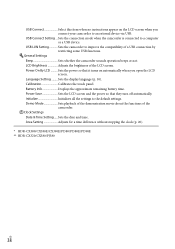
... Settings Beep Sets whether the camcorder sounds operation beeps or not. LCD Brightness Adjusts the brightness of the camcorder. Power On By LCD........... Demo Mode Sets playback of the demonstration movie about the functions of the LCD screen. Initialize Initializes all the settings to a computer or a USB device. Sets the date and time. Sets the connection mode when the camcorder is connected to the default settings. Sets the power so that they turn off automatically. Battery Info Displays the approximate remaining battery time. Power Save Sets the LCD screen...
... Settings Beep Sets whether the camcorder sounds operation beeps or not. LCD Brightness Adjusts the brightness of the camcorder. Power On By LCD........... Demo Mode Sets playback of the demonstration movie about the functions of the LCD screen. Initialize Initializes all the settings to a computer or a USB device. Sets the date and time. Sets the connection mode when the camcorder is connected to the default settings. Sets the power so that they turn off automatically. Battery Info Displays the approximate remaining battery time. Power Save Sets the LCD screen...
Operating Guide
Page 39
... socket) or remove the battery pack, then reconnect it to save the data on the internal memory on other media (backup) before sending your camcorder for details on the problem. Stop the playback, and select [Shooting Mode] [ Movie] or [ Photo]. Your camcorder is recording the image you do so, the data stored on the internal memory will neither copy nor retain your data. See the "Handycam" User Guide (p. 11) for repair. Delete unnecessary images (p. 26...
... socket) or remove the battery pack, then reconnect it to save the data on the internal memory on other media (backup) before sending your camcorder for details on the problem. Stop the playback, and select [Shooting Mode] [ Movie] or [ Photo]. Your camcorder is recording the image you do so, the data stored on the internal memory will neither copy nor retain your data. See the "Handycam" User Guide (p. 11) for repair. Delete unnecessary images (p. 26...
Operating Guide
Page 44
... camcorder (Models with the LCD screen closed . It is not charged, the camcorder operation other settings even when the LCD screen is attached. GB 44 However, even if the pre-installed rechargeable battery is recommended that you start using the supplied AC Adaptor or attach the fully charged battery pack, and leave it with internal memory) Even if you delete all movies and still images, or perform [Format] (p. 37), data on the internal memory...
... camcorder (Models with the LCD screen closed . It is not charged, the camcorder operation other settings even when the LCD screen is attached. GB 44 However, even if the pre-installed rechargeable battery is recommended that you start using the supplied AC Adaptor or attach the fully charged battery pack, and leave it with internal memory) Even if you delete all movies and still images, or perform [Format] (p. 37), data on the internal memory...

Operating Guide
Page 45
Only preinstalled demonstration movie may be deleted. Photo file format: DCF Ver.2.0 Compatible Exif Ver.2.3 Compatible MPF Baseline Compatible Recording media (Movie/Photo): Internal memory HDR-CX380/CX380E/PJ380/PJ380E: 16GB HDR-CX390E/PJ390E: 32GB "Memory Stick PRO Duo" media SD card (Class 4 or faster) The capacity that a user can use HDR-CX380/CX380E: Approx. 15.5 GB*6 HDR-PJ380/PJ380E: Approx. 15.5 GB*2 HDR-CX390E: Approx. 31.1 GB*6 HDR-PJ390E: Approx. 31.1 GB*2 *6 1 GB equals 1 billion bytes, a portion of which...
Only preinstalled demonstration movie may be deleted. Photo file format: DCF Ver.2.0 Compatible Exif Ver.2.3 Compatible MPF Baseline Compatible Recording media (Movie/Photo): Internal memory HDR-CX380/CX380E/PJ380/PJ380E: 16GB HDR-CX390E/PJ390E: 32GB "Memory Stick PRO Duo" media SD card (Class 4 or faster) The capacity that a user can use HDR-CX380/CX380E: Approx. 15.5 GB*6 HDR-PJ380/PJ380E: Approx. 15.5 GB*2 HDR-CX390E: Approx. 31.1 GB*6 HDR-PJ390E: Approx. 31.1 GB*2 *6 1 GB equals 1 billion bytes, a portion of which...
Operating Guide
Page 47
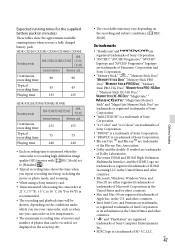
...time 90 90 Typical recording time 45 45 Playing time 135 135 HDR-PJ320E/PJ380/PJ380E/PJ390E Recording media HDR-PJ380/PJ380E/PJ390E HDRPJ320E Internal memory Memory card Continuous recording time 155 155 Typical recording time 75 75 Playing time 240 240 Each recording time is measured when the camcorder is recording high definition image quality (HD) movies with [ REC Mode] set to [Standard ]. Typical recording time shows the time when you repeat recording start/stop, switching the movie or photo mode, and zooming. When using a Sony memory card...
...time 90 90 Typical recording time 45 45 Playing time 135 135 HDR-PJ320E/PJ380/PJ380E/PJ390E Recording media HDR-PJ380/PJ380E/PJ390E HDRPJ320E Internal memory Memory card Continuous recording time 155 155 Typical recording time 75 75 Playing time 240 240 Each recording time is measured when the camcorder is recording high definition image quality (HD) movies with [ REC Mode] set to [Standard ]. Typical recording time shows the time when you repeat recording start/stop, switching the movie or photo mode, and zooming. When using a Sony memory card...

Operating Guide
Page 50
... Charging the battery pack using your computer 19 Computer 31 Creating discs 33 D Data Code 20 Date/Time 20 Display items on the LCD screen 23 Dual Capture 23 E Event View 25 Extended Zoom 24 External media device 34 F Face Priority 24 Full charge 19 G Grip belt 17 H "Handycam" User Guide............11 HDMI Cable 27 How to use this manual 12 I Initialize 39 Initial setup 20 Install 31 Intelligent Auto 24 L Language 10 LCD screen 23 M Mac 30 Media select 20 Memory card 21 "Memory Stick PRO...
... Charging the battery pack using your computer 19 Computer 31 Creating discs 33 D Data Code 20 Date/Time 20 Display items on the LCD screen 23 Dual Capture 23 E Event View 25 Extended Zoom 24 External media device 34 F Face Priority 24 Full charge 19 G Grip belt 17 H "Handycam" User Guide............11 HDMI Cable 27 How to use this manual 12 I Initialize 39 Initial setup 20 Install 31 Intelligent Auto 24 L Language 10 LCD screen 23 M Mac 30 Media select 20 Memory card 21 "Memory Stick PRO...


