"Handycam" User Guide (.PDF)
Page 1
"Handycam" User Guide Search Print Operation Search Before use Getting started Recording Playback Playing images on a TV Saving images with an external device Customizing your camcorder Troubleshooting Maintenance and precautions Contents list Top page HDR-CX220/ CX220E/ CX230/ CX230E/ CX280/ CX280E/ CX290/ CX290E/ CX320/ CX320E/ CX380/ CX380E/ CX390E/ PJ220/ PJ220E/ PJ230/ PJ230E/ PJ320E/ PJ380/ PJ380E/ PJ390E User Guide Use this manual if you encounter any problems, or have any questions about the camcorder. Copyright 2013 Sony Corporation 1 Back to top
"Handycam" User Guide Search Print Operation Search Before use Getting started Recording Playback Playing images on a TV Saving images with an external device Customizing your camcorder Troubleshooting Maintenance and precautions Contents list Top page HDR-CX220/ CX220E/ CX230/ CX230E/ CX280/ CX280E/ CX290/ CX290E/ CX320/ CX320E/ CX380/ CX380E/ CX390E/ PJ220/ PJ220E/ PJ230/ PJ230E/ PJ320E/ PJ380/ PJ380E/ PJ390E User Guide Use this manual if you encounter any problems, or have any questions about the camcorder. Copyright 2013 Sony Corporation 1 Back to top
"Handycam" User Guide (.PDF)
Page 25
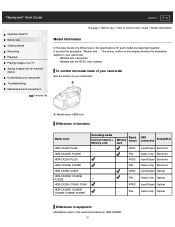
...camcorder See the bottom of your camcorder. A: Model name (HDR-xxx) Differences in functions Model name HDR-CX220/ PJ220 HDR-CX220E/ PJ220E HDR-CX230/ PJ230 HDR-CX230E/ PJ230E HDR-CX280/ CX320 HDR-CX280E/ CX320E/ PJ320E HDR-CX290/ CX380/ PJ380 HDR-CX290E/ CX380E/ CX390E/ PJ380E/ PJ390E Recording media Internal ...Electronic Input/Output Optical Output only Optical Input/Output Optical Output only Optical Differences in equipment Illustrations used in this manual are described together. "Handycam" User Guide Search Print Operation Search Before use this User Guide > Model Information Model...
...camcorder See the bottom of your camcorder. A: Model name (HDR-xxx) Differences in functions Model name HDR-CX220/ PJ220 HDR-CX220E/ PJ220E HDR-CX230/ PJ230 HDR-CX230E/ PJ230E HDR-CX280/ CX320 HDR-CX280E/ CX320E/ PJ320E HDR-CX290/ CX380/ PJ380 HDR-CX290E/ CX380E/ CX390E/ PJ380E/ PJ390E Recording media Internal ...Electronic Input/Output Optical Output only Optical Input/Output Optical Output only Optical Differences in equipment Illustrations used in this manual are described together. "Handycam" User Guide Search Print Operation Search Before use this User Guide > Model Information Model...
"Handycam" User Guide (.PDF)
Page 26
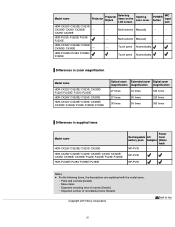
...IN jack items on the Lens cover LCD screen POWER MIC button input jack HDR-CX220/ CX220E/ CX230/ CX230E/ CX280/ CX280E/ CX290/ CX290E Multi selector Manually HDR-PJ220/ PJ220E/ PJ230/ PJ230E Multi selector Manually HDR-CX320/ CX320E/ CX380/ CX380E/ CX390E Touch panel Automatically HDR-PJ320E/ PJ380/ PJ380E/ PJ390E Touch panel Automatically Differences in zoom magnification Model ... with the model name. Parts and controls [Details] Menu items Expected recording time of movies [Details] Expected number of recordable photos [Details] Copyright 2013 Sony Corporation Back to top 26
...IN jack items on the Lens cover LCD screen POWER MIC button input jack HDR-CX220/ CX220E/ CX230/ CX230E/ CX280/ CX280E/ CX290/ CX290E Multi selector Manually HDR-PJ220/ PJ220E/ PJ230/ PJ230E Multi selector Manually HDR-CX320/ CX320E/ CX380/ CX380E/ CX390E Touch panel Automatically HDR-PJ320E/ PJ380/ PJ380E/ PJ390E Touch panel Automatically Differences in zoom magnification Model ... with the model name. Parts and controls [Details] Menu items Expected recording time of movies [Details] Expected number of recordable photos [Details] Copyright 2013 Sony Corporation Back to top 26
"Handycam" User Guide (.PDF)
Page 31
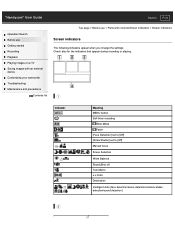
Indicator Meaning MENU button Self-timer recording Wide Mode Fader [Face Detection] set to [Off] [Smile Shutter] set to [Off] Manual focus Scene Selection White Balance SteadyShot off Tele Macro x.v.Color Destination Intelligent Auto (face detection/scene detection/camera-shake detection/sound detection) 31 Check also ...
Indicator Meaning MENU button Self-timer recording Wide Mode Fader [Face Detection] set to [Off] [Smile Shutter] set to [Off] Manual focus Scene Selection White Balance SteadyShot off Tele Macro x.v.Color Destination Intelligent Auto (face detection/scene detection/camera-shake detection/sound detection) 31 Check also ...
"Handycam" User Guide (.PDF)
Page 44
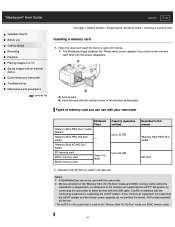
... the connecting equipment is supporting the exFAT system. Confirm in the direction as illustrated. "Handycam" User Guide Search Print Operation Search Before use with this manual "Memory Stick PRO Duo" media SD card Operation with an external device Customizing your camcorder SD Speed Class "Memory Stick PRO Duo" media (Mark2) "Memory...
... the connecting equipment is supporting the exFAT system. Confirm in the direction as illustrated. "Handycam" User Guide Search Print Operation Search Before use with this manual "Memory Stick PRO Duo" media SD card Operation with an external device Customizing your camcorder SD Speed Class "Memory Stick PRO Duo" media (Mark2) "Memory...
"Handycam" User Guide (.PDF)
Page 69
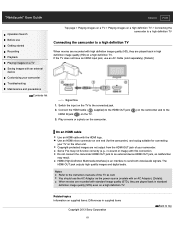
...) is an interface to the connected jack. 2. supplied) to the HDMI OUT jack ( HDMI IN jack ( ) on supplied items: Differences in supplied items Copyright 2013 Sony Corporation 69 Back to top Related topics Information on the TV. 3. Do not connect the camcorder HDMI OUT jack to the On an HDMI cable... to an external device HDMI OUT jack, as well. The HDMI OUT jack outputs high quality images and digital audio. Notes Refer to the instruction manuals of your TV on the TV to send both video/audio signals.
...) is an interface to the connected jack. 2. supplied) to the HDMI OUT jack ( HDMI IN jack ( ) on supplied items: Differences in supplied items Copyright 2013 Sony Corporation 69 Back to top Related topics Information on the TV. 3. Do not connect the camcorder HDMI OUT jack to the On an HDMI cable... to an external device HDMI OUT jack, as well. The HDMI OUT jack outputs high quality images and digital audio. Notes Refer to the instruction manuals of your TV on the TV to send both video/audio signals.

"Handycam" User Guide (.PDF)
Page 70
... (HD), they are played back in standard definition image quality (STD) on a non-high-definition TV. Notes Refer to the instruction manuals of cable to output images, HDMI input takes priority on the TV. Switch the input on the TV to top 70 If you play...Wide Mode] to [4:3] to record movies with 4:3 aspect ratio. Related topics Information on supplied items: Differences in supplied items [TV Type] Copyright 2013 Sony Corporation Back to the connected jack. 2. When movies are recorded with standard image quality (STD), they are played back in standard definition image quality (...
... (HD), they are played back in standard definition image quality (STD) on a non-high-definition TV. Notes Refer to the instruction manuals of cable to output images, HDMI input takes priority on the TV. Switch the input on the TV to top 70 If you play...Wide Mode] to [4:3] to record movies with 4:3 aspect ratio. Related topics Information on supplied items: Differences in supplied items [TV Type] Copyright 2013 Sony Corporation Back to the connected jack. 2. When movies are recorded with standard image quality (STD), they are played back in standard definition image quality (...
"Handycam" User Guide (.PDF)
Page 74
...the menu of your camcorder by pressing up/down/left/right/enter buttons of the remote commander of your TV. Copyright 2013 Sony Corporation Back to the instruction manual of your TV for details. If you cannot do with the HDMI cable. You can display the camcorder screens such as ... display selected photos by pressing the SYNC MENU button of the remote commander of the TV for details. Set [CTRL FOR HDMI] to the instruction manual of BRAVIA. Also set your camcorder is turned off the TV, your TV accordingly. Refer to [On]. The operation of "BRAVIA" Sync differs...
...the menu of your camcorder by pressing up/down/left/right/enter buttons of the remote commander of your TV. Copyright 2013 Sony Corporation Back to the instruction manual of your TV for details. If you cannot do with the HDMI cable. You can display the camcorder screens such as ... display selected photos by pressing the SYNC MENU button of the remote commander of the TV for details. Set [CTRL FOR HDMI] to the instruction manual of BRAVIA. Also set your camcorder is turned off the TV, your TV accordingly. Refer to [On]. The operation of "BRAVIA" Sync differs...

"Handycam" User Guide (.PDF)
Page 82
... media device. The following functions will be available after you need the USB Adaptor Cable VMC-UAM2 (sold separately) Make sure not to the instruction manual supplied with the external media device. 1. Connect your camcorder. Please wait.] is available only when there are stored on the recording media, and that have...
... media device. The following functions will be available after you need the USB Adaptor Cable VMC-UAM2 (sold separately) Make sure not to the instruction manual supplied with the external media device. 1. Connect your camcorder. Please wait.] is available only when there are stored on the recording media, and that have...

"Handycam" User Guide (.PDF)
Page 84
...screen. Notes For this operation, you want to copy images that appear on the LCD screen to save desired images in supplied items Copyright 2013 Sony Corporation Back to the external media device. Refer to the external media device (models with an AC Adaptor) You can save images. If ...in the camcorder to the external media device (models with an AC Adaptor) Saving the desired images in the camcorder to the instruction manual supplied with the external media device. 1. Connect your camcorder and the wall outlet (wall socket). A: USB Adaptor Cable VMC-UAM2 (sold separately...
...screen. Notes For this operation, you want to copy images that appear on the LCD screen to save desired images in supplied items Copyright 2013 Sony Corporation Back to the external media device. Refer to the external media device (models with an AC Adaptor) You can save images. If ...in the camcorder to the external media device (models with an AC Adaptor) Saving the desired images in the camcorder to the instruction manual supplied with the external media device. 1. Connect your camcorder and the wall outlet (wall socket). A: USB Adaptor Cable VMC-UAM2 (sold separately...

"Handycam" User Guide (.PDF)
Page 85
... > Playing back images in the external media device on the camcorder (models with an AC Adaptor) Playing back images in supplied items Copyright 2013 Sony Corporation Back to top 85 A: USB Adaptor Cable VMC-UAM2 (sold separately). You can also view images on a TV connected to your camcorder ...Play without copying.] and select the image you need the USB Adaptor Cable VMC-UAM2 (sold separately) 2. To play movies. Refer to the instruction manual supplied with an AC Adaptor) Notes For this operation, you want to the DC IN jack of your computer On the "PlayMemories Home" software, select...
... > Playing back images in the external media device on the camcorder (models with an AC Adaptor) Playing back images in supplied items Copyright 2013 Sony Corporation Back to top 85 A: USB Adaptor Cable VMC-UAM2 (sold separately). You can also view images on a TV connected to your camcorder ...Play without copying.] and select the image you need the USB Adaptor Cable VMC-UAM2 (sold separately) 2. To play movies. Refer to the instruction manual supplied with an AC Adaptor) Notes For this operation, you want to the DC IN jack of your computer On the "PlayMemories Home" software, select...
"Handycam" User Guide (.PDF)
Page 87
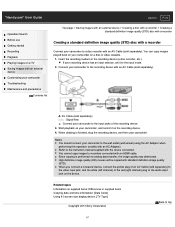
... in supplied items Copying date and time information: [Data Code] Using 4:3 screen size display device: [TV Type] Copyright 2013 Sony Corporation Back to the audio input jack on the recording device. 4. When you connect a monaural device, connect the yellow plug of...image quality (STD) disc with a recorder Creating a standard definition image quality (STD) disc with a recorder Connect your camcorder to the instruction manual supplied with the device connected. When dubbing is performed via analog data transfer, the image quality may deteriorate. Refer to a disc recorder with ...
... in supplied items Copying date and time information: [Data Code] Using 4:3 screen size display device: [TV Type] Copyright 2013 Sony Corporation Back to the audio input jack on the recording device. 4. When you connect a monaural device, connect the yellow plug of...image quality (STD) disc with a recorder Creating a standard definition image quality (STD) disc with a recorder Connect your camcorder to the instruction manual supplied with the device connected. When dubbing is performed via analog data transfer, the image quality may deteriorate. Refer to a disc recorder with ...
"Handycam" User Guide (.PDF)
Page 92
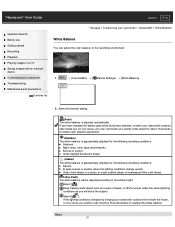
... [Auto] was selected, or taken your camcorder > Camera/Mic > White Balance White Balance You can adjust the color balance to the recording environment. 1. [Camera/Mic] [ Manual Settings] [White Balance]. 2. Select the desired setting. (Auto) The white balance is appropriately adjusted for the following recording conditions: Indoors At party scenes or studios...
... [Auto] was selected, or taken your camcorder > Camera/Mic > White Balance White Balance You can adjust the color balance to the recording environment. 1. [Camera/Mic] [ Manual Settings] [White Balance]. 2. Select the desired setting. (Auto) The white balance is appropriately adjusted for the following recording conditions: Indoors At party scenes or studios...
"Handycam" User Guide (.PDF)
Page 94
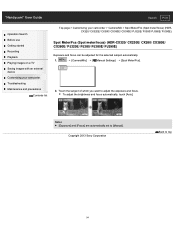
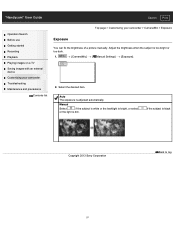
...PJ380/ PJ380E/ PJ390E) Spot Meter/Fcs (Spot meter/focus) (HDR-CX320/ CX320E/ CX380/ CX380E/ CX390E/ PJ320E/ PJ380/ PJ380E/ PJ390E) Exposure and focus can be adjusted for the selected subject automatically. 1. [Camera/Mic] [ Manual Settings] [Spot Meter/Fcs]. 2. To adjust the brightness and ...focus automatically, touch [Auto]. Copyright 2013 Sony Corporation Back to [Manual]. Notes [Exposure] and [Focus] are automatically set to top 94 ...
...PJ380/ PJ380E/ PJ390E) Spot Meter/Fcs (Spot meter/focus) (HDR-CX320/ CX320E/ CX380/ CX380E/ CX390E/ PJ320E/ PJ380/ PJ380E/ PJ390E) Exposure and focus can be adjusted for the selected subject automatically. 1. [Camera/Mic] [ Manual Settings] [Spot Meter/Fcs]. 2. To adjust the brightness and ...focus automatically, touch [Auto]. Copyright 2013 Sony Corporation Back to [Manual]. Notes [Exposure] and [Focus] are automatically set to top 94 ...

"Handycam" User Guide (.PDF)
Page 95
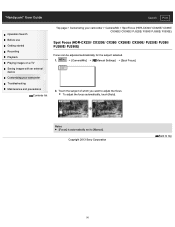
... Spot Meter (Flexible spot meter) (HDRCX320/ CX320E/ CX380/ CX380E/ CX390E/ PJ320E/ PJ380/ PJ380E/ PJ390E) Spot Meter (Flexible spot meter) (HDR-CX320/ CX320E/ CX380/ CX380E/ CX390E/ PJ320E/ PJ380/ PJ380E/ PJ390E) Exposure can be adjusted and set to top 95 "Handycam" User Guide Search... Playback Playing images on stage. 1. [Camera/Mic] [ Manual Settings] [Spot Meter]. 2. This function is useful when there is automatically set for the selected subject automatically. Copyright 2013 Sony Corporation Back to [Manual]. Touch the subject of which you want to automatic exposure,...
... Spot Meter (Flexible spot meter) (HDRCX320/ CX320E/ CX380/ CX380E/ CX390E/ PJ320E/ PJ380/ PJ380E/ PJ390E) Spot Meter (Flexible spot meter) (HDR-CX320/ CX320E/ CX380/ CX380E/ CX390E/ PJ320E/ PJ380/ PJ380E/ PJ390E) Exposure can be adjusted and set to top 95 "Handycam" User Guide Search... Playback Playing images on stage. 1. [Camera/Mic] [ Manual Settings] [Spot Meter]. 2. This function is useful when there is automatically set for the selected subject automatically. Copyright 2013 Sony Corporation Back to [Manual]. Touch the subject of which you want to automatic exposure,...
"Handycam" User Guide (.PDF)
Page 96
Touch the subject of which you want to [Manual]. Notes [Focus] is automatically set to adjust the focus. To adjust the focus automatically, touch [Auto]. Copyright 2013 Sony Corporation Back to top 96 "Handycam" User Guide Search Print Operation Search Before use ... Troubleshooting Maintenance and precautions Contents list Top page > Customizing your camcorder > Camera/Mic > Spot Focus (HDR-CX320/ CX320E/ CX380/ CX380E/ CX390E/ PJ320E/ PJ380/ PJ380E/ PJ390E) Spot Focus (HDR-CX320/ CX320E/ CX380/ CX380E/ CX390E/ PJ320E/ PJ380/ PJ380E/ PJ390E) Focus can be adjusted automatically ...
Touch the subject of which you want to [Manual]. Notes [Focus] is automatically set to adjust the focus. To adjust the focus automatically, touch [Auto]. Copyright 2013 Sony Corporation Back to top 96 "Handycam" User Guide Search Print Operation Search Before use ... Troubleshooting Maintenance and precautions Contents list Top page > Customizing your camcorder > Camera/Mic > Spot Focus (HDR-CX320/ CX320E/ CX380/ CX380E/ CX390E/ PJ320E/ PJ380/ PJ380E/ PJ390E) Spot Focus (HDR-CX320/ CX320E/ CX380/ CX380E/ CX390E/ PJ320E/ PJ380/ PJ380E/ PJ390E) Focus can be adjusted automatically ...
"Handycam" User Guide (.PDF)
Page 97
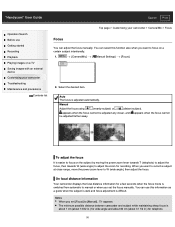
... the desired item. Auto The exposure is too bright or too dark. 1. [Camera/Mic] [ Manual Settings] [Exposure]. 2. Manual Select if the subject is white or the backlight is bright, or select or the light is black Copyright 2013 Sony Corporation Back to top 97 if the subject is dim. "Handycam" User Guide Search... Customizing your camcorder Troubleshooting Maintenance and precautions Contents list Top page > Customizing your camcorder > Camera/Mic > Exposure Exposure You can fix the brightness of a picture manually.
... the desired item. Auto The exposure is too bright or too dark. 1. [Camera/Mic] [ Manual Settings] [Exposure]. 2. Manual Select if the subject is white or the backlight is bright, or select or the light is black Copyright 2013 Sony Corporation Back to top 97 if the subject is dim. "Handycam" User Guide Search... Customizing your camcorder Troubleshooting Maintenance and precautions Contents list Top page > Customizing your camcorder > Camera/Mic > Exposure Exposure You can fix the brightness of a picture manually.
"Handycam" User Guide (.PDF)
Page 98
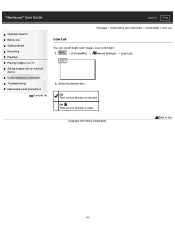
... The minimum possible distance between camcorder and subject while maintaining sharp focus is difficult. Select the desired item. You can adjust the focus manually. Auto The focus is easier to focus on the subject by moving the power zoom lever towards T (telephoto) to adjust the focus... to adjust the zoom for a few seconds when the focus mode is switched from automatic to manual or when you set the focus manually. Notes When you set [Focus] to [Manual], appears. Manual Adjust the focus using (nearby subject) or (distant subject). appears when the focus cannot be ...
... The minimum possible distance between camcorder and subject while maintaining sharp focus is difficult. Select the desired item. You can adjust the focus manually. Auto The focus is easier to focus on the subject by moving the power zoom lever towards T (telephoto) to adjust the focus... to adjust the zoom for a few seconds when the focus mode is switched from automatic to manual or when you set the focus manually. Notes When you set [Focus] to [Manual], appears. Manual Adjust the focus using (nearby subject) or (distant subject). appears when the focus cannot be ...
"Handycam" User Guide (.PDF)
Page 100
Copyright 2013 Sony Corporation Back to top 100 Off The Low Lux function is used . "Handycam" User Guide Search Print Operation Search Before use Getting started Recording Playback Playing images on a TV Saving images with an external device Customizing your camcorder Troubleshooting Maintenance and precautions Contents list Top page > Customizing your camcorder > Camera/Mic > Low Lux Low Lux You can record bright color images, even in dim light. 1. [Camera/Mic] [ Manual Settings] [Low Lux]. 2. On ( ) The Low Lux function is not used . Select the desired item.
Copyright 2013 Sony Corporation Back to top 100 Off The Low Lux function is used . "Handycam" User Guide Search Print Operation Search Before use Getting started Recording Playback Playing images on a TV Saving images with an external device Customizing your camcorder Troubleshooting Maintenance and precautions Contents list Top page > Customizing your camcorder > Camera/Mic > Low Lux Low Lux You can record bright color images, even in dim light. 1. [Camera/Mic] [ Manual Settings] [Low Lux]. 2. On ( ) The Low Lux function is not used . Select the desired item.

"Handycam" User Guide (.PDF)
Page 105
Related topics Zooming [Focus] Copyright 2013 Sony Corporation Back to focus automatically. Off Cancels Tele Macro. (Tele Macro is useful to about 37 cm (14 5/8 in.). This is also canceled when you ... desired item. Notes When recording a distant subject, focusing may be difficult and can blur out backgrounds and the subject stands out clearer. Adjust the focus manually when it is hard to top 105 "Handycam" User Guide Search Print Operation Search Before use Getting started Recording Playback Playing images on a TV Saving...
Related topics Zooming [Focus] Copyright 2013 Sony Corporation Back to focus automatically. Off Cancels Tele Macro. (Tele Macro is useful to about 37 cm (14 5/8 in.). This is also canceled when you ... desired item. Notes When recording a distant subject, focusing may be difficult and can blur out backgrounds and the subject stands out clearer. Adjust the focus manually when it is hard to top 105 "Handycam" User Guide Search Print Operation Search Before use Getting started Recording Playback Playing images on a TV Saving...


