Instruction Manual
Page 2
...to rain or moisture. Never spill liquid of power source indicated on the appliance, or the one way. Model No. DSC-W150/W170 Serial No WARNING To reduce fire or shock hazard, do not expose the unit to insert the plug fully into... plug having one blade wider than the other sources, refer to have a suitable outlet installed. This symbol is a safety feature. Use [ Power Sources This set should still fail to fit, contact your protection, please read these numbers whenever you are ... out parts that may cause hazards. Refer to your home, consult your Sony dealer regarding this product.
...to rain or moisture. Never spill liquid of power source indicated on the appliance, or the one way. Model No. DSC-W150/W170 Serial No WARNING To reduce fire or shock hazard, do not expose the unit to insert the plug fully into... plug having one blade wider than the other sources, refer to have a suitable outlet installed. This symbol is a safety feature. Use [ Power Sources This set should still fail to fit, contact your protection, please read these numbers whenever you are ... out parts that may cause hazards. Refer to your home, consult your Sony dealer regarding this product.
Instruction Manual
Page 13
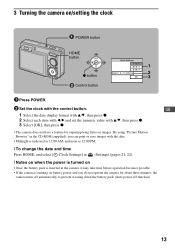
...is turned on • Once the battery pack is inserted in the camera, it may take time before operation becomes possible. • If the camera is running on battery power and you do not operate the camera for superimposing dates on /setting the clock POWER button HOME button 1...; Control button 1 Press POWER. 2 Set the clock with v/V, then press z. 3 Select [OK], then press z. • The camera does not have a feature for about three minutes, the camera turns off automatically to prevent wearing down the battery pack (Auto power-off function). 13 GB 1 Select the date display format...
...is turned on • Once the battery pack is inserted in the camera, it may take time before operation becomes possible. • If the camera is running on battery power and you do not operate the camera for superimposing dates on /setting the clock POWER button HOME button 1...; Control button 1 Press POWER. 2 Set the clock with v/V, then press z. 3 Select [OK], then press z. • The camera does not have a feature for about three minutes, the camera turns off automatically to prevent wearing down the battery pack (Auto power-off function). 13 GB 1 Select the date display format...


