Instruction Manual
Page 2
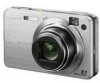
... blade wider than the other sources, refer to your home, consult your Sony dealer regarding this manual for future reference. Refer to these safety instructions completely before operating the appliance,... sufficient magnitude to constitute a risk of any kind into the outlet, try reversing the plug. DSC-W150/W170 Serial No WARNING To reduce fire or shock hazard, do not expose the unit to persons...or the one way. Model No. If you are located on the set. [ Attachments Do not use attachments not recommended by forcing it in. [ Overloading Do not overload wall outlets, extension cords or ...
... blade wider than the other sources, refer to your home, consult your Sony dealer regarding this manual for future reference. Refer to these safety instructions completely before operating the appliance,... sufficient magnitude to constitute a risk of any kind into the outlet, try reversing the plug. DSC-W150/W170 Serial No WARNING To reduce fire or shock hazard, do not expose the unit to persons...or the one way. Model No. If you are located on the set. [ Attachments Do not use attachments not recommended by forcing it in. [ Overloading Do not overload wall outlets, extension cords or ...
Instruction Manual
Page 3
...If the set has been subject to qualified service personnel. [ Replacement parts When replacement parts are required, be sure the service technician has used replacement parts specified by the manufacturer that the set is in cabinet, unless proper ventilation is damaged or frayed. - Refer all servicing to...by the manufacturer. [ Ventilation The slots and openings in the cabinet are specified in performance - Installation [ Water and Moisture Do not use liquid cleaners or aerosol cleaners. If the set has been exposed to the set. Adjust only those controls that it from the wall ...
...If the set has been subject to qualified service personnel. [ Replacement parts When replacement parts are required, be sure the service technician has used replacement parts specified by the manufacturer that the set is in cabinet, unless proper ventilation is damaged or frayed. - Refer all servicing to...by the manufacturer. [ Ventilation The slots and openings in the cabinet are specified in performance - Installation [ Water and Moisture Do not use liquid cleaners or aerosol cleaners. If the set has been exposed to the set. Adjust only those controls that it from the wall ...
Instruction Manual
Page 4
...15 of rechargeable batteries, call : Sony Customer Information Center 1-800-222-SONY (7669) The number below is for the FCC related matters only. [ Regulatory Information Declaration of Conformity Trade Name: SONY Model No.: DSC-W150 Responsible Party: Sony Electronics Inc. Telephone No.: 858-...942-2230 This device complies with the specified type only. You can help preserve our environment by returning your used rechargeable batteries to excessive heat such...
...15 of rechargeable batteries, call : Sony Customer Information Center 1-800-222-SONY (7669) The number below is for the FCC related matters only. [ Regulatory Information Declaration of Conformity Trade Name: SONY Model No.: DSC-W150 Responsible Party: Sony Electronics Inc. Telephone No.: 858-...942-2230 This device complies with the specified type only. You can help preserve our environment by returning your used rechargeable batteries to excessive heat such...
Instruction Manual
Page 5
... and found compliant with the limits for help to conserve natural resources. For more of this product. Instead it shall be used in accordance with separate collection systems) This symbol on the product or on , the user is disposed of electrical and electronic...FCC Rules. Increase the separation between the equipment and receiver. - Consult the dealer or an experienced radio/TV technician for a Class B digital device, pursuant to Part 15 of materials will not occur in a particular installation. [ CAUTION You are designed to provide reasonable protection ...
... and found compliant with the limits for help to conserve natural resources. For more of this product. Instead it shall be used in accordance with separate collection systems) This symbol on the product or on , the user is disposed of electrical and electronic...FCC Rules. Increase the separation between the equipment and receiver. - Consult the dealer or an experienced radio/TV technician for a Class B digital device, pursuant to Part 15 of materials will not occur in a particular installation. [ CAUTION You are designed to provide reasonable protection ...
Instruction Manual
Page 6
... to be replaced, a fuse of the same rating as household waste. If the plug supplied with an or mark) must be used. For more detailed information about recycling of this equipment for the environment and human health which could otherwise be caused by inappropriate waste ... on the packaging indicates that the battery will be treated properly, hand over to the applicable collection point for EMC and product safety is Sony Deutschland GmbH, Hedelfinger Strasse 61, 70327 Stuttgart, Germany. By ensuring these batteries are disposed of correctly, you purchased the product. [ Notice...
... to be replaced, a fuse of the same rating as household waste. If the plug supplied with an or mark) must be used. For more detailed information about recycling of this equipment for the environment and human health which could otherwise be caused by inappropriate waste ... on the packaging indicates that the battery will be treated properly, hand over to the applicable collection point for EMC and product safety is Sony Deutschland GmbH, Hedelfinger Strasse 61, 70327 Stuttgart, Germany. By ensuring these batteries are disposed of correctly, you purchased the product. [ Notice...
Instruction Manual
Page 7
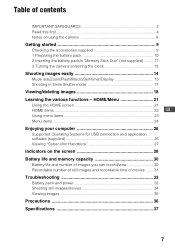
... HOME screen 21 HOME items 22 GB Using menu items 23 Menu items 24 Enjoying your computer 26 Supported Operating Systems for USB connection and application software (supplied 26 Viewing "Cyber-shot Handbook 27 Indicators on /setting the clock 13 Shooting images easily 14... Mode dial/Zoom/Flash/Macro/Self-timer/Display 15 Shooting in Smile Shutter mode 17 Viewing/deleting images 18 Learning the various functions - Table of contents IMPORTANT SAFEGUARDS 2 Read this first 4 Notes on using the camera...
... HOME screen 21 HOME items 22 GB Using menu items 23 Menu items 24 Enjoying your computer 26 Supported Operating Systems for USB connection and application software (supplied 26 Viewing "Cyber-shot Handbook 27 Indicators on /setting the clock 13 Shooting images easily 14... Mode dial/Zoom/Flash/Macro/Self-timer/Display 15 Shooting in Smile Shutter mode 17 Viewing/deleting images 18 Learning the various functions - Table of contents IMPORTANT SAFEGUARDS 2 Read this first 4 Notes on using the camera...
Instruction Manual
Page 8
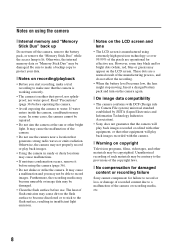
... JEITA (Japan Electronics and Information Technology Industries Association). • Sony does not guarantee that the camera will play back images. • Using the camera in sandy or dusty locations may be damaged. • Clean the flash surface before operating the camera. • Avoid exposing the camera to record images. Insert a charged battery pack and turn off...
... JEITA (Japan Electronics and Information Technology Industries Association). • Sony does not guarantee that the camera will play back images. • Using the camera in sandy or dusty locations may be damaged. • Clean the flash surface before operating the camera. • Avoid exposing the camera to record images. Insert a charged battery pack and turn off...
Instruction Manual
Page 9
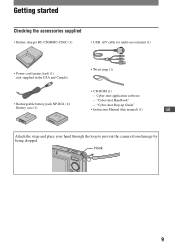
Cyber-shot application software - "Cyber-shot Step-up Guide" Battery case (1) • Instruction Manual (this manual) (1) GB Attach the strap and place your hand through the loop to prevent the camera from damage by being dropped. Getting started Checking the accessories supplied • Battery charger BC-CSGB/BC-CSGC (1) • USB, A/V cable for multi-use terminal (1) • Power cord (mains lead) (1) (not supplied in the USA and Canada) • Wrist strap (1) • CD-ROM (1) - Hook 9 "Cyber-shot Handbook" • Rechargeable battery pack NP-BG1 (1)/ -
Cyber-shot application software - "Cyber-shot Step-up Guide" Battery case (1) • Instruction Manual (this manual) (1) GB Attach the strap and place your hand through the loop to prevent the camera from damage by being dropped. Getting started Checking the accessories supplied • Battery charger BC-CSGB/BC-CSGC (1) • USB, A/V cable for multi-use terminal (1) • Power cord (mains lead) (1) (not supplied in the USA and Canada) • Wrist strap (1) • CD-ROM (1) - Hook 9 "Cyber-shot Handbook" • Rechargeable battery pack NP-BG1 (1)/ -
Instruction Manual
Page 10
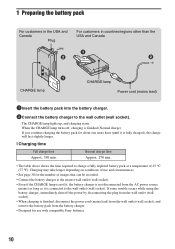
...charging is fully charged), the charge will last slightly longer. [ Charging time Full charge time Approx. 330 min. If some trouble occurs while using the battery charger, immediately shut off , charging is connected to the wall outlet (wall socket). The CHARGE lamp lights up, and charging ...starts. Charging may take longer depending on conditions of use and circumstances. • See page 30 for use with compatible Sony batteries. 10 If you continue charging the battery pack for about one more hour (until it is finished...
...charging is fully charged), the charge will last slightly longer. [ Charging time Full charge time Approx. 330 min. If some trouble occurs while using the battery charger, immediately shut off , charging is connected to the wall outlet (wall socket). The CHARGE lamp lights up, and charging ...starts. Charging may take longer depending on conditions of use and circumstances. • See page 30 for use with compatible Sony batteries. 10 If you continue charging the battery pack for about one more hour (until it is finished...
Instruction Manual
Page 11
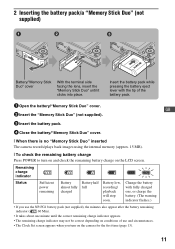
...charged one, or charge the battery. (The warning indicator flashes.) • If you use and circumstances. • The Clock Set screen appears when you turn on and check the remaining battery charge on the camera for the first time (page 13). 11 GB 2 Insert the "Memory Stick Duo" ...). 3 Insert the battery pack. 4 Close the battery/"Memory Stick Duo" cover. [ When there is no "Memory Stick Duo" inserted The camera records/plays back images using the internal memory (approx. 15 MB). [ To check the remaining battery charge Press POWER to turn on the LCD screen. 2 Inserting the ...
...charged one, or charge the battery. (The warning indicator flashes.) • If you use and circumstances. • The Clock Set screen appears when you turn on and check the remaining battery charge on the camera for the first time (page 13). 11 GB 2 Insert the "Memory Stick Duo" ...). 3 Insert the battery pack. 4 Close the battery/"Memory Stick Duo" cover. [ When there is no "Memory Stick Duo" inserted The camera records/plays back images using the internal memory (approx. 15 MB). [ To check the remaining battery charge Press POWER to turn on the LCD screen. 2 Inserting the ...
Instruction Manual
Page 13
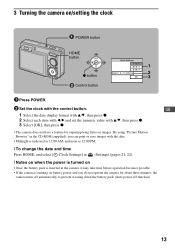
By using "Picture Motion Browser" in the CD-ROM (supplied), you do not operate the camera for superimposing dates on images. 3 Turning the camera on battery power and you can print or save images with the date. • Midnight is indicated as 12:00 AM, ... z button 3 ɟ Control button 1 Press POWER. 2 Set the clock with v/V, then press z. 3 Select [OK], then press z. • The camera does not have a feature for about three minutes, the camera turns off automatically to prevent wearing down the battery pack (Auto power-off function). 13 GB 1 Select the date display format...
By using "Picture Motion Browser" in the CD-ROM (supplied), you do not operate the camera for superimposing dates on images. 3 Turning the camera on battery power and you can print or save images with the date. • Midnight is indicated as 12:00 AM, ... z button 3 ɟ Control button 1 Press POWER. 2 Set the clock with v/V, then press z. 3 Select [OK], then press z. • The camera does not have a feature for about three minutes, the camera turns off automatically to prevent wearing down the battery pack (Auto power-off function). 13 GB 1 Select the date display format...
Instruction Manual
Page 15
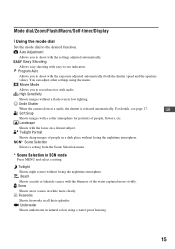
...SCN mode Press MENU and select a setting. Program Auto Allows you to shoot with the settings adjusted automatically. Smile Shutter When the camera detects a smile, the shutter is released automatically. For details, see indicators. GB Soft Snap Shoots images with a softer atmosphere for...of the water captured more clearly. SCN* Scene Selection Selects a setting from the Scene Selection menu. * Scene Selection in natural colors using the menu. High Sensitivity Shoots images without a flash even in white more vividly. Snow Shoots snow scenes in low lighting. You ...
...SCN mode Press MENU and select a setting. Program Auto Allows you to shoot with the settings adjusted automatically. Smile Shutter When the camera detects a smile, the shutter is released automatically. For details, see indicators. GB Soft Snap Shoots images with a softer atmosphere for...of the water captured more clearly. SCN* Scene Selection Selects a setting from the Scene Selection menu. * Scene Selection in natural colors using the menu. High Sensitivity Shoots images without a flash even in white more vividly. Snow Shoots snow scenes in low lighting. You ...
Instruction Manual
Page 16
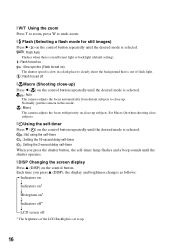
...the self-timer lamp flashes and a beep sounds until the shutter operates. [ DISP Changing the screen display Press v (DISP) on the control button. [ W/T Using the zoom Press T to zoom, press W to undo zoom. [ Flash (Selecting a flash mode for still images) Press B ( ) on the control button ...light. : Flash forced off * The brightness of the LCD Backlight is selected. : Auto The camera adjusts the focus automatically from distant subjects to up. 16 Set Macro On when shooting close subjects. [ Using the self-timer Press V ( ) on the control button repeatedly until the desired mode is selected...
...the self-timer lamp flashes and a beep sounds until the shutter operates. [ DISP Changing the screen display Press v (DISP) on the control button. [ W/T Using the zoom Press T to zoom, press W to undo zoom. [ Flash (Selecting a flash mode for still images) Press B ( ) on the control button ...light. : Flash forced off * The brightness of the LCD Backlight is selected. : Auto The camera adjusts the focus automatically from distant subjects to up. 16 Set Macro On when shooting close subjects. [ Using the self-timer Press V ( ) on the control button repeatedly until the desired mode is selected...
Instruction Manual
Page 17
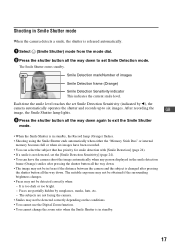
... Detection Sensitivity indicator This indicates the current smile level. Faces are not facing the camera. • Smiles may not be detected correctly depending on the conditions. • You cannot use the Digital Zoom function. • You cannot change the zoom ratio when the Smile Shutter ...is in Smile Shutter mode When the camera detects a smile, the shutter is released automatically. 1 Select (Smile Shutter)...
... Detection Sensitivity indicator This indicates the current smile level. Faces are not facing the camera. • Smiles may not be detected correctly depending on the conditions. • You cannot use the Digital Zoom function. • You cannot change the zoom ratio when the Smile Shutter ...is in Smile Shutter mode When the camera detects a smile, the shutter is released automatically. 1 Select (Smile Shutter)...
Instruction Manual
Page 18
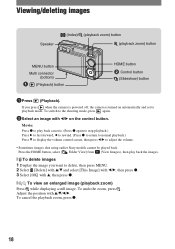
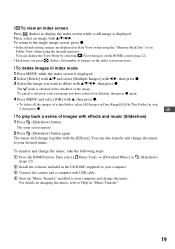
...(bottom) (Playback) button HOME button ɟ Control button (Slideshow) button 1Press (Playback). To switch to adjust the volume. • Sometimes images shot using earlier Sony models cannot be played back. Adjust the position with v, then press z. [ To view an enlarged image (playback zoom) Press while displaying a still ..., press z. 18 Movie: Press z to play back the images. [ To delete images 1 Display the image you press when the camera is powered off, the camera is turned on the control button. To undo the zoom, press . Press the HOME button, select [ Folder View] from (View ...
...(bottom) (Playback) button HOME button ɟ Control button (Slideshow) button 1Press (Playback). To switch to adjust the volume. • Sometimes images shot using earlier Sony models cannot be played back. Adjust the position with v, then press z. [ To view an enlarged image (playback zoom) Press while displaying a still ..., press z. 18 Movie: Press z to play back the images. [ To delete images 1 Display the image you press when the camera is powered off, the camera is turned on the control button. To undo the zoom, press . Press the HOME button, select [ Folder View] from (View ...
Instruction Manual
Page 19
...will change together with USB cable. 4 Start up "Music Transfer" installed to your computer and change the music to Help in Folder View (when using the "Memory Stick Duo") or in "Music Transfer". (Slideshow) 19 To transfer and change the View Mode by selecting (View Images) on ... music. To cancel a selection, select an image you press (Index), the number of images on changing the music, refer to your computer. 3 Connect the camera and a computer with the [Effects]. GB [ To play back a series of images with v, then press z. • To delete all the images of the...
...will change together with USB cable. 4 Start up "Music Transfer" installed to your computer and change the music to Help in Folder View (when using the "Memory Stick Duo") or in "Music Transfer". (Slideshow) 19 To transfer and change the View Mode by selecting (View Images) on ... music. To cancel a selection, select an image you press (Index), the number of images on changing the music, refer to your computer. 3 Connect the camera and a computer with the [Effects]. GB [ To play back a series of images with v, then press z. • To delete all the images of the...
Instruction Manual
Page 20
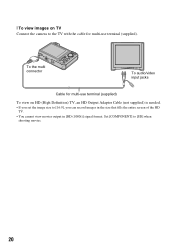
To the multi connector To audio/video input jacks Cable for multi-use terminal (supplied) To view on TV Connect the camera to the TV with the cable for multi-use terminal (supplied). Set [COMPONENT] to [16:9], you set the image size to [SD] when shooting movies. 20 [ To view images on HD (High Definition) TV, an HD Output Adaptor Cable (not supplied) is needed. • If you can record images in the size that fills the entire screen of the HD TV. • You cannot view movies output in [HD (1080i)] signal format.
To the multi connector To audio/video input jacks Cable for multi-use terminal (supplied) To view on TV Connect the camera to the TV with the cable for multi-use terminal (supplied). Set [COMPONENT] to [16:9], you set the image size to [SD] when shooting movies. 20 [ To view images on HD (High Definition) TV, an HD Output Adaptor Cable (not supplied) is needed. • If you can record images in the size that fills the entire screen of the HD TV. • You cannot view movies output in [HD (1080i)] signal format.
Instruction Manual
Page 21
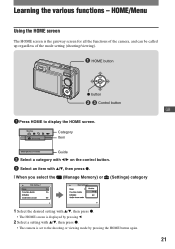
HOME/Menu Using the HOME screen The HOME screen is set to display the HOME screen. Shooting Shooting Category Item Shoot photos or movies Guide 2 Select a category with b/B ... v/V, then press z. [ When you select the (Manage Memory) or (Settings) category 1 Select the desired setting with v/V, then press z. • The camera is the gateway screen for all the functions of the camera, and can be called up regardless of the mode setting (shooting/viewing). HOME button z button ɟ ɠ Control button GB...
HOME/Menu Using the HOME screen The HOME screen is set to display the HOME screen. Shooting Shooting Category Item Shoot photos or movies Guide 2 Select a category with b/B ... v/V, then press z. [ When you select the (Manage Memory) or (Settings) category 1 Select the desired setting with v/V, then press z. • The camera is the gateway screen for all the functions of the camera, and can be called up regardless of the mode setting (shooting/viewing). HOME button z button ɟ ɠ Control button GB...

Instruction Manual
Page 23
Using menu items MENU button z button ɟ ɠ Control button GB 1 Press MENU to turn off the menu. 23 Function Guide • The menu will be ...
Using menu items MENU button z button ɟ ɠ Control button GB 1 Press MENU to turn off the menu. 23 Function Guide • The menu will be ...

Instruction Manual
Page 24
... shooting mode. REC Mode Selects the continuous shooting method. Scene Recognition Automatically detects the shooting conditions and then takes the shot. Smile Detection Selects the priority subject for adjusting the focus when using face detection. For details on the operation 1 page 23 Menu items The available menu items vary depending on the...
... shooting mode. REC Mode Selects the continuous shooting method. Scene Recognition Automatically detects the shooting conditions and then takes the shot. Smile Detection Selects the priority subject for adjusting the focus when using face detection. For details on the operation 1 page 23 Menu items The available menu items vary depending on the...


