Instruction Manual
Page 3
... exhibits a distinct change in cabinet, unless proper ventilation is damaged or frayed. - [ Cleaning Unplug the set from the wall outlet and disconnect the antenna or cable system. If the set does not operate normally when following conditions: - Refer all servicing to protect it . If the set has been exposed to lightning...
... exhibits a distinct change in cabinet, unless proper ventilation is damaged or frayed. - [ Cleaning Unplug the set from the wall outlet and disconnect the antenna or cable system. If the set does not operate normally when following conditions: - Refer all servicing to protect it . If the set has been exposed to lightning...
Instruction Manual
Page 5
... Notice If static electricity or electromagnetism causes data transfer to discontinue midway (fail), restart the application or disconnect and connect the communication cable (USB, etc.) again. [ Disposal of Old Electrical & Electronic Equipment (Applicable GB in the European Union and other European countries... antenna. - Increase the separation between the equipment and receiver. - Consult the dealer or an experienced radio/TV technician for a digital device pursuant to Subpart B of Part 15 of correctly, you purchased the product. 5 By ensuring this manual could otherwise be determined...
... Notice If static electricity or electromagnetism causes data transfer to discontinue midway (fail), restart the application or disconnect and connect the communication cable (USB, etc.) again. [ Disposal of Old Electrical & Electronic Equipment (Applicable GB in the European Union and other European countries... antenna. - Increase the separation between the equipment and receiver. - Consult the dealer or an experienced radio/TV technician for a digital device pursuant to Subpart B of Part 15 of correctly, you purchased the product. 5 By ensuring this manual could otherwise be determined...
Instruction Manual
Page 9
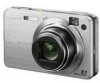
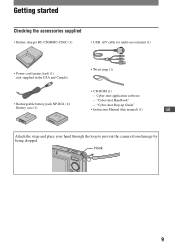
Cyber-shot application software - "Cyber-shot Step-up Guide" Battery case (1) • Instruction Manual (this manual) (1) GB Attach the strap and place your hand through the loop to prevent the camera from damage by being dropped. Hook 9 Getting started Checking the accessories supplied • Battery charger BC-CSGB/BC-CSGC (1) • USB, A/V cable for multi-use terminal (1) • Power cord (mains lead) (1) (not supplied in the USA and Canada) • Wrist strap (1) • CD-ROM (1) - "Cyber-shot Handbook" • Rechargeable battery pack NP-BG1 (1)/ -
Cyber-shot application software - "Cyber-shot Step-up Guide" Battery case (1) • Instruction Manual (this manual) (1) GB Attach the strap and place your hand through the loop to prevent the camera from damage by being dropped. Hook 9 Getting started Checking the accessories supplied • Battery charger BC-CSGB/BC-CSGC (1) • USB, A/V cable for multi-use terminal (1) • Power cord (mains lead) (1) (not supplied in the USA and Canada) • Wrist strap (1) • CD-ROM (1) - "Cyber-shot Handbook" • Rechargeable battery pack NP-BG1 (1)/ -
Instruction Manual
Page 19
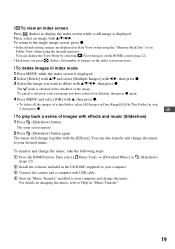
...your computer and change the music, take the following steps. 1 Press the HOME button. You can change the music to your computer. 3 Connect the camera and a computer with v/V/b/B, then press z. You can also transfer and change the View Mode by selecting (View Images) on the HOME screen (page 22...the index screen while a still image is checked in step 2, then press z. To cancel a selection, select an image you want to delete with USB cable. 4 Start up "Music Transfer" installed to your desired music. To return to the single image screen, press z. • In the default setting, ...
...your computer and change the music, take the following steps. 1 Press the HOME button. You can change the music to your computer. 3 Connect the camera and a computer with v/V/b/B, then press z. You can also transfer and change the View Mode by selecting (View Images) on the HOME screen (page 22...the index screen while a still image is checked in step 2, then press z. To cancel a selection, select an image you want to delete with USB cable. 4 Start up "Music Transfer" installed to your desired music. To return to the single image screen, press z. • In the default setting, ...
Instruction Manual
Page 20
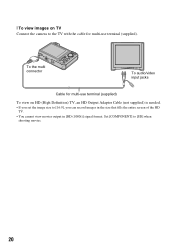
To the multi connector To audio/video input jacks Cable for multi-use terminal (supplied) To view on TV Connect the camera to the TV with the cable for multi-use terminal (supplied). Set [COMPONENT] to [SD] when shooting movies. 20 [ To view images on HD (High Definition) TV, an HD Output Adaptor Cable (not supplied) is needed. • If you set the image size to [16:9], you can record images in the size that fills the entire screen of the HD TV. • You cannot view movies output in [HD (1080i)] signal format.
To the multi connector To audio/video input jacks Cable for multi-use terminal (supplied) To view on TV Connect the camera to the TV with the cable for multi-use terminal (supplied). Set [COMPONENT] to [SD] when shooting movies. 20 [ To view images on HD (High Definition) TV, an HD Output Adaptor Cable (not supplied) is needed. • If you set the image size to [16:9], you can record images in the size that fills the entire screen of the HD TV. • You cannot view movies output in [HD (1080i)] signal format.


