Instruction Manual
Page 3
... have the same characteristics as opening or removing covers may result in the operating instructions. If the set does not operate normally when following conditions: - When the set exhibits a distinct change in the cabinet are provided for necessary ventilation. Use only a cart, stand, tripod, bracket, ...the plugs, receptacles, and the point where the cord exits from the wall outlet and refer servicing to determine that have fallen into the set. - When the power cord or plug is left unattended and unused for example, near a bathtub, washbowl, kitchen sink, or laundry tub...
... have the same characteristics as opening or removing covers may result in the operating instructions. If the set does not operate normally when following conditions: - When the set exhibits a distinct change in the cabinet are provided for necessary ventilation. Use only a cart, stand, tripod, bracket, ...the plugs, receptacles, and the point where the cord exits from the wall outlet and refer servicing to determine that have fallen into the set. - When the power cord or plug is left unattended and unused for example, near a bathtub, washbowl, kitchen sink, or laundry tub...
Instruction Manual
Page 5
...and receiver. - Consult the dealer or an experienced radio/TV technician for a Class B digital device, pursuant to Part 15 of this product is no guarantee that interference will not occur... this equipment. [ Note: This equipment has been tested and found compliant with the limits set out in the EMC Directive for using connection cables shorter than 3 meters (9.8 feet). [... frequencies may cause harmful interference to radio communications. These limits are cautioned that any changes or modifications not expressly approved in this manual could otherwise be determined by turning the...
...and receiver. - Consult the dealer or an experienced radio/TV technician for a Class B digital device, pursuant to Part 15 of this product is no guarantee that interference will not occur... this equipment. [ Note: This equipment has been tested and found compliant with the limits set out in the EMC Directive for using connection cables shorter than 3 meters (9.8 feet). [... frequencies may cause harmful interference to radio communications. These limits are cautioned that any changes or modifications not expressly approved in this manual could otherwise be determined by turning the...
Instruction Manual
Page 11
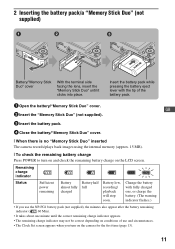
...not supplied). 3 Insert the battery pack. 4 Close the battery/"Memory Stick Duo" cover. [ When there is no "Memory Stick Duo" inserted The camera records/plays back images using the internal memory (approx. 15 MB). [ To check the remaining battery charge Press POWER to turn on the LCD screen... power remaining Battery almost fully charged Battery half full Battery low, recording/ playback will stop soon. Change the battery with the tip of use and circumstances. • The Clock Set screen appears when you use the NP-FG1 battery pack (not supplied), the minutes also appear after...
...not supplied). 3 Insert the battery pack. 4 Close the battery/"Memory Stick Duo" cover. [ When there is no "Memory Stick Duo" inserted The camera records/plays back images using the internal memory (approx. 15 MB). [ To check the remaining battery charge Press POWER to turn on the LCD screen... power remaining Battery almost fully charged Battery half full Battery low, recording/ playback will stop soon. Change the battery with the tip of use and circumstances. • The Clock Set screen appears when you use the NP-FG1 battery pack (not supplied), the minutes also appear after...
Instruction Manual
Page 13
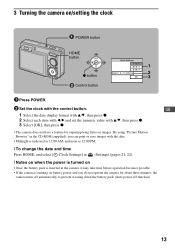
3 Turning the camera on images. By using "Picture Motion Browser" in the CD-ROM (supplied), you can print or save images with the date. • Midnight is indicated as 12:00 AM, and noon as 12:00 PM. [ To change the date and time Press HOME, and select [ Clock Settings] in (Settings) (pages 21, 22...). [ Notes on when the power is turned on • Once the battery pack is inserted in the camera, it may take time before operation becomes possible. • If...
3 Turning the camera on images. By using "Picture Motion Browser" in the CD-ROM (supplied), you can print or save images with the date. • Midnight is indicated as 12:00 AM, and noon as 12:00 PM. [ To change the date and time Press HOME, and select [ Clock Settings] in (Settings) (pages 21, 22...). [ Notes on when the power is turned on • Once the battery pack is inserted in the camera, it may take time before operation becomes possible. • If...
Instruction Manual
Page 16
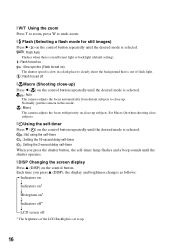
...control button repeatedly until the desired mode is selected. : Not using the self-timer : Setting the 10-second delay self-timer : Setting the 2-second delay self-timer When you press v (DISP), the display and brightness changes as follows: Indicators on r Indicators on* r Histogram on* r Indicators off* r ...Shooting close-up) Press b ( ) on the control button repeatedly until the shutter operates. [ DISP Changing the screen display Press v (DISP) on close -up subjects. Normally, put the camera in a dark place to clearly shoot the background that is out of the LCD Backlight is selected. ...
...control button repeatedly until the desired mode is selected. : Not using the self-timer : Setting the 10-second delay self-timer : Setting the 2-second delay self-timer When you press v (DISP), the display and brightness changes as follows: Indicators on r Indicators on* r Histogram on* r Indicators off* r ...Shooting close-up) Press b ( ) on the control button repeatedly until the shutter operates. [ DISP Changing the screen display Press v (DISP) on close -up subjects. Normally, put the camera in a dark place to clearly shoot the background that is out of the LCD Backlight is selected. ...
Instruction Manual
Page 17
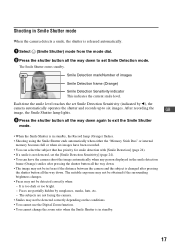
...smile level. Faces are not facing the camera. • Smiles may not be detected correctly depending on the conditions. • You cannot use the Digital Zoom function. • You cannot change the zoom ratio when the Smile Shutter is changed after pressing the shutter button all the ...down to six images. The subjects are partially hidden by b), the camera automatically operates the shutter and records up to set Smile Detection mode. The suitable exposure may not be obtained if the surrounding brightness changes. • Faces may not be detected correctly when: - After recording...
...smile level. Faces are not facing the camera. • Smiles may not be detected correctly depending on the conditions. • You cannot use the Digital Zoom function. • You cannot change the zoom ratio when the Smile Shutter is changed after pressing the shutter button all the ...down to six images. The subjects are partially hidden by b), the camera automatically operates the shutter and records up to set Smile Detection mode. The suitable exposure may not be obtained if the surrounding brightness changes. • Faces may not be detected correctly when: - After recording...
Instruction Manual
Page 19
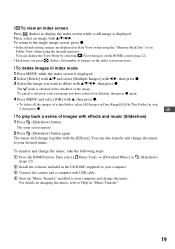
... deletion, then press z again. 4 Press MENU and select [OK] with v/V/b/B, then press z. You can change together with v/V/b/B. Then select [ Music Tool] t [Download Music] in (page 22). 2 Install the software... included in the CD-ROM (supplied) to your computer. 3 Connect the camera and a computer with effects and music (Slideshow) 1 Press (Slideshow) button. [ To view an index ...select an image you want to the single image screen, press z. • In the default setting, images are displayed in Date View (when using the "Memory Stick Duo") or in step...
... deletion, then press z again. 4 Press MENU and select [OK] with v/V/b/B, then press z. You can change together with v/V/b/B. Then select [ Music Tool] t [Download Music] in (page 22). 2 Install the software... included in the CD-ROM (supplied) to your computer. 3 Connect the camera and a computer with effects and music (Slideshow) 1 Press (Slideshow) button. [ To view an index ...select an image you want to the single image screen, press z. • In the default setting, images are displayed in Date View (when using the "Memory Stick Duo") or in step...
Instruction Manual
Page 22
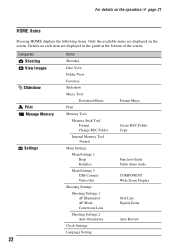
... Music Tool Download Music Print Memory Tool Memory Stick Tool Format Change REC.Folder Internal Memory Tool Format Main Settings Main Settings 1 Beep Initialize Main Settings 2 USB Connect Video Out Shooting Settings Shooting Settings 1 AF Illuminator AF Mode Conversion Lens Shooting Settings 2 Auto Orientation Clock Settings Language Setting Format Music Create REC.Folder Copy Function Guide Smile demo mode...
... Music Tool Download Music Print Memory Tool Memory Stick Tool Format Change REC.Folder Internal Memory Tool Format Main Settings Main Settings 1 Beep Initialize Main Settings 2 USB Connect Video Out Shooting Settings Shooting Settings 1 AF Illuminator AF Mode Conversion Lens Shooting Settings 2 Auto Orientation Clock Settings Language Setting Format Music Create REC.Folder Copy Function Guide Smile demo mode...

Instruction Manual
Page 24
...shooting conditions and then takes the shot. White Balance Adjusts the color tones. Shooting menu Scene Selection Selects the settings pre-adjusted to reduce the red-eye phenomenon. EV Adjusts Exposure. Focus Changes the focus method. Red Eye Reduction Sets to match various scene conditions.... Smile Detection Selects the priority subject for adjusting the focus when using face detection. Color Mode Changes the vividness of the image or adds ...
...shooting conditions and then takes the shot. White Balance Adjusts the color tones. Shooting menu Scene Selection Selects the settings pre-adjusted to reduce the red-eye phenomenon. EV Adjusts Exposure. Focus Changes the focus method. Red Eye Reduction Sets to match various scene conditions.... Smile Detection Selects the priority subject for adjusting the focus when using face detection. Color Mode Changes the vividness of the image or adds ...

Instruction Manual
Page 25
... images filtered to meet certain conditions. (Add/Remove Favorites) Registers images to Favorites or removes images from Favorites. (Slideshow) Sets and performs the Slideshow (playback of a series of images). (Retouch) Retouches still images. (Multi-Purpose Resize) Changes the image size according to print out. (Print) (Rotate) Prints images using a PictBridge compliant printer.
... images filtered to meet certain conditions. (Add/Remove Favorites) Registers images to Favorites or removes images from Favorites. (Slideshow) Sets and performs the Slideshow (playback of a series of images). (Retouch) Retouches still images. (Multi-Purpose Resize) Changes the image size according to print out. (Print) (Rotate) Prints images using a PictBridge compliant printer.
Instruction Manual
Page 30
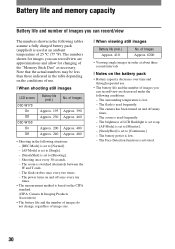
... change, regardless of image size. [ When viewing still images Battery life (min.) Approx. 410 No. The camera has been turned on the battery pack • Battery capacity decreases over time and through repeated use . [ When shooting still images LCD screen DSC-W170 On Off DSC-W150 ...brightness of the "Memory Stick Duo" as necessary. The zoom is low. - The numbers shown for changing of LCD Backlight is set to up. - [AF Mode] is set to [Monitor]. - [SteadyShot] is set to [Shooting]. - The flash strobes once every two times. - The surrounding temperature is switched alternately ...
... change, regardless of image size. [ When viewing still images Battery life (min.) Approx. 410 No. The camera has been turned on the battery pack • Battery capacity decreases over time and through repeated use . [ When shooting still images LCD screen DSC-W170 On Off DSC-W150 ...brightness of the "Memory Stick Duo" as necessary. The zoom is low. - The numbers shown for changing of LCD Backlight is set to up. - [AF Mode] is set to [Monitor]. - [SteadyShot] is set to [Shooting]. - The flash strobes once every two times. - The surrounding temperature is switched alternately ...
Instruction Manual
Page 34
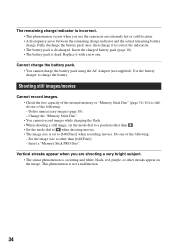
... The battery pack is discharged. Change the "Memory Stick Duo". • You cannot record images while charging the flash. • When shooting a still image, set to a position other than . • Set the mode dial to when shooting movies. • The image size is set the mode dial to [640(... battery pack. • You cannot charge the battery pack using the AC Adaptor (not supplied). Vertical streaks appear when you use the camera in an extremely hot or cold location. • A discrepancy arose between the remaining charge indicator and the actual remaining battery charge. Replace...
... The battery pack is discharged. Change the "Memory Stick Duo". • You cannot record images while charging the flash. • When shooting a still image, set to a position other than . • Set the mode dial to when shooting movies. • The image size is set the mode dial to [640(... battery pack. • You cannot charge the battery pack using the AC Adaptor (not supplied). Vertical streaks appear when you use the camera in an extremely hot or cold location. • A discrepancy arose between the remaining charge indicator and the actual remaining battery charge. Replace...
Instruction Manual
Page 37
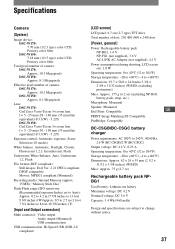
...color filter DSC-W150: 7.18 mm (1/2.5 type) color CCD, Primary color filter Total pixel number of camera: DSC-W170: Approx. 10.3 Megapixels DSC-W150: Approx. 8.3 Megapixels Effective pixel number of camera: DSC-W170: Approx. 10.1 Megapixels DSC-W150: Approx. 8.1 Megapixels Lens: DSC-W170:... (Monaural) Recording media: Internal Memory (approx. 15 MB), "Memory Stick Duo" Flash:Flash range (ISO sensitivity (Recommended exposure Index) set to Auto): Approx. 0.2 to 4.2 m (7 7/8 inches to 13 feet 9 3/8 inches) (W)/approx. 0.5 to 2.7 m (1... and specifications are subject to change without notice. 37
...color filter DSC-W150: 7.18 mm (1/2.5 type) color CCD, Primary color filter Total pixel number of camera: DSC-W170: Approx. 10.3 Megapixels DSC-W150: Approx. 8.3 Megapixels Effective pixel number of camera: DSC-W170: Approx. 10.1 Megapixels DSC-W150: Approx. 8.1 Megapixels Lens: DSC-W170:... (Monaural) Recording media: Internal Memory (approx. 15 MB), "Memory Stick Duo" Flash:Flash range (ISO sensitivity (Recommended exposure Index) set to Auto): Approx. 0.2 to 4.2 m (7 7/8 inches to 13 feet 9 3/8 inches) (W)/approx. 0.5 to 2.7 m (1... and specifications are subject to change without notice. 37

