Instruction Manual
Page 3
... not use power-line operated sets near or over a radiator or heat register, or where it from the wall outlet and disconnect the antenna or cable system. When the power cord or plug is provided. - If the set has been subject to excessive shock by the manufacturer. [ Ventilation The slots and...
... not use power-line operated sets near or over a radiator or heat register, or where it from the wall outlet and disconnect the antenna or cable system. When the power cord or plug is provided. - If the set has been subject to excessive shock by the manufacturer. [ Ventilation The slots and...
Instruction Manual
Page 5
... dealer or an experienced radio/TV technician for help to discontinue midway (fail), restart the application or disconnect and connect the communication cable (USB, etc.) again. [ Disposal of Old Electrical & Electronic Equipment (Applicable GB in Europe This product has been tested and...: This equipment has been tested and found compliant with the limits for a digital device pursuant to provide reasonable protection against harmful interference in accordance with the limits for a Class B digital device, pursuant to correct the interference by inappropriate waste handling of FCC Rules...
... dealer or an experienced radio/TV technician for help to discontinue midway (fail), restart the application or disconnect and connect the communication cable (USB, etc.) again. [ Disposal of Old Electrical & Electronic Equipment (Applicable GB in Europe This product has been tested and...: This equipment has been tested and found compliant with the limits for a digital device pursuant to provide reasonable protection against harmful interference in accordance with the limits for a Class B digital device, pursuant to correct the interference by inappropriate waste handling of FCC Rules...
Instruction Manual
Page 9
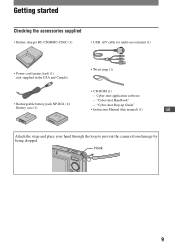
Getting started Checking the accessories supplied • Battery charger BC-CSGB/BC-CSGC (1) • USB, A/V cable for multi-use terminal (1) • Power cord (mains lead) (1) (not supplied in the USA and Canada) • Wrist strap (1) • CD-ROM (1) - "Cyber-shot Step-up Guide" Battery case (1) • Instruction Manual (this manual) (1) GB Attach the strap and place your hand through the loop to prevent the camera from damage by being dropped. Hook 9 "Cyber-shot Handbook" • Rechargeable battery pack NP-BG1 (1)/ - Cyber-shot application software -
Getting started Checking the accessories supplied • Battery charger BC-CSGB/BC-CSGC (1) • USB, A/V cable for multi-use terminal (1) • Power cord (mains lead) (1) (not supplied in the USA and Canada) • Wrist strap (1) • CD-ROM (1) - "Cyber-shot Step-up Guide" Battery case (1) • Instruction Manual (this manual) (1) GB Attach the strap and place your hand through the loop to prevent the camera from damage by being dropped. Hook 9 "Cyber-shot Handbook" • Rechargeable battery pack NP-BG1 (1)/ - Cyber-shot application software -
Instruction Manual
Page 19
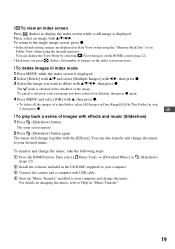
... desired music. To transfer and change the music to delete with b/B, then press z. 3 Select the image you want to your computer. 3 Connect the camera and a computer with USB cable. 4 Start up "Music Transfer" installed to display the index screen while a still image is displayed. 2 Select [Delete] with v/V and select [Multiple Images] with...
... desired music. To transfer and change the music to delete with b/B, then press z. 3 Select the image you want to your computer. 3 Connect the camera and a computer with USB cable. 4 Start up "Music Transfer" installed to display the index screen while a still image is displayed. 2 Select [Delete] with v/V and select [Multiple Images] with...
Instruction Manual
Page 20
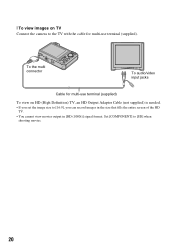
Set [COMPONENT] to [SD] when shooting movies. 20 To the multi connector To audio/video input jacks Cable for multi-use terminal (supplied) To view on TV Connect the camera to the TV with the cable for multi-use terminal (supplied). [ To view images on HD (High Definition) TV, an HD Output Adaptor Cable (not supplied) is needed. • If you set the image size to [16:9], you can record images in the size that fills the entire screen of the HD TV. • You cannot view movies output in [HD (1080i)] signal format.
Set [COMPONENT] to [SD] when shooting movies. 20 To the multi connector To audio/video input jacks Cable for multi-use terminal (supplied) To view on TV Connect the camera to the TV with the cable for multi-use terminal (supplied). [ To view images on HD (High Definition) TV, an HD Output Adaptor Cable (not supplied) is needed. • If you set the image size to [16:9], you can record images in the size that fills the entire screen of the HD TV. • You cannot view movies output in [HD (1080i)] signal format.


