Instruction Manual
Page 7
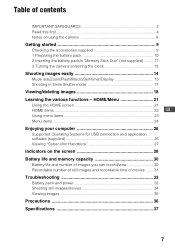
... supplied 9 1 Preparing the battery pack 10 2 Inserting the battery pack/a "Memory Stick Duo" (not supplied) ........ 11 3 Turning the camera on the screen 28 Battery life and memory capacity 30 Battery life and number of images you can record/view 30 Recordable number of still ...Using menu items 23 Menu items 24 Enjoying your computer 26 Supported Operating Systems for USB connection and application software (supplied 26 Viewing "Cyber-shot Handbook 27 Indicators on /setting the clock 13 Shooting images easily 14 Mode dial/Zoom/Flash/Macro/Self-timer/Display 15 Shooting in...
... supplied 9 1 Preparing the battery pack 10 2 Inserting the battery pack/a "Memory Stick Duo" (not supplied) ........ 11 3 Turning the camera on the screen 28 Battery life and memory capacity 30 Battery life and number of images you can record/view 30 Recordable number of still ...Using menu items 23 Menu items 24 Enjoying your computer 26 Supported Operating Systems for USB connection and application software (supplied 26 Viewing "Cyber-shot Handbook 27 Indicators on /setting the clock 13 Shooting images easily 14 Mode dial/Zoom/Flash/Macro/Self-timer/Display 15 Shooting in...
Instruction Manual
Page 8
...turn on the camera again. [ On image data compatibility • The camera conforms with DCF (Design rule for Camera File system) universal standard established by JEITA (Japan Electronics and Information Technology Industries Association). • Sony does not guarantee that the camera will play back ...images recorded or edited with other equipment, or that other equipment will play back images. • Using the camera in insufficient light emission. [ Notes on ...
...turn on the camera again. [ On image data compatibility • The camera conforms with DCF (Design rule for Camera File system) universal standard established by JEITA (Japan Electronics and Information Technology Industries Association). • Sony does not guarantee that the camera will play back ...images recorded or edited with other equipment, or that other equipment will play back images. • Using the camera in insufficient light emission. [ Notes on ...
Instruction Manual
Page 9
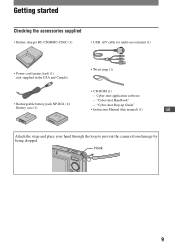
Cyber-shot application software - "Cyber-shot Handbook" • Rechargeable battery pack NP-BG1 (1)/ - Hook 9 "Cyber-shot Step-up Guide" Battery case (1) • Instruction Manual (this manual) (1) GB Attach the strap and place your hand through the loop to prevent the camera from damage by being dropped. Getting started Checking the accessories supplied • Battery charger BC-CSGB/BC-CSGC (1) • USB, A/V cable for multi-use terminal (1) • Power cord (mains lead) (1) (not supplied in the USA and Canada) • Wrist strap (1) • CD-ROM (1) -
Cyber-shot application software - "Cyber-shot Handbook" • Rechargeable battery pack NP-BG1 (1)/ - Hook 9 "Cyber-shot Step-up Guide" Battery case (1) • Instruction Manual (this manual) (1) GB Attach the strap and place your hand through the loop to prevent the camera from damage by being dropped. Getting started Checking the accessories supplied • Battery charger BC-CSGB/BC-CSGC (1) • USB, A/V cable for multi-use terminal (1) • Power cord (mains lead) (1) (not supplied in the USA and Canada) • Wrist strap (1) • CD-ROM (1) -
Instruction Manual
Page 11
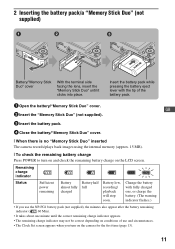
... "Memory Stick Duo" (not supplied). 3 Insert the battery pack. 4 Close the battery/"Memory Stick Duo" cover. [ When there is no "Memory Stick Duo" inserted The camera records/plays back images using the internal memory (approx. 15 MB). [ To check the remaining battery charge Press POWER to turn on the... camera for the first time (page 13). 11 Change the battery with the tip of use the NP-FG1 battery pack (not supplied), the minutes also ...
... "Memory Stick Duo" (not supplied). 3 Insert the battery pack. 4 Close the battery/"Memory Stick Duo" cover. [ When there is no "Memory Stick Duo" inserted The camera records/plays back images using the internal memory (approx. 15 MB). [ To check the remaining battery charge Press POWER to turn on the... camera for the first time (page 13). 11 Change the battery with the tip of use the NP-FG1 battery pack (not supplied), the minutes also ...
Instruction Manual
Page 13
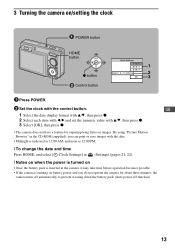
...). [ Notes on when the power is turned on • Once the battery pack is inserted in the camera, it may take time before operation becomes possible. • If the camera is running on battery power and you can print or save images with the control button. GB 1 Select ...z. 2 Select each item with b/B and set the numeric value with v/V, then press z. 3 Select [OK], then press z. • The camera does not have a feature for about three minutes, the camera turns off automatically to prevent wearing down the battery pack (Auto power-off function). 13 By using "Picture Motion Browser" in...
...). [ Notes on when the power is turned on • Once the battery pack is inserted in the camera, it may take time before operation becomes possible. • If the camera is running on battery power and you can print or save images with the control button. GB 1 Select ...z. 2 Select each item with b/B and set the numeric value with v/V, then press z. 3 Select [OK], then press z. • The camera does not have a feature for about three minutes, the camera turns off automatically to prevent wearing down the battery pack (Auto power-off function). 13 By using "Picture Motion Browser" in...
Instruction Manual
Page 14
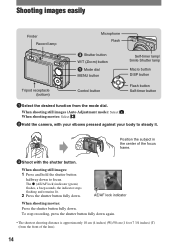
When shooting movies: Select . 2Hold the camera, with the shutter button. AE/AF lock indicator When shooting movies: Press the shutter button fully down to steady it. Shooting images easily Finder Record ...
When shooting movies: Select . 2Hold the camera, with the shutter button. AE/AF lock indicator When shooting movies: Press the shutter button fully down to steady it. Shooting images easily Finder Record ...
Instruction Manual
Page 15
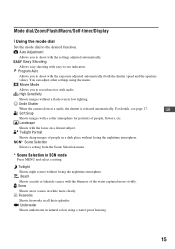
... fireworks in a dark place without losing the nighttime atmosphere. Easy Shooting Allows easy shooting with the blueness of people, flowers, etc. Smile Shutter When the camera detects a smile, the shutter is released automatically. Landscape Shoots with the exposure adjusted automatically (both the shutter speed and the aperture value).
... fireworks in a dark place without losing the nighttime atmosphere. Easy Shooting Allows easy shooting with the blueness of people, flowers, etc. Smile Shutter When the camera detects a smile, the shutter is released automatically. Landscape Shoots with the exposure adjusted automatically (both the shutter speed and the aperture value).
Instruction Manual
Page 16
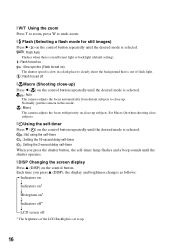
... subjects. Each time you press the shutter button, the self-timer lamp flashes and a beep sounds until the desired mode is selected. : Auto The camera adjusts the focus automatically from distant subjects to up . Set Macro On when shooting close subjects. [ Using the self-timer Press V ( ) on...(DISP) on * r Indicators off* r LCD screen off * The brightness of flash light. : Flash forced off [ Macro (Shooting close -up . 16 Normally, put the camera in a dark place to clearly shoot the background that is out of the LCD Backlight is selected. : Not using the self-timer : Setting the 10...
... subjects. Each time you press the shutter button, the self-timer lamp flashes and a beep sounds until the desired mode is selected. : Auto The camera adjusts the focus automatically from distant subjects to up . Set Macro On when shooting close subjects. [ Using the self-timer Press V ( ) on...(DISP) on * r Indicators off* r LCD screen off * The brightness of flash light. : Flash forced off [ Macro (Shooting close -up . 16 Normally, put the camera in a dark place to clearly shoot the background that is out of the LCD Backlight is selected. : Not using the self-timer : Setting the 10...
Instruction Manual
Page 17
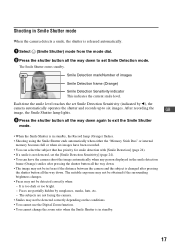
...not be obtained if the surrounding brightness changes. • Faces may not be detected correctly depending on the conditions. • You cannot use the Digital Zoom function. • You cannot change the zoom ratio when the Smile Shutter is in standby. 17 It is too dark or too bright. -... [Smile Detection] (page 24). • If a smile is not detected, set the [Smile Detection Sensitivity] (page 24). • You can have the camera shoot the image automatically when any person displayed in the smile detection frame (Orange) smiles after pressing the shutter button all the way down. •...
...not be obtained if the surrounding brightness changes. • Faces may not be detected correctly depending on the conditions. • You cannot use the Digital Zoom function. • You cannot change the zoom ratio when the Smile Shutter is in standby. 17 It is too dark or too bright. -... [Smile Detection] (page 24). • If a smile is not detected, set the [Smile Detection Sensitivity] (page 24). • You can have the camera shoot the image automatically when any person displayed in the smile detection frame (Orange) smiles after pressing the shutter button all the way down. •...
Instruction Manual
Page 18
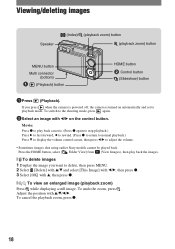
...[ To view an enlarged image (playback zoom) Press while displaying a still image. Movie: Press z to adjust the volume. • Sometimes images shot using earlier Sony models cannot be played back. To undo the zoom, press . Press the HOME button, select [ Folder View] from (View Images), then play...control screen, then press b/B to play back the images. [ To delete images 1 Display the image you press when the camera is powered off, the camera is turned on the control button. To switch to playback mode. Viewing/deleting images Speaker (Index)/ (playback zoom) button (playback...
...[ To view an enlarged image (playback zoom) Press while displaying a still image. Movie: Press z to adjust the volume. • Sometimes images shot using earlier Sony models cannot be played back. To undo the zoom, press . Press the HOME button, select [ Folder View] from (View Images), then play...control screen, then press b/B to play back the images. [ To delete images 1 Display the image you press when the camera is powered off, the camera is turned on the control button. To switch to playback mode. Viewing/deleting images Speaker (Index)/ (playback zoom) button (playback...
Instruction Manual
Page 19
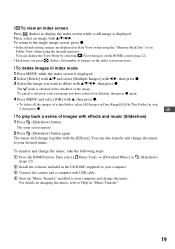
... "Music Transfer" installed to your computer and change the View Mode by selecting (View Images) on changing the music, refer to your computer. 3 Connect the camera and a computer with the [Effects]. GB [ To play back a series of a date/folder, select [All Images in Date Range]/[All In This Folder] in step...
... "Music Transfer" installed to your computer and change the View Mode by selecting (View Images) on changing the music, refer to your computer. 3 Connect the camera and a computer with the [Effects]. GB [ To play back a series of a date/folder, select [All Images in Date Range]/[All In This Folder] in step...
Instruction Manual
Page 20
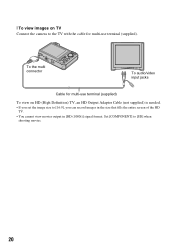
Set [COMPONENT] to [16:9], you can record images in the size that fills the entire screen of the HD TV. • You cannot view movies output in [HD (1080i)] signal format. To the multi connector To audio/video input jacks Cable for multi-use terminal (supplied) To view on HD (High Definition) TV, an HD Output Adaptor Cable (not supplied) is needed. • If you set the image size to [SD] when shooting movies. 20 [ To view images on TV Connect the camera to the TV with the cable for multi-use terminal (supplied).
Set [COMPONENT] to [16:9], you can record images in the size that fills the entire screen of the HD TV. • You cannot view movies output in [HD (1080i)] signal format. To the multi connector To audio/video input jacks Cable for multi-use terminal (supplied) To view on HD (High Definition) TV, an HD Output Adaptor Cable (not supplied) is needed. • If you set the image size to [SD] when shooting movies. 20 [ To view images on TV Connect the camera to the TV with the cable for multi-use terminal (supplied).
Instruction Manual
Page 21
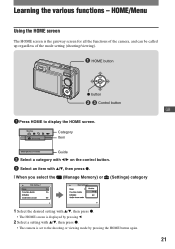
... desired setting with v/V, then press z. • The HOME screen is displayed by pressing b. 2 Select a setting with v/V, then press z. • The camera is the gateway screen for all the functions of the camera, and can be called up regardless of the mode setting (shooting/viewing). Learning the various functions - HOME/Menu Using the...
... desired setting with v/V, then press z. • The HOME screen is displayed by pressing b. 2 Select a setting with v/V, then press z. • The camera is the gateway screen for all the functions of the camera, and can be called up regardless of the mode setting (shooting/viewing). Learning the various functions - HOME/Menu Using the...
Instruction Manual
Page 26
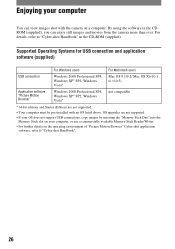
For details, refer to "Cyber-shot Handbook" in the CDROM (supplied), you can view images shot with an OS listed above. Supported Operating Systems for USB connection and application software (supplied) For Windows users For Macintosh...). OS upgrades are not supported. • Your computer must be pre-installed with the camera on a computer. Enjoying your computer, or use a commercially available Memory Stick Reader/Writer. • For further details on the operating environment of "Picture Motion Browser" Cyber-shot application software, refer to "Cyber-shot Handbook". 26
For details, refer to "Cyber-shot Handbook" in the CDROM (supplied), you can view images shot with an OS listed above. Supported Operating Systems for USB connection and application software (supplied) For Windows users For Macintosh...). OS upgrades are not supported. • Your computer must be pre-installed with the camera on a computer. Enjoying your computer, or use a commercially available Memory Stick Reader/Writer. • For further details on the operating environment of "Picture Motion Browser" Cyber-shot application software, refer to "Cyber-shot Handbook". 26

Instruction Manual
Page 27
...camera in the CD-ROM (supplied) explains how to your computer. 3 After copying is complete, double-click "Handbook.pdf". click the shortcut created on your computer, and insert the CD- Adobe Reader is complete, double- ROM (supplied) into the CD-ROM drive. Viewing "Cyber-shot Handbook" "Cyber-shot...27 GB When you install "Cyber-shot Handbook", the "Cyber-shot Step-up Guide" will be installed automatically. 3 After the installation is required to copy. • When you click the [Cyber-shot Handbook] button, the screen for copying "Cyber-shot Handbook" appears. 2 Follow the...
...camera in the CD-ROM (supplied) explains how to your computer. 3 After copying is complete, double-click "Handbook.pdf". click the shortcut created on your computer, and insert the CD- Adobe Reader is complete, double- ROM (supplied) into the CD-ROM drive. Viewing "Cyber-shot Handbook" "Cyber-shot...27 GB When you install "Cyber-shot Handbook", the "Cyber-shot Step-up Guide" will be installed automatically. 3 After the installation is required to copy. • When you click the [Cyber-shot Handbook] button, the screen for copying "Cyber-shot Handbook" appears. 2 Follow the...
Instruction Manual
Page 30
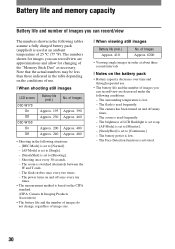
...[ Notes on the battery pack • Battery capacity decreases over time and through repeated use . [ When shooting still images LCD screen DSC-W170 On Off DSC-W150 On Off Battery life (min.) Approx. 195 Approx. 230 Approx. 200 Approx. 240 No. The numbers shown for images you can ... brightness of Images Approx. 390 Approx. 460 Approx. 400 Approx. 480 • Shooting in the table depending on the CIPA standard. (CIPA: Camera & Imaging Products Association) • The battery life and the number of images do not change, regardless of images you can record/view are approximations...
...[ Notes on the battery pack • Battery capacity decreases over time and through repeated use . [ When shooting still images LCD screen DSC-W170 On Off DSC-W150 On Off Battery life (min.) Approx. 195 Approx. 230 Approx. 200 Approx. 240 No. The numbers shown for images you can ... brightness of Images Approx. 390 Approx. 460 Approx. 400 Approx. 480 • Shooting in the table depending on the CIPA standard. (CIPA: Camera & Imaging Products Association) • The battery life and the number of images do not change, regardless of images you can record/view are approximations...
Instruction Manual
Page 31
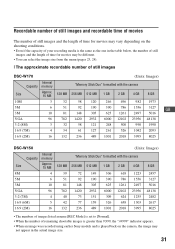
...500 990 1990 16:9 (7M) 4 34 61 127 261 526 1042 2093 16:9 (2M) 16 132 236 489 1001 2018 3995 8025 DSC-W150 Capacity Size 8M 5M 3M VGA 3:2 (7M) 16:9 (6M) 16:9 (2M) Internal memory Approx. 15 MB 4 6 10 96... 4 5 16 128 MB 39 51 81 782 40 42 132 (Units: Images) "Memory Stick Duo" formatted with the camera 256 MB 512 MB 72 92 148 1420 73 77 236 149 190 305 2932 151 159 489 1 GB 306 390 625... than 9,999, the ">9999" indicator appears. • When an image was recorded using earlier Sony models and is played back on the camera, the image may not appear in the actual image size. 31
...500 990 1990 16:9 (7M) 4 34 61 127 261 526 1042 2093 16:9 (2M) 16 132 236 489 1001 2018 3995 8025 DSC-W150 Capacity Size 8M 5M 3M VGA 3:2 (7M) 16:9 (6M) 16:9 (2M) Internal memory Approx. 15 MB 4 6 10 96... 4 5 16 128 MB 39 51 81 782 40 42 132 (Units: Images) "Memory Stick Duo" formatted with the camera 256 MB 512 MB 72 92 148 1420 73 77 236 149 190 305 2932 151 159 489 1 GB 306 390 625... than 9,999, the ">9999" indicator appears. • When an image was recorded using earlier Sony models and is played back on the camera, the image may not appear in the actual image size. 31
Instruction Manual
Page 32
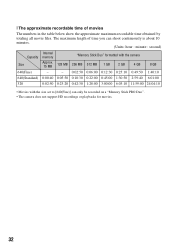
... recordable time of time you can shoot continuously is about 10 minutes. (Units: hour : minute : second) Internal Capacity memory "Memory Stick Duo" formatted with the camera Size Approx. 15 MB 128 MB 256 MB 512 MB 1 GB 2 GB 4 GB 8 GB 640(Fine) - - 0:02:50 0:06:00 0:12:30 0:25:10 0:49...:59:00 24:04:10 • Movies with the size set to [640(Fine)] can only be recorded on a "Memory Stick PRO Duo". • The camera does not support HD recordings or playbacks for movies. 32 The maximum length of movies The numbers in the table below show the approximate maximum...
... recordable time of time you can shoot continuously is about 10 minutes. (Units: hour : minute : second) Internal Capacity memory "Memory Stick Duo" formatted with the camera Size Approx. 15 MB 128 MB 256 MB 512 MB 1 GB 2 GB 4 GB 8 GB 640(Fine) - - 0:02:50 0:06:00 0:12:30 0:25:10 0:49...:59:00 24:04:10 • Movies with the size set to [640(Fine)] can only be recorded on a "Memory Stick PRO Duo". • The camera does not support HD recordings or playbacks for movies. 32 The maximum length of movies The numbers in the table below show the approximate maximum...
Instruction Manual
Page 33
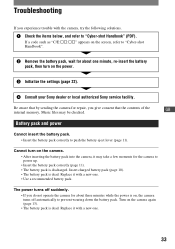
..." appears on the power. 3 Initialize the settings (page 22). 4 Consult your Sony dealer or local authorized Sony service facility. The power turns off automatically to "Cyber-shot Handbook". 2 Remove the battery pack, wait for repair, you do not operate the camera for the camera to power up. • Insert the battery pack correctly (page 11). •...
..." appears on the power. 3 Initialize the settings (page 22). 4 Consult your Sony dealer or local authorized Sony service facility. The power turns off automatically to "Cyber-shot Handbook". 2 Remove the battery pack, wait for repair, you do not operate the camera for the camera to power up. • Insert the battery pack correctly (page 11). •...
Instruction Manual
Page 34
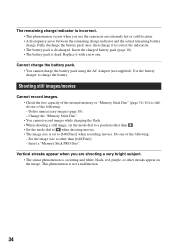
... movies. Do one . If it with a new one of the internal memory or "Memory Stick Duo" (page 31). Vertical streaks appear when you use the camera in an extremely hot or cold location. • A discrepancy arose between the remaining charge indicator and the actual remaining battery charge. Insert a "Memory Stick PRO...
... movies. Do one . If it with a new one of the internal memory or "Memory Stick Duo" (page 31). Vertical streaks appear when you use the camera in an extremely hot or cold location. • A discrepancy arose between the remaining charge indicator and the actual remaining battery charge. Insert a "Memory Stick PRO...


