Instruction Manual
Page 2
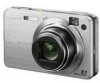
...with a polarized ac power cord plug (a plug having one blade wider than the other sources, refer to insert the plug fully into the set . [ Attachments Do not use attachments not recommended by forcing it in. [ Overloading Do not overload wall outlets, extension cords or convenience... For your Sony dealer regarding this manual for future reference. Never spill liquid of important operating and maintenance (servicing) instructions in fire or electric shock. [ Object and Liquid Entry Never push objects of power source indicated on the appliance, or the one way. DSC-W150/W170 Serial No...
...with a polarized ac power cord plug (a plug having one blade wider than the other sources, refer to insert the plug fully into the set . [ Attachments Do not use attachments not recommended by forcing it in. [ Overloading Do not overload wall outlets, extension cords or convenience... For your Sony dealer regarding this manual for future reference. Never spill liquid of important operating and maintenance (servicing) instructions in fire or electric shock. [ Object and Liquid Entry Never push objects of power source indicated on the appliance, or the one way. DSC-W150/W170 Serial No...
Instruction Manual
Page 3
...tub, in a wet basement, or near a swimming pool, etc. [ Power-Cord Protection Route the power cord so that have fallen into the set. - Refer all servicing to dangerous voltage or other hazards. for long periods of time, unplug it is exposed to the plugs, receptacles, and ...particular attention to direct sunlight. [ Lightning For added protection for this indicates a need for service. [ Servicing Do not attempt to service the set yourself as specified by the manufacturer that it is in fire, electric shock, or other controls may expose you to qualified service personnel. [ ...
...tub, in a wet basement, or near a swimming pool, etc. [ Power-Cord Protection Route the power cord so that have fallen into the set. - Refer all servicing to dangerous voltage or other hazards. for long periods of time, unplug it is exposed to the plugs, receptacles, and ...particular attention to direct sunlight. [ Lightning For added protection for this indicates a need for service. [ Servicing Do not attempt to service the set yourself as specified by the manufacturer that it is in fire, electric shock, or other controls may expose you to qualified service personnel. [ ...
Instruction Manual
Page 5
...the equipment into an outlet on its packaging indicates that this product. For Customers in order to comply with the limits for a digital device pursuant to radio communications. This equipment generates, uses, and can be handed over to correct the interference by inappropriate waste handling ...health, which could void your authority to operate this equipment. [ Note: This equipment has been tested and found compliant with the limits set out in a residential installation. [ CAUTION You are designed to which the receiver is no guarantee that interference will help to Part 15...
...the equipment into an outlet on its packaging indicates that this product. For Customers in order to comply with the limits for a digital device pursuant to radio communications. This equipment generates, uses, and can be handed over to correct the interference by inappropriate waste handling ...health, which could void your authority to operate this equipment. [ Note: This equipment has been tested and found compliant with the limits set out in a residential installation. [ CAUTION You are designed to which the receiver is no guarantee that interference will help to Part 15...
Instruction Manual
Page 7
...menu items 23 Menu items 24 Enjoying your computer 26 Supported Operating Systems for USB connection and application software (supplied 26 Viewing "Cyber-shot Handbook 27 Indicators on the screen 28 Battery life and memory capacity 30 Battery life and number of images you can record/view...supplied 9 1 Preparing the battery pack 10 2 Inserting the battery pack/a "Memory Stick Duo" (not supplied) ........ 11 3 Turning the camera on/setting the clock 13 Shooting images easily 14 Mode dial/Zoom/Flash/Macro/Self-timer/Display 15 Shooting in Smile Shutter mode 17 Viewing/deleting images ...
...menu items 23 Menu items 24 Enjoying your computer 26 Supported Operating Systems for USB connection and application software (supplied 26 Viewing "Cyber-shot Handbook 27 Indicators on the screen 28 Battery life and memory capacity 30 Battery life and number of images you can record/view...supplied 9 1 Preparing the battery pack 10 2 Inserting the battery pack/a "Memory Stick Duo" (not supplied) ........ 11 3 Turning the camera on/setting the clock 13 Shooting images easily 14 Mode dial/Zoom/Flash/Macro/Self-timer/Display 15 Shooting in Smile Shutter mode 17 Viewing/deleting images ...
Instruction Manual
Page 11
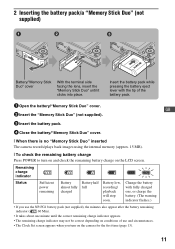
Change the battery with the tip of use and circumstances. • The Clock Set screen appears when you turn on and check the remaining battery charge on the camera for the first time (page 13). 11 GB 2 Insert the "Memory Stick Duo" (not supplied). 3 Insert the battery pack. 4 Close... the battery/"Memory Stick Duo" cover. [ When there is no "Memory Stick Duo" inserted The camera records/plays back images using the internal memory (approx. 15 MB). [ To check the remaining battery charge Press POWER to turn on the LCD screen...
Change the battery with the tip of use and circumstances. • The Clock Set screen appears when you turn on and check the remaining battery charge on the camera for the first time (page 13). 11 GB 2 Insert the "Memory Stick Duo" (not supplied). 3 Insert the battery pack. 4 Close... the battery/"Memory Stick Duo" cover. [ When there is no "Memory Stick Duo" inserted The camera records/plays back images using the internal memory (approx. 15 MB). [ To check the remaining battery charge Press POWER to turn on the LCD screen...
Instruction Manual
Page 13
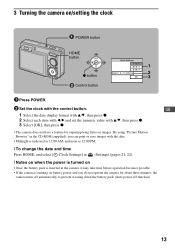
...display format with v/V, then press z. 2 Select each item with b/B and set the numeric value with v/V, then press z. 3 Select [OK], then press z. • The camera does not have a feature for about three minutes, the camera turns off automatically to prevent wearing down the battery pack (Auto power-off ...battery power and you can print or save images with the control button. 3 Turning the camera on/setting the clock POWER button HOME button 1 2 z button 3 ɟ Control button 1 Press POWER. 2 Set the clock with the date. • Midnight is indicated as 12:00 AM, and noon...
...display format with v/V, then press z. 2 Select each item with b/B and set the numeric value with v/V, then press z. 3 Select [OK], then press z. • The camera does not have a feature for about three minutes, the camera turns off automatically to prevent wearing down the battery pack (Auto power-off ...battery power and you can print or save images with the control button. 3 Turning the camera on/setting the clock POWER button HOME button 1 2 z button 3 ɟ Control button 1 Press POWER. 2 Set the clock with the date. • Midnight is indicated as 12:00 AM, and noon...
Instruction Manual
Page 15
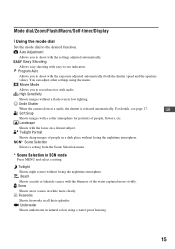
...using the menu. SCN* Scene Selection Selects a setting from the Scene Selection menu. * Scene Selection in all their splendor. You can adjust other settings using a water-proof housing. 15 Smile Shutter When the camera detects a smile, the shutter is released automatically. ...Fireworks Shoots fireworks in SCN mode Press MENU and select a setting. Landscape Shoots with a softer atmosphere for ...
...using the menu. SCN* Scene Selection Selects a setting from the Scene Selection menu. * Scene Selection in all their splendor. You can adjust other settings using a water-proof housing. 15 Smile Shutter When the camera detects a smile, the shutter is released automatically. ...Fireworks Shoots fireworks in SCN mode Press MENU and select a setting. Landscape Shoots with a softer atmosphere for ...
Instruction Manual
Page 16
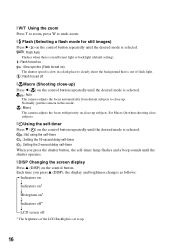
... self-timer Press V ( ) on the control button repeatedly until the desired mode is selected. : Not using the self-timer : Setting the 10-second delay self-timer : Setting the 2-second delay self-timer When you press v (DISP), the display and brightness changes as follows: Indicators on r Indicators on* ...selected. : Flash Auto Flashes when there is insufficient light or backlight (default setting). : Flash forced on : Slow synchro (Flash forced on) The shutter speed is slow in this mode. : Macro The camera adjusts the focus with priority on the control button repeatedly until the desired mode...
... self-timer Press V ( ) on the control button repeatedly until the desired mode is selected. : Not using the self-timer : Setting the 10-second delay self-timer : Setting the 2-second delay self-timer When you press v (DISP), the display and brightness changes as follows: Indicators on r Indicators on* ...selected. : Flash Auto Flashes when there is insufficient light or backlight (default setting). : Flash forced on : Slow synchro (Flash forced on) The shutter speed is slow in this mode. : Macro The camera adjusts the focus with priority on the control button repeatedly until the desired mode...
Instruction Manual
Page 17
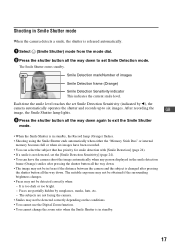
...priority for smile detection with [Smile Detection] (page 24). • If a smile is not detected, set the [Smile Detection Sensitivity] (page 24). • You can have the camera shoot the image automatically when any person displayed in the smile detection frame (Orange) smiles after pressing the ... not be detected correctly depending on the conditions. • You cannot use the Digital Zoom function. • You cannot change the zoom ratio when the Smile Shutter is in Smile Shutter mode When the camera detects a smile, the shutter is released automatically. 1 Select (Smile Shutter) mode...
...priority for smile detection with [Smile Detection] (page 24). • If a smile is not detected, set the [Smile Detection Sensitivity] (page 24). • You can have the camera shoot the image automatically when any person displayed in the smile detection frame (Orange) smiles after pressing the ... not be detected correctly depending on the conditions. • You cannot use the Digital Zoom function. • You cannot change the zoom ratio when the Smile Shutter is in Smile Shutter mode When the camera detects a smile, the shutter is released automatically. 1 Select (Smile Shutter) mode...
Instruction Manual
Page 18
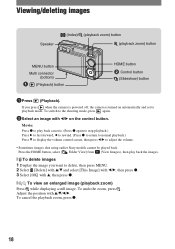
Movie: Press z to adjust the volume. • Sometimes images shot using earlier Sony models cannot be played back. To undo the zoom, press ....to play back the images. [ To delete images 1 Display the image you press when the camera is powered off, the camera is turned on the control button. Viewing/deleting images Speaker (Index)/ (playback zoom) button ...the playback zoom, press z. 18 To switch to the shooting mode, press again. 2Select an image with b/B on automatically and set to delete, then press MENU. 2 Select [Delete] with v/V and select [This Image] with b/B, then press z. 3...
Movie: Press z to adjust the volume. • Sometimes images shot using earlier Sony models cannot be played back. To undo the zoom, press ....to play back the images. [ To delete images 1 Display the image you press when the camera is powered off, the camera is turned on the control button. Viewing/deleting images Speaker (Index)/ (playback zoom) button ...the playback zoom, press z. 18 To switch to the shooting mode, press again. 2Select an image with b/B on automatically and set to delete, then press MENU. 2 Select [Delete] with v/V and select [This Image] with b/B, then press z. 3...
Instruction Manual
Page 19
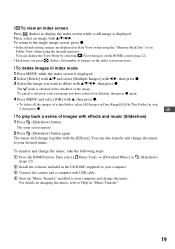
... music, take the following steps. 1 Press the HOME button. To transfer and change the music to the single image screen, press z. • In the default setting, images are displayed in Date View (when using the "Memory Stick Duo") or in Folder View (when using the internal memory). [ To view an index... screen Press (Index) to Help in "Music Transfer". (Slideshow) 19 To return to your computer. 3 Connect the camera and a computer with the [Effects]. Then, select an image with v/V/b/B, then press z.
... music, take the following steps. 1 Press the HOME button. To transfer and change the music to the single image screen, press z. • In the default setting, images are displayed in Date View (when using the "Memory Stick Duo") or in Folder View (when using the internal memory). [ To view an index... screen Press (Index) to Help in "Music Transfer". (Slideshow) 19 To return to your computer. 3 Connect the camera and a computer with the [Effects]. Then, select an image with v/V/b/B, then press z.
Instruction Manual
Page 20
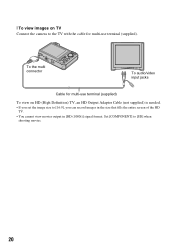
Set [COMPONENT] to [SD] when shooting movies. 20 To the multi connector To audio/video input jacks Cable for multi-use terminal (supplied) To view on TV Connect the camera to the TV with the cable for multi-use terminal (supplied). [ To view images on HD (High Definition) TV, an HD Output Adaptor Cable (not supplied) is needed. • If you set the image size to [16:9], you can record images in the size that fills the entire screen of the HD TV. • You cannot view movies output in [HD (1080i)] signal format.
Set [COMPONENT] to [SD] when shooting movies. 20 To the multi connector To audio/video input jacks Cable for multi-use terminal (supplied) To view on TV Connect the camera to the TV with the cable for multi-use terminal (supplied). [ To view images on HD (High Definition) TV, an HD Output Adaptor Cable (not supplied) is needed. • If you set the image size to [16:9], you can record images in the size that fills the entire screen of the HD TV. • You cannot view movies output in [HD (1080i)] signal format.
Instruction Manual
Page 21
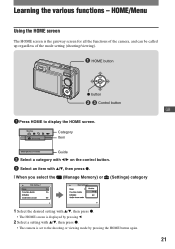
...; Control button GB 1 Press HOME to the shooting or viewing mode by pressing b. 2 Select a setting with v/V, then press z. • The camera is the gateway screen for all the functions of the camera, and can be called up regardless of the mode setting (shooting/viewing). HOME/Menu Using the HOME screen The HOME screen is...
...; Control button GB 1 Press HOME to the shooting or viewing mode by pressing b. 2 Select a setting with v/V, then press z. • The camera is the gateway screen for all the functions of the camera, and can be called up regardless of the mode setting (shooting/viewing). HOME/Menu Using the HOME screen The HOME screen is...
Instruction Manual
Page 22
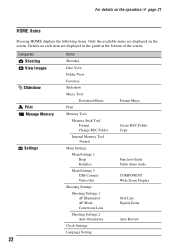
....Folder Internal Memory Tool Format Main Settings Main Settings 1 Beep Initialize Main Settings 2 USB Connect Video Out Shooting Settings Shooting Settings 1 AF Illuminator AF Mode Conversion Lens Shooting Settings 2 Auto Orientation Clock Settings Language Setting Format Music Create REC.Folder Copy Function Guide Smile demo mode COMPONENT Wide Zoom Display Grid Line Digital Zoom Auto Review Details on each...
....Folder Internal Memory Tool Format Main Settings Main Settings 1 Beep Initialize Main Settings 2 USB Connect Video Out Shooting Settings Shooting Settings 1 AF Illuminator AF Mode Conversion Lens Shooting Settings 2 Auto Orientation Clock Settings Language Setting Format Music Create REC.Folder Copy Function Guide Smile demo mode COMPONENT Wide Zoom Display Grid Line Digital Zoom Auto Review Details on each...

Instruction Manual
Page 23
... a desired menu item with v/V on the control button. • If the desired item is hidden, keep pressing v/V until the item appears on the screen. 3 Select a setting with b/B. • If the desired item is hidden, keep pressing b/B until the item appears on the screen. • Select an item in playback mode, then...
... a desired menu item with v/V on the control button. • If the desired item is hidden, keep pressing v/V until the item appears on the screen. 3 Select a setting with b/B. • If the desired item is hidden, keep pressing b/B until the item appears on the screen. • Select an item in playback mode, then...

Instruction Manual
Page 24
... Shutter function. Scene Recognition Automatically detects the shooting conditions and then takes the shot. EV Adjusts Exposure. Red Eye Reduction Sets to match various scene conditions. Color Mode Changes the vividness of flash light. Shooting menu Scene Selection Selects the settings pre-adjusted to reduce the red-eye phenomenon. ISO Selects a luminous sensitivity...
... Shutter function. Scene Recognition Automatically detects the shooting conditions and then takes the shot. EV Adjusts Exposure. Red Eye Reduction Sets to match various scene conditions. Color Mode Changes the vividness of flash light. Shooting menu Scene Selection Selects the settings pre-adjusted to reduce the red-eye phenomenon. ISO Selects a luminous sensitivity...

Instruction Manual
Page 25
... date. (Filter by Faces) Plays back images filtered to meet certain conditions. (Add/Remove Favorites) Registers images to Favorites or removes images from Favorites. (Slideshow) Sets and performs the Slideshow (playback of a series of images). (Retouch) Retouches still images. (Multi-Purpose Resize) Changes the image size according to print out. (Print...
... date. (Filter by Faces) Plays back images filtered to meet certain conditions. (Add/Remove Favorites) Registers images to Favorites or removes images from Favorites. (Slideshow) Sets and performs the Slideshow (playback of a series of images). (Retouch) Retouches still images. (Multi-Purpose Resize) Changes the image size according to print out. (Print...
Instruction Manual
Page 30
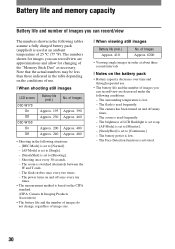
... camera has been turned on and off once every ten times. • The measurement method is used frequently. - The power turns on the battery pack • Battery capacity decreases over time and through repeated use . [ When shooting still images LCD screen DSC-W170 On Off DSC-W150 On... and allow for images you can record/view The numbers shown in the following situations: - [REC Mode] is set to [Normal]. - [AF Mode] is set to [Single]. - [SteadyShot] is set to [Continuous]. - The brightness of Images Approx. 390 Approx. 460 Approx. 400 Approx. 480 • Shooting...
... camera has been turned on and off once every ten times. • The measurement method is used frequently. - The power turns on the battery pack • Battery capacity decreases over time and through repeated use . [ When shooting still images LCD screen DSC-W170 On Off DSC-W150 On... and allow for images you can record/view The numbers shown in the following situations: - [REC Mode] is set to [Normal]. - [AF Mode] is set to [Single]. - [SteadyShot] is set to [Continuous]. - The brightness of Images Approx. 390 Approx. 460 Approx. 400 Approx. 480 • Shooting...
Instruction Manual
Page 31
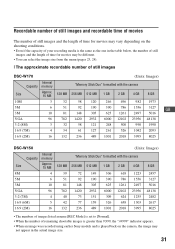
... The approximate recordable number of still images DSC-W170 (Units: Images) Internal Capacity memory "Memory Stick Duo" formatted with the camera Size Approx. 15 MB 128 MB 256 ...127 261 526 1042 2093 16:9 (2M) 16 132 236 489 1001 2018 3995 8025 DSC-W150 Capacity Size 8M 5M 3M VGA 3:2 (7M) 16:9 (6M) 16:9 (2M) ...40 42 132 (Units: Images) "Memory Stick Duo" formatted with the camera 256 MB 512 MB 72 92 148 1420 73 77 236 149 190 305...2617 8025 • The numbers of images listed assume [REC Mode] is set to [Normal]. • When the number of remaining shootable images is greater...
... The approximate recordable number of still images DSC-W170 (Units: Images) Internal Capacity memory "Memory Stick Duo" formatted with the camera Size Approx. 15 MB 128 MB 256 ...127 261 526 1042 2093 16:9 (2M) 16 132 236 489 1001 2018 3995 8025 DSC-W150 Capacity Size 8M 5M 3M VGA 3:2 (7M) 16:9 (6M) 16:9 (2M) ...40 42 132 (Units: Images) "Memory Stick Duo" formatted with the camera 256 MB 512 MB 72 92 148 1420 73 77 236 149 190 305...2617 8025 • The numbers of images listed assume [REC Mode] is set to [Normal]. • When the number of remaining shootable images is greater...
Instruction Manual
Page 32
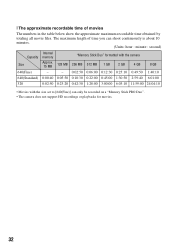
... recordable time of time you can shoot continuously is about 10 minutes. (Units: hour : minute : second) Internal Capacity memory "Memory Stick Duo" formatted with the camera Size Approx. 15 MB 128 MB 256 MB 512 MB 1 GB 2 GB 4 GB 8 GB 640(Fine) - - 0:02:50 0:06:00 0:12:30 0:25:10 0:49...:30 1:28:00 3:00:00 6:03:10 11:59:00 24:04:10 • Movies with the size set to [640(Fine)] can only be recorded on a "Memory Stick PRO Duo". • The camera does not support HD recordings or playbacks for movies. 32 The maximum length of movies The numbers in...
... recordable time of time you can shoot continuously is about 10 minutes. (Units: hour : minute : second) Internal Capacity memory "Memory Stick Duo" formatted with the camera Size Approx. 15 MB 128 MB 256 MB 512 MB 1 GB 2 GB 4 GB 8 GB 640(Fine) - - 0:02:50 0:06:00 0:12:30 0:25:10 0:49...:30 1:28:00 3:00:00 6:03:10 11:59:00 24:04:10 • Movies with the size set to [640(Fine)] can only be recorded on a "Memory Stick PRO Duo". • The camera does not support HD recordings or playbacks for movies. 32 The maximum length of movies The numbers in...


