
Operating Instructions
Page 1
Record the serial number in Japan Digital Still Camera User's Guide/ Troubleshooting Operating Instructions Before operating the unit, please read this product. Owner's Record The model and serial numbers are located on this product ... below. Refer to your Sony dealer regarding this manual and "Read This First" (separate volume) thoroughly, and retain it for future reference. DSC-H1 Serial No DSC-H1 "Read This First" (separate volume) Explains the set-up and basic operations for shooting/playback with your camera. 2-629-895-11(1) Enjoying the camera Using the menu Using the...
Record the serial number in Japan Digital Still Camera User's Guide/ Troubleshooting Operating Instructions Before operating the unit, please read this product. Owner's Record The model and serial numbers are located on this product ... below. Refer to your Sony dealer regarding this manual and "Read This First" (separate volume) thoroughly, and retain it for future reference. DSC-H1 Serial No DSC-H1 "Read This First" (separate volume) Explains the set-up and basic operations for shooting/playback with your camera. 2-629-895-11(1) Enjoying the camera Using the menu Using the...

Operating Instructions
Page 3
...on a circuit different from that any changes or modifications not expressly approved in a particular installation. If this equipment for your nearest Sony service station. 3 Connect the equipment into an outlet on its packaging indicates that interference will not occur in this equipment has ...cover, please contact your safety and convenience. By ensuring this product is no guarantee that this camera. If you will help prevent potential negative consequences for a digital device pursuant to the applicable collection point for help. Instead it shall be sure to radio ...
...on a circuit different from that any changes or modifications not expressly approved in a particular installation. If this equipment for your nearest Sony service station. 3 Connect the equipment into an outlet on its packaging indicates that interference will not occur in this equipment has ...cover, please contact your safety and convenience. By ensuring this product is no guarantee that this camera. If you will help prevent potential negative consequences for a digital device pursuant to the applicable collection point for help. Instead it shall be sure to radio ...

Operating Instructions
Page 4
...loss. In addition to malfunctions and an inability to other bright light. during the access lamp is a "Memory Stick". Notes on using your camera Types of "Memory Stick" that can be charged even if they are not completely discharged. Notes on the Nickel-Metal Hydride battery • ...Charge both of the supplied Ni-MH batteries before using the camera for the first time. (t step 1 in sandy or dusty locations may cause malfunctions. • If moisture condensation occurs, remove it may cause...
...loss. In addition to malfunctions and an inability to other bright light. during the access lamp is a "Memory Stick". Notes on using your camera Types of "Memory Stick" that can be charged even if they are not completely discharged. Notes on the Nickel-Metal Hydride battery • ...Charge both of the supplied Ni-MH batteries before using the camera for the first time. (t step 1 in sandy or dusty locations may cause malfunctions. • If moisture condensation occurs, remove it may cause...
Operating Instructions
Page 5
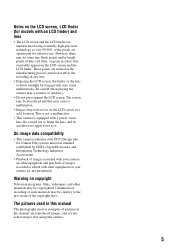
.... These points are not actual images shot using extremely high-precision technology so over 99.99% of such materials may trail across on your camera are operational for effective use. Notes on the LCD screen, LCD finder (for models with a power zoom lens. This is not a malfunction. ... equipment on the LCD screen in any way. • Exposing the LCD screen, the finder, or the lens to direct sunlight for Camera File system) universal standard established by JEITA (Japan Electronics and Information Technology Industries Association). • Playback of images recorded with your...
.... These points are not actual images shot using extremely high-precision technology so over 99.99% of such materials may trail across on your camera are operational for effective use. Notes on the LCD screen, LCD finder (for models with a power zoom lens. This is not a malfunction. ... equipment on the LCD screen in any way. • Exposing the LCD screen, the finder, or the lens to direct sunlight for Camera File system) universal standard established by JEITA (Japan Electronics and Information Technology Industries Association). • Playback of images recorded with your...
Operating Instructions
Page 6
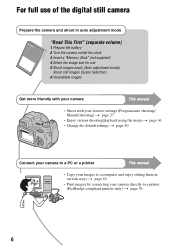
For full use of the digital still camera Prepare the camera and shoot in auto adjustment mode "Read This First" (separate volume) 1 Prepare the battery 2 Turn the camera on/set the clock 3 Insert a "Memory Stick" (not supplied) 4 Select the image size for use 5 Shoot images easily (...Auto adjustment mode) Shoot still images (Scene Selection) 6 View/delete images Get more friendly with your camera This manual • Shoot with your favorite settings (Program auto shooting/ Manual shooting) t page 27 • Enjoy various shooting/playback using the...
For full use of the digital still camera Prepare the camera and shoot in auto adjustment mode "Read This First" (separate volume) 1 Prepare the battery 2 Turn the camera on/set the clock 3 Insert a "Memory Stick" (not supplied) 4 Select the image size for use 5 Shoot images easily (...Auto adjustment mode) Shoot still images (Scene Selection) 6 View/delete images Get more friendly with your camera This manual • Shoot with your favorite settings (Program auto shooting/ Manual shooting) t page 27 • Enjoy various shooting/playback using the...

Operating Instructions
Page 7
... Stick" (Recording with the internal memory 24 Battery life and number of lighting 12 Quality - Adjusting the light intensity 11 Color - Focusing on using your camera 4 Enjoying the camera Basic techniques for better images 10 Focus - Table of contents Notes on a subject successfully 10 Exposure -
... Stick" (Recording with the internal memory 24 Battery life and number of lighting 12 Quality - Adjusting the light intensity 11 Color - Focusing on using your camera 4 Enjoying the camera Basic techniques for better images 10 Focus - Table of contents Notes on a subject successfully 10 Exposure -

Operating Instructions
Page 8
Viewing menu 43 (Folder) - (Protect) DPOF (Print) (Slide) (Resize) (Rotate) (Divide) (Setup) Trimming Using the Setup screen Using Setup items 50 Camera 1 51 1 AF Mode Digital Zoom Date/Time Red Eye Reduction AF Illuminator Auto Review Camera 2 54 2 Expanded Focus Enlarged Icon STEADY SHOT Conversion Lens Internal Memory Tool 56 Format Memory Stick Tool 57 Format Create REC. Folder Change REC. Folder Copy Setup 1 59 1 LCD Backlight EVF Backlight Beep Language Initialize 8
Viewing menu 43 (Folder) - (Protect) DPOF (Print) (Slide) (Resize) (Rotate) (Divide) (Setup) Trimming Using the Setup screen Using Setup items 50 Camera 1 51 1 AF Mode Digital Zoom Date/Time Red Eye Reduction AF Illuminator Auto Review Camera 2 54 2 Expanded Focus Enlarged Icon STEADY SHOT Conversion Lens Internal Memory Tool 56 Format Memory Stick Tool 57 Format Create REC. Folder Change REC. Folder Copy Setup 1 59 1 LCD Backlight EVF Backlight Beep Language Initialize 8
Operating Instructions
Page 9
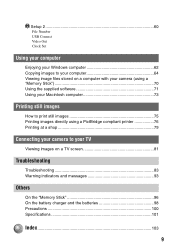
... Set Using your computer Enjoying your Windows computer 62 Copying images to your computer 64 Viewing image files stored on a computer with your camera (using a "Memory Stick 70 Using the supplied software 71 Using your Macintosh computer 73 Printing still images How to print still images... 75 Printing images directly using a PictBridge compliant printer 76 Printing at a shop 79 Connecting your camera to your TV Viewing images on a TV screen 81 Troubleshooting Troubleshooting 83 Warning indicators and messages 93 Others On the "Memory Stick 96...
... Set Using your computer Enjoying your Windows computer 62 Copying images to your computer 64 Viewing image files stored on a computer with your camera (using a "Memory Stick 70 Using the supplied software 71 Using your Macintosh computer 73 Printing still images How to print still images... 75 Printing images directly using a PictBridge compliant printer 76 Printing at a shop 79 Connecting your camera to your TV Viewing images on a TV screen 81 Troubleshooting Troubleshooting 83 Warning indicators and messages 93 Others On the "Memory Stick 96...

Operating Instructions
Page 10
Remember to focus on t "To choose a focus method" (page 32) If the image looks blurred even after focusing, it may be because of camera shake. Press fully down straight away Press halfway down, then Flashing,lit/beeps VGA FINE 101 96 Press fully down S AF 30 F3.5 To shoot a ... techniques for better images Focus Exposure Color Quality This section describes the basics so you can stabilize the camera by leaning against a tree or a building beside you how to use various camera functions such as the mode dial (page 27), jog dial (page 26), the menus (page 36), and so on. Hints...
Remember to focus on t "To choose a focus method" (page 32) If the image looks blurred even after focusing, it may be because of camera shake. Press fully down straight away Press halfway down, then Flashing,lit/beeps VGA FINE 101 96 Press fully down S AF 30 F3.5 To shoot a ... techniques for better images Focus Exposure Color Quality This section describes the basics so you can stabilize the camera by leaning against a tree or a building beside you how to use various camera functions such as the mode dial (page 27), jog dial (page 26), the menus (page 36), and so on. Hints...

Operating Instructions
Page 11
... proper value in the auto adjustment mode. t page 31 [Metering Mode]: Allows you to change the part of light that the camera will receive when you to pass through ISO = Recording sensitivity Overexposure = too much light Whitish image Correct exposure Underexposure = too little...value) Faster Moving objects appear stopped. Open In-focus range narrows, both backward and forward. 11 Shutter speed = Length of time the camera receives Exposure: light Aperture = Size of the opening allowing light to adjust the exposure that has been determined by adjusting the exposure and...
... proper value in the auto adjustment mode. t page 31 [Metering Mode]: Allows you to change the part of light that the camera will receive when you to pass through ISO = Recording sensitivity Overexposure = too much light Whitish image Correct exposure Underexposure = too little...value) Faster Moving objects appear stopped. Open In-focus range narrows, both backward and forward. 11 Shutter speed = Length of time the camera receives Exposure: light Aperture = Size of the opening allowing light to adjust the exposure that has been determined by adjusting the exposure and...
Operating Instructions
Page 13
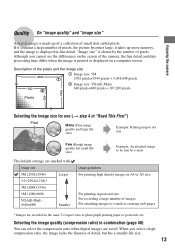
...of images For attaching images to e-mail or creating web pages * Images are recorded in combination (page 40) You can select the compression ratio when digital images are marked with Image size 5M (2592×1944) Larger 3:2 (2592×1728)* 3M (2048×1536) 1M (1280×960) ... image quality (compression ratio) in the same 3:2 aspect ratio as photograph printing paper or postcards, etc. Enjoying the camera 1944 480 Quality On "image quality" and "image size" A digital image is made up to A4 size Few (Rough image quality but has a smaller file size. 13 Usage guidelines For...
...of images For attaching images to e-mail or creating web pages * Images are recorded in combination (page 40) You can select the compression ratio when digital images are marked with Image size 5M (2592×1944) Larger 3:2 (2592×1728)* 3M (2048×1536) 1M (1280×960) ... image quality (compression ratio) in the same 3:2 aspect ratio as photograph printing paper or postcards, etc. Enjoying the camera 1944 480 Quality On "image quality" and "image size" A digital image is made up to A4 size Few (Rough image quality but has a smaller file size. 13 Usage guidelines For...
Operating Instructions
Page 15
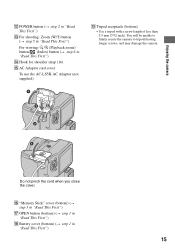
Enjoying the camera L POWER button (t step 2 in "Read This First") M For shooting: Zoom (W/T) button (t step 5 in "Read This First") For viewing: / (Playback zoom) button/ (Index) button (t step 6 in "... (not supplied) 1 S Tripod receptacle (bottom) • Use a tripod with a screw length of less than 5.5 mm (7/32 inch). You will be unable to firmly secure the camera to tripods having longer screws, and may damage the camera. 3 2 4 Do not pinch the cord when you close the cover.
Enjoying the camera L POWER button (t step 2 in "Read This First") M For shooting: Zoom (W/T) button (t step 5 in "Read This First") For viewing: / (Playback zoom) button/ (Index) button (t step 6 in "... (not supplied) 1 S Tripod receptacle (bottom) • Use a tripod with a screw length of less than 5.5 mm (7/32 inch). You will be unable to firmly secure the camera to tripods having longer screws, and may damage the camera. 3 2 4 Do not pinch the cord when you close the cover.
Operating Instructions
Page 17
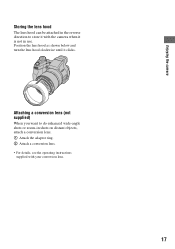
Attaching a conversion lens (not supplied) When you want to store it with your conversion lens. 17 Enjoying the camera Storing the lens hood The lens hood can be attached in the reverse direction to do enhanced wide-angle shots or zoom-in use. Position the lens hood as shown below and turn the lens hood clockwise until it is not in shots on distant objects, attach a conversion lens. 1 Attach the adaptor ring. 2 Attach a conversion lens. • For details, see the operating instructions supplied with the camera when it clicks.
Attaching a conversion lens (not supplied) When you want to store it with your conversion lens. 17 Enjoying the camera Storing the lens hood The lens hood can be attached in the reverse direction to do enhanced wide-angle shots or zoom-in use. Position the lens hood as shown below and turn the lens hood clockwise until it is not in shots on distant objects, attach a conversion lens. 1 Attach the adaptor ring. 2 Attach a conversion lens. • For details, see the operating instructions supplied with the camera when it clicks.

Operating Instructions
Page 19
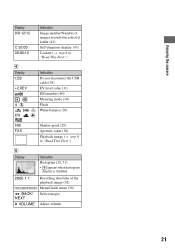
... capacity (23) Remaining "Memory Stick" capacity (23) Recording time [maximum recordable time] (23) Multi Burst interval (40) Remaining number of light or a tripod. Enjoying the camera B Display 2 5 10 90cm 0.9 2 5m Indication Manual focus bar (33) S AF M AF C AF z Set Macro (t step 5 in "Read This First") AF mode (51) AF range finder...
... capacity (23) Remaining "Memory Stick" capacity (23) Recording time [maximum recordable time] (23) Multi Burst interval (40) Remaining number of light or a tripod. Enjoying the camera B Display 2 5 10 90cm 0.9 2 5m Indication Manual focus bar (33) S AF M AF C AF z Set Macro (t step 5 in "Read This First") AF mode (51) AF range finder...
Operating Instructions
Page 21
... image (t step 6 in "Read This First") E Display 2005 1 1 DPOF BACK/ NEXT VOLUME Indication Histogram (22, 31) • appears when histogram display is disabled. Enjoying the camera Display 8/8 12/12 C:32:00 00:00:12 D Display +2.0EV WB Indication Image number/Number of the playback image (52) Menu/Guide menu (36) Select...
... image (t step 6 in "Read This First") E Display 2005 1 1 DPOF BACK/ NEXT VOLUME Indication Histogram (22, 31) • appears when histogram display is disabled. Enjoying the camera Display 8/8 12/12 C:32:00 00:00:12 D Display +2.0EV WB Indication Image number/Number of the playback image (52) Menu/Guide menu (36) Select...

Operating Instructions
Page 22
... the histogram display to on VGA 96 S AF • When you press the (Screen status) button, the display changes as follows. You are using other cameras. 22
... the histogram display to on VGA 96 S AF • When you press the (Screen status) button, the display changes as follows. You are using other cameras. 22

Operating Instructions
Page 23
The number of images that can be recorded using earlier Sony models are played back on a "Memory Stick" formatted with the size set to that of a 32...12:20 0:44:27 11:44:22 0:25:18 1:31:09 24:18:25 • Movies with this camera. Enjoying the camera Number of still images and recording time of movies The tables show the approximate number of still images and the ...length of time for movies that can be recorded on this camera, the display may vary depending on the lower line.) (Images) Capacity Size 5M 3:2 3M 1M VGA(E-Mail) ...
The number of images that can be recorded using earlier Sony models are played back on a "Memory Stick" formatted with the size set to that of a 32...12:20 0:44:27 11:44:22 0:25:18 1:31:09 24:18:25 • Movies with this camera. Enjoying the camera Number of still images and recording time of movies The tables show the approximate number of still images and the ...length of time for movies that can be recorded on this camera, the display may vary depending on the lower line.) (Images) Capacity Size 5M 3:2 3M 1M VGA(E-Mail) ...

Operating Instructions
Page 24
Even when there is no "Memory Stick" inserted in the camera, you can record images using the internal memory. On image data stored in the internal memory We recommend that you copy (back up) data without a "Memory Stick" inserted in the camera. • You cannot move image data on a "Memory ...Stick" to the internal memory. • By connecting the camera and a computer with the internal memory) The camera has 32 MB of your computer Perform the procedure on pages 64 to 68 without fail using the internal memory. [Playback]: Images stored...
Even when there is no "Memory Stick" inserted in the camera, you can record images using the internal memory. On image data stored in the internal memory We recommend that you copy (back up) data without a "Memory Stick" inserted in the camera. • You cannot move image data on a "Memory ...Stick" to the internal memory. • By connecting the camera and a computer with the internal memory) The camera has 32 MB of your computer Perform the procedure on pages 64 to 68 without fail using the internal memory. [Playback]: Images stored...

Operating Instructions
Page 25
...The zoom is low - The flash strobes once every two times - The power turns on and off many times - Enjoying the camera Battery life and number of images that can be recorded/viewed The tables show the approximate number of images that can be recorded/viewed...• The battery capacity decreases as necessary. The surrounding temperature is switched alternately between the W and T ends - The camera has been turned on the CIPA standard. (CIPA: Camera & Imaging Products Association) 25 Note that can be recorded/ viewed and the battery life are decreased under the following situations...
...The zoom is low - The flash strobes once every two times - The power turns on and off many times - Enjoying the camera Battery life and number of images that can be recorded/viewed The tables show the approximate number of images that can be recorded/viewed...• The battery capacity decreases as necessary. The surrounding temperature is switched alternately between the W and T ends - The camera has been turned on the CIPA standard. (CIPA: Camera & Imaging Products Association) 25 Note that can be recorded/ viewed and the battery life are decreased under the following situations...

Operating Instructions
Page 27
... shooting mode Allows you can select the various settings using the menu. (For details on the functions available t page 37) 27 Mode dial Enjoying the camera : Shooting movies t step 5 in "Read This First" Control button Still image shooting modes : Playback/Edit t step 6 in "Read This First" P: Program auto shooting mode Allows...
... shooting mode Allows you can select the various settings using the menu. (For details on the functions available t page 37) 27 Mode dial Enjoying the camera : Shooting movies t step 5 in "Read This First" Control button Still image shooting modes : Playback/Edit t step 6 in "Read This First" P: Program auto shooting mode Allows...


