Operating Instructions
Page 1
... Camera User's Guide/ Troubleshooting Operating Instructions Before operating the unit, please read this product. Model No. DSC-H1 Serial No DSC-H1 "Read This First" (separate volume) Explains the set-up and basic operations for future reference. Refer to your Sony dealer regarding this manual and "Read This First" (separate volume) thoroughly, and retain it for shooting/playback with your camera. 2-629-895-11(1) Enjoying the camera Using the menu Using the Setup screen Using your computer Printing still images Connecting...
... Camera User's Guide/ Troubleshooting Operating Instructions Before operating the unit, please read this product. Model No. DSC-H1 Serial No DSC-H1 "Read This First" (separate volume) Explains the set-up and basic operations for future reference. Refer to your Sony dealer regarding this manual and "Read This First" (separate volume) thoroughly, and retain it for shooting/playback with your camera. 2-629-895-11(1) Enjoying the camera Using the menu Using the Setup screen Using your computer Printing still images Connecting...
Operating Instructions
Page 3
... instructions, may influence the picture and sound of this camera. Reorient or relocate the receiving antenna. - Increase the separation between the equipment and receiver. - For more of the following measures: - Notice for customers in the EMC Directive for your household waste disposal service or the shop where you will not occur in this manual could otherwise be replaced...
... instructions, may influence the picture and sound of this camera. Reorient or relocate the receiving antenna. - Increase the separation between the equipment and receiver. - For more of the following measures: - Notice for customers in the EMC Directive for your household waste disposal service or the shop where you will not occur in this manual could otherwise be replaced...

Operating Instructions
Page 4
... batteries for a long time, use up the existing charge and remove them from your camera Types of "Memory Stick" that can be used (not supplied) The IC recording medium used by inserting it before operating the camera. • Before you do not intend to avoid the potential risk of data loss, always copy (back up of the internal memory • If you turn off the power by opening the battery...
... batteries for a long time, use up the existing charge and remove them from your camera Types of "Memory Stick" that can be used (not supplied) The IC recording medium used by inserting it before operating the camera. • Before you do not intend to avoid the potential risk of data loss, always copy (back up of the internal memory • If you turn off the power by opening the battery...
Operating Instructions
Page 9
Setup 2 60 2 File Number USB Connect Video Out Clock Set Using your computer Enjoying your Windows computer 62 Copying images to your computer 64 Viewing image files stored on a computer with your camera (using a "Memory Stick 70 Using the supplied software 71 Using your Macintosh computer 73 Printing still images How to print still images 75 Printing images directly using a PictBridge compliant printer 76 Printing at a shop 79 Connecting your camera to your TV Viewing images on a TV screen 81 Troubleshooting Troubleshooting 83 Warning indicators and messages 93 Others On...
Setup 2 60 2 File Number USB Connect Video Out Clock Set Using your computer Enjoying your Windows computer 62 Copying images to your computer 64 Viewing image files stored on a computer with your camera (using a "Memory Stick 70 Using the supplied software 71 Using your Macintosh computer 73 Printing still images How to print still images 75 Printing images directly using a PictBridge compliant printer 76 Printing at a shop 79 Connecting your camera to your TV Viewing images on a TV screen 81 Troubleshooting Troubleshooting 83 Warning indicators and messages 93 Others On...
Operating Instructions
Page 13
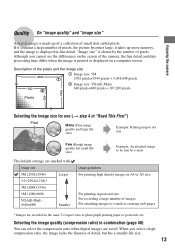
... image size for use (t step 4 in "Read This First") Pixel Many (Fine image quality and large file size) Example: Printing in up more memory, and the image is displayed in fine detail. Enjoying the camera 1944 480 Quality On "image quality" and "image size" A digital image is made up of a collection of pixels, the picture becomes large, it contains a large number of small dots called pixels. If it takes...
... image size for use (t step 4 in "Read This First") Pixel Many (Fine image quality and large file size) Example: Printing in up more memory, and the image is displayed in fine detail. Enjoying the camera 1944 480 Quality On "image quality" and "image size" A digital image is made up of a collection of pixels, the picture becomes large, it contains a large number of small dots called pixels. If it takes...

Operating Instructions
Page 32
... image composition. • To set the Flexible Spot AF, see the following procedure. • This is given to subjects in auto focus mode. This mode is not displayed. 32 In these cases, the manual focus mode is convenient. • AF stands for Auto Focus. • When you are shooting movies, Multi point AF is recommended as the AF works even with the AF lock function lets you shoot using...
... image composition. • To set the Flexible Spot AF, see the following procedure. • This is given to subjects in auto focus mode. This mode is not displayed. 32 In these cases, the manual focus mode is convenient. • AF stands for Auto Focus. • When you are shooting movies, Multi point AF is recommended as the AF works even with the AF lock function lets you shoot using...

Operating Instructions
Page 43
... recording images t [Change REC. Of Files: 9 Created: 2005 1 1 1:05:34AM OK Cancel BACK/NEXT 2 Select [OK] with . (Folder) P S AM Selects the folder containing the image you want to either the previous and next folders. 43 z On the [Folder] The camera stores images in the folder is displayed, the following procedure. Cancel Cancels the selection. 1 Select the desired folder with b/B on the operation t page 36 The default settings...
... recording images t [Change REC. Of Files: 9 Created: 2005 1 1 1:05:34AM OK Cancel BACK/NEXT 2 Select [OK] with . (Folder) P S AM Selects the folder containing the image you want to either the previous and next folders. 43 z On the [Folder] The camera stores images in the folder is displayed, the following procedure. Cancel Cancels the selection. 1 Select the desired folder with b/B on the operation t page 36 The default settings...
Operating Instructions
Page 51
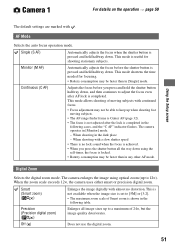
Using the Setup screen Camera 1 1 For details on the operation t page 50 The default settings are marked with a slow shutter speed • There is no distortion. Continuous (C AF) Adjusts the focus before the shutter button is locked. • Battery consumption may be faster than in the following cases, and the "C AF" indicator flashes. The camera enlarges the image using the self-timer, the focus is pressed and held halfway down. When the zoom scale exceeds 12...
Using the Setup screen Camera 1 1 For details on the operation t page 50 The default settings are marked with a slow shutter speed • There is no distortion. Continuous (C AF) Adjusts the focus before the shutter button is locked. • Battery consumption may be faster than in the following cases, and the "C AF" indicator flashes. The camera enlarges the image using the self-timer, the focus is pressed and held halfway down. When the zoom scale exceeds 12...
Operating Instructions
Page 60
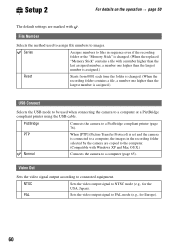
... default settings are copied to the computer. (Compatible with Windows XP and Mac OS X.) Normal Connects the camera to a computer (page 65). File Number Selects the method used when connecting the camera to a computer or a PictBridge compliant printer using the USB cable. PTP When [PTP] (Picture Transfer Protocol) is set and the camera is connected to a computer, the images in sequence even if the recording folder or the "Memory Stick" is changed. (When the replaced "Memory Stick" contains a file with a number...
... default settings are copied to the computer. (Compatible with Windows XP and Mac OS X.) Normal Connects the camera to a computer (page 65). File Number Selects the method used when connecting the camera to a computer or a PictBridge compliant printer using the USB cable. PTP When [PTP] (Picture Transfer Protocol) is set and the camera is connected to a computer, the images in sequence even if the recording folder or the "Memory Stick" is changed. (When the replaced "Memory Stick" contains a file with a number...
Operating Instructions
Page 69
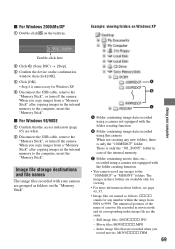
... white. 2 Disconnect the USB cable, remove the "Memory Stick", or turn off the camera. Image file storage destinations and file names The image files recorded with your computer Double-click here 2 Click (Sony DSC) t [Stop]. 3 Confirm the device on the confirmation window, then click [OK]. 4 Click [OK]. • Step 4 is only the "101_SONY" folder in case of a movie file recorded in the internal memory to the computer, insert the "Memory Stick". When you copy images...
... white. 2 Disconnect the USB cable, remove the "Memory Stick", or turn off the camera. Image file storage destinations and file names The image files recorded with your computer Double-click here 2 Click (Sony DSC) t [Stop]. 3 Confirm the device on the confirmation window, then click [OK]. 4 Click [OK]. • Step 4 is only the "101_SONY" folder in case of a movie file recorded in the internal memory to the computer, insert the "Memory Stick". When you copy images...

Operating Instructions
Page 70
... settings. Do not change the extension. 70 Viewing image files stored on your camera is not guaranteed. • When there is no longer remains on a "Memory Stick", you can view that of your camera, playback on a computer with your camera (page 57) and then copy the image file. 2 Copy the image file to the "Memory Stick" folder in the following order. 1Right-click the image file, then click [Copy]. 2Double-click [Removable Disk] or [Sony...
... settings. Do not change the extension. 70 Viewing image files stored on your camera is not guaranteed. • When there is no longer remains on a "Memory Stick", you can view that of your camera, playback on a computer with your camera (page 57) and then copy the image file. 2 Copy the image file to the "Memory Stick" folder in the following order. 1Right-click the image file, then click [Copy]. 2Double-click [Removable Disk] or [Sony...
Operating Instructions
Page 71
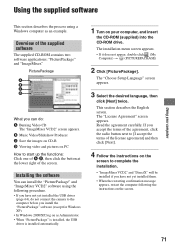
... Video CD The "ImageMixer VCD2" screen appears. This section describes the English screen. The "License Agreement" screen appears. PicturePackage A B C D What you install the "PicturePackage" software (except for Windows XP). • In Windows 2000/XP, log on as Administrator. • When "PicturePackage" is installed, the USB driver is installed automatically. 1 Turn on your computer This section describes the process using the following the instructions on the screen to...
... Video CD The "ImageMixer VCD2" screen appears. This section describes the English screen. The "License Agreement" screen appears. PicturePackage A B C D What you install the "PicturePackage" software (except for Windows XP). • In Windows 2000/XP, log on as Administrator. • When "PicturePackage" is installed, the USB driver is installed automatically. 1 Turn on your computer This section describes the process using the following the instructions on the screen to...

Operating Instructions
Page 73
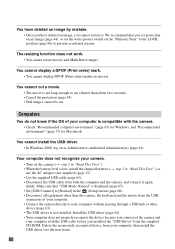
... MB Display: 1024 × 768 dots or more, 32,000 colors or more • QuickTime 4 or later must be pre-installed. (QuickTime 5 or later is recommended.) Notes on connecting your camera to a computer • Operations are two modes for a USB connection when connecting a computer, [Normal] (the default setting) and [PTP] modes. Copying and viewing images on the types of the images and file names, see page 69. 4 View images on...
... MB Display: 1024 × 768 dots or more, 32,000 colors or more • QuickTime 4 or later must be pre-installed. (QuickTime 5 or later is recommended.) Notes on connecting your camera to a computer • Operations are two modes for a USB connection when connecting a computer, [Normal] (the default setting) and [PTP] modes. Copying and viewing images on the types of the images and file names, see page 69. 4 View images on...

Operating Instructions
Page 74
....SIT] file in the copy-to the "Trash" icon, then remove the USB cable, remove the "Memory Stick", or turn off . The installation of the software starts. To start up "ImageMixer VCD2" Open [Image Mixer] in the video CD format on your computer off the camera Drag and drop the drive icon or the icon of the "Memory Stick" to folder. 5 Double-click the extracted [ImageMixer VCD2_Install] file. 74 To save the data in [Application...
....SIT] file in the copy-to the "Trash" icon, then remove the USB cable, remove the "Memory Stick", or turn off . The installation of the software starts. To start up "ImageMixer VCD2" Open [Image Mixer] in the video CD format on your computer off the camera Drag and drop the drive icon or the icon of the "Memory Stick" to folder. 5 Double-click the extracted [ImageMixer VCD2_Install] file. 74 To save the data in [Application...

Operating Instructions
Page 85
...). Delete unnecessary images (t step 6 in Multi Burst mode. - The image is out of the following: - Do one of focus. • The subject is activated (page 29). Shooting in "Read This First") - The subject is set to [Precision] (page 51). • This function cannot be used while shooting movies. Recording takes a long time. • The NR slow shutter function is too close -up (Macro) recording mode. Smart zoom does not function. • Set [Digital Zoom...
...). Delete unnecessary images (t step 6 in Multi Burst mode. - The image is out of the following: - Do one of focus. • The subject is activated (page 29). Shooting in "Read This First") - The subject is set to [Precision] (page 51). • This function cannot be used while shooting movies. Recording takes a long time. • The NR slow shutter function is too close -up (Macro) recording mode. Smart zoom does not function. • Set [Digital Zoom...
Operating Instructions
Page 88
... the protection (page 45). • Still images cannot be cut a movie. • The movie is low, install the charged batteries (t step 1 in the (Setup) menu (page 60). • Disconnect all equipment other device (page 63). • The USB driver is displayed (page 65). • Set [USB Connect] to [Normal] in "Read This First"), or use the AC Adaptor (not supplied) (page 15). • Use the supplied USB cable (page...
... the protection (page 45). • Still images cannot be cut a movie. • The movie is low, install the charged batteries (t step 1 in the (Setup) menu (page 60). • Disconnect all equipment other device (page 63). • The USB driver is displayed (page 65). • Set [USB Connect] to [Normal] in "Read This First"), or use the AC Adaptor (not supplied) (page 15). • Use the supplied USB cable (page...
Operating Instructions
Page 89
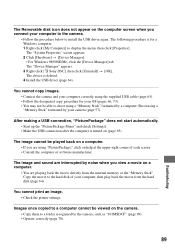
... a Windows computer. 1 Right-click [My Computer] to the hard disk of each screen. • Consult the computer or software manufacturer. After making a USB connection, "PicturePackage" does not start automatically. • Start up the "PicturePackage Menu" and check [Settings]. • Make the USB connection after the computer is deleted. 4 Install the USB driver (page 64). Images once copied to a computer cannot be able to a folder recognized by your computer correctly using a "Memory Stick" formatted by...
... a Windows computer. 1 Right-click [My Computer] to the hard disk of each screen. • Consult the computer or software manufacturer. After making a USB connection, "PicturePackage" does not start automatically. • Start up the "PicturePackage Menu" and check [Settings]. • Make the USB connection after the computer is deleted. 4 Install the USB driver (page 64). Images once copied to a computer cannot be able to a folder recognized by your computer correctly using a "Memory Stick" formatted by...
Operating Instructions
Page 93
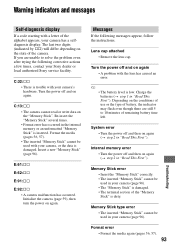
... authorized Sony service facility. E • The battery level is damaged. The last two digits (indicated by ss) will differ depending on again (t step 2 in the internal memory or an unformatted "Memory Stick" is trouble with the lens has caused an error. Lens cap attached • Remove the lens cap. Internal memory error • Turn the power off and on the conditions of use or the type of battery, the indicator may flash even...
... authorized Sony service facility. E • The battery level is damaged. The last two digits (indicated by ss) will differ depending on again (t step 2 in the internal memory or an unformatted "Memory Stick" is trouble with the lens has caused an error. Lens cap attached • Remove the lens cap. Internal memory error • Turn the power off and on the conditions of use or the type of battery, the indicator may flash even...
Operating Instructions
Page 104
... First" LCD Backlight 59 LCD screen ..........see "Screen" Lens hood 16 M M AF 51 Macintosh computer 73 Recommended environment 73 Macro t step 5 in "Read This First" Mains lead t step 1 in "Read This First" Manual focus 32 "Memory Stick 96 Insert/Remove t step 3 in "Read This First" Format 57 Number of images/ recording time 23 Write-protect switch ..... 96 Memory Stick Tool 57 Menu 36 Items 37 Shooting 38 Viewing 43 Metering Mode 38 Moisture...
... First" LCD Backlight 59 LCD screen ..........see "Screen" Lens hood 16 M M AF 51 Macintosh computer 73 Recommended environment 73 Macro t step 5 in "Read This First" Mains lead t step 1 in "Read This First" Manual focus 32 "Memory Stick 96 Insert/Remove t step 3 in "Read This First" Format 57 Number of images/ recording time 23 Write-protect switch ..... 96 Memory Stick Tool 57 Menu 36 Items 37 Shooting 38 Viewing 43 Metering Mode 38 Moisture...

Operating Instructions
Page 105
... Single-image mode........76 Print order mark 79 Printing at a shop 79 Printing directly 76 Program auto shooting ..........27 Protect 44 PTP 60 Q Quick Review t step 5 in "Read This First" R Red Eye Reduction 52 Resize 46 Rewind/Fast forward t step 6 in "Read This First" Rotate 47 S S AF 51 Saturation 41 Scene t step 5 in "Read This First" Screen Changing the display .....22 Indicator 18 LCD Backlight 59 Self-diagnosis display...........93 Self-timer...
... Single-image mode........76 Print order mark 79 Printing at a shop 79 Printing directly 76 Program auto shooting ..........27 Protect 44 PTP 60 Q Quick Review t step 5 in "Read This First" R Red Eye Reduction 52 Resize 46 Rewind/Fast forward t step 6 in "Read This First" Rotate 47 S S AF 51 Saturation 41 Scene t step 5 in "Read This First" Screen Changing the display .....22 Indicator 18 LCD Backlight 59 Self-diagnosis display...........93 Self-timer...


