Operating Instructions
Page 5
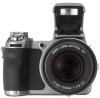
... on the LCD screen, LCD finder (for models with an LCD finder) and lens • The LCD screen and the LCD finder are manufactured using this camera. 5 Be careful not to bump the lens, and be contrary to it. Unauthorized recording of images recorded or edited with ...pictures in any way. • Exposing the LCD screen, the finder, or the lens to direct sunlight for long periods may be discolored and that constantly appear on your camera are operational for Camera File system) universal standard established by JEITA (Japan Electronics and Information Technology Industries Association)....
... on the LCD screen, LCD finder (for models with an LCD finder) and lens • The LCD screen and the LCD finder are manufactured using this camera. 5 Be careful not to bump the lens, and be contrary to it. Unauthorized recording of images recorded or edited with ...pictures in any way. • Exposing the LCD screen, the finder, or the lens to direct sunlight for long periods may be discolored and that constantly appear on your camera are operational for Camera File system) universal standard established by JEITA (Japan Electronics and Information Technology Industries Association)....

Operating Instructions
Page 8
Viewing menu 43 (Folder) - (Protect) DPOF (Print) (Slide) (Resize) (Rotate) (Divide) (Setup) Trimming Using the Setup screen Using Setup items 50 Camera 1 51 1 AF Mode Digital Zoom Date/Time Red Eye Reduction AF Illuminator Auto Review Camera 2 54 2 Expanded Focus Enlarged Icon STEADY SHOT Conversion Lens Internal Memory Tool 56 Format Memory Stick Tool 57 Format Create REC. Folder Change REC. Folder Copy Setup 1 59 1 LCD Backlight EVF Backlight Beep Language Initialize 8
Viewing menu 43 (Folder) - (Protect) DPOF (Print) (Slide) (Resize) (Rotate) (Divide) (Setup) Trimming Using the Setup screen Using Setup items 50 Camera 1 51 1 AF Mode Digital Zoom Date/Time Red Eye Reduction AF Illuminator Auto Review Camera 2 54 2 Expanded Focus Enlarged Icon STEADY SHOT Conversion Lens Internal Memory Tool 56 Format Memory Stick Tool 57 Format Create REC. Folder Change REC. Folder Copy Setup 1 59 1 LCD Backlight EVF Backlight Beep Language Initialize 8

Operating Instructions
Page 14
... screen (18) F MENU button (36) G Control button Menu on: v/V/b/B/z (t step 2 in "Read This First") Menu off: / / / (t step 5 in "Read This First") H (Screen status) button (22) I Lens J Flash (t step 5 in "Read This First") q; 1 2 3 4 qa 5 qs 6 qd 7 qf 8 qg 9 A POWER lamp (t step 2 in "Read This First") B Mode dial (27) C /BRK button (34) D Shutter...
... screen (18) F MENU button (36) G Control button Menu on: v/V/b/B/z (t step 2 in "Read This First") Menu off: / / / (t step 5 in "Read This First") H (Screen status) button (22) I Lens J Flash (t step 5 in "Read This First") q; 1 2 3 4 qa 5 qs 6 qd 7 qf 8 qg 9 A POWER lamp (t step 2 in "Read This First") B Mode dial (27) C /BRK button (34) D Shutter...

Operating Instructions
Page 16
Attaching the shoulder strap and the lens cap Attaching the lens hood When you shoot in bright lighting conditions, such as outdoors, we recommend that you use the lens hood to reduce the image quality deterioration caused by unnecessary light. 1 Attach the adaptor ring. 2 Position the lens hood as shown below and turn the lens hood clockwise until it clicks. • You can attach the lens cap with the lens hood attached. • When the adaptor ring is attached, it may block flashlight, AF illuminator light. 16
Attaching the shoulder strap and the lens cap Attaching the lens hood When you shoot in bright lighting conditions, such as outdoors, we recommend that you use the lens hood to reduce the image quality deterioration caused by unnecessary light. 1 Attach the adaptor ring. 2 Position the lens hood as shown below and turn the lens hood clockwise until it clicks. • You can attach the lens cap with the lens hood attached. • When the adaptor ring is attached, it may block flashlight, AF illuminator light. 16
Operating Instructions
Page 17
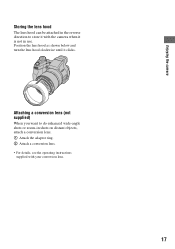
Position the lens hood as shown below and turn the lens hood clockwise until it is not in shots on distant objects, attach a conversion lens. 1 Attach the adaptor ring. 2 Attach a conversion lens. • For details, see the operating instructions supplied with the camera when it clicks. Enjoying the camera Storing the lens hood The lens hood can be attached in the reverse direction to do enhanced wide-angle shots or zoom-in use. Attaching a conversion lens (not supplied) When you want to store it with your conversion lens. 17
Position the lens hood as shown below and turn the lens hood clockwise until it is not in shots on distant objects, attach a conversion lens. 1 Attach the adaptor ring. 2 Attach a conversion lens. • For details, see the operating instructions supplied with the camera when it clicks. Enjoying the camera Storing the lens hood The lens hood can be attached in the reverse direction to do enhanced wide-angle shots or zoom-in use. Attaching a conversion lens (not supplied) When you want to store it with your conversion lens. 17

Operating Instructions
Page 18
..., t step 5 in parentheses for details of operation. Indicators on the screen See the pages in "Read This First") Sharpness (42) 5 Saturation (41) 6 Contrast (41) Conversion lens (55) ON AF illuminator (53) Metering mode (38) Picture effect (41) 18
..., t step 5 in parentheses for details of operation. Indicators on the screen See the pages in "Read This First") Sharpness (42) 5 Saturation (41) 6 Contrast (41) Conversion lens (55) ON AF illuminator (53) Metering mode (38) Picture effect (41) 18

Operating Instructions
Page 33
... 98 AF range finder frame S AF MOVE OK AF range finder frame indicator 3 Move the AF range finder frame to the point you point the lens up or down, the error increases. • The distance selection is approximate. The manual focus bar appears. If 9 flashes, it indicates the limitation... macro mode, and the manual focus is canceld. • Distance setting information in manual focus is limited according to select (Flexible Spot AF). Enjoying the camera To set the Flexible Spot AF 1 Set the mode dial to P, S, A, M or . 2 Press the FOCUS button repeatedly to the zoom scaling or...
... 98 AF range finder frame S AF MOVE OK AF range finder frame indicator 3 Move the AF range finder frame to the point you point the lens up or down, the error increases. • The distance selection is approximate. The manual focus bar appears. If 9 flashes, it indicates the limitation... macro mode, and the manual focus is canceld. • Distance setting information in manual focus is limited according to select (Flexible Spot AF). Enjoying the camera To set the Flexible Spot AF 1 Set the mode dial to P, S, A, M or . 2 Press the FOCUS button repeatedly to the zoom scaling or...

Operating Instructions
Page 53
... does not see the pre-strobe, or other conditions. The AF illuminator emits red light allowing the camera to focus easily when the shutter button is pressed halfway, until the shutter clicks, hold the camera firmly to approximately 2.9 m (9 feet 6 1/4 inches) (zoom: W)/2.6 m (8 feet 6 3/8 inches) (zoom: T) is ...When the manual focus is blocked by them. The ON indicator appears at close range. • When attaching the adaptor ring or a conversion lens, the AF illuminator is selected (page 33), [AF Illuminator] does not function. • The AF range finder frame does not appear. ...
... does not see the pre-strobe, or other conditions. The AF illuminator emits red light allowing the camera to focus easily when the shutter button is pressed halfway, until the shutter clicks, hold the camera firmly to approximately 2.9 m (9 feet 6 1/4 inches) (zoom: W)/2.6 m (8 feet 6 3/8 inches) (zoom: T) is ...When the manual focus is blocked by them. The ON indicator appears at close range. • When attaching the adaptor ring or a conversion lens, the AF illuminator is selected (page 33), [AF Illuminator] does not function. • The AF range finder frame does not appear. ...

Operating Instructions
Page 55
...light may be blocked, causing the lens shadow to appear. • The available zoom area is limited. • The available focusing area is limited. • For details, see the operating instructions supplied with your conversion lens. Using the Setup screen 55 Attach... the supplied adaptor ring, then attach a conversion lens. Tele ( ) Attaches a tele conversion lens. For details on the operation t page 50 Conversion Lens Sets for achieving appropriate focus when attaching an...
...light may be blocked, causing the lens shadow to appear. • The available zoom area is limited. • The available focusing area is limited. • For details, see the operating instructions supplied with your conversion lens. Using the Setup screen 55 Attach... the supplied adaptor ring, then attach a conversion lens. Tele ( ) Attaches a tele conversion lens. For details on the operation t page 50 Conversion Lens Sets for achieving appropriate focus when attaching an...

Operating Instructions
Page 85
...the following: - Zoom does not work . • The flash is too close -up (Macro) recording mode. Smart zoom does not function. • Set [Digital Zoom] to [5M] or [3:2]. - Shooting movies. The flash does not work . • You cannot change the zoom scale when shooting movies. Delete unnecessary ...size is selected. Change the "Memory Stick". • Set the write-protect switch on the screen. • Set the mode dial to position the lens farther away from the subject than [640(Fine)]. - Record in the close . - Shooting in "Read This First"). • The manual focus is...
...the following: - Zoom does not work . • The flash is too close -up (Macro) recording mode. Smart zoom does not function. • Set [Digital Zoom] to [5M] or [3:2]. - Shooting movies. The flash does not work . • You cannot change the zoom scale when shooting movies. Delete unnecessary ...size is selected. Change the "Memory Stick". • Set the write-protect switch on the screen. • Set the mode dial to position the lens farther away from the subject than [640(Fine)]. - Record in the close . - Shooting in "Read This First"). • The manual focus is...

Operating Instructions
Page 92
...Set screen appears when you can use with charged batteries (t step 1 in "Read This First"). 92 The lens gets fogged. • Moisture condensation has occurred. It may take some time depending on the camera. • Set the date and time again (t step 2 in "Read This First") or use it... (page 100). Change the setting of the printer. The lens does not move when you use the AC Adaptor (not supplied). Others Your camera does not work . • The built-in "Read This First"). Remove the batteries, and then, after canceling ...
...Set screen appears when you can use with charged batteries (t step 1 in "Read This First"). 92 The lens gets fogged. • Moisture condensation has occurred. It may take some time depending on the camera. • Set the date and time again (t step 2 in "Read This First") or use it... (page 100). Change the setting of the printer. The lens does not move when you use the AC Adaptor (not supplied). Others Your camera does not work . • The built-in "Read This First"). Remove the batteries, and then, after canceling ...
Operating Instructions
Page 93
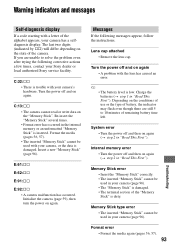
...contact your camera has a selfdiagnosis display. Lens cap attached • Remove the lens cap. Internal memory error • Turn the power off and on again (t step 2 in your camera, or the... of the alphabet appears, your Sony dealer or local authorized Sony service facility. Charge the batteries (t step 1 in your camera's hardware. Initialize the camera (page 59), then turn the...E:92:ss • A camera malfunction has occurred. Warning indicators and messages Self-diagnosis display If a code starting with a letter of the camera. The last two digits (indicated by ss) will...
...contact your camera has a selfdiagnosis display. Lens cap attached • Remove the lens cap. Internal memory error • Turn the power off and on again (t step 2 in your camera, or the... of the alphabet appears, your Sony dealer or local authorized Sony service facility. Charge the batteries (t step 1 in your camera's hardware. Initialize the camera (page 59), then turn the...E:92:ss • A camera malfunction has occurred. Warning indicators and messages Self-diagnosis display If a code starting with a letter of the camera. The last two digits (indicated by ss) will...
Operating Instructions
Page 99
... life. • The battery life varies depending on the battery cover of the camera are dirty, the battery life may be able to shoot at low temperatures, and you may turn off with the lens portion extended when you shoot a lot using the flash and the zoom, the ...41°F). • Do not mix new and old batteries. • The battery remaining indicator does not display the correct information when using the camera. In this reason, the power may turn off even though the battery remaining indicator shows sufficient battery life remaining. • Battery performance differs greatly ...
... life. • The battery life varies depending on the battery cover of the camera are dirty, the battery life may be able to shoot at low temperatures, and you may turn off with the lens portion extended when you shoot a lot using the flash and the zoom, the ...41°F). • Do not mix new and old batteries. • The battery remaining indicator does not display the correct information when using the camera. In this reason, the power may turn off even though the battery remaining indicator shows sufficient battery life remaining. • Battery performance differs greatly ...

Operating Instructions
Page 100
...whether the power is brought from a cold location such as a ski slope into the camera. Charging method Insert charged batteries in the camera, or connect the camera to record clear images. Cleaning the lens Wipe the lens with an LCD cleaning kit (not supplied) to evaporate. x On the internal rechargeable ... about one month it to adapt to remove fingerprints, dust, etc. In this may condense inside the lens, you will be unable to a wall outlet (wall socket) using the camera. x On cleaning Cleaning the LCD screen Wipe the screen surface with a soft cloth to conditions at...
...whether the power is brought from a cold location such as a ski slope into the camera. Charging method Insert charged batteries in the camera, or connect the camera to record clear images. Cleaning the lens Wipe the lens with an LCD cleaning kit (not supplied) to evaporate. x On the internal rechargeable ... about one month it to adapt to remove fingerprints, dust, etc. In this may condense inside the lens, you will be unable to a wall outlet (wall socket) using the camera. x On cleaning Cleaning the LCD screen Wipe the screen surface with a soft cloth to conditions at...
Operating Instructions
Page 101
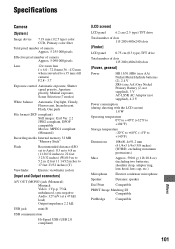
..., Primary color filter Total pixel number of camera Approx. 5 255 000 pixels Effective pixel number of camera Approx. 5 090 000 pixels Lens 12× zoom lens f = 6.0 - 72.0 mm (36 - 432 mm when converted to a 35 mm still camera) F2.8 - 3.7 Exposure control Automatic exposure... maximum protrusions) Mass Approx. 590.8 g (1 lb 20.8 oz) (including two batterries, shoulder strap, adaptor ring, lens hood, lens cap, etc.) Microphone Electret condenser microphone Speaker Dynamic speaker Exif Print Compatible PRINT Image Matching III Compatible PictBridge Compatible Others 101
..., Primary color filter Total pixel number of camera Approx. 5 255 000 pixels Effective pixel number of camera Approx. 5 090 000 pixels Lens 12× zoom lens f = 6.0 - 72.0 mm (36 - 432 mm when converted to a 35 mm still camera) F2.8 - 3.7 Exposure control Automatic exposure... maximum protrusions) Mass Approx. 590.8 g (1 lb 20.8 oz) (including two batterries, shoulder strap, adaptor ring, lens hood, lens cap, etc.) Microphone Electret condenser microphone Speaker Dynamic speaker Exif Print Compatible PRINT Image Matching III Compatible PictBridge Compatible Others 101

Operating Instructions
Page 103
... Camera 2 54 Candle mode t step 5 in "Read This First" 103 Index Folder 57 D Date 52 Date/Time 52 Day&Time 52 Daylight 39 Delete t step 6 in "Read This First" Digital Zoom 51 DirectX 63 Divide 47 DPOF 79 E Effective pixels 101 Electronic transformer t step 1 in "Read This ...13 Computer Copying images 64 Macintosh 73 Recommended environment 63, 73 Software 71 Viewing image stored on a computer with your camera 70 Windows 62 Connecting Computer 65 Printer 77 TV 81 Continuous 51 Contrast 41 Conversion Lens 55 Copy 58 Copying images to your computer 64 Create REC.
... Camera 2 54 Candle mode t step 5 in "Read This First" 103 Index Folder 57 D Date 52 Date/Time 52 Day&Time 52 Daylight 39 Delete t step 6 in "Read This First" Digital Zoom 51 DirectX 63 Divide 47 DPOF 79 E Effective pixels 101 Electronic transformer t step 1 in "Read This ...13 Computer Copying images 64 Macintosh 73 Recommended environment 63, 73 Software 71 Viewing image stored on a computer with your camera 70 Windows 62 Connecting Computer 65 Printer 77 TV 81 Continuous 51 Contrast 41 Conversion Lens 55 Copy 58 Copying images to your computer 64 Create REC.
Operating Instructions
Page 104
... First" Format 56, 57 H High-speed shutter mode t step 5 in "Read This First" Histogram 22, 31 Holding the camera t step 5 in "Read This First" I Identifying parts 14 Image file storage destinations and file names 69 Image quality 13, ... step 5 in "Read This First" Language 59 t step 2 in "Read This First" LCD Backlight 59 LCD screen ..........see "Screen" Lens hood 16 M M AF 51 Macintosh computer 73 Recommended environment 73 Macro t step 5 in "Read This First" Mains lead t step 1... First" Power cord t step 1 in "Read This First" Precautions 100 Precision digital zoom .......... 51
... First" Format 56, 57 H High-speed shutter mode t step 5 in "Read This First" Histogram 22, 31 Holding the camera t step 5 in "Read This First" I Identifying parts 14 Image file storage destinations and file names 69 Image quality 13, ... step 5 in "Read This First" Language 59 t step 2 in "Read This First" LCD Backlight 59 LCD screen ..........see "Screen" Lens hood 16 M M AF 51 Macintosh computer 73 Recommended environment 73 Macro t step 5 in "Read This First" Mains lead t step 1... First" Power cord t step 1 in "Read This First" Precautions 100 Precision digital zoom .......... 51


