
Operating Instructions
Page 4
...as is lit, the data in "Read This First") • The batteries can be charged even if they are two types of "Memory Stick". • "Memory Stick": you can use a "Memory Stick" with your camera. • "Memory Stick Duo": you record one-time events, make a trial recording to make sure that the...8226; Charge both of the supplied Ni-MH batteries before using the camera (page 100). • Do not shake or strike the camera. This is a "Memory Stick". See page 24 on "Memory Stick", see page 98. Water entering the inside of the camera may not be able to record or play back properly. • ...
...as is lit, the data in "Read This First") • The batteries can be charged even if they are two types of "Memory Stick". • "Memory Stick": you can use a "Memory Stick" with your camera. • "Memory Stick Duo": you record one-time events, make a trial recording to make sure that the...8226; Charge both of the supplied Ni-MH batteries before using the camera (page 100). • Do not shake or strike the camera. This is a "Memory Stick". See page 24 on "Memory Stick", see page 98. Water entering the inside of the camera may not be able to record or play back properly. • ...
Operating Instructions
Page 6
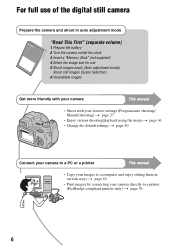
For full use of the digital still camera Prepare the camera and shoot in auto adjustment mode "Read This First" (separate volume) 1 Prepare the battery 2 Turn the camera on/set the clock 3 Insert a "Memory Stick" (not supplied) 4 Select the image size for use 5 Shoot images easily (Auto adjustment ...mode) Shoot still images (Scene Selection) 6 View/delete images Get more friendly with your camera This manual • Shoot with...
For full use of the digital still camera Prepare the camera and shoot in auto adjustment mode "Read This First" (separate volume) 1 Prepare the battery 2 Turn the camera on/set the clock 3 Insert a "Memory Stick" (not supplied) 4 Select the image size for use 5 Shoot images easily (Auto adjustment ...mode) Shoot still images (Scene Selection) 6 View/delete images Get more friendly with your camera This manual • Shoot with...

Operating Instructions
Page 7
... on the screen 18 Changing the screen display 22 Number of still images and recording time of movies 23 When you do not have a "Memory Stick" (Recording with manual adjustment 29 Shooting continuously 34 Using the menu Using menu items 36 Menu items 37 Shooting menu 38 (Metering Mode) WB... images that can be recorded/viewed 25 Using the jog dial 26 Using the mode dial 27 Shooting with the internal memory 24 Battery life and number of contents Notes on using your camera 4 Enjoying the camera Basic techniques for better images 10 Focus - On the effects of lighting 12 Quality -
... on the screen 18 Changing the screen display 22 Number of still images and recording time of movies 23 When you do not have a "Memory Stick" (Recording with manual adjustment 29 Shooting continuously 34 Using the menu Using menu items 36 Menu items 37 Shooting menu 38 (Metering Mode) WB... images that can be recorded/viewed 25 Using the jog dial 26 Using the mode dial 27 Shooting with the internal memory 24 Battery life and number of contents Notes on using your camera 4 Enjoying the camera Basic techniques for better images 10 Focus - On the effects of lighting 12 Quality -

Operating Instructions
Page 8
Folder Change REC. Folder Copy Setup 1 59 1 LCD Backlight EVF Backlight Beep Language Initialize 8 Viewing menu 43 (Folder) - (Protect) DPOF (Print) (Slide) (Resize) (Rotate) (Divide) (Setup) Trimming Using the Setup screen Using Setup items 50 Camera 1 51 1 AF Mode Digital Zoom Date/Time Red Eye Reduction AF Illuminator Auto Review Camera 2 54 2 Expanded Focus Enlarged Icon STEADY SHOT Conversion Lens Internal Memory Tool 56 Format Memory Stick Tool 57 Format Create REC.
Folder Change REC. Folder Copy Setup 1 59 1 LCD Backlight EVF Backlight Beep Language Initialize 8 Viewing menu 43 (Folder) - (Protect) DPOF (Print) (Slide) (Resize) (Rotate) (Divide) (Setup) Trimming Using the Setup screen Using Setup items 50 Camera 1 51 1 AF Mode Digital Zoom Date/Time Red Eye Reduction AF Illuminator Auto Review Camera 2 54 2 Expanded Focus Enlarged Icon STEADY SHOT Conversion Lens Internal Memory Tool 56 Format Memory Stick Tool 57 Format Create REC.
Operating Instructions
Page 9
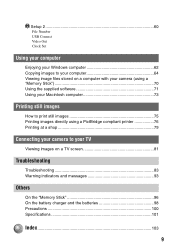
... computer Enjoying your Windows computer 62 Copying images to your computer 64 Viewing image files stored on a computer with your camera (using a "Memory Stick 70 Using the supplied software 71 Using your Macintosh computer 73 Printing still images How to print still images 75 Printing...a PictBridge compliant printer 76 Printing at a shop 79 Connecting your camera to your TV Viewing images on a TV screen 81 Troubleshooting Troubleshooting 83 Warning indicators and messages 93 Others On the "Memory Stick 96 On the battery charger and the batteries 98 Precautions 100 Specifications ...
... computer Enjoying your Windows computer 62 Copying images to your computer 64 Viewing image files stored on a computer with your camera (using a "Memory Stick 70 Using the supplied software 71 Using your Macintosh computer 73 Printing still images How to print still images 75 Printing...a PictBridge compliant printer 76 Printing at a shop 79 Connecting your camera to your TV Viewing images on a TV screen 81 Troubleshooting Troubleshooting 83 Warning indicators and messages 93 Others On the "Memory Stick 96 On the battery charger and the batteries 98 Precautions 100 Specifications ...
Operating Instructions
Page 15
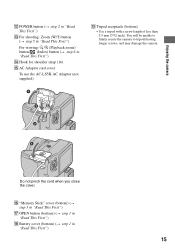
P "Memory Stick" cover (bottom) (t step 3 in "Read This First") Q OPEN button (bottom) (t step 1 in "Read This First") R Battery cover (bottom) (t step 1 in "Read This First") N Hook for ... length of less than 5.5 mm (7/32 inch). You will be unable to firmly secure the camera to tripods having longer screws, and may damage the camera. 3 2 4 Do not pinch the cord when you close the cover. Enjoying the camera L POWER button (t step 2 in "Read This First") M For shooting: Zoom (W/T) button (t step 5 in "Read...
P "Memory Stick" cover (bottom) (t step 3 in "Read This First") Q OPEN button (bottom) (t step 1 in "Read This First") R Battery cover (bottom) (t step 1 in "Read This First") N Hook for ... length of less than 5.5 mm (7/32 inch). You will be unable to firmly secure the camera to tripods having longer screws, and may damage the camera. 3 2 4 Do not pinch the cord when you close the cover. Enjoying the camera L POWER button (t step 2 in "Read This First") M For shooting: Zoom (W/T) button (t step 5 in "Read...

Operating Instructions
Page 19
... folder (57) • This does not appear when using the internal memory. Even if the vibration warning appears, you from shooting clear images. Remaining internal memory capacity (23) Remaining "Memory Stick" capacity (23) Recording time [maximum recordable time] (23) Multi Burst... interval (40) Remaining number of light or a tripod. However, we recommend turning on the previous page) Menu/Guide menu (36) 19 Enjoying the camera B Display ...
... folder (57) • This does not appear when using the internal memory. Even if the vibration warning appears, you from shooting clear images. Remaining internal memory capacity (23) Remaining "Memory Stick" capacity (23) Recording time [maximum recordable time] (23) Multi Burst... interval (40) Remaining number of light or a tripod. However, we recommend turning on the previous page) Menu/Guide menu (36) 19 Enjoying the camera B Display ...

Operating Instructions
Page 20
...6 in "Read This First") C Display 101 101 Indication PictBridge connecting (77) Recording folder (57) • This does not appear when using the internal memory. Zoom scaling (t step 6 in "Read This First") Frame by frame playback (34) B Display 101-0012 Indication Folder-file number (43) Playback bar (t...") Protect (44) Print order (DPOF) mark (79) Change folder (43) • This does not appear when using the internal memory. Remaining internal memory capacity (23) Remaining "Memory Stick" capacity (23) Playback folder (43) • This does not appear when using the internal...
...6 in "Read This First") C Display 101 101 Indication PictBridge connecting (77) Recording folder (57) • This does not appear when using the internal memory. Zoom scaling (t step 6 in "Read This First") Frame by frame playback (34) B Display 101-0012 Indication Folder-file number (43) Playback bar (t...") Protect (44) Print order (DPOF) mark (79) Change folder (43) • This does not appear when using the internal memory. Remaining internal memory capacity (23) Remaining "Memory Stick" capacity (23) Playback folder (43) • This does not appear when using the internal...

Operating Instructions
Page 23
... 0:25:18 1:31:09 24:18:25 • Movies with this internal memory is equivalent to [640(Fine)] can be recorded using earlier Sony models are played back on this camera, the display may vary depending on a "Memory Stick PRO". • For image size and image quality, see page 13. •...; When images recorded using this camera. The values may differ from the actual image size...
... 0:25:18 1:31:09 24:18:25 • Movies with this internal memory is equivalent to [640(Fine)] can be recorded using earlier Sony models are played back on this camera, the display may vary depending on a "Memory Stick PRO". • For image size and image quality, see page 13. •...; When images recorded using this camera. The values may differ from the actual image size...

Operating Instructions
Page 24
... hard disc of your computer Perform the procedure on a "Memory Stick" to the internal memory. • By connecting the camera and a computer with the image size set to the internal memory. 24 When you do not have a "Memory Stick" (Recording with a capacity of 32 MB or more, ... "Memory Stick". Even when there is not removable. To copy (back up ) data without a "Memory Stick" inserted in [Copy] (page 58). On image data stored in the internal memory We recommend that you copy (back up ) data on a "Memory Stick" Prepare a "Memory Stick" with the internal memory) The camera has...
... hard disc of your computer Perform the procedure on a "Memory Stick" to the internal memory. • By connecting the camera and a computer with the image size set to the internal memory. 24 When you do not have a "Memory Stick" (Recording with a capacity of 32 MB or more, ... "Memory Stick". Even when there is not removable. To copy (back up ) data without a "Memory Stick" inserted in [Copy] (page 58). On image data stored in the internal memory We recommend that you copy (back up ) data on a "Memory Stick" Prepare a "Memory Stick" with the internal memory) The camera has...

Operating Instructions
Page 25
...times • The measurement method is set to [Monitor] - [STEADY SHOT] is based on and off many times - The camera has been turned on the CIPA standard. (CIPA: Camera & Imaging Products Association) 25 The flash strobes once every two times - The flash is used frequently - [LCD Backlight] is...No. The battery power is used - Enjoying the camera Battery life and number of images that can be recorded/viewed The tables show the approximate number of images that can be recorded or viewed take into account changing the "Memory Stick" as the number of uses increases and also over ...
...times • The measurement method is set to [Monitor] - [STEADY SHOT] is based on and off many times - The camera has been turned on the CIPA standard. (CIPA: Camera & Imaging Products Association) 25 The flash strobes once every two times - The flash is used frequently - [LCD Backlight] is...No. The battery power is used - Enjoying the camera Battery life and number of images that can be recorded/viewed The tables show the approximate number of images that can be recorded or viewed take into account changing the "Memory Stick" as the number of uses increases and also over ...

Operating Instructions
Page 34
... [400]: 1/25 second or slower When [ISO] is not [400]: 1/6 second or slower • When the battery level is low, or when the internal memory or "Memory Stick" is full, the Burst stops. • You may not be selected. • You can select the image with the appropriate exposure after recording when you...
... [400]: 1/25 second or slower When [ISO] is not [400]: 1/6 second or slower • When the battery level is low, or when the internal memory or "Memory Stick" is full, the Burst stops. • You may not be selected. • You can select the image with the appropriate exposure after recording when you...

Operating Instructions
Page 43
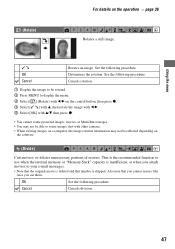
... Name:102MSDCF No. OK See the following indicators appear. : Moves to the previous folder. : Moves to the next folder. : Moves to play back (when using a "Memory Stick" only). Cancel Cancels the selection. 1 Select the desired folder with v, then press z. You can change the folder for recording images t [Change REC. Folder] (page 57... create a new one. • To create a new folder t [Create REC. Using the menu Viewing menu For details on the control button. z On the [Folder] The camera stores images in the folder is displayed, the following procedure.
... Name:102MSDCF No. OK See the following indicators appear. : Moves to the previous folder. : Moves to the next folder. : Moves to play back (when using a "Memory Stick" only). Cancel Cancels the selection. 1 Select the desired folder with v, then press z. You can change the folder for recording images t [Change REC. Folder] (page 57... create a new one. • To create a new folder t [Create REC. Using the menu Viewing menu For details on the control button. z On the [Folder] The camera stores images in the folder is displayed, the following procedure.
Operating Instructions
Page 46
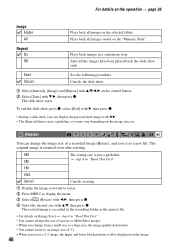
... "Read This First" 1M VGA Cancel Cancels resizing. 1 Display the image you resize a 3:2 image, the upper and lower black portions will be displayed on the "Memory Stick". Cancels the slide show. 1 Select [Interval], [Image] and [Repeat] with v/V/b/B on the image size, etc. (Resize) P S AM You can display the previous/next image with...
... "Read This First" 1M VGA Cancel Cancels resizing. 1 Display the image you resize a 3:2 image, the upper and lower black portions will be displayed on the "Memory Stick". Cancels the slide show. 1 Select [Interval], [Image] and [Repeat] with v/V/b/B on the image size, etc. (Resize) P S AM You can display the previous/next image with...
Operating Instructions
Page 47
... Cuts movies, or deletes unnecessary portions of movies. See the following procedure. This is the recommended function to use when the internal memory or "Memory Stick" capacity is insufficient, or when you cut them. Cancels rotation. 1 Display the image to be rotated. 2 Press MENU to ...display the menu. 3 Select [ ] (Rotate) with b/B on the control button, then press z. 4 Select [ ] with v, then rotate the image with b/B. 5 Select [OK] with other cameras...
... Cuts movies, or deletes unnecessary portions of movies. See the following procedure. This is the recommended function to use when the internal memory or "Memory Stick" capacity is insufficient, or when you cut them. Cancels rotation. 1 Display the image to be rotated. 2 Press MENU to ...display the menu. 3 Select [ ] (Rotate) with b/B on the control button, then press z. 4 Select [ ] with v, then rotate the image with b/B. 5 Select [OK] with other cameras...
Operating Instructions
Page 56
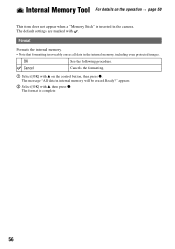
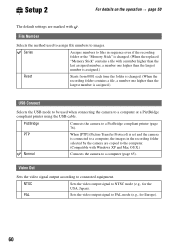
... default settings are marked with v, then press z. Format Formats the internal memory. • Note that formatting irrevocably erases all data in the camera. Cancel Cancels the formatting. 1 Select [OK] with v on the operation t page 50 This item does not appear when a "Memory Stick" is complete. 56 OK See the following procedure. The message "All...
... default settings are marked with v, then press z. Format Formats the internal memory. • Note that formatting irrevocably erases all data in the camera. Cancel Cancels the formatting. 1 Select [OK] with v on the operation t page 50 This item does not appear when a "Memory Stick" is complete. 56 OK See the following procedure. The message "All...

Operating Instructions
Page 57
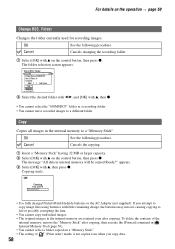
... z. The format is created or selected. • You cannot delete a folder with the camera. The folder creation screen appears. A new folder is created with v on a "Memory Stick", including even protected images. Folder Creates a folder in the newly created folder until a different... then press z. A commercially available "Memory Stick" are already formatted, and can be erased Ready?" The message "All data in Memory Stick will be stored in the camera. Create REC. Create REC. folder 102MSDCF Ready? Format Formats the "Memory Stick". When the folder capacity is exceeded...
... z. The format is created or selected. • You cannot delete a folder with the camera. The folder creation screen appears. A new folder is created with v on a "Memory Stick", including even protected images. Folder Creates a folder in the newly created folder until a different... then press z. A commercially available "Memory Stick" are already formatted, and can be erased Ready?" The message "All data in Memory Stick will be stored in the camera. Create REC. Create REC. folder 102MSDCF Ready? Format Formats the "Memory Stick". When the folder capacity is exceeded...
Operating Instructions
Page 58
...AC Adaptor (not supplied). Copying starts. If you copy data. 58 To delete the contents of the internal memory, remove the "Memory Stick" after copying. Folder Changes the folder currently used for recording images. The folder selection screen appears. Copy Copies ...Cancels changing the recording folder. 1 Select [OK] with v on the control button, then press z. Select REC. Cancel Cancels the copying. 1 Insert a "Memory Stick" having 32 MB or larger capacity. 2 Select [OK] with v, then z. • You cannot select the "100MSDCF" folder as a recording folder. ...
...AC Adaptor (not supplied). Copying starts. If you copy data. 58 To delete the contents of the internal memory, remove the "Memory Stick" after copying. Folder Changes the folder currently used for recording images. The folder selection screen appears. Copy Copies ...Cancels changing the recording folder. 1 Select [OK] with v on the control button, then press z. Select REC. Cancel Cancels the copying. 1 Insert a "Memory Stick" having 32 MB or larger capacity. 2 Select [OK] with v, then z. • You cannot select the "100MSDCF" folder as a recording folder. ...
Operating Instructions
Page 60
...a computer, the images in sequence even if the recording folder or the "Memory Stick" is assigned.) USB Connect Selects the USB mode to be used to assign file numbers to images. PictBridge Connects the camera to connected equipment. PAL Sets the video output signal to PAL mode (e.g., ...changed. (When the recording folder contains a file, a number one higher than the largest number is changed. (When the replaced "Memory Stick" contains a file with Windows XP and Mac OS X.) Normal Connects the camera to a computer (page 65). File Number Selects the method used when connecting the...
...a computer, the images in sequence even if the recording folder or the "Memory Stick" is assigned.) USB Connect Selects the USB mode to be used to assign file numbers to images. PictBridge Connects the camera to connected equipment. PAL Sets the video output signal to PAL mode (e.g., ...changed. (When the recording folder contains a file, a number one higher than the largest number is changed. (When the replaced "Memory Stick" contains a file with Windows XP and Mac OS X.) Normal Connects the camera to a computer (page 65). File Number Selects the method used when connecting the...
Operating Instructions
Page 64
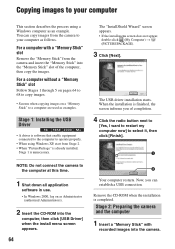
...finished, the screen informs you can copy images from the camera to your computer This section describes the process using Windows XP, start from the camera and insert the "Memory Stick" into the camera. You can establish a USB connection. The USB driver ...installation starts. Now, you of the computer, then copy the images. Stage 2: Preparing the camera and the computer 1 Insert a "Memory Stick" with a "Memory Stick" slot Remove the "Memory Stick" from Stage 2. • When "PicturePackage" is already installed, Stage 1 is software that enable equipment connected...
...finished, the screen informs you can copy images from the camera to your computer This section describes the process using Windows XP, start from the camera and insert the "Memory Stick" into the camera. You can establish a USB connection. The USB driver ...installation starts. Now, you of the computer, then copy the images. Stage 2: Preparing the camera and the computer 1 Insert a "Memory Stick" with a "Memory Stick" slot Remove the "Memory Stick" from Stage 2. • When "PicturePackage" is already installed, Stage 1 is software that enable equipment connected...


