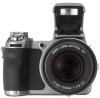
Operating Instructions
Page 5
.... Warning on copyright Television programs, films, videotapes, and other equipment on your camera are not guaranteed. This is not a malfunction. • This camera is equipped with a power zoom lens. On image data compatibility • This camera conforms with DCF (Design rule for Camera File system) universal standard established by JEITA (Japan Electronics and Information Technology...
.... Warning on copyright Television programs, films, videotapes, and other equipment on your camera are not guaranteed. This is not a malfunction. • This camera is equipped with a power zoom lens. On image data compatibility • This camera conforms with DCF (Design rule for Camera File system) universal standard established by JEITA (Japan Electronics and Information Technology...

Operating Instructions
Page 8
Folder Change REC. Viewing menu 43 (Folder) - (Protect) DPOF (Print) (Slide) (Resize) (Rotate) (Divide) (Setup) Trimming Using the Setup screen Using Setup items 50 Camera 1 51 1 AF Mode Digital Zoom Date/Time Red Eye Reduction AF Illuminator Auto Review Camera 2 54 2 Expanded Focus Enlarged Icon STEADY SHOT Conversion Lens Internal Memory Tool 56 Format Memory Stick Tool 57 Format Create REC. Folder Copy Setup 1 59 1 LCD Backlight EVF Backlight Beep Language Initialize 8
Folder Change REC. Viewing menu 43 (Folder) - (Protect) DPOF (Print) (Slide) (Resize) (Rotate) (Divide) (Setup) Trimming Using the Setup screen Using Setup items 50 Camera 1 51 1 AF Mode Digital Zoom Date/Time Red Eye Reduction AF Illuminator Auto Review Camera 2 54 2 Expanded Focus Enlarged Icon STEADY SHOT Conversion Lens Internal Memory Tool 56 Format Memory Stick Tool 57 Format Create REC. Folder Copy Setup 1 59 1 LCD Backlight EVF Backlight Beep Language Initialize 8

Operating Instructions
Page 14
... screen (18) F MENU button (36) G Control button Menu on: v/V/b/B/z (t step 2 in "Read This First") Menu off: / / / (t step 5 in "Read This First") H (Screen status) button (22) I Lens J Flash (t step 5 in "Read This First")
... screen (18) F MENU button (36) G Control button Menu on: v/V/b/B/z (t step 2 in "Read This First") Menu off: / / / (t step 5 in "Read This First") H (Screen status) button (22) I Lens J Flash (t step 5 in "Read This First")

Operating Instructions
Page 16
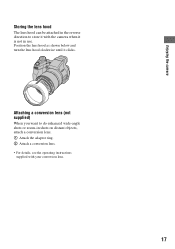
Attaching the shoulder strap and the lens cap Attaching the lens hood When you shoot in bright lighting conditions, such as outdoors, we recommend that you use the lens hood to reduce the image quality deterioration caused by unnecessary light. 1 Attach the adaptor ring. 2 Position the lens hood as shown below and turn the lens hood clockwise until it clicks. • You can attach the lens cap with the lens hood attached. • When the adaptor ring is attached, it may block flashlight, AF illuminator light. 16
Attaching the shoulder strap and the lens cap Attaching the lens hood When you shoot in bright lighting conditions, such as outdoors, we recommend that you use the lens hood to reduce the image quality deterioration caused by unnecessary light. 1 Attach the adaptor ring. 2 Position the lens hood as shown below and turn the lens hood clockwise until it clicks. • You can attach the lens cap with the lens hood attached. • When the adaptor ring is attached, it may block flashlight, AF illuminator light. 16
Operating Instructions
Page 17
Enjoying the camera Storing the lens hood The lens hood can be attached in the reverse direction to do enhanced wide-angle shots or zoom-in use. Attaching a conversion lens (not supplied) When you want to store it with your conversion lens. 17 Position the lens hood as shown below and turn the lens hood clockwise until it is not in shots on distant objects, attach a conversion lens. 1 Attach the adaptor ring. 2 Attach a conversion lens. • For details, see the operating instructions supplied with the camera when it clicks.
Enjoying the camera Storing the lens hood The lens hood can be attached in the reverse direction to do enhanced wide-angle shots or zoom-in use. Attaching a conversion lens (not supplied) When you want to store it with your conversion lens. 17 Position the lens hood as shown below and turn the lens hood clockwise until it is not in shots on distant objects, attach a conversion lens. 1 Attach the adaptor ring. 2 Attach a conversion lens. • For details, see the operating instructions supplied with the camera when it clicks.

Operating Instructions
Page 18
..., t step 5 in parentheses for details of operation. Indicators on the screen See the pages in "Read This First") Sharpness (42) 5 Saturation (41) 6 Contrast (41) Conversion lens (55) ON AF illuminator (53) Metering mode (38) Picture effect (41) 18
..., t step 5 in parentheses for details of operation. Indicators on the screen See the pages in "Read This First") Sharpness (42) 5 Saturation (41) 6 Contrast (41) Conversion lens (55) ON AF illuminator (53) Metering mode (38) Picture effect (41) 18

Operating Instructions
Page 33
The color of the [Conversion Lens]. 33 To move the AF range finder frame again, press z again. • When the AF range finder frame ... To set the manual focus 1 Set the mode dial to P, S, A, M or . 2 Press the FOCUS button repeatedly to select 9. Enjoying the camera To set to [On] on the Setup screen, the image on the screen is expanded double to focus on the Setup screen. VGAFINE P 98 AF...AF MOVE OK AF range finder frame indicator 3 Move the AF range finder frame to the point you point the lens up or down, the error increases. • The distance selection is [On].
The color of the [Conversion Lens]. 33 To move the AF range finder frame again, press z again. • When the AF range finder frame ... To set the manual focus 1 Set the mode dial to P, S, A, M or . 2 Press the FOCUS button repeatedly to select 9. Enjoying the camera To set to [On] on the Setup screen, the image on the screen is expanded double to focus on the Setup screen. VGAFINE P 98 AF...AF MOVE OK AF range finder frame indicator 3 Move the AF range finder frame to the point you point the lens up or down, the error increases. • The distance selection is [On].

Operating Instructions
Page 53
.... • The AF illuminator does not operate when (Twilight mode) or (Landscape mode) is pressed halfway, until the shutter clicks, hold the camera firmly to focus more before shooting. Off Does not use Red Eye Reduction. • Because it takes about a second until the focus is selected... can immediately shoot the next image. 53 The ON indicator appears at close range. • When attaching the adaptor ring or a conversion lens, the AF illuminator is not set to focus easily when the shutter button is selected in dark surroundings. Auto Uses the AF illuminator. Auto...
.... • The AF illuminator does not operate when (Twilight mode) or (Landscape mode) is pressed halfway, until the shutter clicks, hold the camera firmly to focus more before shooting. Off Does not use Red Eye Reduction. • Because it takes about a second until the focus is selected... can immediately shoot the next image. 53 The ON indicator appears at close range. • When attaching the adaptor ring or a conversion lens, the AF illuminator is not set to focus easily when the shutter button is selected in dark surroundings. Auto Uses the AF illuminator. Auto...

Operating Instructions
Page 55
...appropriate focus when attaching an optional conversion lens. Close-up ( ) Attaches a close-up lens. Tele ( ) Attaches a tele conversion lens. Off Does not attach a lens. • When using the built-in flash or AF illuminator, the light may be blocked, causing the lens shadow to appear. • The... available zoom area is limited. • The available focusing area is limited. • For details, see the operating instructions supplied with your conversion lens. Using the Setup screen 55 Wide ( )...
...appropriate focus when attaching an optional conversion lens. Close-up ( ) Attaches a close-up lens. Tele ( ) Attaches a tele conversion lens. Off Does not attach a lens. • When using the built-in flash or AF illuminator, the light may be blocked, causing the lens shadow to appear. • The... available zoom area is limited. • The available focusing area is limited. • For details, see the operating instructions supplied with your conversion lens. Using the Setup screen 55 Wide ( )...

Operating Instructions
Page 85
... does not function. • Set [Digital Zoom] to [640(Fine)] when recording movies. The subject is set to a other position than and when shooting still images. • Set the mode dial to position the lens farther away from the subject than [640(Fine)]. - The image is too close -up (...NR slow shutter function is set to [Smart] (page 51). • This function cannot be used when: - Smart zoom does not function. • Set [Digital Zoom] to [5M] or [3:2]. - This is correct (page 55). Select the auto focus mode using the FOCUS button (page 32). • Confirm that the...
... does not function. • Set [Digital Zoom] to [640(Fine)] when recording movies. The subject is set to a other position than and when shooting still images. • Set the mode dial to position the lens farther away from the subject than [640(Fine)]. - The image is too close -up (...NR slow shutter function is set to [Smart] (page 51). • This function cannot be used when: - Smart zoom does not function. • Set [Digital Zoom] to [5M] or [3:2]. - This is correct (page 55). Select the auto focus mode using the FOCUS button (page 32). • Confirm that the...

Operating Instructions
Page 92
... The power is on, but the camera does not work . • Use the type of batteries you turn on the camera. Remove the batteries, and then, after canceling printing. • Wait for a long time. • This is not working properly. The lens gets fogged. • Moisture condensation ...has occurred. The lens does not move when you use it (page 100...
... The power is on, but the camera does not work . • Use the type of batteries you turn on the camera. Remove the batteries, and then, after canceling printing. • Wait for a long time. • This is not working properly. The lens gets fogged. • Moisture condensation ...has occurred. The lens does not move when you use it (page 100...
Operating Instructions
Page 93
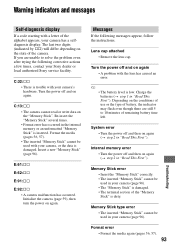
... memory error • Turn the power off and on again. The last two digits (indicated by ss) will differ depending on again (t step 2 in "Read This First"). E:61:ss E:62:ss E:91:ss E:92:ss • A camera malfunction has occurred. Format error • Format the media again (pages 56, .... • Format error has occurred in your Sony dealer or local authorized Sony service facility. Format the media (pages 56, 57). • The inserted "Memory Stick" cannot be used with the lens has caused an error. Lens cap attached • Remove the lens cap. Turn the power off and then on ...
... memory error • Turn the power off and on again. The last two digits (indicated by ss) will differ depending on again (t step 2 in "Read This First"). E:61:ss E:62:ss E:91:ss E:92:ss • A camera malfunction has occurred. Format error • Format the media again (pages 56, .... • Format error has occurred in your Sony dealer or local authorized Sony service facility. Format the media (pages 56, 57). • The inserted "Memory Stick" cannot be used with the lens has caused an error. Lens cap attached • Remove the lens cap. Turn the power off and then on ...
Operating Instructions
Page 99
... environment, and is different for two or three times the expected shooting time, and try test shooting before you use it in your camera just before actually using Oxy Nickel Primary Battery. • Due to characteristics of Nickel-Metal Hydride batteries • The battery life is.... • The battery remaining indicator does not display the correct information when using the camera. For this reason, the camera may be extremely short. For this case, replace the batteries with the lens portion extended when you may be able to the supplied Nickel-Metal Hydride batteries. The...
... environment, and is different for two or three times the expected shooting time, and try test shooting before you use it in your camera just before actually using Oxy Nickel Primary Battery. • Due to characteristics of Nickel-Metal Hydride batteries • The battery life is.... • The battery remaining indicator does not display the correct information when using the camera. For this reason, the camera may be extremely short. For this case, replace the batteries with the lens portion extended when you may be able to the supplied Nickel-Metal Hydride batteries. The...

Operating Instructions
Page 100
... surface with a soft cloth to remove fingerprints, dust, etc. Cleaning the lens Wipe the lens with an LCD cleaning kit (not supplied) to remove fingerprints, dust, etc. x On moisture condensation If the camera is taken from an air-conditioned room or car interior to shoot with a... date and time. How to prevent moisture condensation When bringing the camera from a cold to a warm location, moisture may condense inside the lens, you attempt to the hot outdoors, etc. Cleaning the camera surface Clean the camera surface with a soft cloth slightly moistened with water, then wipe...
... surface with a soft cloth to remove fingerprints, dust, etc. Cleaning the lens Wipe the lens with an LCD cleaning kit (not supplied) to remove fingerprints, dust, etc. x On moisture condensation If the camera is taken from an air-conditioned room or car interior to shoot with a... date and time. How to prevent moisture condensation When bringing the camera from a cold to a warm location, moisture may condense inside the lens, you attempt to the hot outdoors, etc. Cleaning the camera surface Clean the camera surface with a soft cloth slightly moistened with water, then wipe...
Operating Instructions
Page 101
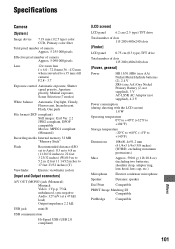
..., Primary color filter Total pixel number of camera Approx. 5 255 000 pixels Effective pixel number of camera Approx. 5 090 000 pixels Lens 12× zoom lens f = 6.0 - 72.0 mm (36 - 432 mm when converted to a 35 mm still camera) F2.8 - 3.7 Exposure control Automatic exposure... maximum protrusions) Mass Approx. 590.8 g (1 lb 20.8 oz) (including two batterries, shoulder strap, adaptor ring, lens hood, lens cap, etc.) Microphone Electret condenser microphone Speaker Dynamic speaker Exif Print Compatible PRINT Image Matching III Compatible PictBridge Compatible Others 101
..., Primary color filter Total pixel number of camera Approx. 5 255 000 pixels Effective pixel number of camera Approx. 5 090 000 pixels Lens 12× zoom lens f = 6.0 - 72.0 mm (36 - 432 mm when converted to a 35 mm still camera) F2.8 - 3.7 Exposure control Automatic exposure... maximum protrusions) Mass Approx. 590.8 g (1 lb 20.8 oz) (including two batterries, shoulder strap, adaptor ring, lens hood, lens cap, etc.) Microphone Electret condenser microphone Speaker Dynamic speaker Exif Print Compatible PRINT Image Matching III Compatible PictBridge Compatible Others 101

Operating Instructions
Page 103
... 64 Macintosh 73 Recommended environment 63, 73 Software 71 Viewing image stored on a computer with your camera 70 Windows 62 Connecting Computer 65 Printer 77 TV 81 Continuous 51 Contrast 41 Conversion Lens 55 Copy 58 Copying images to your computer 64 Create REC. Folder 57 D Date 52 Date/...Time 52 Day&Time 52 Daylight 39 Delete t step 6 in "Read This First" Digital Zoom 51 DirectX 63 Divide 47 DPOF 79 E Effective...
... 64 Macintosh 73 Recommended environment 63, 73 Software 71 Viewing image stored on a computer with your camera 70 Windows 62 Connecting Computer 65 Printer 77 TV 81 Continuous 51 Contrast 41 Conversion Lens 55 Copy 58 Copying images to your computer 64 Create REC. Folder 57 D Date 52 Date/...Time 52 Day&Time 52 Daylight 39 Delete t step 6 in "Read This First" Digital Zoom 51 DirectX 63 Divide 47 DPOF 79 E Effective...
Operating Instructions
Page 104
... First" Format 56, 57 H High-speed shutter mode t step 5 in "Read This First" Histogram 22, 31 Holding the camera t step 5 in "Read This First" I Identifying parts 14 Image file storage destinations and file names 69 Image quality 13, ... step 5 in "Read This First" Language 59 t step 2 in "Read This First" LCD Backlight 59 LCD screen ..........see "Screen" Lens hood 16 M M AF 51 Macintosh computer 73 Recommended environment 73 Macro t step 5 in "Read This First" Mains lead t step 1... First" Power cord t step 1 in "Read This First" Precautions 100 Precision digital zoom .......... 51
... First" Format 56, 57 H High-speed shutter mode t step 5 in "Read This First" Histogram 22, 31 Holding the camera t step 5 in "Read This First" I Identifying parts 14 Image file storage destinations and file names 69 Image quality 13, ... step 5 in "Read This First" Language 59 t step 2 in "Read This First" LCD Backlight 59 LCD screen ..........see "Screen" Lens hood 16 M M AF 51 Macintosh computer 73 Recommended environment 73 Macro t step 5 in "Read This First" Mains lead t step 1... First" Power cord t step 1 in "Read This First" Precautions 100 Precision digital zoom .......... 51


