User Manual
Page 2
CAUTION Replace the battery with Part 15 of Conformity Trade Name: SONY Model No.: DCR-HC54E Responsible Party: Sony Electronics Inc. For customers in a particular installation. Regulatory Information Declaration of the FCC Rules. If this equipment does cause .../TV technician for the FCC related matters only. Operation is subject to comply with Part 15 of Conformity Trade Name: SONY Model No.: DCR-HC52E Responsible Party: Sony Electronics Inc. These limits are cautioned that may not cause harmful interference, and (2) this equipment. Increase the separation between...
CAUTION Replace the battery with Part 15 of Conformity Trade Name: SONY Model No.: DCR-HC54E Responsible Party: Sony Electronics Inc. For customers in a particular installation. Regulatory Information Declaration of the FCC Rules. If this equipment does cause .../TV technician for the FCC related matters only. Operation is subject to comply with Part 15 of Conformity Trade Name: SONY Model No.: DCR-HC52E Responsible Party: Sony Electronics Inc. These limits are cautioned that may not cause harmful interference, and (2) this equipment. Increase the separation between...
User Manual
Page 4
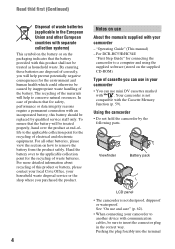
... battery. See "On use and care" (p. 62). • When connecting your camcorder to another device with communication cables, be treated as household waste. For DCR-HC53E/HC54E "First Step Guide" for connecting the camcorder to the applicable collection point for safety, performance or data integrity reasons require a permanent connection with the Cassette...
... battery. See "On use and care" (p. 62). • When connecting your camcorder to another device with communication cables, be treated as household waste. For DCR-HC53E/HC54E "First Step Guide" for connecting the camcorder to the applicable collection point for safety, performance or data integrity reasons require a permanent connection with the Cassette...
User Manual
Page 5
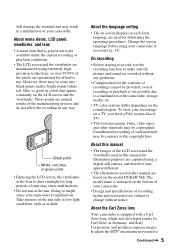
...used for illustration purposes are captured using a digital still camera, and therefore may appear different. • The illustrations used in Germany, and Sony Corporation, and produces superior images. The model name is not possible due to make sure the picture and sound are recorded without notice. will...is grayed out is equipped with a Carl Zeiss lens, which was developed jointly by Carl Zeiss, in this manual are based on the model DCR-HC54E. Unauthorized recording of such materials may be some tiny black points and/or bright points (white, red, blue, or green in a malfunction ...
...used for illustration purposes are captured using a digital still camera, and therefore may appear different. • The illustrations used in Germany, and Sony Corporation, and produces superior images. The model name is not possible due to make sure the picture and sound are recorded without notice. will...is grayed out is equipped with a Carl Zeiss lens, which was developed jointly by Carl Zeiss, in this manual are based on the model DCR-HC54E. Unauthorized recording of such materials may be some tiny black points and/or bright points (white, red, blue, or green in a malfunction ...
User Manual
Page 7
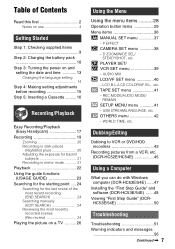
.../Editing Dubbing to VCR or DVD/HDD recorders 43 Recording pictures from a VCR, etc. (DCR-HC52E/HC54E 45 Using a Computer What you can do with Windows computer (DCR-HC53E/54E) ......47 Installing the "First Step Guide" and software (DCR-HC53E/54E) .......48 Viewing "First Step Guide" (DCRHC53E/54E 50 Troubleshooting Troubleshooting 51 Warning indicators...
.../Editing Dubbing to VCR or DVD/HDD recorders 43 Recording pictures from a VCR, etc. (DCR-HC52E/HC54E 45 Using a Computer What you can do with Windows computer (DCR-HC53E/54E) ......47 Installing the "First Step Guide" and software (DCR-HC53E/54E) .......48 Viewing "First Step Guide" (DCRHC53E/54E 50 Troubleshooting Troubleshooting 51 Warning indicators...
User Manual
Page 9
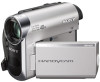
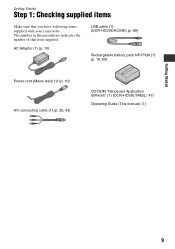
Getting Started Step 1: Checking supplied items Make sure that item supplied. The number in the parentheses indicates the number of that you have following items supplied with your camcorder. AC Adaptor (1) (p. 10) USB cable (1) (DCR-HC53E/HC54E) (p. 69) Rechargeable battery pack NP-FH30 (1) (p. 10, 60) Power cord (Mains lead) (1) (p. 10) A/V connecting cable (1) (p. 26, 43) CD-ROM "Handycam Application Software" (1) (DCR-HC53E/54E)(p. 47) Operating Guide (This manual) (1) Getting Started 9
Getting Started Step 1: Checking supplied items Make sure that item supplied. The number in the parentheses indicates the number of that you have following items supplied with your camcorder. AC Adaptor (1) (p. 10) USB cable (1) (DCR-HC53E/HC54E) (p. 69) Rechargeable battery pack NP-FH30 (1) (p. 10, 60) Power cord (Mains lead) (1) (p. 10) A/V connecting cable (1) (p. 26, 43) CD-ROM "Handycam Application Software" (1) (DCR-HC53E/54E)(p. 47) Operating Guide (This manual) (1) Getting Started 9
User Manual
Page 34
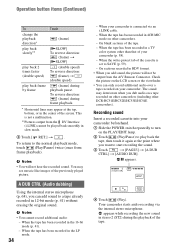
...). A DUB CTRL (Audio dubbing) Using the internal stereo microphone (p. 68), you want to SAVE (p. 59). - On sections recorded in a TV color system other DCR-HC51E/HC52E/HC53E/HC54E camcorders). The sound may deteriorate when you add sound, the picture will not hear the recorded sound. X appears. 60min A DUB CTRL 0:00:00:00...
...). A DUB CTRL (Audio dubbing) Using the internal stereo microphone (p. 68), you want to SAVE (p. 59). - On sections recorded in a TV color system other DCR-HC51E/HC52E/HC53E/HC54E camcorders). The sound may deteriorate when you add sound, the picture will not hear the recorded sound. X appears. 60min A DUB CTRL 0:00:00:00...

User Manual
Page 35
...to select [AUDIO MIX], then touch [EXEC]. LCD BRT (LCD bright) See page 33. 35 HC51E/HC53E, or (VCR SET) for the DCR- REC CTRL (Recording control) (DCR-HC52E/HC54E) See page 45. b Notes • The original sound (ST1) is output at the default setting. Using the Menu 5 Touch (Stop)... when you have recorded audio (p. 22). 2 Touch t [PAGE1] t [MENU]. 3 Select (PLAYER SET) for the DCR-HC52E/HC54E, then touch / to adjust the balance of the original sound (ST1) and the new sound (ST2), then touch [EXEC]. To dub on which you want...
...to select [AUDIO MIX], then touch [EXEC]. LCD BRT (LCD bright) See page 33. 35 HC51E/HC53E, or (VCR SET) for the DCR- REC CTRL (Recording control) (DCR-HC52E/HC54E) See page 45. b Notes • The original sound (ST1) is output at the default setting. Using the Menu 5 Touch (Stop)... when you have recorded audio (p. 22). 2 Touch t [PAGE1] t [MENU]. 3 Select (PLAYER SET) for the DCR-HC52E/HC54E, then touch / to adjust the balance of the original sound (ST1) and the new sound (ST2), then touch [EXEC]. To dub on which you want...
User Manual
Page 36
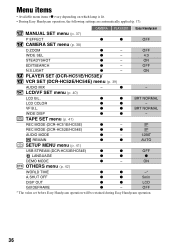
... D ZOOM z - ON EDITSEARCH z - VF B.L. OFF WIDE SEL z - 4:3 STEADYSHOT z - OFF N.S.LIGHT z - TAPE SET menu (p. 41) REC MODE (DCR-HC51E/HC53E) z - ON OTHERS menu (p. 42) WORLD TIME z z -* A.SHUT OFF z z 5min DISP OUT z z LCD GUIDEFRAME z - LCD/VF SET menu...WIDE DISP z z - SP REC MODE (DCR-HC52E/HC54E) z z SP AUDIO MODE z - 12BIT REMAIN z z AUTO SETUP MENU menu (p. 41) USB STREAM (DCR-HC53E/HC54E) z z OFF LANGUAGE z z z DEMO MODE z - ON PLAYER SET (DCR-HC51E/HC53E)/ VCR SET (DCR-HC52E/HC54E) menu (p. 39) AUDIO MIX - z...
... D ZOOM z - ON EDITSEARCH z - VF B.L. OFF WIDE SEL z - 4:3 STEADYSHOT z - OFF N.S.LIGHT z - TAPE SET menu (p. 41) REC MODE (DCR-HC51E/HC53E) z - ON OTHERS menu (p. 42) WORLD TIME z z -* A.SHUT OFF z z 5min DISP OUT z z LCD GUIDEFRAME z - LCD/VF SET menu...WIDE DISP z z - SP REC MODE (DCR-HC52E/HC54E) z z SP AUDIO MODE z - 12BIT REMAIN z z AUTO SETUP MENU menu (p. 41) USB STREAM (DCR-HC53E/HC54E) z z OFF LANGUAGE z z z DEMO MODE z - ON PLAYER SET (DCR-HC51E/HC53E)/ VCR SET (DCR-HC52E/HC54E) menu (p. 39) AUDIO MIX - z...

User Manual
Page 37
... and brightness are reversed. Using the Menu 37 Only the original pictures can record pictures edited with B. z Tips • You can be output. • For DCR-HC52E/HC54E: You cannot add effects to the playback pictures are selected. MANUAL SET menu -
... and brightness are reversed. Using the Menu 37 Only the original pictures can record pictures edited with B. z Tips • You can be output. • For DCR-HC52E/HC54E: You cannot add effects to the playback pictures are selected. MANUAL SET menu -

User Manual
Page 39
AUDIO MIX The PLAYER SET menu is for the DCRHC51E/HC53E, and the VCR SET menu is for the DCR-HC52E/HC54E. Using the Menu 39 b Notes • Do not cover the infrared port with your fingers or other objects (p. 68). • Remove the conversion lens (optional) ...
AUDIO MIX The PLAYER SET menu is for the DCRHC51E/HC53E, and the VCR SET menu is for the DCR-HC52E/HC54E. Using the Menu 39 b Notes • Do not cover the infrared port with your fingers or other objects (p. 68). • Remove the conversion lens (optional) ...
User Manual
Page 41
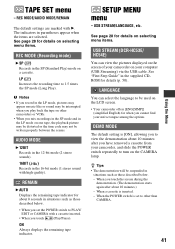
... page 28 for details on the LCD screen. • Your camcorder offers [ENG[SIMP]] (simplified English) for details on selecting menu items. USB STREAM (DCR-HC53E/ HC54E) You can select the language to view the demonstration about 10 minutes after about 8 seconds in the 16-bit mode (1 stereo sound with a cassette inserted...
... page 28 for details on the LCD screen. • Your camcorder offers [ENG[SIMP]] (simplified English) for details on selecting menu items. USB STREAM (DCR-HC53E/ HC54E) You can select the language to view the demonstration about 10 minutes after about 8 seconds in the 16-bit mode (1 stereo sound with a cassette inserted...
User Manual
Page 46
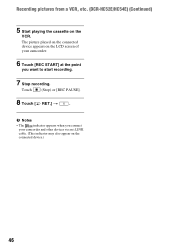
b Notes • The indicator appears when you want to start recording. 7 Stop recording. Touch (Stop) or [REC PAUSE]. 8 Touch [ RET.] t . The picture played on the connected device appears on the LCD screen of your camcorder. 6 Touch [REC START] at the point you connect your camcorder and other devices via an i.LINK cable. (This indicator may also appear on the VCR. Recording pictures from a VCR, etc. (DCR-HC52E/HC54E) (Continued) 5 Start playing the cassette on the connected device.) 46
b Notes • The indicator appears when you want to start recording. 7 Stop recording. Touch (Stop) or [REC PAUSE]. 8 Touch [ RET.] t . The picture played on the connected device appears on the LCD screen of your camcorder. 6 Touch [REC START] at the point you connect your camcorder and other devices via an i.LINK cable. (This indicator may also appear on the VCR. Recording pictures from a VCR, etc. (DCR-HC52E/HC54E) (Continued) 5 Start playing the cassette on the connected device.) 46
User Manual
Page 59
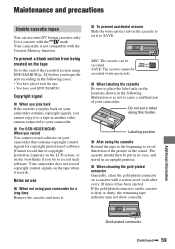
...) before you try to SAVE. Labeling position x After using the cassette Rewind the tape to the beginning to cause a malfunction of your camcorder. x For DCR-HC52E/HC54E: When you play back If the cassette you record You cannot record software on your camcorder contains copyright signals, you cannot copy it to a tape...
...) before you try to SAVE. Labeling position x After using the cassette Rewind the tape to the beginning to cause a malfunction of your camcorder. x For DCR-HC52E/HC54E: When you play back If the cassette you record You cannot record software on your camcorder contains copyright signals, you cannot copy it to a tape...
User Manual
Page 66
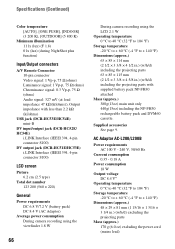
...: 327 mV (at load impedance 47 kΩ (kilohms)), Output impedance with less than 2.2 kΩ (kilohms) USB jack (DCR-HC53E/HC54E) mini-B DV input/output jack (DCR-HC52E/ HC54E) i.LINK Interface (IEEE1394, 4-pin connector S100) DV output jack (DCR-HC51E/HC53E) i.LINK Interface (IEEE1394, 4-pin connector S100) LCD screen Picture 6.2 cm (2.5 type) Total dot number 123...
...: 327 mV (at load impedance 47 kΩ (kilohms)), Output impedance with less than 2.2 kΩ (kilohms) USB jack (DCR-HC53E/HC54E) mini-B DV input/output jack (DCR-HC52E/ HC54E) i.LINK Interface (IEEE1394, 4-pin connector S100) DV output jack (DCR-HC51E/HC53E) i.LINK Interface (IEEE1394, 4-pin connector S100) LCD screen Picture 6.2 cm (2.5 type) Total dot number 123...

User Manual
Page 69
For how to adjust the volume, see page 22. H BATT (battery release) PUSH button (11) I CHG (charge) lamp (10) J For DCR-HC53E/HC54E: (USB) jack K . (back light) button (21) Continued , 69 Quick Reference D LCD screen/touch panel (15, 71) E Zoom buttons (20) F REC START/STOP button (17, 19) G Speaker Playback sounds comes out from the speaker. A DISP/BATT INFO button (11, 15) B EASY button (17) C RESET button Initializes all the settings, including the setting of the date and time.
For how to adjust the volume, see page 22. H BATT (battery release) PUSH button (11) I CHG (charge) lamp (10) J For DCR-HC53E/HC54E: (USB) jack K . (back light) button (21) Continued , 69 Quick Reference D LCD screen/touch panel (15, 71) E Zoom buttons (20) F REC START/STOP button (17, 19) G Speaker Playback sounds comes out from the speaker. A DISP/BATT INFO button (11, 15) B EASY button (17) C RESET button Initializes all the settings, including the setting of the date and time.

User Manual
Page 70
Identifying parts and controls (Continued) A POWER switch (13) B Viewfinder (15) C Eyecup (64) D Viewfinder lens adjustment lever (15) E For DCR-HC51E/HC53E: DV OUT interface (43) For DCR-HC52E/HC54E: DV interface (43, 45) F DC IN jack (10) G A/V Remote Connector (26, 43) H CAMERA, PLAY/EDIT lamp (13) I REC START/STOP button (17, 19) J Tripod receptacle Attach the tripod (optional: the length of the screw must be less than 5.5 mm (7/32 in.)) to the tripod receptacle using a tripod screw. 70
Identifying parts and controls (Continued) A POWER switch (13) B Viewfinder (15) C Eyecup (64) D Viewfinder lens adjustment lever (15) E For DCR-HC51E/HC53E: DV OUT interface (43) For DCR-HC52E/HC54E: DV interface (43, 45) F DC IN jack (10) G A/V Remote Connector (26, 43) H CAMERA, PLAY/EDIT lamp (13) I REC START/STOP button (17, 19) J Tripod receptacle Attach the tripod (optional: the length of the screw must be less than 5.5 mm (7/32 in.)) to the tripod receptacle using a tripod screw. 70


