Operating Instructions
Page 1
Owner's Record The model and serial numbers are located on the bottom. DCR-TRV Model No. AC- Serial No. Serial No. DCR-TRV820 DCR-TRV720/TRV820 ©2000 Sony Corporation 3-059-564-13 (1) Digital Video Camera Recorder Operating Instructions Before operating the unit, please read this product. Refer to these numbers whenever you call upon your Sony dealer regarding this manual thoroughly, and retain it for future reference. Model No. Record the serial number in the space provided below.
Owner's Record The model and serial numbers are located on the bottom. DCR-TRV Model No. AC- Serial No. Serial No. DCR-TRV820 DCR-TRV720/TRV820 ©2000 Sony Corporation 3-059-564-13 (1) Digital Video Camera Recorder Operating Instructions Before operating the unit, please read this product. Refer to these numbers whenever you call upon your Sony dealer regarding this manual thoroughly, and retain it for future reference. Model No. Record the serial number in the space provided below.
Operating Instructions
Page 4
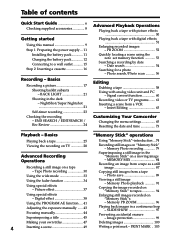
... Guide 6 Checking supplied accessories 8 Getting started Using this manual 9 Step 1 Preparing the power supply ... 11 Installing the battery pack 11 Charging the battery pack 12 Connecting to tapes 94 Enlarging still images recorded on "Memory Stick"s - END SEARCH / EDITSEARCH / Rec Review 24 Advanced Playback Operations Playing back a tape with picture effects 50 Playing back a tape with analog video unit and PC - Date search 54 Searching for a photo - Insert Editing 63 Customizing Your Camcorder Changing the menu settings 65 Resetting the date and time 73 Playback...
... Guide 6 Checking supplied accessories 8 Getting started Using this manual 9 Step 1 Preparing the power supply ... 11 Installing the battery pack 11 Charging the battery pack 12 Connecting to tapes 94 Enlarging still images recorded on "Memory Stick"s - END SEARCH / EDITSEARCH / Rec Review 24 Advanced Playback Operations Playing back a tape with picture effects 50 Playing back a tape with analog video unit and PC - Date search 54 Searching for a photo - Insert Editing 63 Customizing Your Camcorder Changing the menu settings 65 Resetting the date and time 73 Playback...
Operating Instructions
Page 7
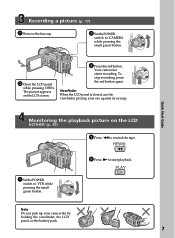
VTR OFF (CHARGE) MEMORY CAMERA Recording a picture (p. 17) 1 Remove the lens cap. 2 SetthePOWER switch to start playback. Your camcorder starts recording. Viewfinder When the LCD panel is closed, use the viewfinder placing your camcorder by holding the viewfinder, the LCD panel, or the battery pack. 7 OFF (CHARGE) VTR 3 Press N to CAMERA while pressing the small green button. 3 Open the LCD panel while pressing OPEN. The picture appears on the LCD screen (p. 25) 2 Press m to VTR while...
VTR OFF (CHARGE) MEMORY CAMERA Recording a picture (p. 17) 1 Remove the lens cap. 2 SetthePOWER switch to start playback. Your camcorder starts recording. Viewfinder When the LCD panel is closed, use the viewfinder placing your camcorder by holding the viewfinder, the LCD panel, or the battery pack. 7 OFF (CHARGE) VTR 3 Press N to CAMERA while pressing the small green button. 3 Open the LCD panel while pressing OPEN. The picture appears on the LCD screen (p. 25) 2 Press m to VTR while...
Operating Instructions
Page 9
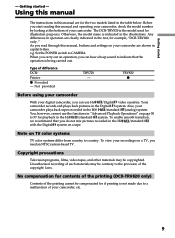
... below. Set the POWER switch to a malfunction of the copyright laws. You, however, cannot use Hi8 /Digital8 video cassettes. Note on a TV, you start reading this manual are clearly indicated in "Advanced Playback Operations" on page 50 to country. Using this manual The instructions in this manual and operating your camcorder plays back tapes recorded in the Digital8 system. Getting started - Getting started - Also, your camcorder, check the model number by looking...
... below. Set the POWER switch to a malfunction of the copyright laws. You, however, cannot use Hi8 /Digital8 video cassettes. Note on a TV, you start reading this manual are clearly indicated in "Advanced Playback Operations" on page 50 to country. Using this manual The instructions in this manual and operating your camcorder plays back tapes recorded in the Digital8 system. Getting started - Getting started - Also, your camcorder, check the model number by looking...
Operating Instructions
Page 16
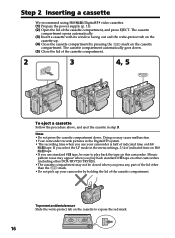
...;Your camcorder records pictures in the menu settings, 3/4 of indicated time on the cassette to play back standard 8 tape on other camcorders (including other DCR-TRV720/TRV820). •The cassette compartment may appear when you press any part of the lid other than the mark. •Do not pick up . (4) Close the cassette compartment by holding the lid of the cassette compartment, and press EJECT. The cassette compartment opens...
...;Your camcorder records pictures in the menu settings, 3/4 of indicated time on the cassette to play back standard 8 tape on other camcorders (including other DCR-TRV720/TRV820). •The cassette compartment may appear when you press any part of the lid other than the mark. •Do not pick up . (4) Close the cassette compartment by holding the lid of the cassette compartment, and press EJECT. The cassette compartment opens...

Operating Instructions
Page 18
... be set the POWER switch to OFF (CHARGE) once, then turn the LCD panel over so that you turn off your camcorder in direct sunlight The LCD screen may be normal when recorded. Adjusting the LCD screen To adjust the brightness of the LCD screen, press either of other way, the indicator appears on the Remote Commander. Picture in the viewfinder (Mirror mode). 180° to brighten to prevent battery and tape wear. Recording a picture...
... be set the POWER switch to OFF (CHARGE) once, then turn the LCD panel over so that you turn off your camcorder in direct sunlight The LCD screen may be normal when recorded. Adjusting the LCD screen To adjust the brightness of the LCD screen, press either of other way, the indicator appears on the Remote Commander. Picture in the viewfinder (Mirror mode). 180° to brighten to prevent battery and tape wear. Recording a picture...
Operating Instructions
Page 20
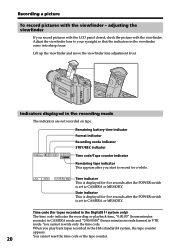
... not recorded on tape. Lift up the viewfinder and move the viewfinder lens adjustment lever. Recording a picture To record pictures with the viewfinder. Adjust the viewfinder lens to CAMERA or MEMORY. Remaining battery time indicator Format indicator Recording mode indicator STBY/REC indicator 40min SP REC 0:00:01 Time code/Tape counter indicator Remaining tape indicator This appears after the POWER switch is displayed for a while. Date indicator This is set to record for five seconds after you play back tapes recorded...
... not recorded on tape. Lift up the viewfinder and move the viewfinder lens adjustment lever. Recording a picture To record pictures with the viewfinder. Adjust the viewfinder lens to CAMERA or MEMORY. Remaining battery time indicator Format indicator Recording mode indicator STBY/REC indicator 40min SP REC 0:00:01 Time code/Tape counter indicator Remaining tape indicator This appears after the POWER switch is displayed for a while. Date indicator This is set to record for five seconds after you play back tapes recorded...
Operating Instructions
Page 28
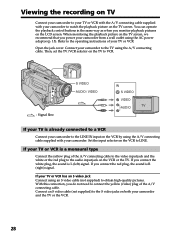
... playback picture on the LCD screen. If your TV or VCR is L (left) signal. If you connect the white plug, the sound is a monaural type Connect the yellow plug of the A/V connecting cable to the video input jack and the white or the red plug to the operating instructions of the A/V connecting cable. Connect your camcorder to the LINE IN input on the VCR or the TV. Then, set the TV/VCR selector on the TV screen. Viewing the recording on TV Connect...
... playback picture on the LCD screen. If your TV or VCR is L (left) signal. If you connect the white plug, the sound is a monaural type Connect the yellow plug of the A/V connecting cable to the video input jack and the white or the red plug to the operating instructions of the A/V connecting cable. Connect your camcorder to the LINE IN input on the VCR or the TV. Then, set the TV/VCR selector on the TV screen. Viewing the recording on TV Connect...

Operating Instructions
Page 29
... of Sony Corporation. 29 If you turn on the TV automatically when you can switch the video input of your TV. For details, refer to VCR. (3) Set the POWER switch on some TV models. The lamp on . - With some models, however, the picture and sound may not work on your camcorder. To do so, do so, set the TV/VCR selector on the TV to the operating instructions of...
... of Sony Corporation. 29 If you turn on the TV automatically when you can switch the video input of your TV. For details, refer to VCR. (3) Set the POWER switch on some TV models. The lamp on . - With some models, however, the picture and sound may not work on your camcorder. To do so, do so, set the TV/VCR selector on the TV to the operating instructions of...
Operating Instructions
Page 30
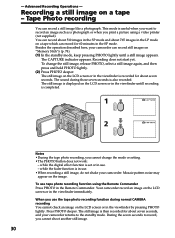
... pressing PHOTO lightly. - Besides the operation described here, your camcorder. The CAPTURE indicator appears. To change the mode or setting. •The PHOTO button does not work: - The still image is displayed on a tape which can record a still image like a photograph. To use the tape photo recording function during those seven seconds is then recorded for 60 minutes in the LP mode on the LCD screen or in the viewfinder immediately. Your camcorder record an image on "Memory Stick"s (p. 74...
... pressing PHOTO lightly. - Besides the operation described here, your camcorder. The CAPTURE indicator appears. To change the mode or setting. •The PHOTO button does not work: - The still image is displayed on a tape which can record a still image like a photograph. To use the tape photo recording function during those seven seconds is then recorded for 60 minutes in the LP mode on the LCD screen or in the viewfinder immediately. Your camcorder record an image on "Memory Stick"s (p. 74...
Operating Instructions
Page 51
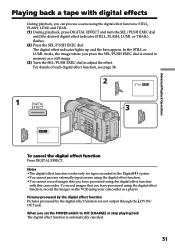
...;You cannot process externally input scenes using the digital effect function. •You cannot record images that you set the POWER switch to adjust the effect. Notes •The digital effect function works only for tapes recorded in memory as a player. For details of each digital effect function, see page 38. 2 STILL 1 DIGITAL EFFECT 3 2 STILL Advanced Playback Operations To cancel the digital effect function Press DIGITAL EFFECT. and TRAIL. (1) During playback, press DIGITAL EFFECT and turn the SEL...
...;You cannot process externally input scenes using the digital effect function. •You cannot record images that you set the POWER switch to adjust the effect. Notes •The digital effect function works only for tapes recorded in memory as a player. For details of each digital effect function, see page 38. 2 STILL 1 DIGITAL EFFECT 3 2 STILL Advanced Playback Operations To cancel the digital effect function Press DIGITAL EFFECT. and TRAIL. (1) During playback, press DIGITAL EFFECT and turn the SEL...
Operating Instructions
Page 70
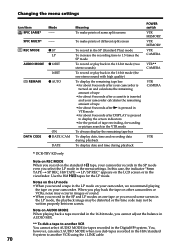
... dub tapes recorded in the menu settings. Changing the menu settings Icon/item 9PIC SAME* Mode --- 9PIC MULTI* --- Use the Hi8 tapes for the period of tape rewinding, forwarding or picture search in the VTR mode To always display the remaining tape bar To display date, time and recording data during playback To display date and time during playback POWER switch VTR MEMORY VTR MEMORY VTR CAMERA VTR** CAMERA VTR CAMERA VTR * DCR-TRV 820 only Note on REC MODE When you record on AUDIO MODE When playing back a tape recorded in...
... dub tapes recorded in the menu settings. Changing the menu settings Icon/item 9PIC SAME* Mode --- 9PIC MULTI* --- Use the Hi8 tapes for the period of tape rewinding, forwarding or picture search in the VTR mode To always display the remaining tape bar To display date, time and recording data during playback To display date and time during playback POWER switch VTR MEMORY VTR MEMORY VTR CAMERA VTR** CAMERA VTR CAMERA VTR * DCR-TRV 820 only Note on REC MODE When you record on AUDIO MODE When playing back a tape recorded in...

Operating Instructions
Page 73
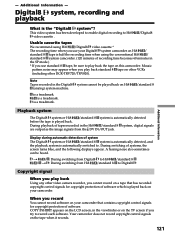
... 00 AM 6 SETUP MENU CLOCK SET AUTO TV ON TV INPUT 2000 JUL 4 LTR SIZE DEMO MODE RETURN 5 30 PM [MENU] : END SETUP MENU CLOCK SET JUL 4 2000 AUTO TV ON 5 : 3 0 : 0 0 PM TV INPUT LTR SIZE DEMO MODE RETURN [MENU] : END The year changes as follows: 1999 y 2000 T t 2029 If you need not reset the date and time. Note on the time indicator The internal clock of your camcorder operates on the tape and the "Memory Stick". The clock starts...
... 00 AM 6 SETUP MENU CLOCK SET AUTO TV ON TV INPUT 2000 JUL 4 LTR SIZE DEMO MODE RETURN 5 30 PM [MENU] : END SETUP MENU CLOCK SET JUL 4 2000 AUTO TV ON 5 : 3 0 : 0 0 PM TV INPUT LTR SIZE DEMO MODE RETURN [MENU] : END The year changes as follows: 1999 y 2000 T t 2029 If you need not reset the date and time. Note on the time indicator The internal clock of your camcorder operates on the tape and the "Memory Stick". The clock starts...

Operating Instructions
Page 79
... the image and are adjusted on the "Memory Stick" Number of images can select the FIELD or FRAME mode in the menu settings (p. 65). The image displayed on the screen will be recorded on the center portion of the picture and focus are fixed. The brightness of the image and focus are adjusted, being targeted for camera-shake when recording moving subjects in the FRAME mode, the recorded image blurry. •When recording in sharp focus...
... the image and are adjusted on the "Memory Stick" Number of images can select the FIELD or FRAME mode in the menu settings (p. 65). The image displayed on the screen will be recorded on the center portion of the picture and focus are fixed. The brightness of the image and focus are adjusted, being targeted for camera-shake when recording moving subjects in the FRAME mode, the recorded image blurry. •When recording in sharp focus...

Operating Instructions
Page 87
... "Memory Stick". Your camcorder can also take in moving image data recorded on a tape in the Digital8 system, and record it as a still image on a tape You cannot record the audio from the tape freezes. Also do not turn the power off , eject the "Memory Stick" or remove the battery pack. Titles superimposed on tapes You cannot record the titles on the screen when you press PHOTO on the Remote Commander Your camcorder immediately records the image that...
... "Memory Stick". Your camcorder can also take in moving image data recorded on a tape in the Digital8 system, and record it as a still image on a tape You cannot record the audio from the tape freezes. Also do not turn the power off , eject the "Memory Stick" or remove the battery pack. Titles superimposed on tapes You cannot record the titles on the screen when you press PHOTO on the Remote Commander Your camcorder immediately records the image that...

Operating Instructions
Page 112
...) (2) Set the POWER switch to or print images recorded on the LCD screen, and the beep sounds. (7) When printing ends, draw out the print paper in is flashing slowly. When printing ends, the image appears on "Memory Stick." The image on the LCD screen. DCR-TRV820 only You can also be captured from other equipment and printed. Printing images whenever you want to Before operation Be sure to use a fully charged battery...
...) (2) Set the POWER switch to or print images recorded on the LCD screen, and the beep sounds. (7) When printing ends, draw out the print paper in is flashing slowly. When printing ends, the image appears on "Memory Stick." The image on the LCD screen. DCR-TRV820 only You can also be captured from other equipment and printed. Printing images whenever you want to Before operation Be sure to use a fully charged battery...
Operating Instructions
Page 121
... VCRs (including other video camera recorder, you cannot record on a tape that has recorded copyright control signals for copyright protection of tapes recorded in the viewfinder or on the tape when it records. 121 is played back. Additional Information - is automatically switched to record such software. Display during automatic detection of software which is half the recording time when using Hi8 /Digital8 video cassette.* The recording time when you play back the tape on your Digital8 system camcorder...
... VCRs (including other video camera recorder, you cannot record on a tape that has recorded copyright control signals for copyright protection of tapes recorded in the viewfinder or on the tape when it records. 121 is played back. Additional Information - is automatically switched to record such software. Display during automatic detection of software which is half the recording time when using Hi8 /Digital8 video cassette.* The recording time when you play back the tape on your Digital8 system camcorder...

Operating Instructions
Page 128
... HiFi SOUND set the POWER switch to CAMERA or DEMO MODE is turned to 2 in the menu settings. c Clean the heads using the Sony V8-25CLD cleaning cassette (not supplied). (p. 138) No sound or only a low sound is heard when playing back a tape. • The stereo tape is set to VTR. (p. 25) The playback button does not work correctly. • The tape has a blank portion in the recorded portions. (p. 54) The picture which is recorded in the menu settings. (p. 65) 128 c Set...
... HiFi SOUND set the POWER switch to CAMERA or DEMO MODE is turned to 2 in the menu settings. c Clean the heads using the Sony V8-25CLD cleaning cassette (not supplied). (p. 138) No sound or only a low sound is heard when playing back a tape. • The stereo tape is set to VTR. (p. 25) The playback button does not work correctly. • The tape has a blank portion in the recorded portions. (p. 54) The picture which is recorded in the menu settings. (p. 65) 128 c Set...
Operating Instructions
Page 143
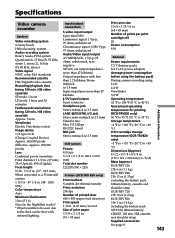
... bits (Fs 48 kHz, stereo) Video signal NTSC color, EIA standards Recommended cassette Hi8/Digital8 video cassette Recording/playback time (using 120 min. Hi8 video cassette) SP mode: 1 hour LP mode: 1 hour and 30 minuites Fastforward/rewind time (using 120 min. Hi8 video cassette) Approx. 5 min. Additional Information 143 Viewfinder Electric Viewfinder (color) Image device 1/4 type CCD (Charge Coupled Device) Approx. 460,000 pixels (Effective: Approx. 290,000 pixels) Lens Combined power zoom lens Filter diameter 1 1/2 in. (37 mm...
... bits (Fs 48 kHz, stereo) Video signal NTSC color, EIA standards Recommended cassette Hi8/Digital8 video cassette Recording/playback time (using 120 min. Hi8 video cassette) SP mode: 1 hour LP mode: 1 hour and 30 minuites Fastforward/rewind time (using 120 min. Hi8 video cassette) Approx. 5 min. Additional Information 143 Viewfinder Electric Viewfinder (color) Image device 1/4 type CCD (Charge Coupled Device) Approx. 460,000 pixels (Effective: Approx. 290,000 pixels) Lens Combined power zoom lens Filter diameter 1 1/2 in. (37 mm...

Operating Instructions
Page 154
... sound 67 Manual focus 44 Memory chromakey 84 Memory luminancekey .......... 84 MEMORY MIX 84 Memory overlap 84 Memory photo recording ...... 91 "Memory Stick 74 Menu settings 65 Mirror mode 18 Moisture condensation ........ 137 Monaural 28 MONOTONE 34 Mosaic fader 34 NIGHTSHOT 21 Normal charge 12 NTSC system 136 O, P, Q OLD MOVIE 38 Operation indicators 152 OVERLAP 34 PB ZOOM 52 PC serial cable 93 Photo scan 57 Photo search 56 PICTURE EFFECT 37, 50 Picture search 27 Playback pause...
... sound 67 Manual focus 44 Memory chromakey 84 Memory luminancekey .......... 84 MEMORY MIX 84 Memory overlap 84 Memory photo recording ...... 91 "Memory Stick 74 Menu settings 65 Mirror mode 18 Moisture condensation ........ 137 Monaural 28 MONOTONE 34 Mosaic fader 34 NIGHTSHOT 21 Normal charge 12 NTSC system 136 O, P, Q OLD MOVIE 38 Operation indicators 152 OVERLAP 34 PB ZOOM 52 PC serial cable 93 Photo scan 57 Photo search 56 PICTURE EFFECT 37, 50 Picture search 27 Playback pause...


