Operating Instructions
Page 1
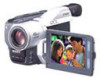
DCR-TRV820 DCR-TRV720/TRV820 ©2000 Sony Corporation Owner's Record The model and serial numbers are located on the bottom. Model No. DCR-TRV Model No. AC- Refer to these numbers whenever you call upon your Sony dealer regarding this manual thoroughly, and retain it for future reference. Serial No. 3-059-564-13 (1) Digital Video Camera Recorder Operating Instructions Before operating the unit, please read this product. Record the serial number in the space provided below. Serial No.
DCR-TRV820 DCR-TRV720/TRV820 ©2000 Sony Corporation Owner's Record The model and serial numbers are located on the bottom. Model No. DCR-TRV Model No. AC- Refer to these numbers whenever you call upon your Sony dealer regarding this manual thoroughly, and retain it for future reference. Serial No. 3-059-564-13 (1) Digital Video Camera Recorder Operating Instructions Before operating the unit, please read this product. Record the serial number in the space provided below. Serial No.
Operating Instructions
Page 2
... conditions.: (1) This device may not cause harmful interference, and (2) this manual could void your purchase of the FCC Rules. Declaration of Conformity Trade Name: SONY Model No.: DCR-TRV720 Responsible Party: Sony Electronics lnc. Operation is intended to alert the user to persons. Your Digital Handycam is intended to alert the user to the presence of...
... conditions.: (1) This device may not cause harmful interference, and (2) this manual could void your purchase of the FCC Rules. Declaration of Conformity Trade Name: SONY Model No.: DCR-TRV720 Responsible Party: Sony Electronics lnc. Operation is intended to alert the user to persons. Your Digital Handycam is intended to alert the user to the presence of...
Operating Instructions
Page 4
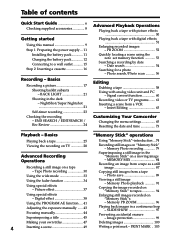
...operations Playing back a tape 25 Viewing the recording on TV 28 Using "Memory Stick"-introduction ... 74 Recording still images on a moving image - Digital effect 38 Using the PROGRAM AE function .... 41 Adjusting the exposure manually ...... 43 Focusing manually 44 Superimposing a title 45 Superimposing a ...using the zero set memory function 53 Searching a recording by date - Date search 54 Searching for a photo - Signal convert function 60 Recording video or TV programs ....... 61 Inserting a scene from a tape - MEMORY MIX 84 Recording an image from a tape as a still image...
...operations Playing back a tape 25 Viewing the recording on TV 28 Using "Memory Stick"-introduction ... 74 Recording still images on a moving image - Digital effect 38 Using the PROGRAM AE function .... 41 Adjusting the exposure manually ...... 43 Focusing manually 44 Superimposing a title 45 Superimposing a ...using the zero set memory function 53 Searching a recording by date - Date search 54 Searching for a photo - Signal convert function 60 Recording video or TV programs ....... 61 Inserting a scene from a tape - MEMORY MIX 84 Recording an image from a tape as a still image...
Operating Instructions
Page 5
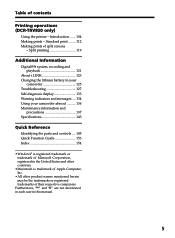
... of their respective companies. Table of split screens - Introduction ....... 104 Making prints - Split printing 119 Additional Information Digital8 system, recording and playback 121 About i.LINK 123 Changing the lithium battery in your camcorder 125 Troubleshooting 127 Self-diagnosis display 133 Warning indicators and... other product names mentioned herein may be the trademarks or registered trademarks of Microsoft Corporation, registered in this manual. 5 Standard print ........ 112 Making prints of contents Printing operations (DCR-TRV820 only) Using the printer -
... of their respective companies. Table of split screens - Introduction ....... 104 Making prints - Split printing 119 Additional Information Digital8 system, recording and playback 121 About i.LINK 123 Changing the lithium battery in your camcorder 125 Troubleshooting 127 Self-diagnosis display 133 Warning indicators and... other product names mentioned herein may be the trademarks or registered trademarks of Microsoft Corporation, registered in this manual. 5 Standard print ........ 112 Making prints of contents Printing operations (DCR-TRV820 only) Using the printer -
Operating Instructions
Page 9
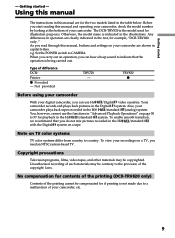
... view your recordings on your camcorder. Copyright precautions Television programs, films, video tapes, and other materials may be copyrighted. As you read through this manual and operating your camcorder plays back tapes recorded in the Digital8 system. You, however, cannot use Hi8 /Digital8 video cassettes. Unauthorized recording of such materials may be contrary to CAMERA. Getting started...
... view your recordings on your camcorder. Copyright precautions Television programs, films, video tapes, and other materials may be copyrighted. As you read through this manual and operating your camcorder plays back tapes recorded in the Digital8 system. You, however, cannot use Hi8 /Digital8 video cassettes. Unauthorized recording of such materials may be contrary to CAMERA. Getting started...

Operating Instructions
Page 10
...this manual Precautions on the LCD screen and in the viewfinder. The inside of the viewfinder, LCD screen or lens may be compensated if recording or playback is in your camcorder. (DCR-TRV820... only) •Do not place your camcorder to malfunction. These points occur normally in any way. Effective ratio of the recording ...from rain and sea water. Letting your camcorder get wet. However, do not affect the recorded picture in the manufacturing process and do not leave your camcorder exposed to temperature above 140°...
...this manual Precautions on the LCD screen and in the viewfinder. The inside of the viewfinder, LCD screen or lens may be compensated if recording or playback is in your camcorder. (DCR-TRV820... only) •Do not place your camcorder to malfunction. These points occur normally in any way. Effective ratio of the recording ...from rain and sea water. Letting your camcorder get wet. However, do not affect the recorded picture in the manufacturing process and do not leave your camcorder exposed to temperature above 140°...
Operating Instructions
Page 22
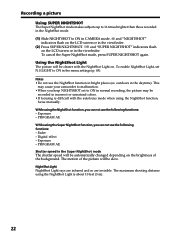
... the following functions: - Digital effect - Recording a picture Using SUPER NIGHTSHOT The Super NightShot mode makes subjects up to 16 times brighter than those recorded in the NightShot mode. (1) Slide NIGHTSHOT to ON in the menu settings (p. 65). outdoors in CAMERA mode. NightShot Light NightShot Light... picture will be slow. Notes •Do not use the following functions: - PROGRAM AE While using the NightShot function, focus manually. Fader - The maximum shooting distance using the NightShot Light is difficult with the NightShot Light on the LCD screen or in the...
... the following functions: - Digital effect - Recording a picture Using SUPER NIGHTSHOT The Super NightShot mode makes subjects up to 16 times brighter than those recorded in the NightShot mode. (1) Slide NIGHTSHOT to ON in the menu settings (p. 65). outdoors in CAMERA mode. NightShot Light NightShot Light... picture will be slow. Notes •Do not use the following functions: - PROGRAM AE While using the NightShot function, focus manually. Fader - The maximum shooting distance using the NightShot Light is difficult with the NightShot Light on the LCD screen or in the...
Operating Instructions
Page 26
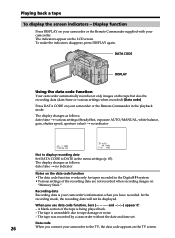
... a camcorder without the date and time set. When you have recorded. Press DATA CODE on "Memory Stick." The display changes as follows: date/time t various settings (SteadyShot, exposure AUTO/MANUAL, white balance, gain, shutter speed, aperture value) t no indicator Notes on the data code ...function •The data code function works only for tapes recorded in the Digital8 system. •Various settings of the tape ...
... a camcorder without the date and time set. When you have recorded. Press DATA CODE on "Memory Stick." The display changes as follows: date/time t various settings (SteadyShot, exposure AUTO/MANUAL, white balance, gain, shutter speed, aperture value) t no indicator Notes on the data code ...function •The data code function works only for tapes recorded in the Digital8 system. •Various settings of the tape ...
Operating Instructions
Page 40
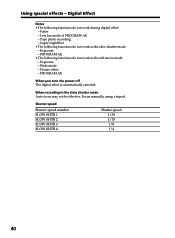
... 2 SLOW SHTR 3 SLOW SHTR 4 Shutter speed 1/30 1/15 1/8 1/4 40 PROGRAM AE When you turn the power off The digital effect is automatically canceled. When recording in the slow shutter mode: - Tape photo recording - Exposure - Focus manually using a tripod. Wide mode - Picture effect - Using special effects - Super NightShot •The following functions do not work...
... 2 SLOW SHTR 3 SLOW SHTR 4 Shutter speed 1/30 1/15 1/8 1/4 40 PROGRAM AE When you turn the power off The digital effect is automatically canceled. When recording in the slow shutter mode: - Tape photo recording - Exposure - Focus manually using a tripod. Wide mode - Picture effect - Using special effects - Super NightShot •The following functions do not work...
Operating Instructions
Page 43
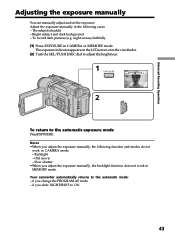
... backlight function does not work in MEMORY mode. Advanced Recording Operations Adjusting the exposure manually You can manually adjust and set the exposure. To record dark pictures (e.g. Adjust the exposure manually in the following function and modes do not work in CAMERA mode: - Bright subject and dark background - The exposure indicator appears on the LCD screen...
... backlight function does not work in MEMORY mode. Advanced Recording Operations Adjusting the exposure manually You can manually adjust and set the exposure. To record dark pictures (e.g. Adjust the exposure manually in the following function and modes do not work in CAMERA mode: - Bright subject and dark background - The exposure indicator appears on the LCD screen...
Operating Instructions
Page 44
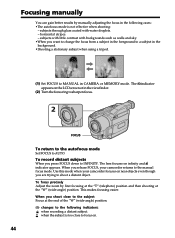
... want to change the focus from a subject in the foreground to a subject in the background. •Shooting a stationary subject when using a tripod. (1) Set FOCUS to MANUAL in CAMERA or MEMORY mode. To record distant subjects When you release FOCUS, your camcorder focuses on the LCD screen or in the following indicators: when...
... want to change the focus from a subject in the foreground to a subject in the background. •Shooting a stationary subject when using a tripod. (1) Set FOCUS to MANUAL in CAMERA or MEMORY mode. To record distant subjects When you release FOCUS, your camcorder focuses on the LCD screen or in the following indicators: when...
Operating Instructions
Page 60
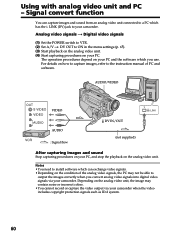
...The operation procedures depend on your PC and the software which you convert analog video signals into digital video signals via your PC, and stop the playback on the condition of PC and software. Analog video signals t Digital video signals (1) Set the POWER switch to VTR. (2) Set A/V t DV ...Signal convert function You can exchange video signals. •Depending on the analog video unit. LINK (DV) jack to the instruction manual of the analog video signals, the PC may contain noise or incorrect colors. •You cannot record or capture the video output via your camcorder. For...
...The operation procedures depend on your PC and the software which you convert analog video signals into digital video signals via your PC, and stop the playback on the condition of PC and software. Analog video signals t Digital video signals (1) Set the POWER switch to VTR. (2) Set A/V t DV ...Signal convert function You can exchange video signals. •Depending on the analog video unit. LINK (DV) jack to the instruction manual of the analog video signals, the PC may contain noise or incorrect colors. •You cannot record or capture the video output via your camcorder. For...
Operating Instructions
Page 65
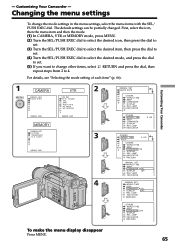
..., select the menu items with the SEL/ PUSH EXEC dial. For details, see "Selecting the mode setting of each item" (p. 66). 1 MENU CAMERA MANUAL SET AUTO SHTR [MENU] : END MEMORY CAMERA SET D ZOOM STEADYSHOT N. Customizing Your Camcorder - Changing the menu settings To change other items, select RETURN and press the dial, then repeat...
..., select the menu items with the SEL/ PUSH EXEC dial. For details, see "Selecting the mode setting of each item" (p. 66). 1 MENU CAMERA MANUAL SET AUTO SHTR [MENU] : END MEMORY CAMERA SET D ZOOM STEADYSHOT N. Customizing Your Camcorder - Changing the menu settings To change other items, select RETURN and press the dial, then repeat...
Operating Instructions
Page 66
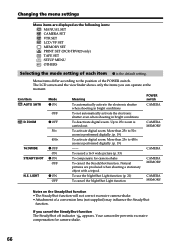
...the electronic shutter even when shooting in bright conditions To deactivate digital zoom. Natural pictures are displayed as the following icons: MANUAL SET CAMERA SET VTR SET LCD/VF SET MEMORY SET PRINT SET (DCR-TRV820 only) TAPE SET SETUP MENU OTHERS Selecting the mode ... N.S. More than 25× to 50× zoom is performed digitally. (p. 19) --- Your camcorder prevents excessive compensation for camera-shake To cancel the SteadyShot function. To record a 16:9 wide picture (p. 33) To compensate for camera-shake. 66 The LCD screen and the viewfinder shows only the items...
...the electronic shutter even when shooting in bright conditions To deactivate digital zoom. Natural pictures are displayed as the following icons: MANUAL SET CAMERA SET VTR SET LCD/VF SET MEMORY SET PRINT SET (DCR-TRV820 only) TAPE SET SETUP MENU OTHERS Selecting the mode ... N.S. More than 25× to 50× zoom is performed digitally. (p. 19) --- Your camcorder prevents excessive compensation for camera-shake To cancel the SteadyShot function. To record a 16:9 wide picture (p. 33) To compensate for camera-shake. 66 The LCD screen and the viewfinder shows only the items...
Operating Instructions
Page 123
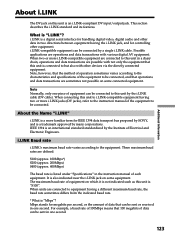
i.LINK is a digital serial interface for handling digital video, digital audio and other data in two directions between equipment having the i.LINK jack, and for IEEE 1394 data transport bus proposed by SONY, and is connected to this unit in one second. 123 Note Normally, only one piece of equipment...however, that the method of operation sometimes varies according to the characteristics and specifications of the equipment to be sent in the instruction manual of data can be connected to this unit to the equipment. IEEE 1394 is an i.LINK-compliant DV input/output jack. i.LINK...
i.LINK is a digital serial interface for handling digital video, digital audio and other data in two directions between equipment having the i.LINK jack, and for IEEE 1394 data transport bus proposed by SONY, and is connected to this unit in one second. 123 Note Normally, only one piece of equipment...however, that the method of operation sometimes varies according to the characteristics and specifications of the equipment to be sent in the instruction manual of data can be connected to this unit to the equipment. IEEE 1394 is an i.LINK-compliant DV input/output jack. i.LINK...
Operating Instructions
Page 124
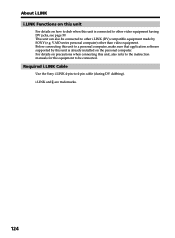
...This unit can also be connected. Required i.LINK Cable Use the Sony i.LINK 4-pin-to be connected to other than video equipment. Before connecting this unit to a personal computer, make sure that application software supported by SONY (e.g. For details on the personal computer. About i.LINK i.LINK ...precautions when connecting this unit, also refer to the instruction manuals for the equipment to -4-pin cable (during DV dubbing). VAIO series personal computer) other i.LINK (DV) compatible equipment made by this unit is connected to other video equipment having DV jacks, see page 59.
...This unit can also be connected. Required i.LINK Cable Use the Sony i.LINK 4-pin-to be connected to other than video equipment. Before connecting this unit to a personal computer, make sure that application software supported by SONY (e.g. For details on the personal computer. About i.LINK i.LINK ...precautions when connecting this unit, also refer to the instruction manuals for the equipment to -4-pin cable (during DV dubbing). VAIO series personal computer) other i.LINK (DV) compatible equipment made by this unit is connected to other video equipment having DV jacks, see page 59.
Operating Instructions
Page 127
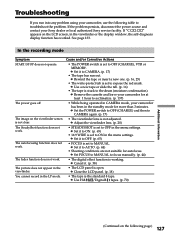
...digital effect function is set to acclimatize. (p. 137) • While being operated in CAMERA mode, your camcorder has been in the menu settings. c Remove the cassette and leave your camcorder for autofocus. If the problem persists, disconnect the power source and contact your Sony dealer or local authorized Sony service facility. In the recording... is stuck to OFF in the viewfinder or the display window, the self-diagnosis display function has worked. c Cancel it to MANUAL. c Set it . (p. 38) • The LCD panel is not clear. The image on the viewfinder screen is open...
...digital effect function is set to acclimatize. (p. 137) • While being operated in CAMERA mode, your camcorder has been in the menu settings. c Remove the cassette and leave your camcorder for autofocus. If the problem persists, disconnect the power source and contact your Sony dealer or local authorized Sony service facility. In the recording... is stuck to OFF in the viewfinder or the display window, the self-diagnosis display function has worked. c Cancel it to MANUAL. c Set it . (p. 38) • The LCD panel is not clear. The image on the viewfinder screen is open...
Operating Instructions
Page 152
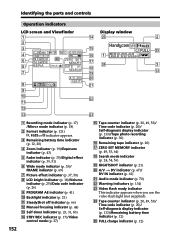
...01 SEARCH qk ql 3 qd A / V DV w; 16BIT 8 wa 9 0 ws qa qs qd wd 1 Recording mode indicator (p. 17) /Mirror mode indicator (p. 18) 2 Format indicator (p. 121) , or indicator appears. 3 ... time indicator (p. 12, 20) 4 Zoom indicator (p. 19)/Exposure indicator (p. 43) 5 Fader indicator (p. 35)/Digital effect indicator (p. 39, 51) 6 Wide mode indicator (p. 33)/ FRAME indicator (p. 69) 7 Picture effect indicator... SteadyShot off indicator (p. 66) qs Manual focusing indicator (p. 44) qd Self-timer indicator (p. 23, 31, 83) qf STBY/REC indicator (p. 17)/Video control mode (p. 27) 152 qg ...
...01 SEARCH qk ql 3 qd A / V DV w; 16BIT 8 wa 9 0 ws qa qs qd wd 1 Recording mode indicator (p. 17) /Mirror mode indicator (p. 18) 2 Format indicator (p. 121) , or indicator appears. 3 ... time indicator (p. 12, 20) 4 Zoom indicator (p. 19)/Exposure indicator (p. 43) 5 Fader indicator (p. 35)/Digital effect indicator (p. 39, 51) 6 Wide mode indicator (p. 33)/ FRAME indicator (p. 69) 7 Picture effect indicator... SteadyShot off indicator (p. 66) qs Manual focusing indicator (p. 44) qd Self-timer indicator (p. 23, 31, 83) qf STBY/REC indicator (p. 17)/Video control mode (p. 27) 152 qg ...
Operating Instructions
Page 153
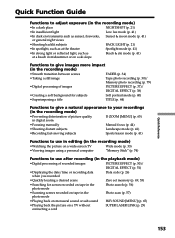
...) •Superimposing a title TITLE (p. 44) Functions to give a natural appearance to your recordings (in the recording mode) •Preventing deterioration of picture quality in digital zoom D ZOOM [MENU] (p. 65) •Focusing manually Manual focus (p. 44) •Shooting distant subjects Landscape mode (p. 41) •Recording fast-moving subjects Sports lesson mode (p. 41) Functions to use in editing...
...) •Superimposing a title TITLE (p. 44) Functions to give a natural appearance to your recordings (in the recording mode) •Preventing deterioration of picture quality in digital zoom D ZOOM [MENU] (p. 65) •Focusing manually Manual focus (p. 44) •Shooting distant subjects Landscape mode (p. 41) •Recording fast-moving subjects Sports lesson mode (p. 41) Functions to use in editing...

Operating Instructions
Page 154
...28, 32, 58, 88 BACK LIGHT 21 Battery pack 11 BEEP 72 BOUNCE 34 C, D Camera chromakey 84 Charging battery 12 Clock set 73 Connection (viewing on TV 28 (dubbing a tape... 74 LANC /DIGITAL I/O 93, 149 LCD screen 18 LUMINANCEKEY 38 M, N Main sound 67 Manual focus 44 Memory chromakey 84 Memory luminancekey .......... 84 MEMORY MIX 84 Memory overlap 84 Memory photo recording ...... 91 "Memory... sound 67 SUPER LASER LINK ..... 29, 146 SUPER NIGHTSHOT 22 S video jack 28 T, U, V Tape counter 20 Tape photo recording 30 Telephote 19 Time code 20 Title 45 TRAIL 38 Transition 18 TV...
...28, 32, 58, 88 BACK LIGHT 21 Battery pack 11 BEEP 72 BOUNCE 34 C, D Camera chromakey 84 Charging battery 12 Clock set 73 Connection (viewing on TV 28 (dubbing a tape... 74 LANC /DIGITAL I/O 93, 149 LCD screen 18 LUMINANCEKEY 38 M, N Main sound 67 Manual focus 44 Memory chromakey 84 Memory luminancekey .......... 84 MEMORY MIX 84 Memory overlap 84 Memory photo recording ...... 91 "Memory... sound 67 SUPER LASER LINK ..... 29, 146 SUPER NIGHTSHOT 22 S video jack 28 T, U, V Tape counter 20 Tape photo recording 30 Telephote 19 Time code 20 Title 45 TRAIL 38 Transition 18 TV...


