Insert: Getting Online with your Camera
Page 2
... Handycam® camcorder. For further information...? However, Online Registration after this date will continue to be possible through your Network Handycam® camcorder will no longer be possible. Please refer to the table below for the page number in the Operating Instructions manual containing the appropriate instructions for assistance. model name Registration (*1)AOL setting (*2)Other ISP setting procedure DCR-IP7BT DCR-PC120BT DCR-TRV50, 950 DCR-IP55 Not compatible...
... Handycam® camcorder. For further information...? However, Online Registration after this date will continue to be possible through your Network Handycam® camcorder will no longer be possible. Please refer to the table below for the page number in the Operating Instructions manual containing the appropriate instructions for assistance. model name Registration (*1)AOL setting (*2)Other ISP setting procedure DCR-IP7BT DCR-PC120BT DCR-TRV50, 950 DCR-IP55 Not compatible...
Network Function/Application Operating Instructions
Page 2
... to recording/playback malfunction or storage media problems. Precautions •Before using the network function, make backup copies of your email messages and your camcorder is repaired by services. •Wireless connection function using the battery pack When the remaining battery power is insufficient for easy setup with a fully charged battery pack. NetFront is a registered trademark of your recordings Any recording contents or downloaded files cannot be different from time to time due to the operating instructions of Access...
... to recording/playback malfunction or storage media problems. Precautions •Before using the network function, make backup copies of your email messages and your camcorder is repaired by services. •Wireless connection function using the battery pack When the remaining battery power is insufficient for easy setup with a fully charged battery pack. NetFront is a registered trademark of your recordings Any recording contents or downloaded files cannot be different from time to time due to the operating instructions of Access...
Network Function/Application Operating Instructions
Page 34
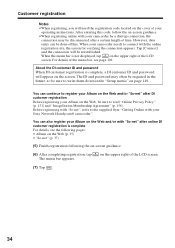
.... When your Sony Network Handycam® camcorder". You can be disconnected after online DI customer registration is not displayed, tap menu on -screen guidance. •When registering online with "So-net" after a certain length of time. When the menu bar is complete For details, see page 108. After entering this code, follow the on the upper right of the LCD screen. Before registering...
.... When your Sony Network Handycam® camcorder". You can be disconnected after online DI customer registration is not displayed, tap menu on -screen guidance. •When registering online with "So-net" after a certain length of time. When the menu bar is complete For details, see page 108. After entering this code, follow the on the upper right of the LCD screen. Before registering...
Network Function/Application Operating Instructions
Page 36
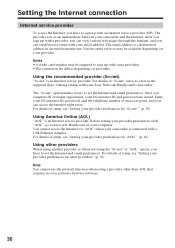
... connection Internet service provider To access the Internet, you have to set the Internet and email preferences. Once you have to sign up with your Sony Network Handycam® camcorder". Using America Online (AOL) "AOL" is an Internet service provider. You cannot access the Internet via "AOL" when your DI customer ID and password are issued. Note You cannot use the network function when using...
... connection Internet service provider To access the Internet, you have to set the Internet and email preferences. Once you have to sign up with your Sony Network Handycam® camcorder". Using America Online (AOL) "AOL" is an Internet service provider. You cannot access the Internet via "AOL" when your DI customer ID and password are issued. Note You cannot use the network function when using...
Network Function/Application Operating Instructions
Page 122
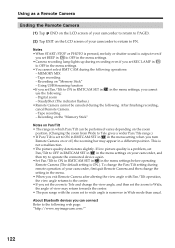
... Wide mode than usual. Tape recording - To change the view angle, and then set Pan/Tilt to OFF in RMTCAM SET in in the menu settings on your camcorder to return to FN. Using as a Remote Camera Ending the Remote Camera (1) Tap END on the LCD screen of your camcorder to return to PAGE3. (2) Tap EXIT on the LCD screen of your camcorder, and then try to operate the connected device again. •Set Pan...
... Wide mode than usual. Tape recording - To change the view angle, and then set Pan/Tilt to OFF in RMTCAM SET in in the menu settings on your camcorder to return to FN. Using as a Remote Camera Ending the Remote Camera (1) Tap END on the LCD screen of your camcorder to return to PAGE3. (2) Tap EXIT on the LCD screen of your camcorder, and then try to operate the connected device again. •Set Pan...
PIXELA ImageMixer v1.5 Instruction Manual
Page 232
..., like DVD Video, support playback control. Setting up menu composition, contents, navigation, etc. Video/TV Format: There are displayed per second is called a disc. The number of a VHS tape, such as MPEG-1, with recorded high quality image and sound. Slideshow: Like a slide, it is a button for recording images and sounds on the remote control of Video/TV format, NTSC and PAL. Contents: This refers to digital image and high-fi audio. The slideshow number corresponds with the remote control of 352x240...
..., like DVD Video, support playback control. Setting up menu composition, contents, navigation, etc. Video/TV Format: There are displayed per second is called a disc. The number of a VHS tape, such as MPEG-1, with recorded high quality image and sound. Slideshow: Like a slide, it is a button for recording images and sounds on the remote control of Video/TV format, NTSC and PAL. Contents: This refers to digital image and high-fi audio. The slideshow number corresponds with the remote control of 352x240...
Operating Instructions
Page 12
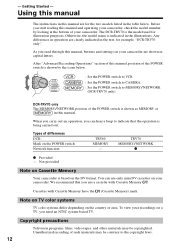
... on your camcorder, check the model number by the icons below . DCR-TRV70 only The MEMORY/NETWORK position of the POWER switch is the model used for the two models listed in this manual and operating your camcorder. Before you can use a cassette with Cassette Memory have the (Cassette Memory) mark. Otherwise, the model name is based on the country or area. POWER VCR OFF(CHG) CAMERA MEMORY/ NETWORK : Set the POWER switch to VCR. : Set the POWER switch to CAMERA. : Set the POWER switch to indicate...
... on your camcorder, check the model number by the icons below . DCR-TRV70 only The MEMORY/NETWORK position of the POWER switch is the model used for the two models listed in this manual and operating your camcorder. Before you can use a cassette with Cassette Memory have the (Cassette Memory) mark. Otherwise, the model name is based on the country or area. POWER VCR OFF(CHG) CAMERA MEMORY/ NETWORK : Set the POWER switch to VCR. : Set the POWER switch to CAMERA. : Set the POWER switch to indicate...
Operating Instructions
Page 125
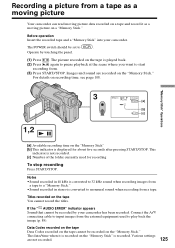
... the recorded tape and a "Memory Stick" into your camcorder has been recorded. Operate by your camcorder. Various settings are recorded on the "Memory Stick." The POWER switch should be recorded on the tape You cannot record the titles. For details on recording time, see page 108. Connect the A/V connecting cable to start recording from. (3) Press START/STOP. Recording a picture from a tape as a moving picture data recorded on a tape and record it is recorded on the "Memory Stick" is displayed for recording To stop recording Press START/STOP. Images and sound are...
... the recorded tape and a "Memory Stick" into your camcorder has been recorded. Operate by your camcorder. Various settings are recorded on the "Memory Stick." The POWER switch should be recorded on the tape You cannot record the titles. For details on recording time, see page 108. Connect the A/V connecting cable to start recording from. (3) Press START/STOP. Recording a picture from a tape as a moving picture data recorded on a tape and record it is recorded on the "Memory Stick" is displayed for recording To stop recording Press START/STOP. Images and sound are...
Operating Instructions
Page 148
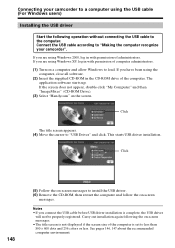
... you are using the USB cable (For Windows users) Installing the USB driver Start the following the on-screen messages. •The title screen is not displayed if the screen size of computer administrators. (1) Turn on the screen. Click 148 (5) Follow the on -screen messages. Connect the USB cable according to install the USB driver. (6) Remove the CD-ROM, then restart the computer and follow the on -screen messages to "Making the computer recognize your camcorder to a computer using Windows XP...
... you are using the USB cable (For Windows users) Installing the USB driver Start the following the on-screen messages. •The title screen is not displayed if the screen size of computer administrators. (1) Turn on the screen. Click 148 (5) Follow the on -screen messages. Connect the USB cable according to install the USB driver. (6) Remove the CD-ROM, then restart the computer and follow the on -screen messages to "Making the computer recognize your camcorder to a computer using Windows XP...
Operating Instructions
Page 152
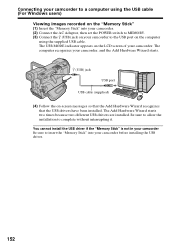
... install the USB driver if the "Memory Stick" is not in your camcorder Be sure to insert the "Memory Stick" into your camcorder. (2) Connect the AC Adaptor, then set the POWER switch to MEMORY. (3) Connect the (USB) jack on the "Memory Stick" (1) Insert the "Memory Stick" into your camcorder to complete without interrupting it. The computer recognizes your camcorder. Be sure to allow the installation to the USB port on the computer using the USB cable (For Windows users) Viewing images recorded...
... install the USB driver if the "Memory Stick" is not in your camcorder Be sure to insert the "Memory Stick" into your camcorder. (2) Connect the AC Adaptor, then set the POWER switch to MEMORY. (3) Connect the (USB) jack on the "Memory Stick" (1) Insert the "Memory Stick" into your camcorder to complete without interrupting it. The computer recognizes your camcorder. Be sure to allow the installation to the USB port on the computer using the USB cable (For Windows users) Viewing images recorded...
Operating Instructions
Page 153
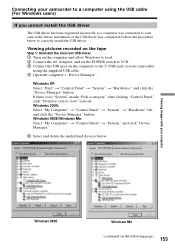
... "Control Panel," click "Switch to your camcorder using the USB cable (For Windows users) If you cannot install the USB driver The USB driver has been registered incorrectly as a computer was connected to classic view" instead. Viewing pictures recorded on the tape Step 1: Uninstall the incorrect USB driver 1 Turn on the computer and allow Windows to load. 2 Connect the AC Adaptor, and set the POWER switch to VCR. 3 Connect the USB port on the computer to correctly install the USB driver. Windows 98SE/Windows Me...
... "Control Panel," click "Switch to your camcorder using the USB cable (For Windows users) If you cannot install the USB driver The USB driver has been registered incorrectly as a computer was connected to classic view" instead. Viewing pictures recorded on the tape Step 1: Uninstall the incorrect USB driver 1 Turn on the computer and allow Windows to load. 2 Connect the AC Adaptor, and set the POWER switch to VCR. 3 Connect the USB port on the computer to correctly install the USB driver. Windows 98SE/Windows Me...
Operating Instructions
Page 155
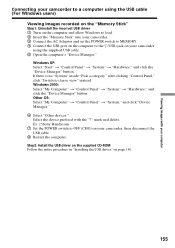
... in "Installing the USB driver" on your camcorder using the USB cable (For Windows users) Viewing images recorded on the "Memory Stick" Step1: Uninstall the incorrect USB driver 1 Turn on the computer and allow Windows to load. 2 Insert the "Memory Stick" into your camcorder. 3 Connect the AC Adaptor and set the POWER switch to MEMORY. 4 Connect the USB port on the computer to the (USB) jack on your camcorder, then disconnect the USB cable. 8 Restart the computer. Ex: (?)Sony Handycam 7 Set the POWER switch to classic view" instead...
... in "Installing the USB driver" on your camcorder using the USB cable (For Windows users) Viewing images recorded on the "Memory Stick" Step1: Uninstall the incorrect USB driver 1 Turn on the computer and allow Windows to load. 2 Insert the "Memory Stick" into your camcorder. 3 Connect the AC Adaptor and set the POWER switch to MEMORY. 4 Connect the USB port on the computer to the (USB) jack on your camcorder, then disconnect the USB cable. 8 Restart the computer. Ex: (?)Sony Handycam 7 Set the POWER switch to classic view" instead...

Operating Instructions
Page 160
... camcorder to create a Video CD. (7) After the "Video CD successfully created." Easy Video CD automatically begins to capture images onto the CD-R to the USB port on a computer - The tape is automatically played back. message appears, click "Quit." 160 Viewing pictures recorded on the tape on the computer using the supplied USB cable. (5) Insert a new CD-R in the CD-R drive of the computer. (6) Click "Start." USB Streaming (For Windows users) Making Video...
... camcorder to create a Video CD. (7) After the "Video CD successfully created." Easy Video CD automatically begins to capture images onto the CD-R to the USB port on a computer - The tape is automatically played back. message appears, click "Quit." 160 Viewing pictures recorded on the tape on the computer using the supplied USB cable. (5) Insert a new CD-R in the CD-R drive of the computer. (6) Click "Start." USB Streaming (For Windows users) Making Video...
Operating Instructions
Page 163
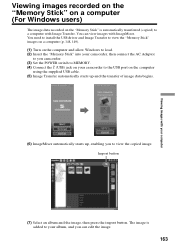
... (7) Select an album and the image, then press the import button. You need to install the USB driver and Image Transfer to view the "Memory Stick" images on a computer (p. 148, 149). (1) Turn on the computer and allow Windows to load. (2) Insert the "Memory Stick" into your camcorder, then connect the AC Adaptor to you camcorder. (3) Set the POWER switch to MEMORY. (4) Connect the (USB) jack on your camcorder to the USB port on the "Memory Stick" is added to view the copied image.
... (7) Select an album and the image, then press the import button. You need to install the USB driver and Image Transfer to view the "Memory Stick" images on a computer (p. 148, 149). (1) Turn on the computer and allow Windows to load. (2) Insert the "Memory Stick" into your camcorder, then connect the AC Adaptor to you camcorder. (3) Set the POWER switch to MEMORY. (4) Connect the (USB) jack on your camcorder to the USB port on the "Memory Stick" is added to view the copied image.
Operating Instructions
Page 164
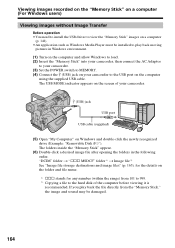
... play back the file directly from 101 to 999. 2) Copying a file to the hard disk of your camcorder to the USB port on the computer using the supplied USB cable. The folders inside the "Memory Stick" appear. (6) Double-click a desired image file after opening the folders in Windows environment. (1) Turn on the computer and allow Windows to load. (2) Insert the "Memory Stick" into your camcorder, then connect the AC Adaptor to your camcorder. (3) Set the POWER switch to MEMORY. (4) Connect...
... play back the file directly from 101 to 999. 2) Copying a file to the hard disk of your camcorder to the USB port on the computer using the supplied USB cable. The folders inside the "Memory Stick" appear. (6) Double-click a desired image file after opening the folders in Windows environment. (1) Turn on the computer and allow Windows to load. (2) Insert the "Memory Stick" into your camcorder, then connect the AC Adaptor to your camcorder. (3) Set the POWER switch to MEMORY. (4) Connect...
Operating Instructions
Page 168
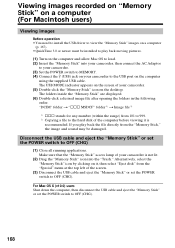
... number (within the range) from 101 to 999. 2) Copying a file to the hard disk of the screen. (3) Disconnect the USB cable and eject the "Memory Stick" or set the POWER switch to OFF (CHG). Viewing images recorded on "Memory Stick" on a computer (For Macintosh users) Viewing images Before operation •You need to install the USB driver to view the "Memory Stick" images on a computer (p. 167). •QuickTime 3.0 or newer must be damaged. Make sure that the "Memory Stick" access lamp of your camcorder to MEMORY. (4) Connect...
... number (within the range) from 101 to 999. 2) Copying a file to the hard disk of the screen. (3) Disconnect the USB cable and eject the "Memory Stick" or set the POWER switch to OFF (CHG). Viewing images recorded on "Memory Stick" on a computer (For Macintosh users) Viewing images Before operation •You need to install the USB driver to view the "Memory Stick" images on a computer (p. 167). •QuickTime 3.0 or newer must be damaged. Make sure that the "Memory Stick" access lamp of your camcorder to MEMORY. (4) Connect...
Operating Instructions
Page 193
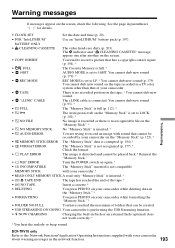
... TAPE Insert a cassette. * • DELETING You press PHOTO on your camcorder about warning messages in parentheses "( )" for details. Troubleshooting • CLOCK SET Set the date and time (p. 20). • FOR "InfoLITHIUM" Use an "InfoLITHIUM" battery pack (p. 197). You cannot dub new sound (p. 93). * • FULL The "Memory Stick" is not compatible MEMORY STICK with your camcorder while deleting data in flash or an external flash (optional) does not work correctly. * * You hear the melody or beep sound. DCR-TRV70...
... TAPE Insert a cassette. * • DELETING You press PHOTO on your camcorder about warning messages in parentheses "( )" for details. Troubleshooting • CLOCK SET Set the date and time (p. 20). • FOR "InfoLITHIUM" Use an "InfoLITHIUM" battery pack (p. 197). You cannot dub new sound (p. 93). * • FULL The "Memory Stick" is not compatible MEMORY STICK with your camcorder while deleting data in flash or an external flash (optional) does not work correctly. * * You hear the melody or beep sound. DCR-TRV70...
Operating Instructions
Page 218
... Interval Recording 66 Interval Photo Recording 121 JPEG 102 Labeling a cassette 100 LANC jack 212 LUMI 56 M, N Main sound 195 Manual focus 63 M. CHROM 118 CHARGE (charge) lamp ........ 16 Charging battery pack 16 Charging built-in rechargeable battery 204 CLEANING CASSETTE ...... 203 Clock set memory 74 Zoom 33 CHROM 118 M. Index A, B AC Adaptor 16 Adjusting the viewfinder ...... 31 Audio dubbing 93 AUDIO MIX 96 AUDIO MODE 179 Auto red eye reduction ........ 113 AUTO SHTR 173 A/V connecting cable 44...
... Interval Recording 66 Interval Photo Recording 121 JPEG 102 Labeling a cassette 100 LANC jack 212 LUMI 56 M, N Main sound 195 Manual focus 63 M. CHROM 118 CHARGE (charge) lamp ........ 16 Charging battery pack 16 Charging built-in rechargeable battery 204 CLEANING CASSETTE ...... 203 Clock set memory 74 Zoom 33 CHROM 118 M. Index A, B AC Adaptor 16 Adjusting the viewfinder ...... 31 Audio dubbing 93 AUDIO MIX 96 AUDIO MODE 179 Auto red eye reduction ........ 113 AUTO SHTR 173 A/V connecting cable 44...
Marketing Specifications
Page 1
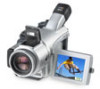
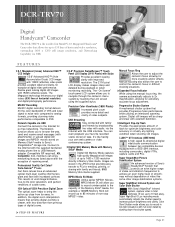
... accurate focus adjustment. AOL Compatible: AOL members can even playback your digital videos (530 lines of horizontal resolution) and digital photography performance. USB Streaming Stay connected with family and friends by touching the LCD screen using the manual focus ring, the camera automatically adjusts to record in virtually any lighting condition when shooting still images. i.LINK®* DV Interface (IEEE1394) A high speed bi-directional digital video/audio communication between two compatible devices equipped with increased contrast. Color Slow Shutter mode allows...
... accurate focus adjustment. AOL Compatible: AOL members can even playback your digital videos (530 lines of horizontal resolution) and digital photography performance. USB Streaming Stay connected with family and friends by touching the LCD screen using the manual focus ring, the camera automatically adjusts to record in virtually any lighting condition when shooting still images. i.LINK®* DV Interface (IEEE1394) A high speed bi-directional digital video/audio communication between two compatible devices equipped with increased contrast. Color Slow Shutter mode allows...
Marketing Specifications
Page 2
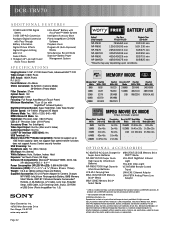
... MPEG Movie EX Mode: Yes Viewfinder: Precision Color (180 K Pixels) LCD: 2.5" Precision Color (211K Pixels) Accessory Shoe: Yes (Intelligent) Video Input/Output: Yes/Yes (Mini and S-Video) Audio Input/Output: Yes/Yes i.LINK® DV Interface (IEEE1394): Yes USB Terminal: Yes Memory Stick PRO™ Media Compatibility: Tested to support up to designate that a product contains an IEEE1394 connector. does not support Access Control security function USB Streaming: Yes Headphone Jack: Yes (Mini, Stereo) Mic-Input: Yes (Stereo) White Balance: Auto...
... MPEG Movie EX Mode: Yes Viewfinder: Precision Color (180 K Pixels) LCD: 2.5" Precision Color (211K Pixels) Accessory Shoe: Yes (Intelligent) Video Input/Output: Yes/Yes (Mini and S-Video) Audio Input/Output: Yes/Yes i.LINK® DV Interface (IEEE1394): Yes USB Terminal: Yes Memory Stick PRO™ Media Compatibility: Tested to support up to designate that a product contains an IEEE1394 connector. does not support Access Control security function USB Streaming: Yes Headphone Jack: Yes (Mini, Stereo) Mic-Input: Yes (Stereo) White Balance: Auto...


