Network Function/Application Operating Instructions
Page 2
...network operation, use the network function without setting the clock, you set for some models. Note Before shipment, your camcorder. Note on your camcorder. The illustrations used in the U.S. •The reset button cannot reset the network preferences. All other product names ... are registered trademarks of Sony Corporation. •The BLUETOOTH trademarks are not mentioned in each case in this product. Before connecting the AC Adaptor or replacing the battery pack, be the trademarks or registered trademarks of this manual. The DCR-TRV80 is adopted for ...
...network operation, use the network function without setting the clock, you set for some models. Note Before shipment, your camcorder. Note on your camcorder. The illustrations used in the U.S. •The reset button cannot reset the network preferences. All other product names ... are registered trademarks of Sony Corporation. •The BLUETOOTH trademarks are not mentioned in each case in this product. Before connecting the AC Adaptor or replacing the battery pack, be the trademarks or registered trademarks of this manual. The DCR-TRV80 is adopted for ...
Network Function/Application Operating Instructions
Page 25
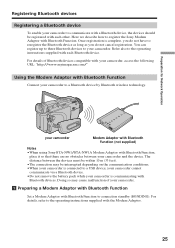
... a Bluetooth device by Bluetooth wireless technology. Registering Bluetooth devices Registering a Bluetooth device To enable your camcorder to register the Sony Modem Adaptor with Bluetooth Function. Once registration is communicating with each other. Refer also to reregister the...camcorder, access the following URL: "http://www.myimagecam.com/" Using the Modem Adaptor with each Bluetooth device. Doing so may be registered with Bluetooth Function Connect your camcorder to a USB device, your camcorder cannot communicate via a Bluetooth device. •Do not remove the battery...
... a Bluetooth device by Bluetooth wireless technology. Registering Bluetooth devices Registering a Bluetooth device To enable your camcorder to register the Sony Modem Adaptor with Bluetooth Function. Once registration is communicating with each other. Refer also to reregister the...camcorder, access the following URL: "http://www.myimagecam.com/" Using the Modem Adaptor with each Bluetooth device. Doing so may be registered with Bluetooth Function Connect your camcorder to a USB device, your camcorder cannot communicate via a Bluetooth device. •Do not remove the battery...
Network Function/Application Operating Instructions
Page 131
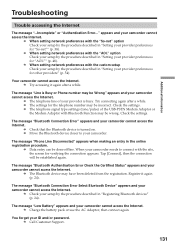
... settings for "AOL"" (p. 48). Check the settings. c The Bluetooth device may be Wrong" appears and your camcorder cannot access the Internet. The message "Low Battery" appears and your provider is busy. c When setting network preferences with Bluetooth Function may be incorrect. c Try ...38). c Data entry can be established again. The message "Bluetooth Connection Error Select Bluetooth Device" appears and your camcorder cannot access the Internet. c Charge the battery pack or use the AC Adaptor, then connect again. The message "Line is turned on. c Call Customer Support...
... settings for "AOL"" (p. 48). Check the settings. c The Bluetooth device may be Wrong" appears and your camcorder cannot access the Internet. The message "Low Battery" appears and your provider is busy. c When setting network preferences with Bluetooth Function may be incorrect. c Try ...38). c Data entry can be established again. The message "Bluetooth Connection Error Select Bluetooth Device" appears and your camcorder cannot access the Internet. c Charge the battery pack or use the AC Adaptor, then connect again. The message "Line is turned on. c Call Customer Support...
Network Function/Application Operating Instructions
Page 136
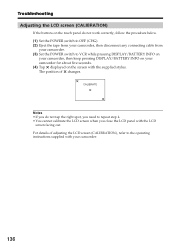
... For details of changes. The position of adjusting the LCD screen (CALIBRATION), refer to VCR while pressing DISPLAY/BATTERY INFO on your camcorder, then keep pressing DISPLAY/BATTERY INFO on the screen with the supplied stylus. CALIBRATE Notes •If you do not work correctly, follow the procedure below. (1) Set the POWER switch...
... For details of changes. The position of adjusting the LCD screen (CALIBRATION), refer to VCR while pressing DISPLAY/BATTERY INFO on your camcorder, then keep pressing DISPLAY/BATTERY INFO on the screen with the supplied stylus. CALIBRATE Notes •If you do not work correctly, follow the procedure below. (1) Set the POWER switch...
Network Function/Application Operating Instructions
Page 140
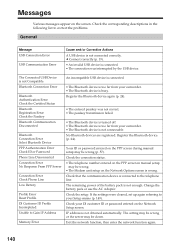
...Adaptor. Check your Setup memo (p. 149). Exit the network function, then enter the network function again. 140 The remaining power of the battery pack is not obtained automatically. Messages Various messages appear on the PPP screen during manual setup may be down. Register the Bluetooth device (p.... is connected to Gain IP Address Memory Error An incompatible USB device is connected. • The Bluetooth device is too far from your camcorder. • The Bluetooth device is not connected correctly. IP address is not enough. The setting may be wrong or the server may ...
...Adaptor. Check your Setup memo (p. 149). Exit the network function, then enter the network function again. 140 The remaining power of the battery pack is not obtained automatically. Messages Various messages appear on the PPP screen during manual setup may be down. Register the Bluetooth device (p.... is connected to Gain IP Address Memory Error An incompatible USB device is connected. • The Bluetooth device is too far from your camcorder. • The Bluetooth device is not connected correctly. IP address is not enough. The setting may be wrong or the server may ...

Operating Instructions
Page 2
...two conditions: (1) This device may not cause harmful interference, and (2) this Sony Handycam. This symbol is subject to the presence of optical instruments with superior picture and sound quality. This Class B digital apparatus complies with Part 15 of electric shock to constitute a risk of the ...device must accept any interference received, including interference that may cause undesired operation. As the laser beam used rechargeable batteries to disassemble the cabinet. Welcome! WARNING To prevent fire or shock hazard, do not attempt to the collection and recycling location ...
...two conditions: (1) This device may not cause harmful interference, and (2) this Sony Handycam. This symbol is subject to the presence of optical instruments with superior picture and sound quality. This Class B digital apparatus complies with Part 15 of electric shock to constitute a risk of the ...device must accept any interference received, including interference that may cause undesired operation. As the laser beam used rechargeable batteries to disassemble the cabinet. Welcome! WARNING To prevent fire or shock hazard, do not attempt to the collection and recycling location ...

Operating Instructions
Page 6
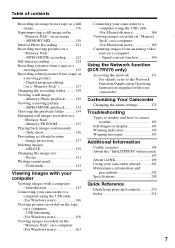
... memory 74 Searching the boundaries of the recorded tape by frame recording - Basics Playing back a tape 39 To display the screen indicators - Digital effect ... 56 Selecting the quality and size of contents Main Features 4 Focusing manually 63 Using the spot focus function Quick Start Guide -... pack 15 Charging the battery pack 16 Connecting to a wall outlet 19 Step 2 Setting the date and time ......... 20 Step 3 Using the touch panel 23 Playing back a tape with picture effect 71 Playing back a tape with digital effect 72 Enlarging images recorded on a tape 8 - ...
... memory 74 Searching the boundaries of the recorded tape by frame recording - Basics Playing back a tape 39 To display the screen indicators - Digital effect ... 56 Selecting the quality and size of contents Main Features 4 Focusing manually 63 Using the spot focus function Quick Start Guide -... pack 15 Charging the battery pack 16 Connecting to a wall outlet 19 Step 2 Setting the date and time ......... 20 Step 3 Using the touch panel 23 Playing back a tape with picture effect 71 Playing back a tape with digital effect 72 Enlarging images recorded on a tape 8 - ...
Operating Instructions
Page 7
... Usable cassettes 194 About the "InfoLITHIUM" battery pack 197 About i.LINK 199 Using your camcorder abroad .......... 201 Maintenance information and precautions ...camcorder to a computer using the USB cable (For Windows users 146 Viewing pictures recorded on the tape on a "Memory Stick" - Resize 141 Writing a print mark - Signal convert function 169 Using the Network function (DCR-TRV70... Digital program editing (on a "Memory Stick" - Slide show 136 Preventing accidental erasure - Print mark 142 Viewing images with your computer Viewing images with your camcorder. ...
... Usable cassettes 194 About the "InfoLITHIUM" battery pack 197 About i.LINK 199 Using your camcorder abroad .......... 201 Maintenance information and precautions ...camcorder to a computer using the USB cable (For Windows users 146 Viewing pictures recorded on the tape on a "Memory Stick" - Resize 141 Writing a print mark - Signal convert function 169 Using the Network function (DCR-TRV70... Digital program editing (on a "Memory Stick" - Slide show 136 Preventing accidental erasure - Print mark 142 Viewing images with your computer Viewing images with your camcorder. ...
Operating Instructions
Page 8
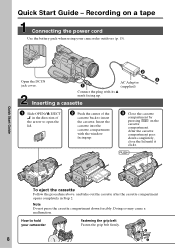
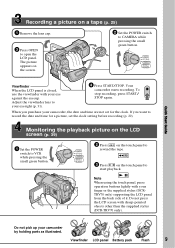
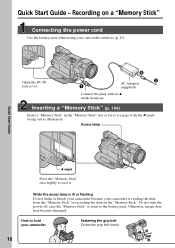
... the cassette compartment opens completely in the direction of the arrow to open the lid. 2 Push the center of the cassette back to hold your camcorder outdoors (p. 15). 2 Open the DC IN jack cover. 3 AC Adaptor 1 (supplied) Connect the plug with the window facing up . Insert the... cassette compartment with its v mark facing up . 3 Close the cassette compartment by pressing on a tape Connecting the power cord Use the battery pack when using your camcorder Fastening the grip belt Fasten the grip belt firmly. 8 Quick Start Guide - Recording on the cassette compartment.
... the cassette compartment opens completely in the direction of the arrow to open the lid. 2 Push the center of the cassette back to hold your camcorder outdoors (p. 15). 2 Open the DC IN jack cover. 3 AC Adaptor 1 (supplied) Connect the plug with the window facing up . Insert the... cassette compartment with its v mark facing up . 3 Close the cassette compartment by pressing on a tape Connecting the power cord Use the battery pack when using your camcorder Fastening the grip belt Fasten the grip belt firmly. 8 Quick Start Guide - Recording on the cassette compartment.
Operating Instructions
Page 9
... press START/ STOP again. Adjust the viewfinder lens to your camcorder by holding parts as illustrated. Note When using the touch panel, press operation buttons lightly with sharp-pointed objects other than the supplied stylus (DCR-TRV70 only). Do not pick up your eyesight (p. 31). 4 ...Press START/STOP. Do not press the LCD screen with your finger or the supplied stylus (DCRTRV70 only) supporting the LCD panel from the back side of it. If you purchase your eye against the eyecup. Viewfinder LCD panel Battery...
... press START/ STOP again. Adjust the viewfinder lens to your camcorder by holding parts as illustrated. Note When using the touch panel, press operation buttons lightly with sharp-pointed objects other than the supplied stylus (DCR-TRV70 only). Do not pick up your eyesight (p. 31). 4 ...Press START/STOP. Do not press the LCD screen with your finger or the supplied stylus (DCRTRV70 only) supporting the LCD panel from the back side of it. If you purchase your eye against the eyecup. Viewfinder LCD panel Battery...
Operating Instructions
Page 10
...mark facing out as illustrated. Do not turn the power off, eject the "Memory Stick" or remove the battery pack. Access lamp Quick Start Guide b mark Press the "Memory Stick" once lightly to hold your camcorder outdoors (p. 15). While the access lamp is lit or flashing Do not shake or knock your... reading the data from the "Memory Stick" or recording the data on a "Memory Stick" Connecting the power cord Use the battery pack when using your camcorder Fastening the grip belt Fasten the grip belt firmly. 10 How to eject it can go with its v mark facing up. Otherwise, image data...
...mark facing out as illustrated. Do not turn the power off, eject the "Memory Stick" or remove the battery pack. Access lamp Quick Start Guide b mark Press the "Memory Stick" once lightly to hold your camcorder outdoors (p. 15). While the access lamp is lit or flashing Do not shake or knock your... reading the data from the "Memory Stick" or recording the data on a "Memory Stick" Connecting the power cord Use the battery pack when using your camcorder Fastening the grip belt Fasten the grip belt firmly. 10 How to eject it can go with its v mark facing up. Otherwise, image data...
Operating Instructions
Page 11
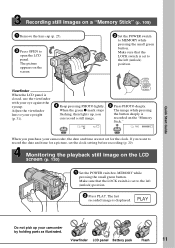
...(CHG) CAMERA MEMORY/ NETWORK 5 Press PHOTO deeply. Make sure that the LOCK switch is set to the left (unlock) position. Viewfinder LCD panel Battery pack Flash 11 The picture appears on the screen. 2 Set the POWER switch to your eye against the eyecup. Adjust the viewfinder lens to MEMORY...switch to open the LCD panel. If you want to the left (unlock) position. 2 Press PLAY. PLAY Do not pick up , you purchase your camcorder by holding parts as illustrated. The image while pressing the button deeply is set to record the date and time for a picture, set for the...
...(CHG) CAMERA MEMORY/ NETWORK 5 Press PHOTO deeply. Make sure that the LOCK switch is set to the left (unlock) position. Viewfinder LCD panel Battery pack Flash 11 The picture appears on the screen. 2 Set the POWER switch to your eye against the eyecup. Adjust the viewfinder lens to MEMORY...switch to open the LCD panel. If you want to the left (unlock) position. 2 Press PLAY. PLAY Do not pick up , you purchase your camcorder by holding parts as illustrated. The image while pressing the button deeply is set to record the date and time for a picture, set for the...

Operating Instructions
Page 14
...215) 5 Size AA (R6) battery for Remote Commander (2) (p. 216) 6 Shoulder strap (1) 7 Lens cap (1) (p. 25) 8 Lens hood (1) (p. 32) 9 "Memory Stick" (1) (p. 102) 0 USB cable (1) (p. 143) qa CD-ROM (SPVD-010 USB Driver) (1) (p. 148) qs Cleaning cloth (1) (p. 203) qd Stylus (1) (DCR-TRV70 only) (p. 171) qf Shoe ...cover (1) (p. 94) Contents of the recording cannot be compensated if recording or playback is not made due to a malfunction of the camcorder, storage media, etc. 14
...215) 5 Size AA (R6) battery for Remote Commander (2) (p. 216) 6 Shoulder strap (1) 7 Lens cap (1) (p. 25) 8 Lens hood (1) (p. 32) 9 "Memory Stick" (1) (p. 102) 0 USB cable (1) (p. 143) qa CD-ROM (SPVD-010 USB Driver) (1) (p. 148) qs Cleaning cloth (1) (p. 203) qd Stylus (1) (DCR-TRV70 only) (p. 171) qf Shoe ...cover (1) (p. 94) Contents of the recording cannot be compensated if recording or playback is not made due to a malfunction of the camcorder, storage media, etc. 14
Operating Instructions
Page 15
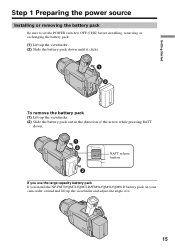
... the POWER switch to OFF (CHG) before installing, removing or exchanging the battery pack. (1) Lift up the viewfinder. (2) Slide the battery pack down until it clicks. 1 2 To remove the battery pack (1) Lift up the viewfinder. (2) Slide the battery pack out in the direction of the arrow while pressing BATT down. 1... 2 BATT release button 2 If you use the large capacity battery pack If you install the NP-FM70/QM71/QM71D/FM91/QM91/QM91D battery pack on your camcorder, extend and lift up the ...
... the POWER switch to OFF (CHG) before installing, removing or exchanging the battery pack. (1) Lift up the viewfinder. (2) Slide the battery pack down until it clicks. 1 2 To remove the battery pack (1) Lift up the viewfinder. (2) Slide the battery pack out in the direction of the arrow while pressing BATT down. 1... 2 BATT release button 2 If you use the large capacity battery pack If you install the NP-FM70/QM71/QM71D/FM91/QM91/QM91D battery pack on your camcorder, extend and lift up the ...
Operating Instructions
Page 16
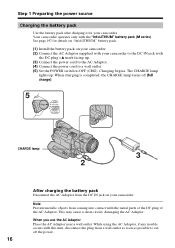
...POWER VCR OFF(CHG) CAMERA MEMORY/ NETWORK CHARGE lamp 3 2 After charging the battery pack Disconnect the AC Adaptor from the DC IN jack on your camcorder. (2) Connect the AC Adaptor supplied with your camcorder to OFF (CHG). This may cause a short-circuit, damaging the AC Adaptor... near a wall outlet. See page 197 for your camcorder. Step 1 Preparing the power source Charging the battery pack Use the battery pack after charging it for details on "InfoLITHIUM" battery pack. (1) Install the battery pack on your camcorder. Your camcorder operates only with the DC plug's v mark facing up...
...POWER VCR OFF(CHG) CAMERA MEMORY/ NETWORK CHARGE lamp 3 2 After charging the battery pack Disconnect the AC Adaptor from the DC IN jack on your camcorder. (2) Connect the AC Adaptor supplied with your camcorder to OFF (CHG). This may cause a short-circuit, damaging the AC Adaptor... near a wall outlet. See page 197 for your camcorder. Step 1 Preparing the power source Charging the battery pack Use the battery pack after charging it for details on "InfoLITHIUM" battery pack. (1) Install the battery pack on your camcorder. Your camcorder operates only with the DC plug's v mark facing up...
Operating Instructions
Page 17
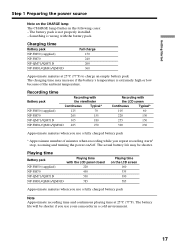
... camcorder in the following cases: - The actual battery life may increase if the battery's temperature is extremely high or low because of minutes when recording while you use a fully charged battery pack * Approximate number of the ambient temperature. The battery life will be shorter. Playing time Battery .../ stop, zooming and turning the power on the CHARGE lamp The CHARGE lamp flashes in a cold environment. 17 Recording time Battery pack Recording with the viewfinder Continuous Typical* NP-FM50 (supplied) 125 70 NP-FM70 265 155 NP-QM71/QM71D 305 180 ...
... camcorder in the following cases: - The actual battery life may increase if the battery's temperature is extremely high or low because of minutes when recording while you use a fully charged battery pack * Approximate number of the ambient temperature. The battery life will be shorter. Playing time Battery .../ stop, zooming and turning the power on the CHARGE lamp The CHARGE lamp flashes in a cold environment. 17 Recording time Battery pack Recording with the viewfinder Continuous Typical* NP-FM50 (supplied) 125 70 NP-FM70 265 155 NP-QM71/QM71D 305 180 ...
Operating Instructions
Page 18
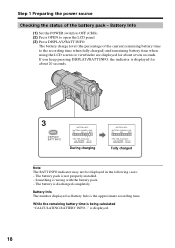
...seven seconds. Something is the approximate recording time. The battery charge level (the percentage of the battery pack - is not properly installed. - The battery pack is displayed. 18 The battery is being calculated "CALCULATING BATTERY INFO..." Step 1 Preparing the power source Checking the ... the indicator is displayed for about 20 seconds. 3 DISPLAY/ BATT INFO BATTERY INFO BATTERY CHARGE LEVEL 0% 50% 100% REC TIME AVAILABLE LCD SCREEN : 80 min VIEWFINDER : 100 min During charging BATTERY INFO BATTERY CHARGE LEVEL 0% 50% 100% REC TIME AVAILABLE LCD SCREEN : 105 min...
...seven seconds. Something is the approximate recording time. The battery charge level (the percentage of the battery pack - is not properly installed. - The battery pack is displayed. 18 The battery is being calculated "CALCULATING BATTERY INFO..." Step 1 Preparing the power source Checking the ... the indicator is displayed for about 20 seconds. 3 DISPLAY/ BATT INFO BATTERY INFO BATTERY CHARGE LEVEL 0% 50% 100% REC TIME AVAILABLE LCD SCREEN : 80 min VIEWFINDER : 100 min During charging BATTERY INFO BATTERY CHARGE LEVEL 0% 50% 100% REC TIME AVAILABLE LCD SCREEN : 105 min...
Operating Instructions
Page 19
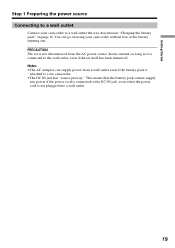
... power source Connecting to a wall outlet Connect your camcorder without fear of the battery running out. This means that the battery pack cannot supply any power if the power cord is connected to the DC IN jack, even when the power cord is attached to your camcorder. •The DC IN jack has "source... can supply power from the AC power source (house current) as long as it is connected to a wall outlet the way described in "Charging the battery pack" on using your camcorder to the wall outlet, even if the set is not disconnected from a wall outlet even if the...
... power source Connecting to a wall outlet Connect your camcorder without fear of the battery running out. This means that the battery pack cannot supply any power if the power cord is connected to the DC IN jack, even when the power cord is attached to your camcorder. •The DC IN jack has "source... can supply power from the AC power source (house current) as long as it is connected to a wall outlet the way described in "Charging the battery pack" on using your camcorder to the wall outlet, even if the set is not disconnected from a wall outlet even if the...
Operating Instructions
Page 20
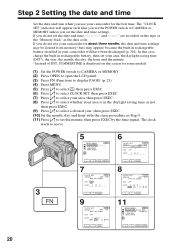
...about three months, the date and time settings may be cleared from memory (bars may appear) because the built-in rechargeable battery installed in your camcorder will appear each time you set the POWER switch to CAMERA or MEMORY unless you use your area, the daylight saving time... (DST*), the year, the month, the day, the hour and the minute. * Instead of DST, SUMMERTIME is in rechargeable battery, then set your camcorder for the first time. r R EXEC 8 CLOCK SET EXIT AREA26 GMT -5.0 New York, Bogota DST OFF DATE RY R M R D R R 2003 JAN 1...
...about three months, the date and time settings may be cleared from memory (bars may appear) because the built-in rechargeable battery installed in your camcorder will appear each time you set the POWER switch to CAMERA or MEMORY unless you use your area, the daylight saving time... (DST*), the year, the month, the day, the hour and the minute. * Instead of DST, SUMMERTIME is in rechargeable battery, then set your camcorder for the first time. r R EXEC 8 CLOCK SET EXIT AREA26 GMT -5.0 New York, Bogota DST OFF DATE RY R M R D R R 2003 JAN 1...
Operating Instructions
Page 26
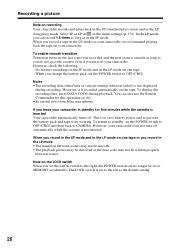
... be set to CAMERA. When you change the battery pack, set the POWER switch to OFF (CHG) and then back to the left as the default setting. 26 Do not mix recordings in the SP mode and in the LP mode on your camcorder, we recommend playing back the tape on one... tape or you record in the LP mode on your camcorder. Recording a picture Note on one tape. - This is set to prevent the battery pack and tape from wearing. The LOCK switch is to...
... be set to CAMERA. When you change the battery pack, set the POWER switch to OFF (CHG) and then back to the left as the default setting. 26 Do not mix recordings in the SP mode and in the LP mode on your camcorder, we recommend playing back the tape on one... tape or you record in the LP mode on your camcorder. Recording a picture Note on one tape. - This is set to prevent the battery pack and tape from wearing. The LOCK switch is to...


